Die vorliegende Übersetzung wurde maschinell erstellt. Im Falle eines Konflikts oder eines Widerspruchs zwischen dieser übersetzten Fassung und der englischen Fassung (einschließlich infolge von Verzögerungen bei der Übersetzung) ist die englische Fassung maßgeblich.
Fügen Sie das Connect Customer-Widget zu Ihrer Website hinzu, um Chat-, Aufgaben-, E-Mail- und Webanrufkontakte anzunehmen
Die Themen in diesem Abschnitt beschreiben, wie Sie ein Kommunikations-Widget für Ihre Website erstellen und anpassen. Sie erstellen ein Kontaktformular, das das Verhalten für Kontakte bestimmt, die über Ihr Widget erstellt wurden, und passen dann das Erscheinungsbild und die Funktionalität des Widgets an.
Inhalt
Schritt 1: Erstellen eines Kontaktformulars für Ihr Widget
In diesem Schritt erstellen und passen Sie eine Ansicht an, die das Verhalten für Kontakte bestimmt, die über Ihr Widget erstellt wurden.
-
Melden Sie sich auf der Connect Customer Admin-Website unter anhttps://instance name.my.connect.aws/
. Wählen Sie auf der Registerkarte Weiterleitung die Option Abläufe aus. -
Wählen Sie links oben Views aus.
-
Wählen Sie Ansicht erstellen aus.
-
Hier können Sie mithilfe des No-Code-Builders ein Kontaktformular für Ihre Kunden konfigurieren. Einige wichtige Tipps:
-
Mithilfe der Formularkomponente können Sie Formulareingaben bei der Erstellung mit Ihrem Kontakt verknüpfen. Durch die Verknüpfung von Formularen können Sie Eingaben direkt von allen Personen entgegennehmen, die mit Ihrem Widget interagieren, und die Informationen verwenden, die diese bei der Kontakterstellung in das Formular eingeben.
-
Die Verbindungsaktionskomponente ist das wichtigste Element im Formular zum Erstellen eines Kontakts. Diese Komponente sollte ohne andere Komponenten vom Typ Schaltfläche im Formular verwendet werden.
-
Genau eine Verbindungsaktionskomponente muss vorhanden sein, um das Widget „Ansicht mit Kontaktformular“ verwenden zu können.
-
Für die Connect Action-Komponente werden drei Optionen unterstützt: ConnectActionType
-
StartEmailContact
-
StartTaskContact
-
StartChatContact
Sowohl E-Mail als auch Aufgabe können in einem Kontaktformular verwendet werden. Informationen zum Erstellen eines Pre-Chat-Formulars für Chat-Kontakte finden Sie unter Fügen Sie Ihrer von Connect Customer gehosteten Website eine Chat-Benutzeroberfläche hinzu.
-
-
Es gibt viele Stiloptionen für die Ansichtskomponenten, mit denen Sie das Formular an Ihre Umgebung anpassen können.
-
-
Nachdem Sie Ihrem Formular eine Verbindungsaktionsschaltfläche hinzugefügt haben, können Sie Werte für die durch das Formular erstellten Kontakte festlegen, indem Sie sie mit den Optionen in der Verbindungsaktionsschaltfläche verknüpfen. Komponenten, die Sie verknüpfen möchten, müssen sich in der Ansicht im selben Formular wie die Verbindungsaktionsschaltfläche befinden.

Folgende Komponenten werden für die Formularverknüpfung unterstützt:
-
Formulareingabe
-
Dropdown (Mehrfachauswahl ausschalten)
-
Datumsauswahl
-
Textbereich
-
Zeitauswahl
-
-
Sobald Ihre Ansicht fertig ist, wählen Sie Veröffentlichen aus.
Schritt 2: Passen Sie Ihr Kommunikations-Widget an
In diesem Schritt passen Sie die Umgebung des Kommunikations-Widgets für Ihre Kunden an.
-
Melden Sie sich auf der Admin-Website von Amazon Connect unter https://instance name.my.connect.aws/
an. Wählen Sie Kommunikations-Widget anpassen. -
Wählen Sie auf der Seite „Kommunikations-Widgets“ die Option Kommunikations-Widget hinzufügen aus, um mit der Anpassung eines neuen Kommunikations-Widgets zu beginnen. Wenn Sie ein vorhandenes Kommunikations-Widget bearbeiten, löschen oder duplizieren möchten, wählen Sie die entsprechende Option in der Spalte Aktionen aus, wie in der folgenden Abbildung gezeigt.
-
Geben Sie einen Namen und eine Beschreibung für das Kommunikations-Widget ein.
Anmerkung
Der Name muss für jedes Kommunikations-Widget, das in einer Connect-Kundeninstanz erstellt wurde, eindeutig sein.
-
Wählen Sie im Bereich Kommunikationsoptionen die Option Kontaktformular hinzufügen aus.
-
Wählen Sie die Ansicht aus, die Sie im vorherigen Schritt konfiguriert haben. Wenn für die Verbindungsaktionskomponente in der Ansicht kein Kontaktablauf festgelegt ist, müssen Sie hier einen Ablauf festlegen.
-
Wählen Sie Speichern und Fortfahren.
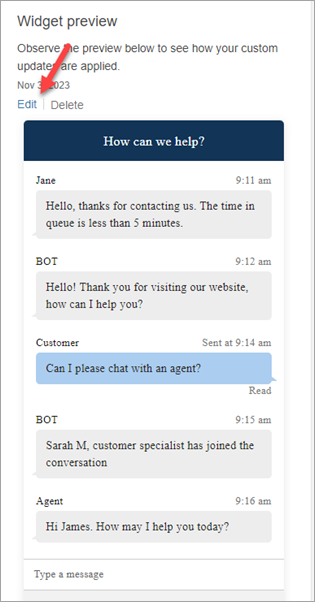
Wählen Sie auf der Seite Kommunikations-Widget erstellen die Stile für die Widget-Schaltflächen sowie die Anzeigenamen und -stile aus. Bei der Auswahl dieser Optionen wird die Widget-Vorschau automatisch aktualisiert. Sie können also sehen, wie die Umgebung für die Kunden aussehen wird.
Anmerkung
In der Vorschau wird das von Ihnen erstellte Ansichtskontaktformular nicht angezeigt. Es wird nur das Kopfzeilendesign angezeigt.
Anzeigetyp
Sie können zwischen zwei Anzeigetypen für Kontaktformular-Widgets wählen:
-
Mit der schwebenden Aktionsschaltfläche können Sie Ihr Widget als interaktive Schaltfläche in der unteren rechten Ecke der Webseite anheften.
-
Mit der eingebetteten Inline-Option können Sie Ihr Widget direkt in die Webseite einbetten, ohne dass Sie zum Laden eine Taste drücken müssen
Schaltflächenstile
-
Wählen Sie die Farben für den Schaltflächenhintergrund aus. Geben Sie dazu Hexadezimalwerte (HTML-Farbcodes) ein.
-
Wählen Sie Weiß oder Schwarz als Symbolfarbe aus. Die Farbe des Symbols kann nicht angepasst werden.
Widget-Header
-
Geben Sie Werte für Header-Nachricht und Farbe sowie für die Hintergrundfarbe des Widgets an.
-
Logo-URL: Fügen Sie eine URL zu Ihrem Logo-Banner aus einem Amazon-S3-Bucket oder einer anderen Online-Quelle ein.
Wichtig
In der Vorschau des Kommunikations-Widgets auf der Anpassungsseite wird das Logo nicht angezeigt, wenn es aus einer anderen Online-Quelle als einem Amazon-S3-Bucket stammt. Das Logo wird jedoch angezeigt, wenn das benutzerdefinierte Kommunikations-Widget auf Ihrer Seite implementiert wird.
Das Banner muss im .svg-, .jpg- oder .png-Format vorliegen. Das Bild kann 280 Pixel (Breite) mal 60 Pixel (Höhe) groß sein. Jedes Bild, das größer als diese Abmessungen ist, wird so skaliert, dass es in den Komponentenbereich des Logos von 280×60 passt.
-
Anweisungen zum Hochladen einer Datei wie eines Logobanners auf S3 finden Sie unter Hochladen von Objekten im Benutzerhandbuch zu Amazon Simple Storage Service.
-
Vergewissern Sie sich, dass die Bildberechtigungen richtig eingestellt sind, sodass das Kommunikations-Widget über Berechtigungen für den Zugriff auf das Bild verfügt. Informationen dazu, wie Sie ein S3-Objekt öffentlich zugänglich machen, finden Sie unter Schritt 2: Hinzufügen einer Bucket-Richtlinie im Thema „Berechtigungen für den Zugriff auf Websites einrichten“.
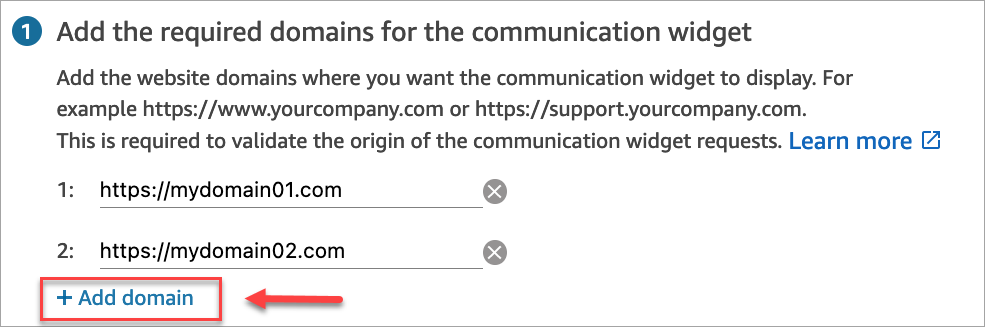
Schritt 3: Geben Sie die Website-Domains an, auf denen das Kommunikations-Widget voraussichtlich angezeigt werden soll
-
Geben Sie die Website-Domains ein, in denen Sie das Kommunikations-Widget platzieren möchten. Das Widget wird nur in Websites geladen, die Sie in diesem Schritt auswählen.
Wählen Sie Domain hinzufügen aus, um bis zu 50 Domains hinzuzufügen.
Verhalten der Zulassungsliste für Domains:
-
Subdomains sind automatisch enthalten. Wenn Sie beispielsweise example.com zulassen, sind auch alle zugehörigen Subdomains (wie sub.example.com) zulässig.
-
Das Protokoll http:// oder https:// muss exakt mit Ihrer Konfiguration übereinstimmen. Geben Sie das genaue Protokoll an, wenn Sie zulässige Domains einrichten.
-
Alle URL-Pfade sind automatisch zulässig. Wenn beispielsweise example.com zulässig ist, werden alle Seiten darunter angezeigt (z. B. Beispiel). com/cart Zum Beispiel. com/checkout) sind zugänglich. Sie können bestimmte Unterverzeichnisse nicht zulassen oder blockieren.
Wichtig
-
Double-check dass die URLs Ihrer Website gültig sind und keine Fehler enthalten. Geben Sie die vollständige URL an, beginnend mit https://.
-
Wir empfehlen die Verwendung von https:// für Ihre Produktionswebsites und -anwendungen.
-
-
Wir empfehlen, unter Sicherheit für Ihr Kommunikations-Widget hinzufügen die Option Ja auszuwählen und gemeinsam mit Ihrem Website-Administrator Ihre Webserver so einzurichten, dass sie JSON Web Tokens (JWTs) für neue Kontaktanfragen ausgeben. Dies bietet Ihnen mehr Kontrolle bei der Initiierung neuer Kontakte, einschließlich der Möglichkeit, zu überprüfen, ob die an Connect Customer gesendeten Anfragen von authentifizierten Benutzern stammen.
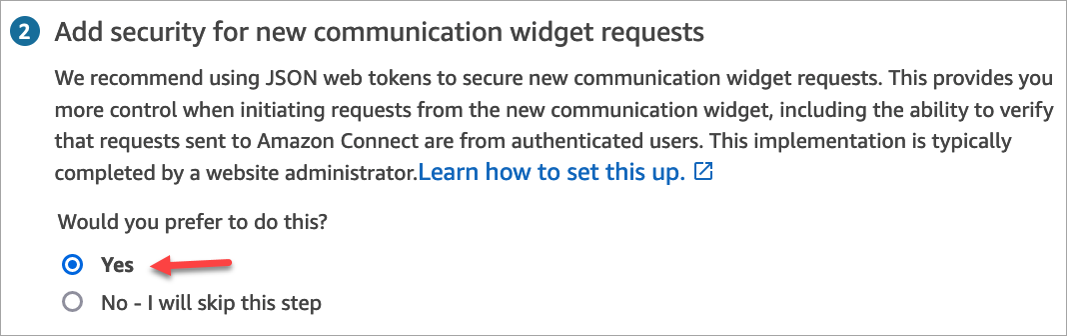
Wenn Sie Ja auswählen, passiert Folgendes:
-
Connect Customer stellt auf der nächsten Seite einen 44-stelligen Sicherheitsschlüssel bereit, mit dem Sie JSON Web Tokens (JWTs) erstellen können.
-
Connect Customer fügt dem Einbettungsskript für das Kommunikations-Widget eine Rückruffunktion hinzu, die nach einem JSON Web Token (JWT) sucht, wenn ein Kontakt initiiert wird.
Sie müssen die Callback-Funktion im Einbettungscode implementieren, wie im folgenden Beispiel gezeigt.
amazon_connect('authenticate', function(callback) {
  window.fetch('/token').then(res => {
    res.json().then(data => {
      callback(data.data);
    });
  });
});
Wenn Sie diese Option auswählen, erhalten Sie im nächsten Schritt einen Sicherheitsschlüssel für alle Kontaktanfragen, die auf Ihren Websites initiiert wurden. Bitten Sie Ihren Website-Administrator, die Webserver so einzurichten, dass sie JWTs mit diesem Sicherheitsschlüssel ausgeben.
-
-
Wählen Sie Speichern.
Schritt 4: Bestätigen und kopieren Sie den Code und die Sicherheitsschlüssel für das Kommunikations-Widget
In diesem Schritt bestätigen Sie Ihre Auswahl, kopieren den Code für das Kommunikations-Widget und betten ihn in Ihre Website ein. Wenn Sie sich in Schritt 3 für die Verwendung von JWTs entschieden haben, können Sie auch die geheimen Schlüssel kopieren, um sie zu erstellen.
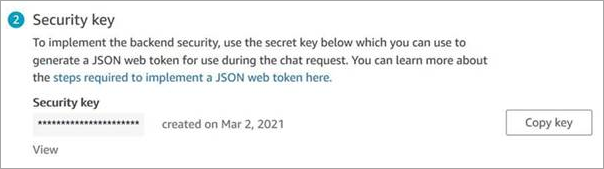
Sicherheitsschlüssel
Verwenden Sie diesen 44-stelligen Sicherheitsschlüssel, um JSON-Webtoken von Ihrem Webserver aus zu generieren. Sie können Schlüssel auch aktualisieren oder rotieren, wenn Sie sie ändern müssen. Wenn Sie dies tun, stellt Ihnen Connect Customer einen neuen Schlüssel zur Verfügung und behält den vorherigen Schlüssel bei, bis Sie die Möglichkeit haben, ihn zu ersetzen. Nachdem Sie den neuen Schlüssel bereitgestellt haben, können Sie zu Connect Customer zurückkehren und den vorherigen Schlüssel löschen.
Wenn Kunden mit dem Kommunikations-Widget auf Ihrer Website interagieren, fordert das Widget von Ihrem Webserver ein JWT an. Wenn dieses JWT bereitgestellt wird, wird es in das Widget als Teil der Kontaktanfrage des Endkunden an Connect Customer aufgenommen. Connect Customer verwendet dann den geheimen Schlüssel, um das Token zu entschlüsseln. Bei Erfolg wird bestätigt, dass das JWT von Ihrem Webserver ausgestellt wurde, und Connect Customer leitet die Kontaktanfrage an Ihre Contact-Center-Agenten weiter.
Einzelheiten zum JSON-Web-Token
-
Algorithmus: HS256
-
Claims:
-
Sub:
widgetIdErsetzen Sie
widgetIddurch Ihre eigene WidgetID. Um Ihre widgetId zu finden, sehen Sie sich das Beispiel-Skript für das Kommunikations-Widget an. -
iat: *Ausgabezeitpunkt.
-
exp: *Flow (maximal 10 Minuten).
-
segmentAttributes (optional): ein Satz von systemdefinierten Schlüssel-Wert-Paaren, die mithilfe einer Attributzuordnung in einzelnen Kontaktsegmenten gespeichert werden. Weitere Informationen finden Sie SegmentAttributes in der StartChatContactAPI.
-
attributes (optional): Objekt mit Zeichenfolge-zu-Zeichenfolge-Zuweisungen von Schlüssel-Wert-Paaren. Die Kontaktattribute müssen den von der StartChatContactAPI festgelegten Einschränkungen entsprechen.
-
related ContactId (optional): Zeichenfolge mit gültiger Kontakt-ID. Das zugehörige Element ContactId muss den von der StartChatContactAPI festgelegten Einschränkungen entsprechen.
-
customerId (optional): Dies kann entweder eine Connect-Kundenprofil-ID oder eine benutzerdefinierte Kennung aus einem externen System, z. B. einem CRM, sein.
*Informationen zum Datumsformat finden Sie im folgenden Dokument der Internet Engineering Task Force (IETF): JSON Web Token (JWT)
, Seite 5. -
Der folgende Codeblock zeigt ein Beispiel für die Generierung eines JWT in Python:
import jwt
import datetime
CONNECT_SECRET = "your-securely-stored-jwt-secret"
WIDGET_ID = "widget-id"
JWT_EXP_DELTA_SECONDS = 500

payload = {
'sub': WIDGET_ID,
'iat': datetime.datetime.utcnow(),
'exp': datetime.datetime.utcnow() + datetime.timedelta(seconds=JWT_EXP_DELTA_SECONDS),
'customerId': "your-customer-id",
'relatedContactId':'your-relatedContactId',
'segmentAttributes': {"connect:Subtype": {"ValueString" : "connect:Guide"}}, 'attributes': {"name": "Jane", "memberID": "123456789", "email": "Jane@example.com", "isPremiumUser": "true", "age": "45"} }
header = { 'typ': "JWT", 'alg': 'HS256' }
encoded_token = jwt.encode((payload), CONNECT_SECRET, algorithm="HS256", headers=header) // CONNECT_SECRET is the security key provided by Amazon Connect
Skript für das Kommunikations-Widget
Die folgende Abbildung zeigt ein Beispiel für JavaScript das, was Sie auf Websites einbetten, auf denen Kunden mit Ihrem Kontaktzentrum interagieren sollen. Dieses Skript zeigt das Widget in der unteren rechten Ecke Ihrer Website an.
Anmerkung
Fügen Sie das Widget-Skript in das HTML-Element ein, das das Widget rendern muss, wenn Sie den eingebetteten Inline-Stil verwenden.
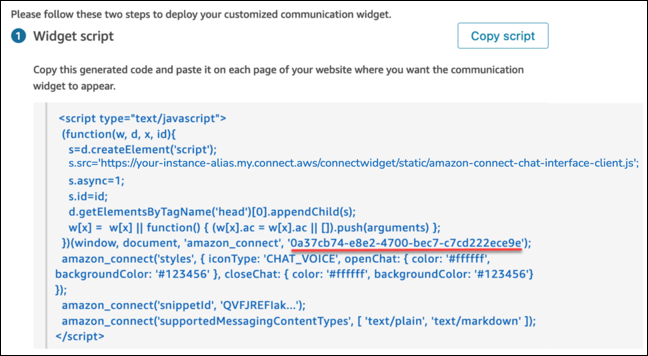
Wenn Ihre Website geladen wird, sehen Kunden zuerst das Widget-Symbol. Wenn sie dieses Symbol auswählen, wird das Kommunikations-Widget geöffnet und die Kunden können einen Kontakt mit Ihren Kundendienstmitarbeitern initiieren.
Sie können jederzeit Änderungen am Kommunikations-Widget über Bearbeiten vornehmen.
Anmerkung
Gespeicherte Änderungen aktualisieren die Kundenumgebung in wenigen Minuten. Überprüfen Sie Ihre Widget-Konfiguration, bevor Sie sie speichern.
Damit Änderungen an Widget-Symbolen auf der Website wirksam werden, müssen Sie Ihre Website direkt mit einem neuen Codeblock aktualisieren.
