本文為英文版的機器翻譯版本,如內容有任何歧義或不一致之處,概以英文版為準。
使用 ScriptProcessor 以利用 Sentinel-2 衛星資料計算標準化差異植被指數 (NDVI)
下列程式碼範例說明如何使用 Studio Classic 筆記本內的專門建置地理空間影像,來計算特定地理空間區域的標準化差異植被指數,以及如何從 SageMaker AI Python SDK 使用 ScriptProcessor
此示範也使用一個使用地理空間核心和執行個體類型的 Amazon SageMaker Studio Classic 筆記本執行個體。若要了解如何建立 Studio Classic 地理空間筆記本執行個體,請參閱使用地理空間影像建立 Amazon SageMaker Studio Classic 筆記本。
您可以複製並貼上下列程式碼片段,在您自己的筆記本執行個體中進行此示範操作:
使用 SearchRasterDataCollection 查詢 Sentinel-2 點陣式資料集合
您可以使用 search_raster_data_collection 查詢支援的點陣式資料集合。此範例使用從 Sentinel-2 衛星提取的資料。指定的感興趣區域 (AreaOfInterest) 是愛荷華州北部的農村地區,時間範圍 (TimeRangeFilter) 為 2022 年 1 月 1 日至 2022 年 12 月 30 日。要查看 AWS 區域 中可用的點陣式資料集合,請使用 list_raster_data_collections。若要查看使用此 API 的程式碼範例,請參閱《Amazon SageMaker AI 開發人員指南》中的 ListRasterDataCollections。
在下列程式碼範例中,您會使用與 Sentinel-2 點陣式資料集合 arn:aws:sagemaker-geospatial:us-west-2:378778860802:raster-data-collection/public/nmqj48dcu3g7ayw8 相關聯的 ARN。
search_raster_data_collection API 請求需要兩個參數:
-
您需要指定對應於您要查詢的點陣式資料集合的
Arn參數。 -
您還需要指定一個
RasterDataCollectionQuery參數,該參數需要在 Python 字典中。
下列程式碼範例包含儲存至 search_rdc_query 變數之 RasterDataCollectionQuery 參數所需的必要鍵值對。
search_rdc_query = {
    "AreaOfInterest": {
        "AreaOfInterestGeometry": {
            "PolygonGeometry": {
                "Coordinates": [[
                    [
              -94.50938680498298,
              43.22487436936203
            ],
            [
              -94.50938680498298,
              42.843474642037194
            ],
            [
              -93.86520004156142,
              42.843474642037194
            ],
            [
              -93.86520004156142,
              43.22487436936203
            ],
            [
              -94.50938680498298,
              43.22487436936203
            ]
               ]]
            }
        }
    },
    "TimeRangeFilter": {"StartTime": "2022-01-01T00:00:00Z", "EndTime": "2022-12-30T23:59:59Z"}
}
若要提出 search_raster_data_collection 請求,您必須指定 Sentinel-2 點陣式資料集合的 ARN:arn:aws:sagemaker-geospatial:us-west-2:378778860802:raster-data-collection/public/nmqj48dcu3g7ayw8。您還必須傳入之前定義的 Python 字典,該字典指定查詢參數。
## Creates a SageMaker Geospatial client instance
sm_geo_client= session.create_client(service_name="sagemaker-geospatial")

search_rdc_response1 = sm_geo_client.search_raster_data_collection(
    Arn='arn:aws:sagemaker-geospatial:us-west-2:378778860802:raster-data-collection/public/nmqj48dcu3g7ayw8',
    RasterDataCollectionQuery=search_rdc_query
)
此 API 的結果無法分頁。若要收集 search_raster_data_collection 作業傳回的所有衛星影像,您可以實作 while 迴路。這會在 API 回應中檢查 NextToken:
## Holds the list of API responses from search_raster_data_collection
items_list = []
while search_rdc_response1.get('NextToken') and search_rdc_response1['NextToken'] != None:
    items_list.extend(search_rdc_response1['Items'])

    search_rdc_response1 = sm_geo_client.search_raster_data_collection(
    	Arn='arn:aws:sagemaker-geospatial:us-west-2:378778860802:raster-data-collection/public/nmqj48dcu3g7ayw8',
        RasterDataCollectionQuery=search_rdc_query,
        NextToken=search_rdc_response1['NextToken']
    )
API 回應傳回對應於特定影像帶的 Assets 金鑰下的 URL 清單。以下是 API 回應的截斷版本。為了清晰起見,部分影像帶已被移除。
{
	'Assets': {
        'aot': {
            'Href': 'https://sentinel-cogs.s3.us-west-2.amazonaws.com/sentinel-s2-l2a-cogs/15/T/UH/2022/12/S2A_15TUH_20221230_0_L2A/AOT.tif'
        },
        'blue': {
            'Href': 'https://sentinel-cogs.s3.us-west-2.amazonaws.com/sentinel-s2-l2a-cogs/15/T/UH/2022/12/S2A_15TUH_20221230_0_L2A/B02.tif'
        },
        'swir22-jp2': {
            'Href': 's3://sentinel-s2-l2a/tiles/15/T/UH/2022/12/30/0/B12.jp2'
        },
        'visual-jp2': {
            'Href': 's3://sentinel-s2-l2a/tiles/15/T/UH/2022/12/30/0/TCI.jp2'
        },
        'wvp-jp2': {
            'Href': 's3://sentinel-s2-l2a/tiles/15/T/UH/2022/12/30/0/WVP.jp2'
        }
    },
    'DateTime': datetime.datetime(2022, 12, 30, 17, 21, 52, 469000, tzinfo = tzlocal()),
    'Geometry': {
        'Coordinates': [
            [
                [-95.46676936182894, 43.32623760511659],
                [-94.11293433656887, 43.347431265475954],
                [-94.09532154452742, 42.35884880571144],
                [-95.42776890002203, 42.3383710796791],
                [-95.46676936182894, 43.32623760511659]
            ]
        ],
        'Type': 'Polygon'
    },
    'Id': 'S2A_15TUH_20221230_0_L2A',
    'Properties': {
        'EoCloudCover': 62.384969,
        'Platform': 'sentinel-2a'
    }
}
在下一節中,您會使用 API 回應中的 'Id' 金鑰建立資訊清單檔案。
使用 search_raster_data_collection API 回應中的 Id 金鑰建立輸入資訊清單檔案
執行處理任務時,您必須指定來自 Amazon S3 的資料輸入。輸入資料類型可以是資訊清單檔案,其會指向個別資料檔案。您還可以為要處理的每個文件新增字首。下面的代碼範例定義了將產生資訊清單檔案的資料夾。
使用 SDK for Python (Boto3) 來取得與 Studio Classic 筆記本執行個體相關聯之執行角色的預設儲存貯體和 ARN:
sm_session = sagemaker.session.Session() s3 = boto3.resource('s3') # Gets the default excution role associated with the notebook execution_role_arn = sagemaker.get_execution_role() # Gets the default bucket associated with the notebook s3_bucket = sm_session.default_bucket() # Can be replaced with any name s3_folder ="script-processor-input-manifest"
接下來,您建立資訊清單檔案。它會保留您稍後在步驟 4 中執行處理工作時所要處理的衛星影像的 URL。
# Format of a manifest file
manifest_prefix = {}
manifest_prefix['prefix'] = 's3://' + s3_bucket + '/' + s3_folder + '/'
manifest = [manifest_prefix]

print(manifest)
下列程式碼範例會傳回將在其中建立資訊清單檔案的 S3 URI。
[{'prefix': 's3://sagemaker-us-west-2-111122223333/script-processor-input-manifest/'}]
執行處理工作時,不需要 search_raster_data_collection 回應的所有回應元素。
下列程式碼片段會移除不必要的元素 'Properties'、'Geometry' 和 'DateTime'。'Id' 鍵值對、'Id': 'S2A_15TUH_20221230_0_L2A',包含年份和月份。下列程式碼範例會剖析該資料,以便在 Python 字典 dict_month_items 中建立新的金鑰。這些值是從 SearchRasterDataCollection 查詢傳回的資產。
# For each response get the month and year, and then remove the metadata not related to the satelite images.
dict_month_items = {}
for item in items_list:
    # Example ID being split: 'S2A_15TUH_20221230_0_L2A'
    yyyymm = item['Id'].split("_")[2][:6]
    if yyyymm not in dict_month_items:
        dict_month_items[yyyymm] = []

    # Removes uneeded metadata elements for this demo
    item.pop('Properties', None)
    item.pop('Geometry', None)
    item.pop('DateTime', None)

    # Appends the response from search_raster_data_collection to newly created key above
    dict_month_items[yyyymm].append(item)
此程式碼範例使用 .upload_file()dict_month_items 作為 JSON 物件上傳至 Amazon S3:
## key_ is the yyyymm timestamp formatted above
## value_ is the reference to all the satellite images collected via our searchRDC query
for key_, value_ in dict_month_items.items():
    filename = f'manifest_{key_}.json'
    with open(filename, 'w') as fp:
        json.dump(value_, fp)
    s3.meta.client.upload_file(filename, s3_bucket, s3_folder + '/' + filename)
    manifest.append(filename)
    os.remove(filename)
此程式碼範例會上傳父 manifest.json 檔案,該檔案指向上傳至 Amazon S3 的所有其他資訊清單。它還將路徑儲存到局部變數:s3_manifest_uri。當您在步驟 4 中執行處理任務時,您將再次使用該變數來指定輸入資料的來源。
with open('manifest.json', 'w') as fp:
    json.dump(manifest, fp)
s3.meta.client.upload_file('manifest.json', s3_bucket, s3_folder + '/' + 'manifest.json')
os.remove('manifest.json')

s3_manifest_uri = f's3://{s3_bucket}/{s3_folder}/manifest.json'
現在您已建立輸入資訊清單檔案並將其上傳,您可以編寫指令碼來處理處理任務中的資料。它會處理來自衛星影像的資料、計算 NDVI,然後將結果傳回至不同的 Amazon S3 位置。
編寫可計算 NDVI 的指令碼
Amazon SageMaker Studio Classic 支援使用 %%writefile 儲存格魔術命令。使用此命令執行儲存格後,其內容將儲存到本機 Studio Classic 目錄。這是計算 NDVI 的特定代碼。但是,當您針對處理任務編寫自己的指令碼時,下列項目可能很有用:
-
在您的處理任務容器中,容器內的本機路徑必須以
/opt/ml/processing/開頭。在這個例子中,input_data_path = '/opt/ml/processing/input_data/'和processed_data_path = '/opt/ml/processing/output_data/'皆以這種方式指定。 -
使用 Amazon SageMaker Processing,處理任務執行的 指令碼可以將已處理的資料直接上傳到 Amazon S3。若要這麼做,請確定與執行個體相關聯的
ScriptProcessor執行角色具有存取 S3 儲存貯體的必要需求。您也可以在執行處理任務時指定輸出參數。如需進一步了解,請參閱 Amazon SageMaker Python SDK中的.run()API 作業。在此程式碼範例中,資料處理的結果會直接上傳到 Amazon S3。 -
若要管理連接到處理任務的 Amazon EBSContainer 大小,請使用
volume_size_in_gb參數。容器的預設大小為 30 GB。您可以選擇使用 Python 程式庫廢棄項目收集器來管理 Amazon EBS 容器中的儲存。 下列程式碼範例會將陣列載入處理工作容器中。當陣列建立並填滿記憶體時,處理工作會當機。為了避免當機,下列範例包含從處理工作容器中移除陣列的命令。
%%writefile compute_ndvi.py

import os
import pickle
import sys
import subprocess
import json
import rioxarray

if __name__ == "__main__":
    print("Starting processing")

    input_data_path = '/opt/ml/processing/input_data/'
    input_files = []

    for current_path, sub_dirs, files in os.walk(input_data_path):
        for file in files:
            if file.endswith(".json"):
                input_files.append(os.path.join(current_path, file))

    print("Received {} input_files: {}".format(len(input_files), input_files))

    items = []
    for input_file in input_files:
        full_file_path = os.path.join(input_data_path, input_file)
        print(full_file_path)
        with open(full_file_path, 'r') as f:
            items.append(json.load(f))

    items = [item for sub_items in items for item in sub_items]

    for item in items:
        red_uri = item["Assets"]["red"]["Href"]
        nir_uri = item["Assets"]["nir"]["Href"]

        red = rioxarray.open_rasterio(red_uri, masked=True)
        nir = rioxarray.open_rasterio(nir_uri, masked=True)

        ndvi = (nir - red)/ (nir + red)

        file_name = 'ndvi_' + item["Id"] + '.tif'
        output_path = '/opt/ml/processing/output_data'
        output_file_path = f"{output_path}/{file_name}"

        ndvi.rio.to_raster(output_file_path)
        print("Written output:", output_file_path)
您現在有一個可以計算 NDVI 的指令碼。接下來,您可以建立 ScriptProcessor 的執行個體並執行處理工作。
建立 ScriptProcessor 類別的執行個體
此示範使用可透過 Amazon SageMaker Python SDK 取得的 ScriptProcessor.run() 方法開始處理任務。
from sagemaker.processing import ScriptProcessor, ProcessingInput, ProcessingOutput image_uri ='081189585635.dkr.ecr.us-west-2.amazonaws.com/sagemaker-geospatial-v1-0:latest'processor = ScriptProcessor( command=['python3'], image_uri=image_uri, role=execution_role_arn, instance_count=4, instance_type='ml.m5.4xlarge', sagemaker_session=sm_session ) print('Starting processing job.')
當您開始處理任務作時,您需要指定一個 ProcessingInput
-
您在步驟 2 中建立的資訊清單檔案路徑,
s3_manifest_uri。這是輸入資料至容器的來源。 -
要將輸入資料儲存至容器中的路徑。必須符合您在指令碼中指定的路徑。
-
使用
s3_data_type參數指定輸入為"ManifestFile"。
s3_output_prefix_url = f"s3://{s3_bucket}/{s3_folder}/output"

processor.run(
    code='compute_ndvi.py',
    inputs=[
        ProcessingInput(
            source=s3_manifest_uri,
            destination='/opt/ml/processing/input_data/',
            s3_data_type="ManifestFile",
            s3_data_distribution_type="ShardedByS3Key"
        ),
    ],
    outputs=[
        ProcessingOutput(
            source='/opt/ml/processing/output_data/',
            destination=s3_output_prefix_url,
            s3_upload_mode="Continuous"
        )
    ]
)
下列程式碼範例會使用 .describe() 方法
preprocessing_job_descriptor = processor.jobs[-1].describe()
s3_output_uri = preprocessing_job_descriptor["ProcessingOutputConfig"]["Outputs"][0]["S3Output"]["S3Uri"]
print(s3_output_uri)
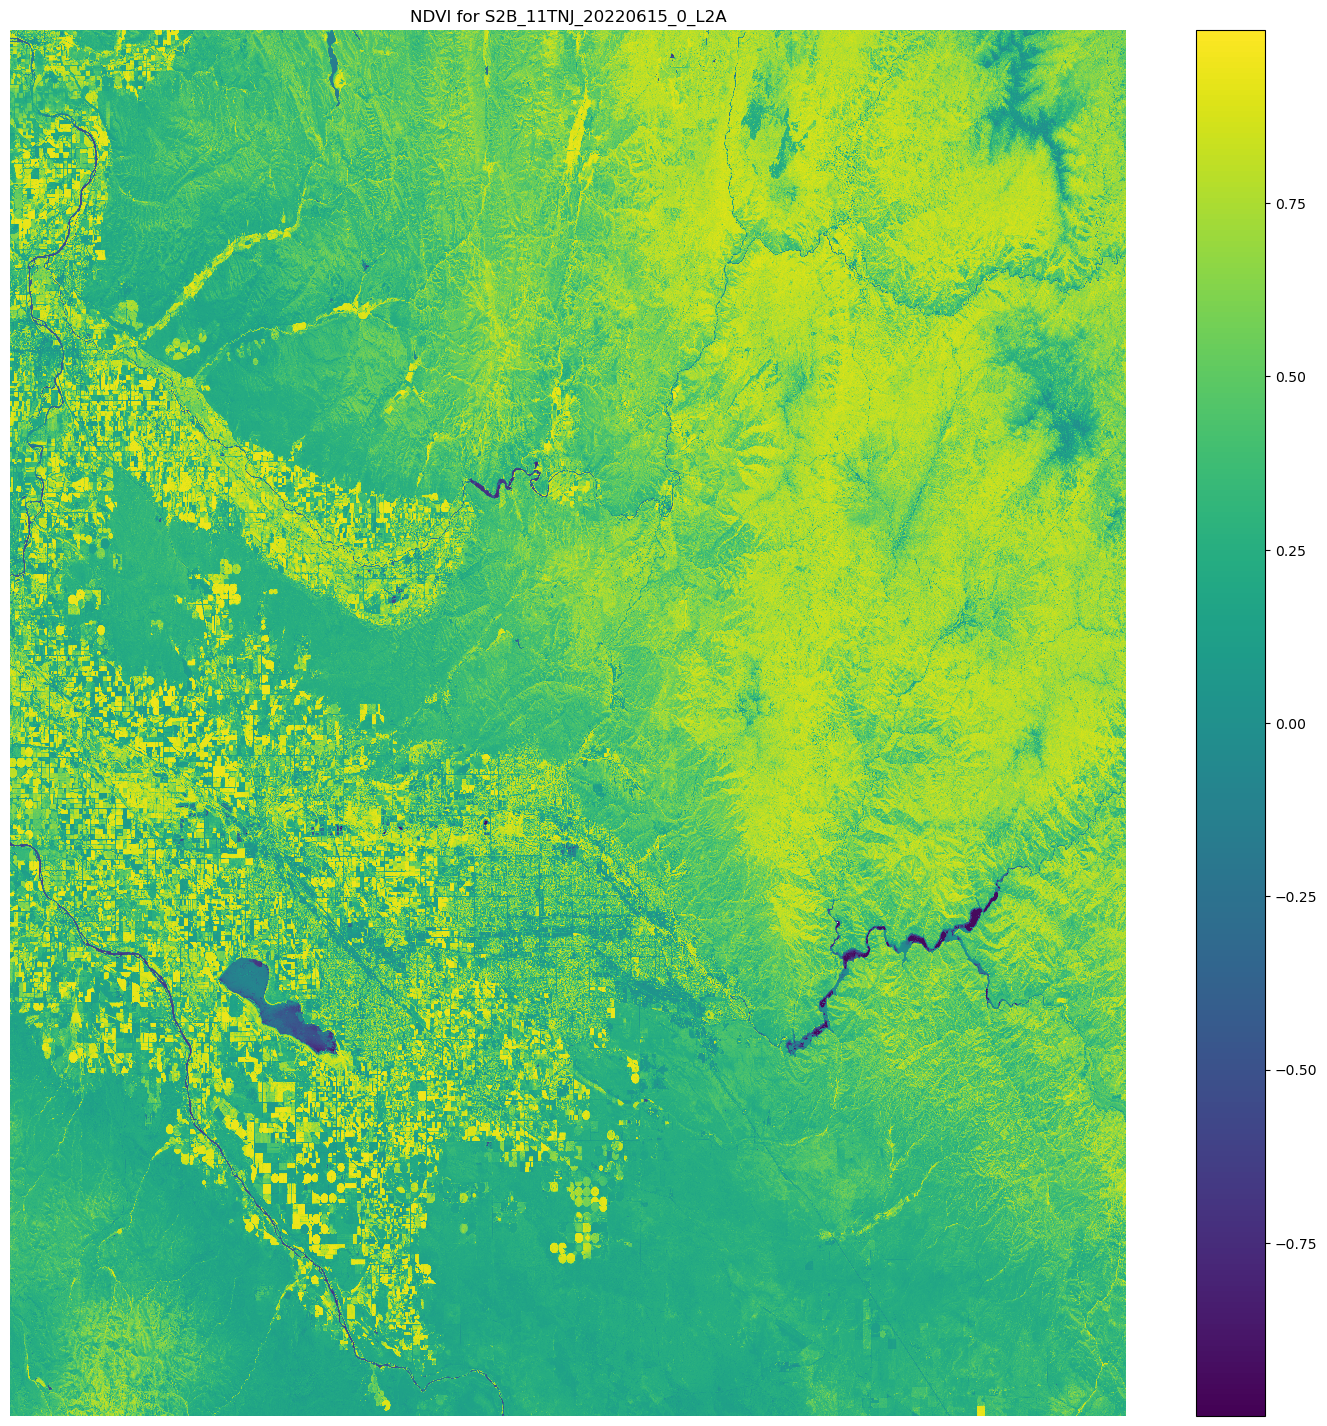
使用 matplotlib 視覺化您的結果
使用 Matplotlib.open_rasterio() API 作業開啟影像陣列,然後使用 Sentinel-2 衛星資料中的 nir 和 red 影像帶來計算 NDVI。
# Opens the python arrays
import rioxarray

red_uri = items[25]["Assets"]["red"]["Href"]
nir_uri = items[25]["Assets"]["nir"]["Href"]

red = rioxarray.open_rasterio(red_uri, masked=True)
nir = rioxarray.open_rasterio(nir_uri, masked=True)

# Calculates the NDVI
ndvi = (nir - red)/ (nir + red)

# Common plotting library in Python
import matplotlib.pyplot as plt

f, ax = plt.subplots(figsize=(18, 18))
ndvi.plot(cmap='viridis', ax=ax)
ax.set_title("NDVI for {}".format(items[25]["Id"]))
ax.set_axis_off()
plt.show()
前面程式碼範例的輸出是一個衛星影像,其 NDVI 值覆蓋在其上。接近 1 的 NDVI 值表示存在許多植被,接近 0 的值表示沒有植被。
使用 ScriptProcessor 的示範結束。
