本文為英文版的機器翻譯版本,如內容有任何歧義或不一致之處,概以英文版為準。
建立客戶資料並將其擷取至 Customer Profiles
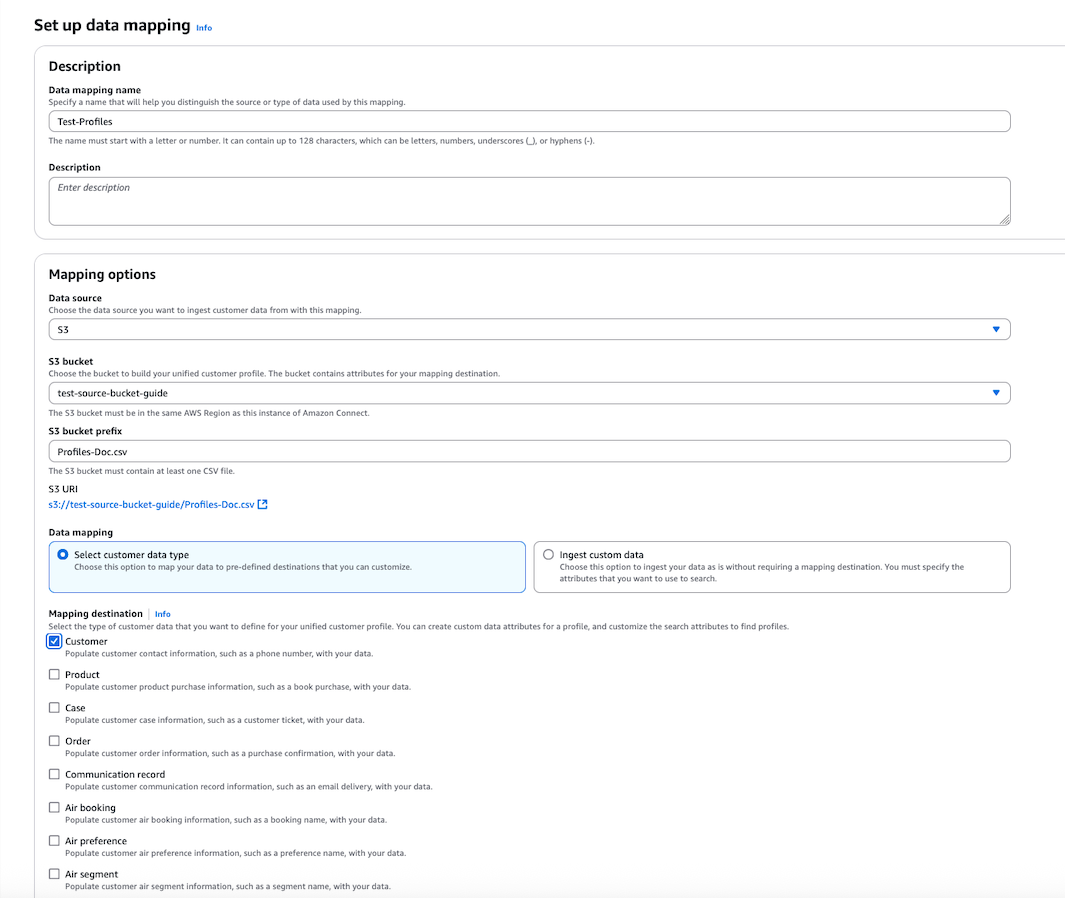
您可以使用 Amazon S3 定義來自任何來源的資料,並順暢地為客戶設定檔添加內容,而不需要自訂或預先建置的整合。例如,假設您想要向客服人員提供相關的購買歷史記錄資訊。您可以從內部應用程式將購買交易資料匯入 S3 上的試算表檔案,然後將其連結至客戶設定檔。
若要進行設定,您需要定義描述自訂設定檔物件外觀的物件類型對映。此對應定義了如何使用資料中的欄位來填入標準設定檔中的欄位,或如何用來將資料指派給特定設定檔。
建立物件類型對映之後,您可以使用 PutProfileObject API 將自訂設定檔資料從 CRM 上傳至自訂設定檔物件。
注意
Customer Profiles 不支援從包含點符號的 CSV 標頭擷取資料。
如需客戶設定檔從 Amazon S3 儲存貯體存取資料以進行資料映射所需的 IAM 許可清單,請參閱 Connect Customer Profiles 定義的動作中的 PutProfileObject資料表。
客戶設定檔擷取
擷取帳戶型設定檔
-
將資料檔案上傳至 S3。帳戶型設定檔所參考設定檔以及帳戶設定檔本身的擷取應分開進行。
-
用於帳戶設定檔擷取的新檔案應包含新的屬性:設定檔類型,以及電子郵件和電話的參與偏好設定。
-
使用 AWS 主控台,從 S3 擷取檔案至客戶設定檔
範例設定檔 (在下列帳戶型設定檔中參考) CSV
FirstName LastName PersonalEmailAddress PhoneNumber State CustomerId ProfileType Sam Joe sam@example.com 1111111111 WA 456 PROFILE John Doe john@example.com 2222222222 IL 789 PROFILE Sally Doe sally@example.com 3333333333 或 111 PROFILE 帳戶型設定檔範例 CSV
AccountId ProfileType PrimaryOwner SecondaryOwner EmailEngagementPreferences PhoneEngagementPreferences ACC111 ACCOUNT_PROFILE Sam Joe John Doe [{"KeyName":"CustomerId","KeyValue":"456","ContactType":"PersonalEmailAddress"},{"KeyName":"CustomerId","KeyValue":"789","ContactType":"PersonalEmailAddress"}] [{"KeyName":"CustomerId","KeyValue":"456","ContactType":"PhoneNumber"},{"KeyName":"CustomerId","KeyValue":"789","ContactType":"PhoneNumber"}] ACC112 ACCOUNT_PROFILE John Doe Sally Doe [{"KeyName":"CustomerId","KeyValue":"111","ContactType":"PersonalEmailAddress"}] [{"KeyName":"CustomerId","KeyValue":"111","ContactType":"PhoneNumber"}] 電子郵件的參與偏好設定範例:
[ {"KeyName": "CustomerId", "KeyValue": "456", "ContactType": "PersonalEmailAddress"}, {"KeyName": "CustomerId", "KeyValue": "789", "ContactType": "PersonalEmailAddress"} ]電話的參與偏好設定範例:
[
 {"KeyName": "CustomerId", "KeyValue": "456", "ContactType": "PhoneNumber"},
 {"KeyName": "CustomerId", "KeyValue": "789", "ContactType": "PhoneNumber"}
]
注意
針對 ProfileType
PROFILE,您可以透過相同方式,擷取和新增參與偏好設定。 -
建立兩個資料映射 - 一個用於子設定檔,另一個用於帳戶型設定檔。
-
接著,映射客戶設定檔屬性。請留意,目的地為
ProfileType。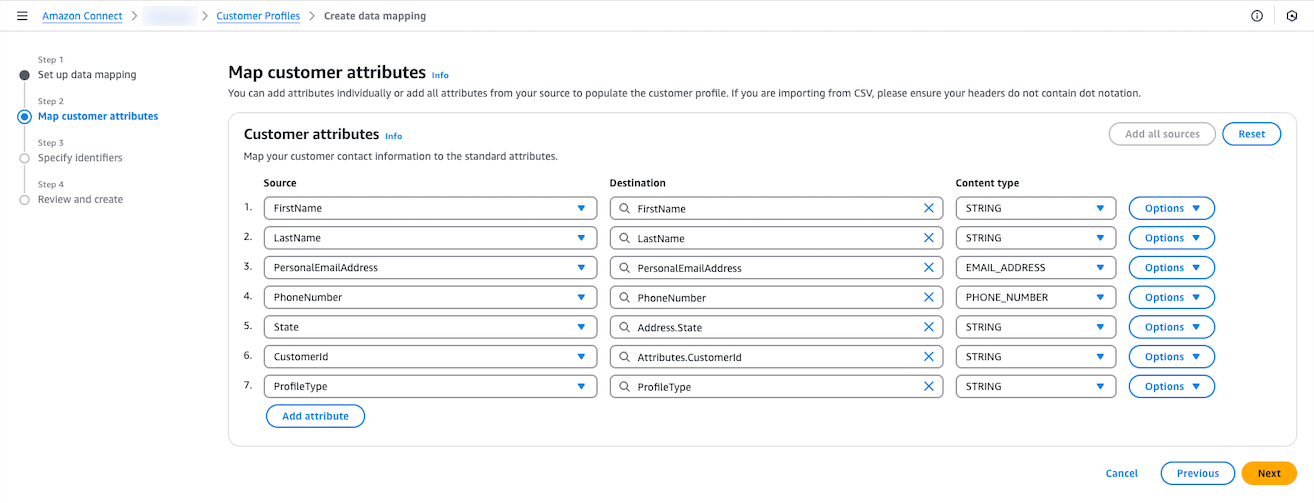
用於擷取帳戶型設定檔所參考設定檔的物件類型映射範例
{ "AllowProfileCreation": true, "Description": "Standard Profile Object Type", "Fields": { "FirstName": { "ContentType": "STRING", "Source": "_source.FirstName", "Target": "_profile.FirstName" }, "LastName": { "ContentType": "STRING", "Source": "_source.LastName", "Target": "_profile.LastName" }, "PhoneNumber": { "ContentType": "PHONE_NUMBER", "Source": "_source.PhoneNumber", "Target": "_profile.PhoneNumber" }, "PersonalEmailAddress": { "ContentType": "EMAIL_ADDRESS", "Source": "_source.PersonalEmailAddress", "Target": "_profile.PersonalEmailAddress" }, "State": { "ContentType": "STRING", "Source": "_source.State", "Target": "_profile.Address.State" }, "CustomerId": { "ContentType": "STRING", "Source": "_source.CustomerId", "Target": "_profile.Attributes.CustomerId" }, "ProfileType": { "ContentType": "STRING", "Source": "_source.ProfileType", "Target": "_profile.ProfileType" } }, "Keys": { "CustomerId": [ { "FieldNames": [ "CustomerId" ], "StandardIdentifiers": [ "PROFILE", "UNIQUE" ] } ] } } -
請重複此程序,以擷取帳戶型設定檔。記下 EngagementPreferences.Email 和 EngagementPreference.Phone。
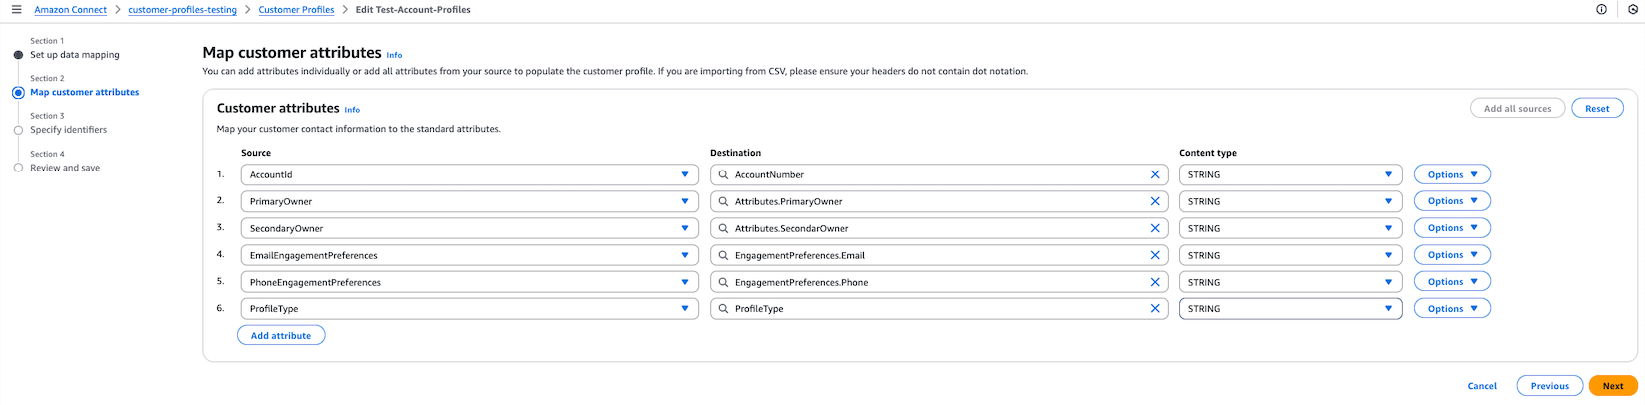
用於擷取帳戶型設定檔的物件類型映射範例
{ "AllowProfileCreation": true, "Description": "Account-based profiles Object Type", "Fields": { "AccountNumber": { "ContentType": "STRING", "Source": "_source.AccountId", "Target": "_profile.AccountNumber" }, "PrimaryOwner": { "ContentType": "STRING", "Source": "_source.PrimaryOwner", "Target": "_profile.Attributes.PrimaryOwner" }, "SecondaryOwner": { "ContentType": "STRING", "Source": "_source.SecondaryOwner", "Target": "_profile.Attributes.SecondaryOwner" }, "ProfileType": { "ContentType": "STRING", "Source": "_source.ProfileType", "Target": "_profile.ProfileType" }, "EmailEngagementPreferences": { "ContentType": "STRING", "Source": "_source.EmailEngagementPreferences", "Target": "_profile.EngagementPreferences.Email" }, "PhoneEngagementPreferences": { "ContentType": "STRING", "Source": "_source.PhoneEngagementPreferences", "Target": "_profile.EngagementPreferences.Phone" } }, "Keys": { "Account": [ { "FieldNames": [ "AccountNumber" ], "StandardIdentifiers": [ "PROFILE", "UNIQUE" ] } ] } } -
建立兩個資料來源整合,每個整合都會根據所描述的關係建立映射。例如,帳戶/設定檔。
注意
-
只有在使用 Connect Customer Profiles 主控台中的 SearchProfiles API 或 Profile 指標,驗證帳戶型設定檔中參考的設定檔成功擷取之後,才能擷取帳戶型設定檔。
-
自動產生映射不適用於擷取帳戶型設定檔及其子設定檔。
-
聯絡偏好設定的電子郵件和電話清單可以有
KeyName和KeyValue或ProfileId來參考子設定檔。KeyName應為唯一的識別符。 -
更新子設定檔時,不會更新帳戶型設定檔的參與偏好設定。必須透過擷取路徑更新。
