Get started with the AgentCore CLI
This tutorial shows you how to use the AgentCore CLI
The AgentCore CLI is a command-line tool that scaffolds agent projects, deploys them to Amazon Bedrock AgentCore Runtime, and invokes them. You can use the CLI with popular Python agent frameworks such as Strands Agents
For information about the HTTP protocol that the agent uses, see HTTP protocol contract.
Topics
Prerequisites
Before you start, make sure you have:
-
AWS Account with credentials configured. To configure your AWS credentials, see Configuration and credential file settings in the AWS CLI.
-
Node.js 20+ installed. The AgentCore CLI is distributed as an npm package.
-
Python 3.10+ installed. The generated agent code is Python.
-
AWS CDK installed. The CLI uses the AWS CDK to deploy resources. For information, see Getting started with the AWS CDK.
-
AWS Permissions : To create and deploy an agent with the AgentCore CLI, you must have appropriate permissions. For information, see Use the AgentCore CLI.
-
Model access : Anthropic Claude Sonnet 4.0 enabled in the Amazon Bedrock console (if using Bedrock as the model provider). For information about using a different model with Strands Agents, see the Model Providers section in the Strands Agents SDK
documentation.
Step 1: Install the AgentCore CLI
Install the AgentCore CLI globally:
npm install -g @aws/agentcore
Verify the installation:
agentcore --help
You should see output similar to the following:
Usage: agentcore [options] [command]

Build and deploy Agentic AI applications on AgentCore

Options:
  -V, --version                output the version number
  -h, --help                   Display help

Commands:
  add [subcommand]             Add resources (agent, evaluator, online-eval,
                               memory, identity, target)
  dev|d [options]              Launch local development server with hot-reload.
  deploy|p [options]           Deploy project infrastructure to AWS via CDK.
  create [options]             Create a new AgentCore project
  evals                        View past eval run results.
  fetch                        Fetch access info for deployed resources.
  help                         Display help topics
  invoke|i [options] [prompt]  Invoke a deployed agent endpoint.
  logs|l [options]             Stream or search agent runtime logs.
  package|pkg [options]        Package agent artifacts without deploying.
  pause                        Pause an online eval config.
  remove [subcommand]          Remove resources from project config.
  resume                       Resume a paused online eval config.
  run                          Run on-demand evaluation.
  status|s [options]           Show deployed resource details and status.
  traces|t                     View and download agent traces.
  update [options]             Check for and install CLI updates
  validate [options]           Validate agentcore/ config files.
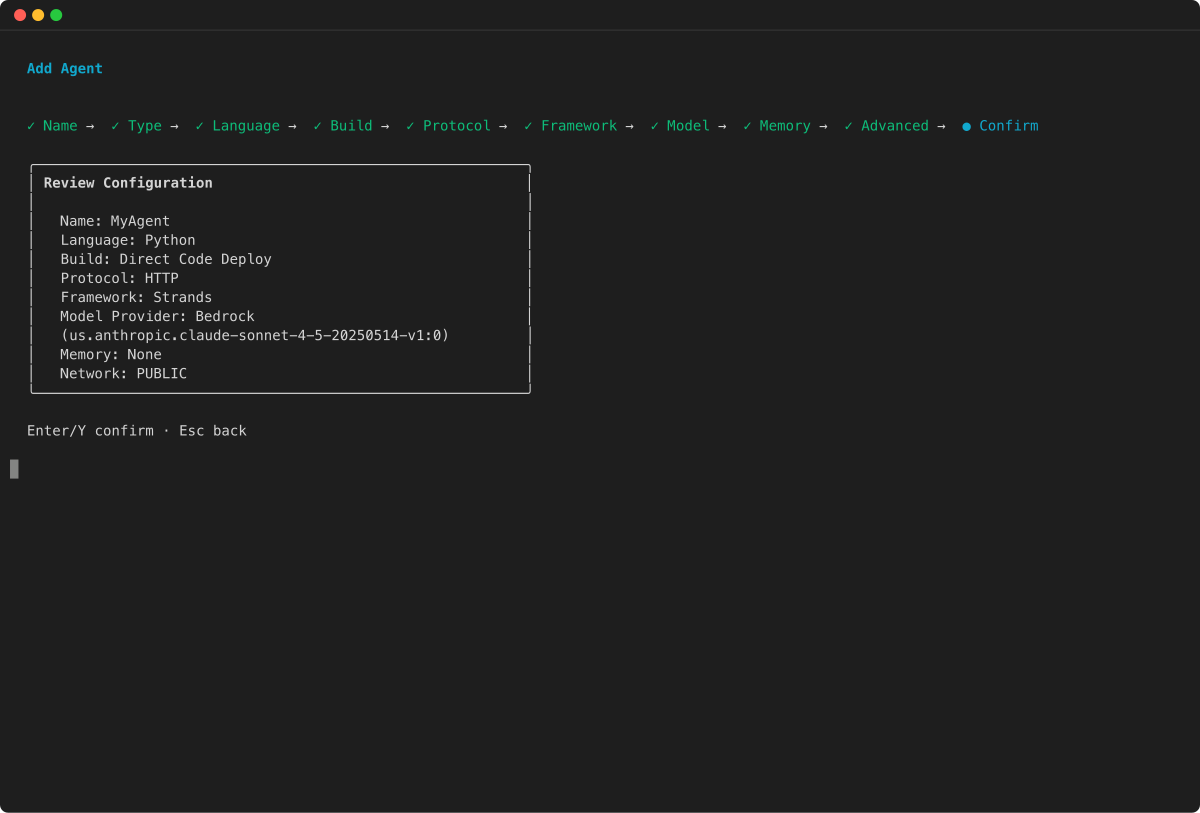
Step 2: Create your agent project
Use the agentcore create command to scaffold a new agent project:
Example

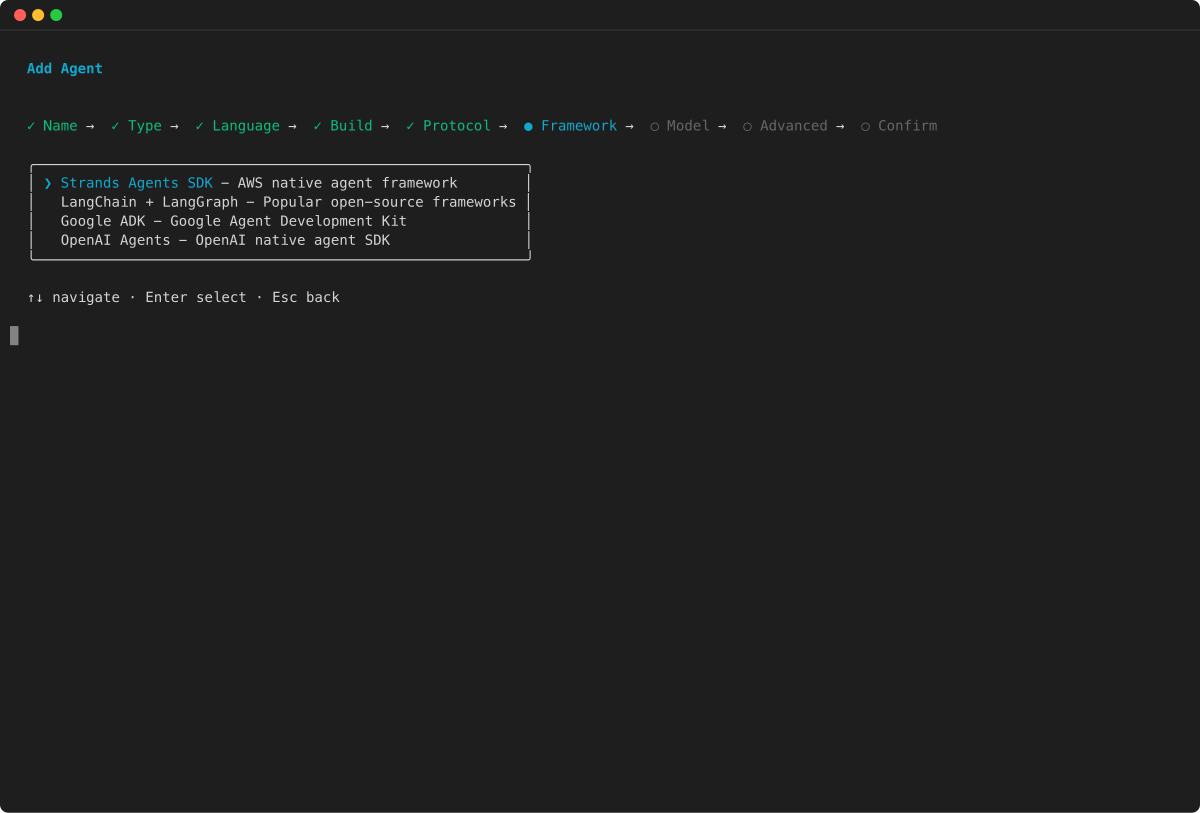
The agentcore create command accepts the following flags:
-
--name– The project name (alphanumeric, starts with a letter, max 36 characters). -
--framework– The agent framework. Supported values:Strands,LangChain_LangGraph,GoogleADK,OpenAIAgents. -
--protocol– The protocol mode. Supported values:HTTP(default),MCP,A2A. -
--build– The build type. Supported values:CodeZip(default),Container. -
--model-provider– The model provider. Supported values:Bedrock,Anthropic,OpenAI,Gemini. -
--memory– Memory configuration. Supported values:none,shortTerm,longAndShortTerm.
The command generates a project directory with the following structure:
MyAgent/
  agentcore/
    agentcore.json        # Project and agent configuration
    aws-targets.json      # AWS account and region targets
    .env.local            # Local environment variables (gitignored)
  app/
    MyAgent/
      main.py             # Agent entrypoint
      pyproject.toml      # Python dependencies
  README.md
The agentcore/agentcore.json file contains your project and agent configuration. The app/MyAgent/main.py file contains starter agent code using your selected framework.
To add payment capabilities to your project, run:
agentcore add payment-manager --name MyPayments --auto-payment --default-spend-limit 5.00
agentcore add payment-connector --manager MyPayments --name MyConnector --provider CoinbaseCDP \
  --api-key-id <KEY_ID> --api-key-secret <KEY_SECRET> --wallet-secret <WALLET_SECRET>
This configures the AgentCorePaymentsPlugin in your agent and provisions payment infrastructure on deploy. See Payments quick start for the full workflow.
Step 3: Test your agent locally
Before deploying to AWS, test your agent locally using the development server. First, change into the project directory:
cd MyAgent
If you selected a model provider that requires an API key (OpenAI, Anthropic, or Gemini), make sure the key is configured in agentcore/.env.local.
Start the local development server:
Example

The agentcore dev command:
-
Opens agent inspector in your web browser
-
Automatically creates a Python virtual environment and installs dependencies
-
Starts a local server that mimics the AgentCore Runtime environment
-
Runs on
http://localhost:8080by default (use-pto change the port)
To view server logs in real time (non-interactive mode), use the --logs flag:
agentcore dev --logs
In a separate terminal, invoke your local agent:
agentcore dev "Hello, tell me a joke"
Passing a prompt sends it to the running local development server. Use --stream to see the response streamed in real time.
Step 4: Enable observability for your agent
Amazon Bedrock AgentCore Observability helps you trace, debug, and monitor agents that you host in Amazon Bedrock AgentCore Runtime. First enable CloudWatch Transaction Search by following the instructions at Enabling Amazon Bedrock AgentCore runtime observability . To observe your agent, see View observability data for your Amazon Bedrock AgentCore agents.
After you deploy your agent, you can use the AgentCore CLI to stream logs and view traces:
# Stream agent logs
agentcore logs

# List recent traces
agentcore traces list
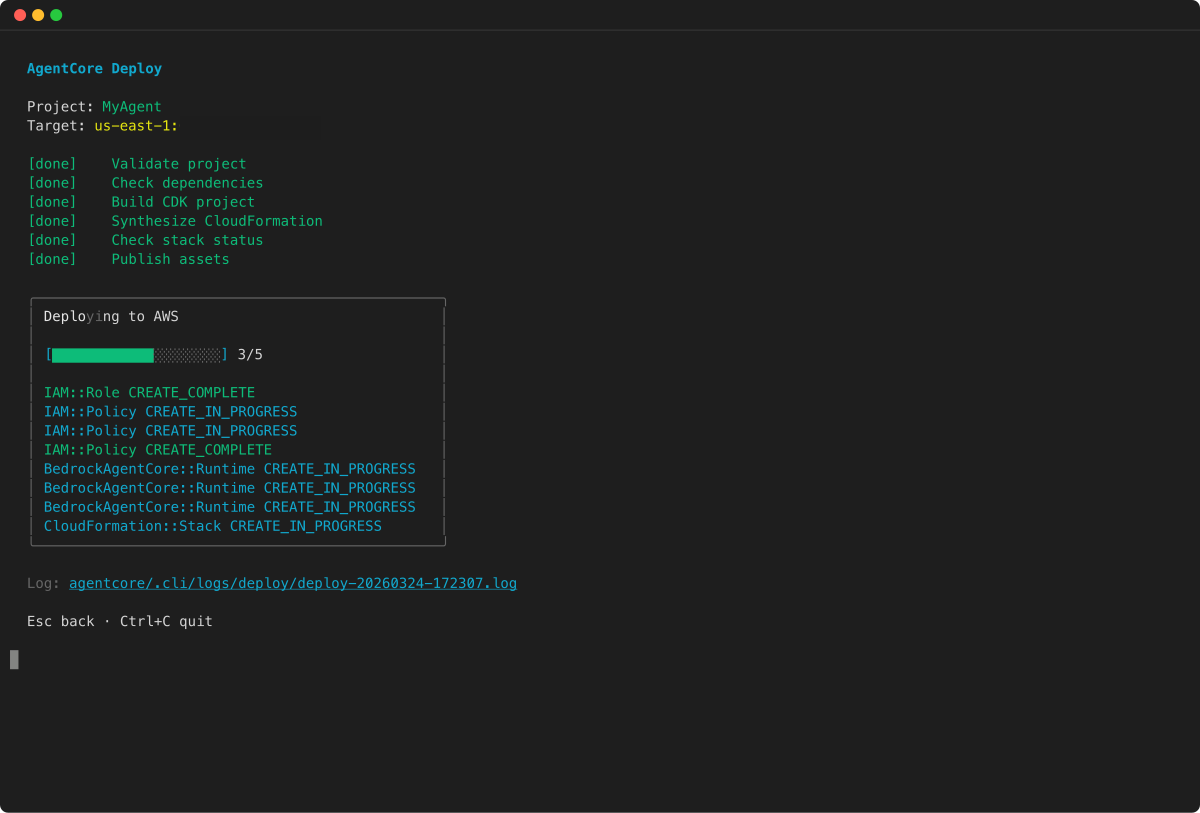
Step 5: Deploy to Amazon Bedrock AgentCore Runtime
Deploy your agent to Amazon Bedrock AgentCore Runtime:
Example
To preview the deployment without making changes, use the --plan flag:
agentcore deploy --plan
The agentcore deploy command:
-
Reads your
agentcore/agentcore.jsonandagentcore/aws-targets.jsonconfiguration -
Packages your agent code (as a CodeZip archive or Docker container, depending on your build type)
-
Uses the AWS CDK to synthesize and deploy CloudFormation resources
-
Creates the necessary AWS resources (IAM roles, Amazon Bedrock AgentCore Runtime, etc.)
Use -v for verbose output that shows resource-level deployment events. Use -y to auto-confirm the deployment without a prompt.
If the deployment fails, check for common issues.
Step 6: Test your deployed agent
After deployment completes, invoke your deployed agent:
Example

If you see a joke in the response, your agent is running in Amazon Bedrock AgentCore Runtime and can be invoked. If not, check for common issues.
Step 7: Invoke your deployed agent
Example
Step 8: Clean up
If you no longer want to host the agent in Amazon Bedrock AgentCore Runtime, remove the deployed AWS resources. First, remove all resources from your local configuration:
Example

Then deploy again to tear down the AWS resources:
Example

The remove all command resets the agentcore/agentcore.json configuration file while preserving agentcore/aws-targets.json and deployment state. The subsequent deploy detects the removed resources and tears down the corresponding AWS resources.
Find your resources
After deployment, you can check the status of your resources by using the AgentCore CLI:
Example

You can also view your resources in the AWS Console:
| Resource | Location |
|---|---|
|
Agent Logs |
CloudWatch → Log groups → |
|
CloudFormation Stack |
CloudFormation → Stacks → search for your project name |
|
IAM Role |
IAM → Roles → Search for "BedrockAgentCore" |
|
S3 Assets (CodeZip) |
S3 → Buckets → CDK staging bucket |
Common issues and solutions
Common issues and solutions when getting started with the AgentCore CLI. For more troubleshooting information, see Troubleshoot Amazon Bedrock AgentCore Runtime.
- Permission denied errors
-
Verify your AWS credentials and permissions:
-
Verify AWS credentials:
aws sts get-caller-identity -
Check you have the required policies attached
-
Review caller permissions policy for detailed requirements
-
- Model access denied
-
Enable model access in the Bedrock console:
-
Enable Anthropic Claude 4.0 in the Bedrock console
-
Make sure you’re in the correct AWS Region (us-west-2 by default)
-
- CDK deployment errors
-
Check CDK setup and permissions:
-
Make sure you have bootstrapped your AWS account for CDK:
cdk bootstrap -
Verify your caller permissions include CloudFormation and CDK access
-
Use
agentcore deploy -vfor verbose output to identify the failing resource
-
- Port 8080 in use (local only)
-
Find and stop processes that are using port 8080:
Use
lsof -ti:8080to get a list of processes using port 8080.Use
kill -9 PIDto stop the process. ReplacePIDwith the process ID.Alternatively, start the dev server on a different port:
agentcore dev -p 3000 - Region mismatch
-
Verify the AWS Region with
aws configure get regionand make sure the region inagentcore/aws-targets.jsonmatches where your resources should be deployed. - Configuration validation errors
-
Validate your configuration files:
Use
agentcore validateto check for syntax or schema errors inagentcore/agentcore.jsonand related configuration files.
Advanced options (Optional)
After creating your agent project with agentcore create , you can extend it by using the agentcore add commands. For the full CLI reference, see the AgentCore CLI documentation
Build types
When creating your project, choose a build type that fits your needs:
- CodeZip (default)
-
Your agent code is packaged as a zip archive and uploaded to S3. This is the simplest option and does not require Docker:
agentcore create --name MyAgent --framework Strands --model-provider Bedrock --memory none --build CodeZip - Container
-
Your agent code is packaged as a Docker container image. Use this option when you need custom system-level dependencies or a specific base image:
agentcore create --name MyAgent --framework Strands --model-provider Bedrock --memory none --build Container
Add resources to your project
You can add additional resources to your project after creation:
# Add another agent to the same project
agentcore add agent --name SecondAgent --language Python --framework Strands --model-provider Bedrock

# Add a memory store for conversational context
agentcore add memory --name MyMemory --strategies SEMANTIC

# Add an API key credential for external services
agentcore add credential --name MyApiKey --type api-key --api-key your-api-key

# Add a payment manager for x402 microtransactions
agentcore add payment-manager --name MyPayments --auto-payment --default-spend-limit 5.00
After adding resources, run agentcore deploy to provision the new resources in AWS.
Why ARM64?
Amazon Bedrock AgentCore Runtime runs on ARM64 (AWS Graviton). The AgentCore CLI handles architecture compatibility automatically for both the CodeZip and Container build types. For Container builds, only images built for ARM64 will work when deployed to Amazon Bedrock AgentCore Runtime.
