示例:集成来自 Datadog 和 Splunk 的通知
此示例提供了将 Datadog 和 Splunk 中的通知集成到 AWS 事件检测及响应服务的详细步骤。
主题
步骤 1:将您的 APM 设置为 Amazon EventBridge 中的事件源
在您的 AWS 账户中将每个 APM 设置为 Amazon EventBridge 中的事件源。有关将您的 APM 设置为事件源的说明,请参阅 Amazon EventBridge 合作伙伴中针对您工具的事件源设置说明
通过将 APM 设置为事件源,您可以将来自 APM 的通知摄取到您 AWS 账户中的事件总线中。设置完成后,AWS 事件检测及响应服务可在事件总线收到事件时启动事件管理流程。此流程会在您的 APM 中将 Amazon EventBridge 添加为目标。
步骤 2:创建自定义事件总线
最好是使用自定义事件总线。AWS 事件检测及响应服务使用自定义事件总线来摄取转换后的事件。AWS Lambda 函数将转换伙伴事件总线事件,并将其发送至自定义事件总线。AWS 事件检测及响应服务会安装托管规则,用于从自定义事件总线摄取事件。
您可以使用默认的事件总线,而非自定义事件总线。AWS 事件检测及响应服务会修改托管规则,以便从默认事件总线而非自定义事件总线摄取事件。
在 AWS 账户中创建自定义事件总线:
-
访问 https://console.aws.amazon.com/events/
,打开 Amazon EventBridge 控制台。 -
选择总线、事件总线。
-
在自定义事件总线下,选择创建。
-
在名称下为您的事件总线提供一个名称。推荐采用以下格式:APMName-AWSIncidentDetectionResponse-EventBus。
例如,如果您使用的是 Datadog 或 Splunk,请使用以下对应的格式:
-
Datadog:Datadog-AWSIncidentDetectionResponse-EventBus
-
Splunk:Splunk-AWSIncidentDetectionResponse-EventBus
-
步骤 3:创建用于转换的 AWS Lambda 函数
Lambda 函数将在步骤 1 中的合作伙伴事件总线和步骤 2 中的自定义(或默认)事件总线之间转换事件。Lambda 函数转换符合 AWS 事件检测及响应服务托管规则。
在 AWS 账户中创建 AWS Lambda 函数
-
打开 AWS Lambda 控制台的 Functions (函数) 页面
。 -
选择创建函数。
-
选择从头开始创作选项卡。
-
对于函数名称,输入一个采用
APMName-AWSIncidentDetectionResponse-LambdaFunction格式的名称。以下是 Datadog 和 Splunk 的示例:
Datadog:Datadog-AWSIncidentDetectionResponse-LambdaFunction
-
Splunk:Splunk-AWSIncidentDetectionResponse-LambdaFunction
-
对于运行时,选择 Python 3.10。
-
将其余字段保留默认值。选择创建函数。
-
在代码编辑页面上,将默认的 Lambda 函数内容替换为以下代码示例中的函数。
请注意以下代码示例中以 # 开头的注释。这些注释指出了要更改的值。
Datadog 转换代码模板:
import logging
import json
import boto3

logger = logging.getLogger()
logger.setLevel(logging.INFO)

# Change the EventBusName to the custom event bus name you created previously or use your default event bus which is called 'default'.
# Example 'Datadog-AWSIncidentDetectionResponse-EventBus'
EventBusName = "Datadog-AWSIncidentDetectionResponse-EventBus"

def lambda_handler(event, context):
    # Set the event["detail"]["incident-detection-response-identifier"] value to the name of your alert that is coming from your APM. Each APM is different and each unique alert will have a different name.
    # Replace the dictionary path, event["detail"]["meta"]["monitor"]["name"], with the path to your alert name based on your APM payload.
    # This example is for finding the alert name for Datadog.
    event["detail"]["incident-detection-response-identifier"] = event["detail"]["meta"]["monitor"]["name"]
    logger.info(f"We got: {json.dumps(event, indent=2)}")

    client = boto3.client('events')
    response = client.put_events(
     Entries=[
              {
               'Detail': json.dumps(event["detail"], indent=2),
               'DetailType': 'ams.monitoring/generic-apm', # Do not modify. This DetailType value is required.
               'Source': 'GenericAPMEvent', # Do not modify. This Source value is required.
               'EventBusName': EventBusName # Do not modify. This variable is set at the top of this code as a global variable. Change the variable value for your eventbus name at the top of this code.
             }
     ]
    )
    print(response['Entries'])
Splunk 转换代码模板:
import logging import json import boto3 logger = logging.getLogger() logger.setLevel(logging.INFO) # Change the EventBusName to the custom event bus name you created previously or use your default event bus which is called 'default'. # Example Splunk-AWSIncidentDetectionResponse-EventBus EventBusName = "Splunk-AWSIncidentDetectionResponse-EventBus" def lambda_handler(event, context): # Set the event["detail"]["incident-detection-response-identifier"] value to the name of your alert that is coming from your APM. Each APM is different and each unique alert will have a different name. # replace the dictionary path event["detail"]["ruleName"] with the path to your alert name based on your APM payload. # This example is for finding the alert name in Splunk. event["detail"]["incident-detection-response-identifier"] = event["detail"]["ruleName"] logger.info(f"We got: {json.dumps(event, indent=2)}") client = boto3.client('events') response = client.put_events( Entries=[ { 'Detail': json.dumps(event["detail"], indent=2), 'DetailType': 'ams.monitoring/generic-apm', # Do not modify. This DetailType value is required. 'Source': 'GenericAPMEvent', # Do not modify. This Source value is required. 'EventBusName': EventBusName # Do not modify. This variable is set at the top of this code as a global variable. Change the variable value for your eventbus name at the top of this code. } ] ) print(response['Entries']) -
选择部署。
-
为要接收转换后数据的事件总线的 Lambda 执行角色添加 PutEvents 权限:
打开 AWS Lambda 控制台的 Functions (函数) 页面
。 -
选择函数,然后在配置选项卡上选择权限。
-
在执行角色下,选择角色名称以在 AWS Identity and Access Management 控制台中打开执行角色。
-
在权限策略下,选择现有的策略名称以打开策略。
-
在此策略中定义的权限下,选择编辑。
-
在策略编辑器页面上,选择添加新语句:
-
策略编辑器会添加一个新的空白语句,类似于以下内容

-
将自动生成的新语句替换为以下内容:
{ "Sid": "AWSIncidentDetectionResponseEventBus0", "Effect": "Allow", "Action": "events:PutEvents", "Resource": "arn:aws:events:{region}:{accountId}:event-bus/{custom-eventbus-name}" } 资源是您在步骤 2:创建自定义事件总线中创建的自定义事件总线的 ARN,或者,如果您在 Lambda 代码中使用默认事件总线,则为默认事件总线的 ARN。
-
查看并确认已为角色添加所需权限。
-
选择将此新版本设为默认版本,然后选择保存更改。
有效载荷转换需要什么?
AWS 事件检测及响应服务摄取的事件总线事件中需要以下 JSON 键值对。
{
    "detail-type": "ams.monitoring/generic-apm",
    "source": "GenericAPMEvent"
    "detail" : {
        "incident-detection-response-identifier": "Your alarm name from your APM",
    }
}
以下示例显示了来自合作伙伴事件总线的事件在转换前后的情况。
{
    "version": "0",
    "id": "a6150a80-601d-be41-1a1f-2c5527a99199",
    "detail-type": "Datadog Alert Notification",
    "source": "aws.partner/datadog.com/Datadog-aaa111bbbc",
    "account": "123456789012",
    "time": "2023-10-25T14:42:25Z",
    "region": "us-east-1",
    "resources": [],
    "detail": {
      "alert_type": "error",
      "event_type": "query_alert_monitor",
      "meta": {
        "monitor": {
          "id": 222222,
          "org_id": 3333333333,
          "type": "query alert",
          "name": "UnHealthyHostCount",
          "message": "@awseventbridge-Datadog-aaa111bbbc",
          "query": "max(last_5m):avg:aws.applicationelb.un_healthy_host_count{aws_account:123456789012} \u003c\u003d 1",
          "created_at": 1686884769000,
          "modified": 1698244915000,
          "options": {
            "thresholds": {
              "critical": 1.0
            }
          },
        },
        "result": {
          "result_id": 7281010972796602670,
          "result_ts": 1698244878,
          "evaluation_ts": 1698244868,
          "scheduled_ts": 1698244938,
          "metadata": {
            "monitor_id": 222222,
            "metric": "aws.applicationelb.un_healthy_host_count"
          }
        },
        "transition": {
          "trans_name": "Triggered",
          "trans_type": "alert"
        },
        "states": {
          "source_state": "OK",
          "dest_state": "Alert"
        },
        "duration": 0
      },
      "priority": "normal",
      "source_type_name": "Monitor Alert",
      "tags": [
        "aws_account:123456789012",
        "monitor"
      ]
    }
}
请注意,在转换事件之前,detail-type 表示发出警报的 APM,源来自合作伙伴 APM,incident-detection-response-identifier 键不存在。
Lambda 函数转换上述事件并将其放入目标自定义或默认事件总线中。转换后的有效载荷目前包含所需的键值对。
{
    "version": "0",
    "id": "7f5e0fc1-e917-2b5d-a299-50f4735f1283",
    "detail-type": "ams.monitoring/generic-apm",
    "source": "GenericAPMEvent",
    "account": "123456789012",
    "time": "2023-10-25T14:42:25Z",
    "region": "us-east-1",
    "resources": [],
    "detail": {
      "incident-detection-response-identifier": "UnHealthyHostCount",
      "alert_type": "error",
      "event_type": "query_alert_monitor",
      "meta": {
        "monitor": {
          "id": 222222,
          "org_id": 3333333333,
          "type": "query alert",
          "name": "UnHealthyHostCount",
          "message": "@awseventbridge-Datadog-aaa111bbbc",
          "query": "max(last_5m):avg:aws.applicationelb.un_healthy_host_count{aws_account:123456789012} \u003c\u003d 1",
          "created_at": 1686884769000,
          "modified": 1698244915000,
          "options": {
            "thresholds": {
              "critical": 1.0
            }
          },
        },
        "result": {
          "result_id": 7281010972796602670,
          "result_ts": 1698244878,
          "evaluation_ts": 1698244868,
          "scheduled_ts": 1698244938,
          "metadata": {
            "monitor_id": 222222,
            "metric": "aws.applicationelb.un_healthy_host_count"
          }
        },
        "transition": {
          "trans_name": "Triggered",
          "trans_type": "alert"
        },
        "states": {
          "source_state": "OK",
          "dest_state": "Alert"
        },
        "duration": 0
      },
      "priority": "normal",
      "source_type_name": "Monitor Alert",
      "tags": [
        "aws_account:123456789012",
        "monitor"
      ]
    }
}
请注意,detail-type 现在是 ams.monitoring/generic-apm,源现在是 GenericAPMEvent,在详细信息下有新的键值对:incident-detection-response-identifier。
在上面的示例中,incident-detection-response-identifier 值取自路径 $.detail.meta.monitor.name 下的警报名称。APM 警报名称路径因 APM 而异。Lambda 函数必须修改为从正确的合作伙伴事件 JSON 路径中获取警报名称并将其用于 incident-detection-response-identifier 值。
incident-detection-response-identifier 上设置的每个唯一名称会在加入期间提供给 AWS 事件检测及响应服务团队。不会处理 incident-detection-response-identifier 名称未知的事件。
步骤 4:创建自定义 Amazon EventBridge 规则
步骤 1 中创建的合作伙伴事件总线需要您创建的 EventBridge 规则。该规则将所需的事件从合作伙伴事件总线发送到步骤 3 中创建的 Lambda 函数。
有关定义 EventBridge 规则的指南,请参阅 Amazon EventBridge 规则。
-
访问 https://console.aws.amazon.com/events/
,打开 Amazon EventBridge 控制台。 -
选择规则,然后选择与您的 APM 关联的合作伙伴事件总线。以下是合作伙伴事件总线示例:
Datadog:aws.partner/datadog.com/eventbus-name
Splunk:aws.partner/signalfx.com/RandomString
-
选择创建规则,创建新的 EventBridge 规则。
-
对于规则名称,请按
APMName-AWS Incident Detection and Response-EventBridgeRule格式输入名称,然后选择下一步。名称示例如下:-
Datadog:Datadog-AWSIncidentDetectionResponse-EventBridgeRule
-
Splunk:Splunk-AWSIncidentDetectionResponse-EventBridgeRule
-
-
对于事件源,选择 AWS 事件或 EventBridge 合作伙伴事件。
-
将示例事件和创建方法保留为默认值。
-
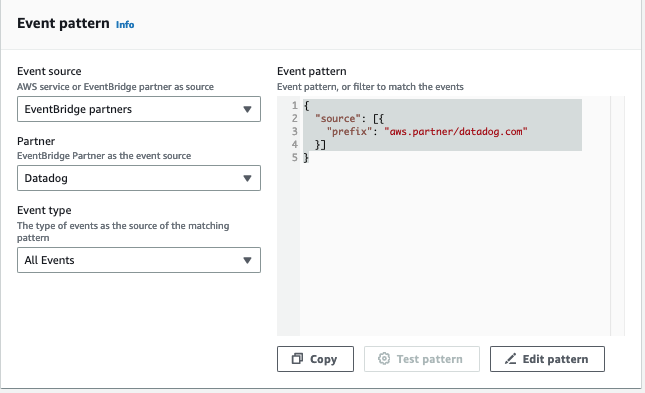
对于事件模式,请选择以下内容:
事件源:EventBridge 合作伙伴。
合作伙伴:选择您的 APM 合作伙伴。
事件类型:所有事件。
以下是示例事件模式:
Datadog 事件模式示例

Splunk 事件模式示例

-
对于目标,请选择以下内容:
-
目标类型:AWS 服务
-
选择目标:选择 Lambda 函数。
-
函数:您在步骤 2 中创建的 Lambda 函数的名称。
-
-
选择下一步、保存规则。