翻訳は機械翻訳により提供されています。提供された翻訳内容と英語版の間で齟齬、不一致または矛盾がある場合、英語版が優先します。
シャドウバリアントを使用してモデルをテストする
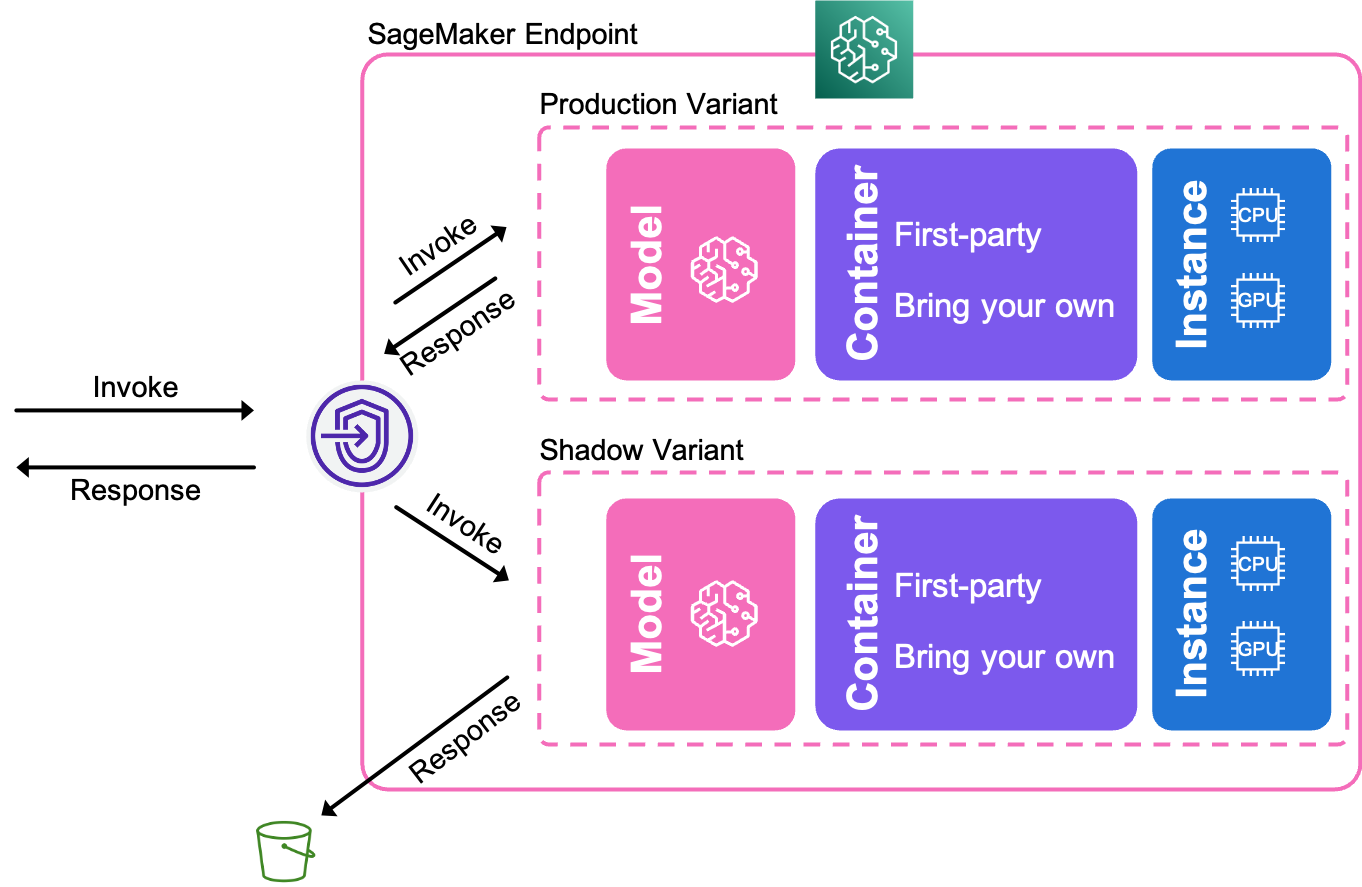
SageMaker AI Model Shadow Deployments を使用すると、長期間実行されるシャドウバリアントを作成して、モデル提供スタックの新しい候補コンポーネントを本番環境に昇格させる前に検証できます。次の図は、シャドウバリアントの詳しい仕組みを示しています。
シャドウバリアントのデプロイ
次のコード例は、シャドウバリアントをプログラムによってデプロイする方法を示しています。例のユーザープレースホルダーテキストを独自の情報に置き換えます。
-
2 つの SageMaker AI モデルを作成します。1 つは本番稼働バリアント用、もう 1 つはシャドウバリアント用です。
import boto3 from sagemaker import get_execution_role, Session aws_region = "aws-region" boto_session = boto3.Session(region_name=aws_region) sagemaker_client = boto_session.client("sagemaker") role = get_execution_role() bucket = Session(boto_session).default_bucket() model_name1 = "name-of-your-first-model" model_name2 = "name-of-your-second-model" sagemaker_client.create_model( ModelName = model_name1, ExecutionRoleArn = role, Containers=[ { "Image": "ecr-image-uri-for-first-model", "ModelDataUrl": "s3-location-of-trained-first-model" } ] ) sagemaker_client.create_model( ModelName = model_name2, ExecutionRoleArn = role, Containers=[ { "Image": "ecr-image-uri-for-second-model", "ModelDataUrl": "s3-location-of-trained-second-model" } ] ) -
エンドポイント設定を作成します。設定で本番稼働用バリアントとシャドウバリアントの両方を指定します。
endpoint_config_name =name-of-your-endpoint-configcreate_endpoint_config_response = sagemaker_client.create_endpoint_config( EndpointConfigName=endpoint_config_name, ProductionVariants=[ { "VariantName":name-of-your-production-variant, "ModelName": model_name1, "InstanceType":"ml.m5.xlarge", "InitialInstanceCount":1, "InitialVariantWeight":1, } ], ShadowProductionVariants=[ { "VariantName":name-of-your-shadow-variant, "ModelName": model_name2, "InstanceType":"ml.m5.xlarge", "InitialInstanceCount":1, "InitialVariantWeight":1, } ] ) -
エンドポイントを作成します。
create_endpoint_response = sm.create_endpoint(
    EndpointName=name-of-your-endpoint,
    EndpointConfigName=endpoint_config_name,
)
