Connect to Private Amazon RDS PostgreSQL Database Using AWS CloudShell
| AWS experience | Beginner |
| Time to complete | 30 minutes |
| Cost to complete | Less than $1 when completed in 1 hour |
| Services used | AWS CloudShell |
| Last updated | February 23, 2026 |
Introduction
Following AWS best practices, databases should be hosted in private subnets within an Amazon Virtual Private Cloud (Amazon VPC) for enhanced security. When an Amazon RDS PostgreSQL database is hosted in private subnets without public access, you must create another instance in a public subnet and then connect to the database instance. Alternatively, you can establish a connection by creating an AWS Client VPN
A simpler and more cost-effective alternative is to use AWS CloudShell
There is no additional charge for AWS CloudShell. You only pay for other AWS resources you use with CloudShell to create and run your applications.
Prerequisites
Before starting this tutorial, you will need:
An AWS account: If you don't already have one, follow the Setting Up Your AWS Environment
getting started guide for a quick overview.
Tasks
This tutorial is divided into the following short tasks. You must complete each task before moving on to the next one.
Create a custom Amazon Virtual Private Cloud with public and private subnets (5 Minutes)
Create an Amazon RDS PostgreSQL database hosted in private subnets within an Amazon VPC. (10 Minutes)
Set up an AWS CloudShell Virtual Private Cloud environment and test connectivity (10 Minutes)
Clean up resources (5 Minutes)
Implementation
In this task, you will use an AWS CloudFormation template to create a custom Amazon VPC with public and private subnets.
-
Open AWS CloudShell
-
Copy and paste the following commands into CloudShell:
git clone https://github.com/aws-samples/sample-Amazon-Q-Developer-Cookbook.git cd sample-Amazon-Q-Developer-Cookbook/dev-vpc-with-private-subnet/example-result/custom-vpc chmod 700 deploy.sh ./deploy.sh -
Choose Paste.
The commands performed the following actions:
-
Deployed an AWS CloudFormation template in a VPC with a pair of public and private subnets spread across two Availability Zones.
-
Deployed an internet gateway with a default route on the public subnets.
-
Deployed a NAT gateway and default routes for the NAT gateway in the private subnets.
-
-
Open AWS CloudFormation
and wait for the Status column of the custom-vpc stack to show CREATE_COMPLETE. -
Open Amazon VPC
. -
Select Your VPCs from the left menu.
-
Select CustomVPC, and then select the Resource map tab to review the layout of the subnets and route tables.

In this task, you will create an Amazon RDS PostgreSQL database hosted in private subnets within an Amazon VPC you've created in the previous task.
-
Open the Amazon RDS
console, and select Create a database. 
-
For Engine options, select PostgreSQL Engine type.

-
For Engine version, select PostgreSQL 16.8-R2.

-
Select the Dev/Test template with the Single-AZ DB instance deployment option.

-
Name your DB instance identifier.
-
For example, postgresql-demo

-
-
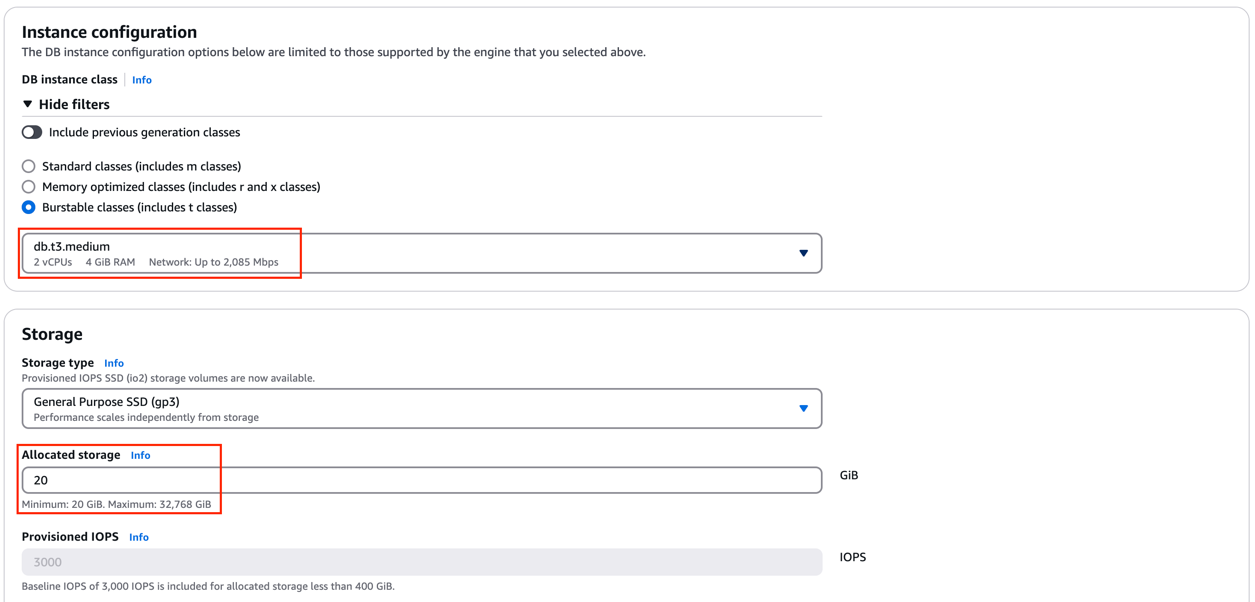
Under Instance Configuration, select Burstable classes.
-
Select db.t3.medium for DB instance class, and set Allocated Storage to 20GB.
-
Under Connectivity:
-
Select the CustomVPC you created in previous task.
-
Confirm that the Public access setting is set to No.
-
Select the default security group.

-
-
Leave all other options as their default settings, and choose Create database.
-
After the database instance successfully creates, select View connection Details.

-
Copy the hostname of the instance, and select Manage Credentials.

-
Retrieve the password by selecting Retrieve secret value.
Important
Take note of the username, Endpoint, and password. You will need these values for your VPC environment in the next task.

In this task, you will set up an AWS CloudShell VPC environment and test connectivity.
-
Open AWS CloudShell
, and select the + button to bring up an option for Create VPC environment. 
-
Name the VPC environment.
-
For example, cloudshell-vpc-demo.
-
-
Select CustomVPC, any Private subnet, and the default security group.
-
Choose Create.

Note
Public IP addresses are not allocated to CloudShell VPC environments by default. VPC environments created in public subnets with routing tables configured to route all traffic to Internet Gateway will not have access to public internet, but private subnets configured with Network Address Translation (NAT) have access to public internet. VPC environments created in such private subnets will have access to public internet.
-
Once the environment is set up, install version 16 of PostgreSQL by copying and pasting these commands.
-
Choose Paste.
Note
It is possible that your PostgreSQL version may be outdated compared to your Amazon RDS PostgreSQL database. These commands remove the older version and installs PostgreSQL version 16.
psql --version sudo dnf remove postgresql15* -y sudo dnf clean all -
After that completes, copy and paste the following command to install version 16 of PostgreSQL.
-
Choose Paste.
sudo dnf install postgresql16 -y -
In your AWS CloudShell VPC environment, run the following PostgreSQL command:
Note
These are the values at the end of Task 2.
psql -h<HOSTNAME>-U<USERNAME>Note
<HOSTNAME>is your database endpoint<USERNAME>is your database administrator username -
Enter your password to finish establishing a connection to your database.

-
Validate your setup by running this test command:
CREATE DATABASE demodb;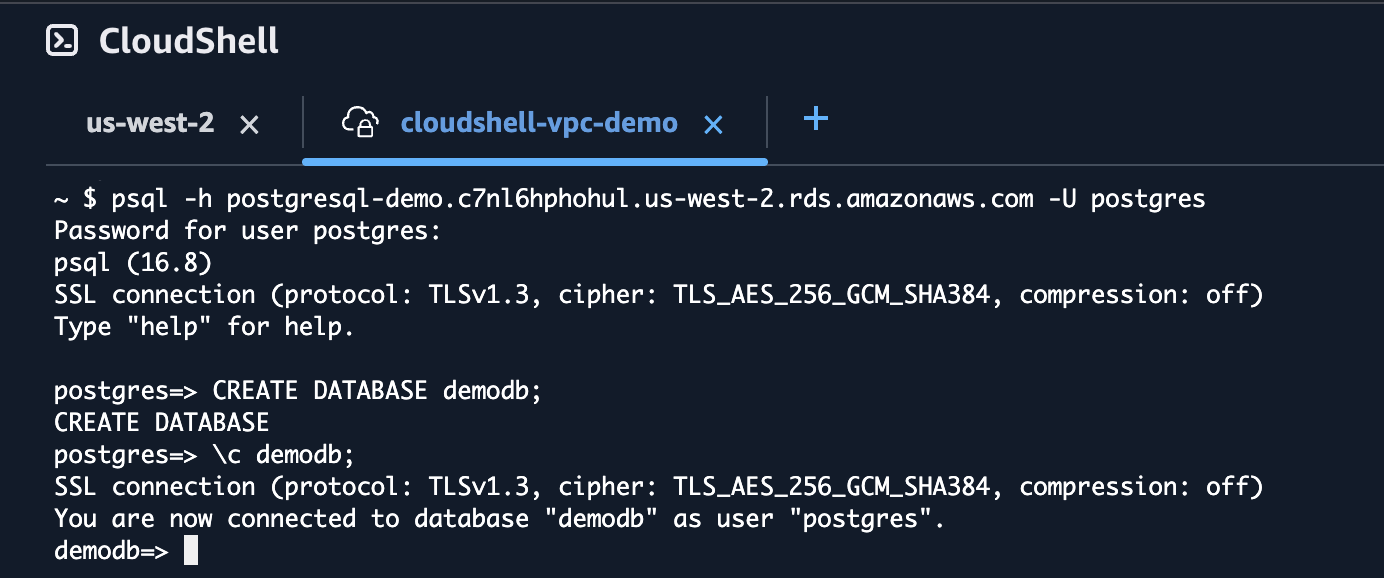
To avoid unexpected charges, follow these clean-up steps:
-
Open AWS CloudShell
, and select Delete. Note
VPC environments do not have persistent storage. The $HOME directory is deleted when your VPC environment times out (after 20-30 minutes of inactivity), or when you delete or restart your environment.

-
Enter delete, and choose Delete to confirm the deletion of the VPC environment.
-
Open Amazon RDS
, and select Databases. -
Select postgresql-demo.
-
Select Actions, and select Delete.

-
Enter delete me to remove the PostgreSQL database instance.
-
Open AWS CloudFormation
, and select custom-vpc. -
Select Delete.

-
Choose Delete to remove the CloudFormation stack.
Conclusion
You have learned how to connect to an Amazon RDS PostgreSQL instance in private subnets within Amazon VPC using AWS CloudShell.
