Connect Customer Client Application
Connect Customer screen recording is supported in Windows and Chrome OS. This page provides the download and installation instructions for the screen recording application in each operating system, and the minimum system requirements for the agent devices.
Windows
Version information
-
Version: v2.0.3 (latest)
-
Release date: January 16 2025
-
Download link: AmazonConnectClientWin-v2.0.3
-
Release note: This version supports AWS GovCloud (US) customers and has security improvements.
The above link downloads the AmazonConnectClientWin-[version].zip file. The zip file contains the Amazon.Connect.Client.Service.Setup.[version].msi file. For installation instructions, see Enable screen recording.
To be notified when there is an update to the Connect Customer Client Application, we recommend subscribing to the RSS feed of this administrator guide. Choose the RSS link that appears under the title of this page (it's next to the PDF link).
Client install instructions
In this step you install the Amazon.Connect.Client.Service file onto the agent's desktop, or into the virtual environment that the agent uses. This is the Connect Customer Client Application.
Note
-
In case of Windows multi-session OS, run the installer only once on the machine. Screen recording on Windows multi-session OS is supported only by version 2.0.0 or later.
-
If your Connect Customer instance is in AWS GovCloud (US-West), you must install version 2.0.3 or later.
-
You need to configure an allowlist of Connect Customer domains that are allowed to communicate with the client application. Screen recordings are captured only from Connect Customer domains specified in your allowlist.
Programmatic installation by using software distribution tools
-
Download the latest version of the Amazon.Connect.Client.Service.Setup.msi file.
-
Use your organization's software distribution mechanism, such as Software Center, to install the Amazon.Connect.Client.Service client app on agent desktops.
-
Deploy using your organization's enterprise software distribution system such as Microsoft System Center Configuration Manager, SCCM, or other automated deployment tools.
-
Include the
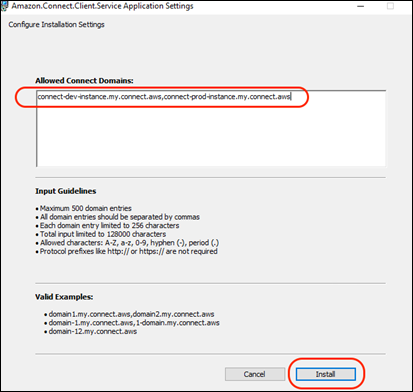
ALLOWED_CONNECT_DOMAINSparameter by using the following syntax:msiexec /i Amazon.Connect.Client.Service.Setup.msi ALLOWED_CONNECT_DOMAINS="connect-dev-instance.my.connect.aws,connect-prod-instance.my.connect.aws"
Manual installation
-
Download the latest version of the Amazon.Connect.Client.Service.Setup.msi file.
-
Choose the installer file.
-
Enter the Connect Customer domains allowlist when prompted. The following image shows an example of how to specify a domain in the allowlist on the Configure Installation Settings dialog box. For more examples, see Guidelines for specifying your Amazon Connect domains allowlist below.
-
Choose Install to complete the installation.
Verify the Connect Customer Client Application is running and functioning correctly
To verify that the application is running:
-
In Windows Task Manager, check for a background process named Amazon.Connect.Client.Service. This is the Connect Customer Client Application.
-
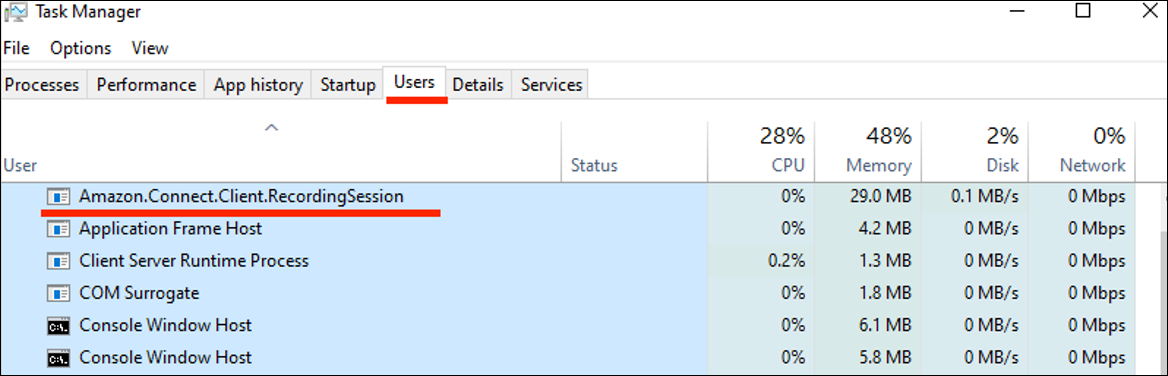
In Windows Task Manager, under Users processes, check for another process named Amazon.Connect.Client.RecordingSession after the user accepts the very first contact where screen recording is enabled.
The following image shows Amazon.Connect.Client.RecordingSession in Task Manager.
To verify that the application is functioning correctly and creating log files:
-
Navigate to the following directory:
C:\ProgramData\Amazon\Amazon.Connect.Client.Service\logs -
Open log files that are present in the directory.
-
In a successful installation the log files contain the following line:
Checking that services are still running, result : true -
Navigate to the following directory:
%USERPROFILE%\AppData\Local\Amazon\Amazon.Connect.Client.RecordingSession\Logs -
Open log files that are present in the directory.
-
In a successful installation the log files contain the following line:
Session initiation completed
                                        with result: True
Guidelines for specifying your Connect Customer domains allowlist
Be sure to adhere to the following guidelines when you enter domains in the Allowed Connect Domains box. Otherwise your installation will fail.
-
Format: Comma-separated Connect Customer domains
-
Valid characters for Connect Customer domains: Use only A-Z, a-z, 0-9, hyphen (-), period (.)
-
Protocol prefixes such as https:// or http:// are not required.
-
Limitations:
-
Maximum 500 domain entries
-
Maximum 256 characters per domain entry
-
Maximum 128,000 characters total input length
-
Following are examples of how to specify your domain.
Correct
-
domain1.my.connect.aws,domain2.my.connect.aws
-
ddomain-1.my.connect.aws, 1-domain.my.connect.aws
-
domain-12.my.connect.aws
Incorrect
-
_123domain.foo
-
domain:2.foo
-
*domain.my.connect.aws
-
https://domain1.my.connect.aws
-
*.my.connect.aws
Chrome OS
Connect Customer screen recording feature on ChromeOS requires two components:
-
Isolated Web App
-
Google Chrome Browser Extension
The installation of these components on Agent Chrome devices can be performed through Google Enterprise Admin Console. The URLs to configure the installation of the Isolated Web App and Chrome browser extension are provided below and can be set to automatic update through web manifest configuration JSON.
Download location and Install instructions
Complete the following steps on the Google Enterprise Admin Console. Apply the policy for all the agent devices where screen recording feature needs to be enabled.
Install Isolated Web App
-
Web Bundle ID:
ajbye5keylrcyakugr3zttu6f524eoamjc7mc6ubw3x3547xu3hxqaacai -
Update Manifest URL:
https://screenrecording.connect.aws/chromeos/amazon-connect-client-iwa/releases/update_manifest.json
To install Isolated Web App
-
Navigate to the Google Admin Portal
(https://admin.google.com) and login with your Google enterprise admin credentials. -
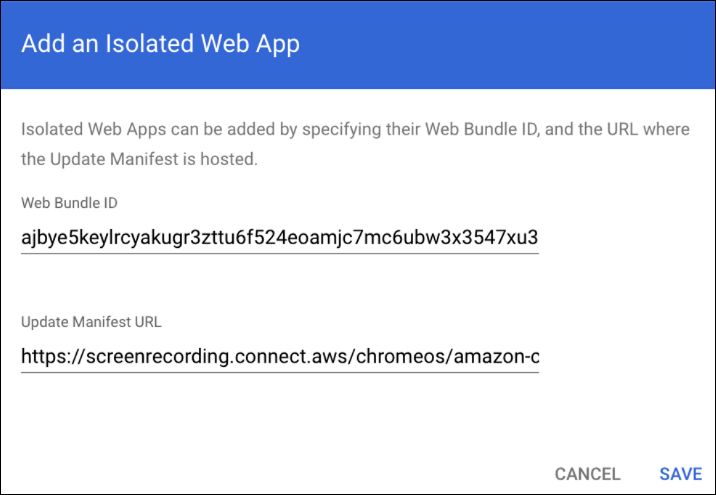
Select Add an Isolated Web App.
-
Copy and paste the following details, and then choose Save:
-
Web Bundle ID:
ajbye5keylrcyakugr3zttu6f524eoamjc7mc6ubw3x3547xu3hxqaacai -
Update Manifest URL: https://screenrecording.connect.aws/chromeos/amazon-connect-client-iwa/releases/update_manifest.json
The following image shows an example Add an Isolated Web App dialog box that has been completed.
-
-
Configure Installation Policy to
Force
                                    Install + Pin to ChromeOS Taskbar
and change Launch on Login toForce Launch and Prevent Closingto make sure Isolated Web App starts automatically when a computer is logged into and restarts.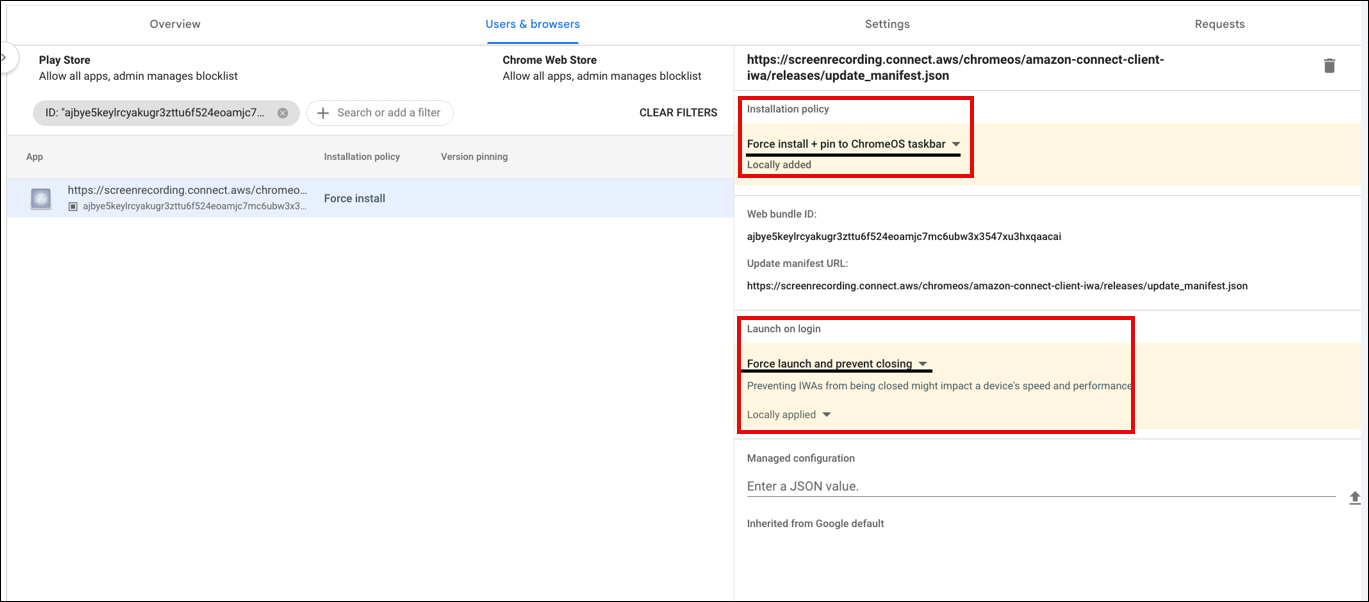
-
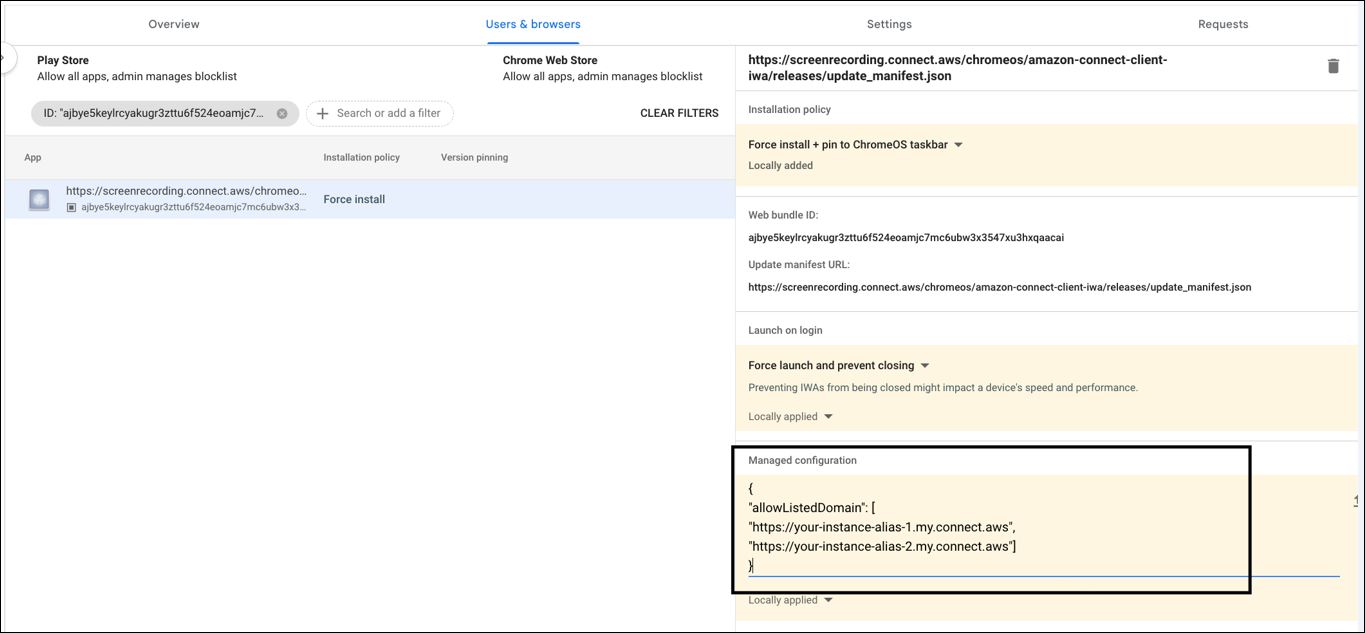
Configure Managed configuration to allowlist your Connect Customer domains that are allowed to initiate screen recording on agent machines. An example of Managed configuration is shown in the following image.
-
The key name MUST be
allowListedDomain. Domain names should not include any paths, query strings, or trailing slashes (/). -
Replace
your-instance-alias-*with your actual Connect Customer instance alias.
{ "allowListedDomain": [ "https://your-instance-alias-1.my.connect.aws", "https://your-instance-alias-2.my.connect.aws"] } -
-
Complete the following steps to configure the Isolated Web App to allow Direct sockets, Screen recording, and Window management permissions:
-
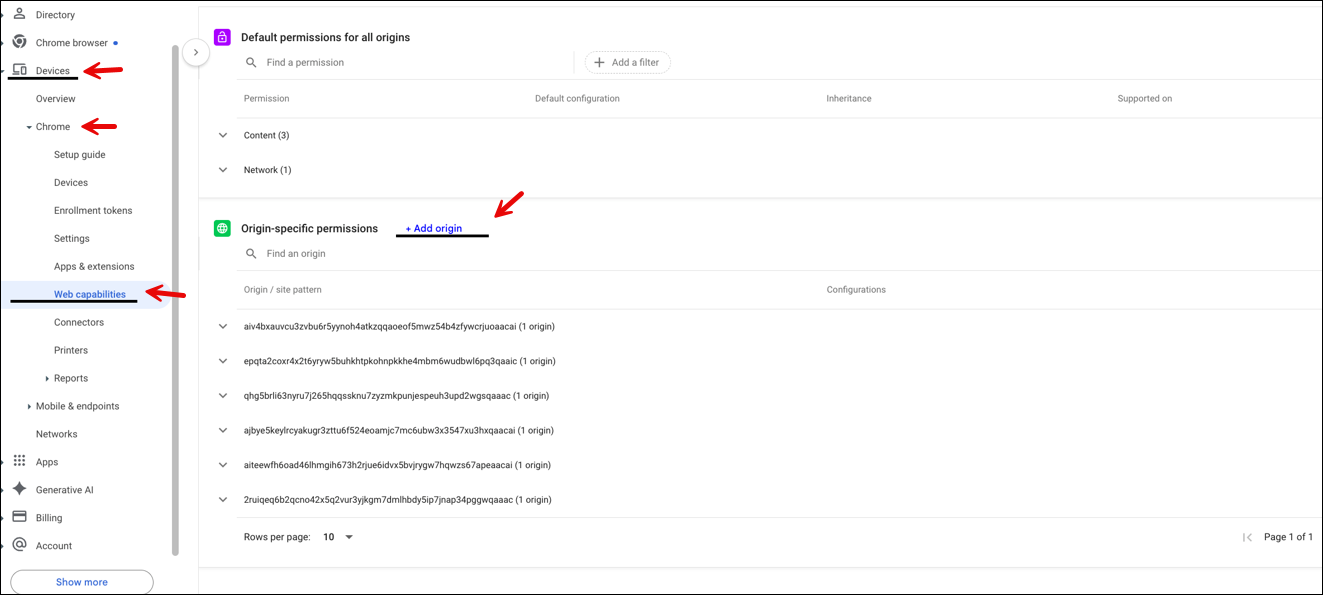
Navigate to Devices, Chrome, Web capabilities, Add Origin.
-
input
ajbye5keylrcyakugr3zttu6f524eoamjc7mc6ubw3x3547xu3hxqaacai, and then choose Save.
The following image shows where Devices, ChromeS, and Web capabilities are located in the left navigation menu in Chrome.
-
The following image shows the location of Direct sockets, Screen recording, and Window management on the Web capabilities page.

Install Google Chrome Browser Extension
-
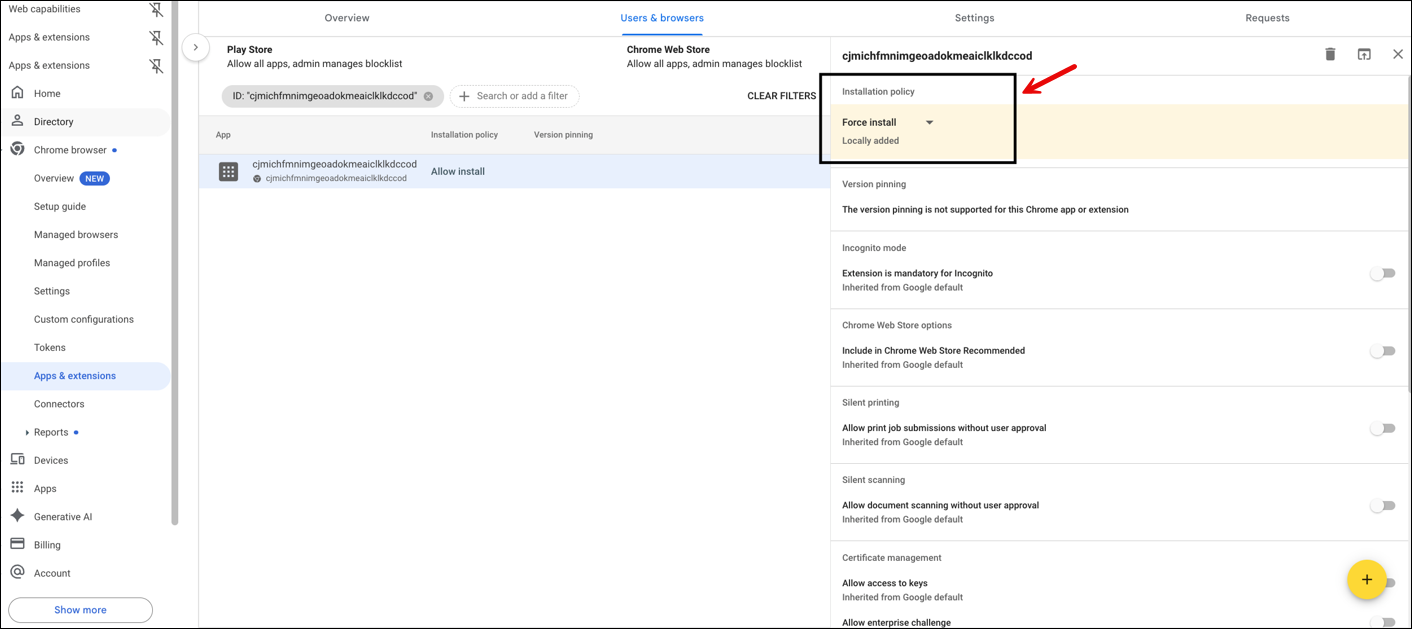
Extension ID: cjmichfmnimgeoadokmeaiclklkdccod
-
Custom URL:
https://screenrecording.connect.aws/chromeos/amazon-connect-extension/releases/updates.xml
To install Google Chrome Browser Extension
-
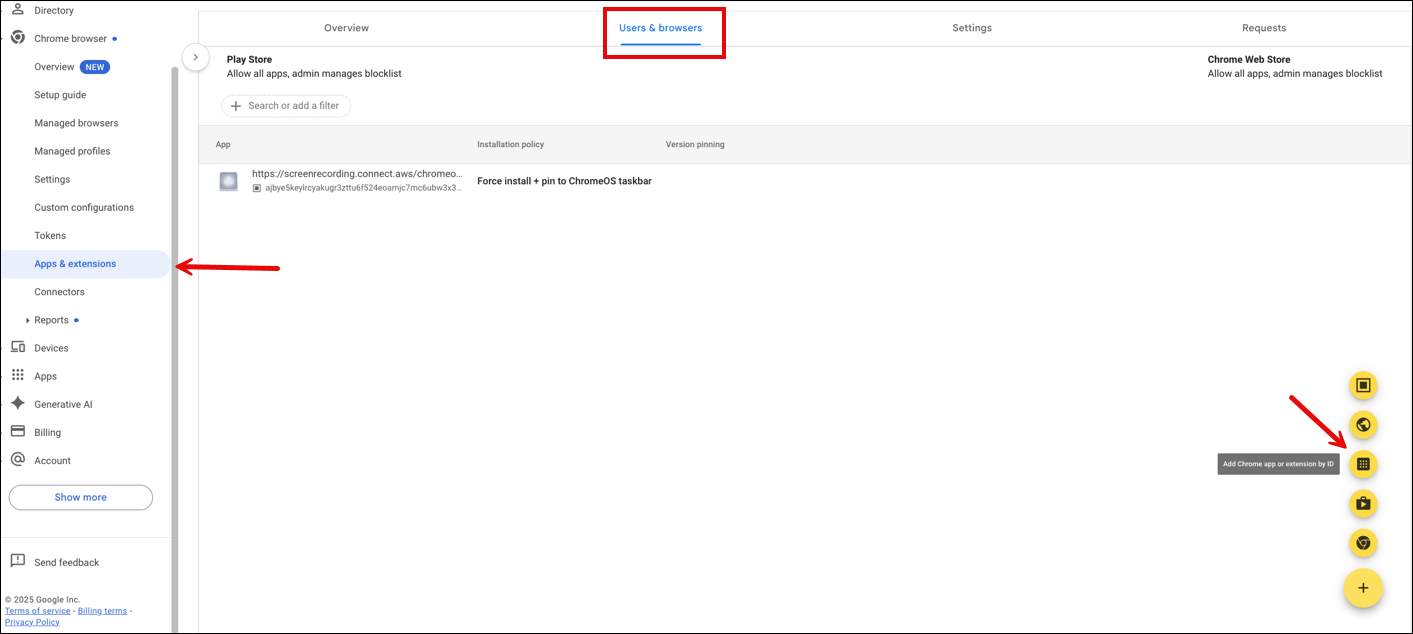
Navigate to Add Chrome app or extension by ID, as shown in the following image.
-
In the Add Chrome app or extension by ID, choose From a custom URL and enter the following information:
-
Extension ID:
cjmichfmnimgeoadokmeaiclklkdccod -
Custom URL:
https://screenrecording.connect.aws/chromeos/amazon-connect-extension/releases/updates.xml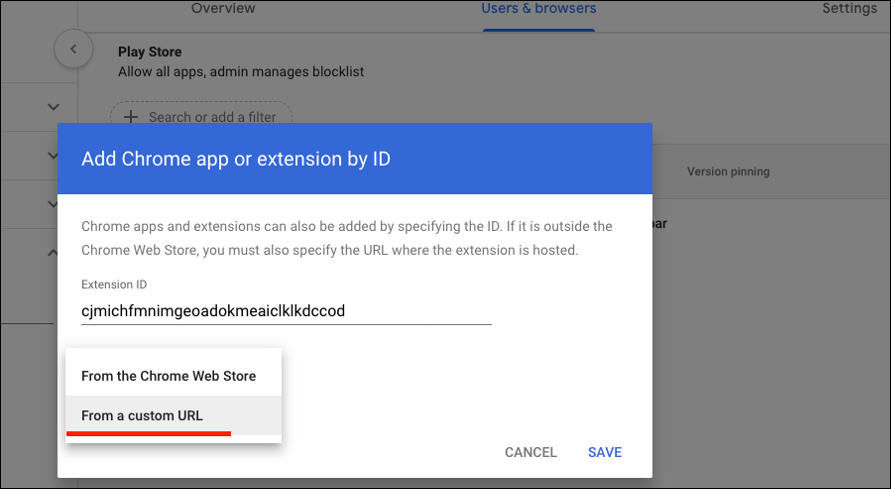
-
-
Configure Installation Policy to Force Install, and then choose Save, as shown in the following image.