AWS App Runner is no longer open to new customers. Existing customers can continue to use the service as normal. For more information, see AWS App Runner availability change.
AWS App Runner availability change
After careful consideration, we decided to close AWS App Runner to new customers. Existing AWS App Runner customers can continue to use the service as normal, including creating new resources and services. AWS continues to invest in security and availability for AWS App Runner, but we do not plan to introduce new features.
We recommend that customers explore Amazon Elastic Container Service (Amazon ECS) Express Mode when migrating from AWS App Runner. Amazon ECS Express Mode preserves App Runner's operating simplicity while providing access to the broader Amazon ECS feature set. With a single API call, you provide a container image and two IAM roles, and Amazon ECS provisions a complete application stack in your AWS account, including an ECS service on Fargate, an Application Load Balancer, auto scaling, and networking. There is no additional charge for using Amazon ECS Express Mode. You pay only for the underlying AWS resources created to run your application.
This guide describes how to migrate an existing App Runner service to ECS Express Mode and gradually shift traffic using DNS routing.
Migration overview
This guide uses a blue/green deployment approach with DNS weighted routing to migrate traffic from App Runner to ECS Express Mode. Both services run simultaneously during the migration. You use Amazon Route 53 (or your DNS provider) to gradually shift traffic from the App Runner service to the ECS Express Mode service, starting with a small percentage and increasing over time. This approach minimizes downtime and allows you to roll back by adjusting DNS weights if issues arise.
A typical migration includes the following steps:
Review the configuration of the existing App Runner service
Create an ECS Express Mode service using the same container image
Configure the same custom domain for the ECS Express Mode service, if you use a custom domain
Shift traffic from App Runner to ECS Express Mode using DNS routing
Complete the migration and delete the App Runner service when it is no longer needed
Prerequisites
Before you start, make sure that you have the following:
An AWS account with appropriate AWS Identity and Access Management permissions to create and manage Amazon ECS, AWS App Runner, Amazon Route 53, and Application Load Balancer resources
AWS CLI installed and configured with credentials for your AWS account
A container image stored in Amazon Elastic Container Registry (or another container registry) to deploy to ECS Express Mode
The IAM roles required by ECS Express Mode:
ecsTaskExecutionRolefor Amazon ECS task execution andecsInfrastructureRoleForExpressServicesfor ECS Express Mode infrastructure provisioning
If you want to preserve an existing custom domain during migration, you also need:
A registered domain name that you control, such as
app.example.com, using either Amazon Route 53 or a third-party domain registrarAn SSL/TLS certificate in AWS Certificate Manager (ACM) that matches your custom domain. Request a public ACM certificate in the same AWS Region where you're deploying your resources. Both App Runner and Amazon ECS Express Mode require an ACM certificate to enable HTTPS access with custom domains.
Before you begin
-
Container image requirement — ECS Express Mode deploys a container image. If your App Runner service is deployed from source code, first add a build step that creates a container image and pushes it to a registry such as Amazon Elastic Container Registry. Then deploy that image to ECS Express Mode. See Migrating source-based deployments for details on migrating source-based deployments.
-
Domain behavior — If your App Runner service already uses a custom domain, such as
app.example.com, you can reuse that same hostname during migration and gradually shift traffic between App Runner and ECS Express Mode by updating DNS.If your App Runner service uses only the default App Runner service URL, the ECS Express Mode service will have a different endpoint. In this case there is no shared hostname that can be used for gradual traffic shifting. You should create and validate the ECS Express Mode service and then update clients or DNS to use the new endpoint.
Migration walkthrough
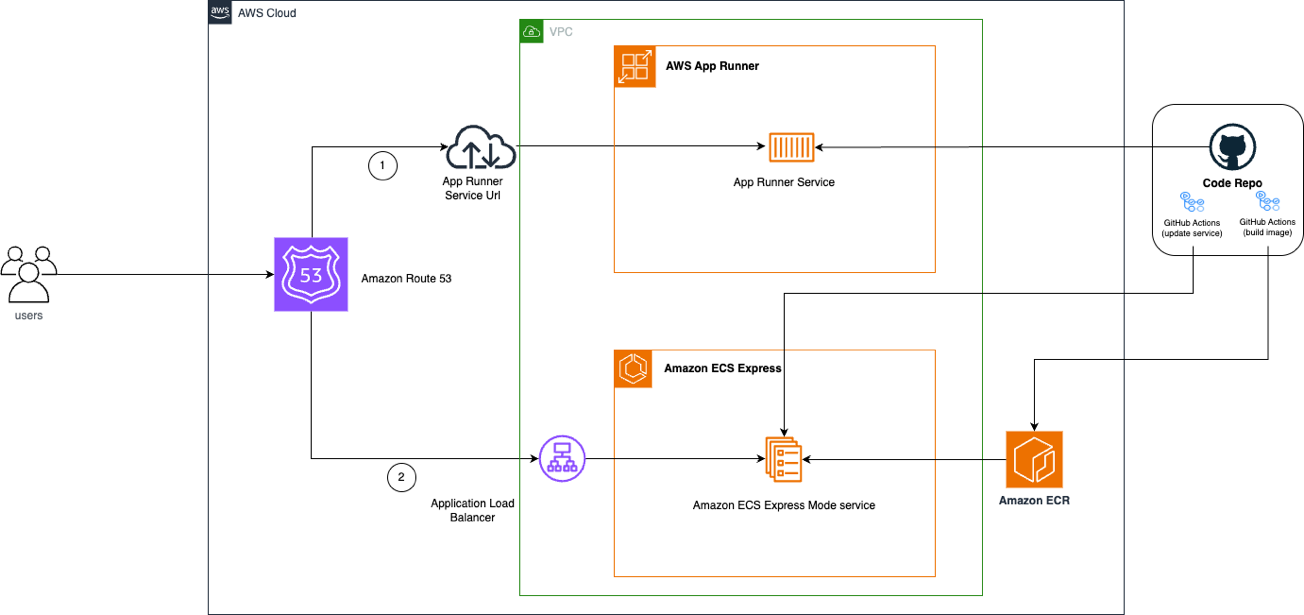
The following diagram shows how the migration works using Route 53 to shift DNS records between your App Runner service and your ECS Express Mode service.

Step 1: Review the existing App Runner configuration
In the App Runner console, review your existing service and note the values that you want to carry forward. At a minimum, note the following:
Container image
Application port
Environment variables
Custom domain name, if configured
ACM certificate associated with the custom domain, if configured
You can also review any other runtime settings that you want to carry forward into the new service.
For custom domain details, see Managing custom domain names for an App Runner service.
Step 2: Create the ECS Express Mode service
Create an ECS Express Mode service using the same container image used by your App Runner service. You can create the service using either the AWS Management Console or the AWS CLI.
Example CLI command:
aws ecs create-express-gateway-service \
    --execution-role-arn arn:aws:iam::123456789012:role/ecsTaskExecutionRole \
    --infrastructure-role-arn arn:aws:iam::123456789012:role/ecsInfrastructureRoleForExpressServices \
    --primary-container '{
        "image": "123456789012.dkr.ecr.us-east-1.amazonaws.com/my-app:latest",
        "containerPort": 8080,
        "environment": [{
            "name": "ENV_VAR_NAME",
            "value": "value"
        }]
    }' \
    --service-name "my-application" \
    --health-check-path "/" \
    --scaling-target '{"minTaskCount":1,"maxTaskCount":4}' \
    --monitor-resources
Replace the image, port, environment variables, and scaling values with those from your App Runner service.
This command provisions a complete application stack in your AWS account, including an ECS service on Fargate, an Application Load Balancer with target groups and health checks, auto-scaling policies, security groups and networking configuration, and a default URL.
Provisioning typically takes 3–5 minutes. You can track progress in the Amazon ECS console under the Resources tab.
Once complete, test your ECS Express Mode service using the default URL shown in the console. Verify that your application works correctly before proceeding with the traffic shift.
Step 3: Configure the custom domain for ECS Express Mode
If your App Runner service uses a custom domain, configure the same custom domain for the ECS Express Mode service before shifting traffic. This step configures the Application Load Balancer created for the ECS Express Mode service so that it accepts traffic for your domain and uses the ACM certificate for HTTPS.
Add your custom domain as a host header condition in the Application Load Balancer listener rule. Use the same domain name you associated with your App Runner service (for example,
app.example.com). This tells the Application Load Balancer to route traffic from your domain to the ECS Express Mode target group.Add the SSL certificate to the Application Load Balancer HTTPS listener. Add the ACM certificate noted in Step 1 to the HTTPS listener.
For detailed instructions, see Adding a custom domain to your service in the Amazon ECS Developer Guide.
The following image shows an example of configuring the host header condition in the Application Load Balancer listener rule.

Step 4: Shift traffic using Route 53 weighted routing
If your App Runner service already uses a custom domain, you can gradually shift traffic to the ECS Express Mode service by using Route 53 weighted routing. Weighted routing allows you to route traffic for the same hostname to multiple endpoints. Each endpoint is defined as a separate DNS record with its own weight, and Route 53 distributes requests according to those weights.
Note
This guide uses Route 53 as the example. If you use another DNS provider, make equivalent DNS changes using your provider's traffic-management features.
Convert the existing App Runner record to a weighted record:
Open the Route 53 console.
Choose Hosted zones, then select the hosted zone for your domain.
Locate the existing record for your hostname (for example
app.example.com) that currently points to App Runner.Edit the record and change its Routing policy to Weighted.
Set Weight to
100(this directs all initial traffic to App Runner).Under Record ID, enter a descriptive identifier such as
app-runner-service.Choose Save changes.
Create a weighted record for ECS Express Mode:
Create a new record in the same hosted zone.
Use the same record name (for example
app.example.com).Use the same record type.
Set Routing policy to Weighted.
Under Route traffic to, choose Alias to Application and Classic Load Balancer.
Choose your ECS Express Mode Application Load Balancer from the dropdown.
Set Weight to
0(no traffic flows to ECS Express Mode until you explicitly increase the weight).Under Record ID, enter a descriptive identifier such as
ecs-express-service.Choose Create records.
Gradually shift traffic:
Once the DNS records are configured, begin shifting traffic by increasing the ECS Express Mode weight while proportionally decreasing the App Runner weight. A recommended approach:
Set ECS Express Mode to 10 / App Runner to 90
Monitor and validate the service handles requests successfully
Increase to 25 / 75
Increase to 50 / 50
Increase to 75 / 25
Complete at 100 / 0
At each step, test the application before shifting additional traffic. If issues occur at any point, roll back by adjusting the weights back to their previous values.
Important
Keep your App Runner service running for a validation period (such as 24–48 hours) to confirm DNS changes have propagated globally and to provide a rollback option if needed. If you encounter issues, you can quickly revert the Route 53 weights back to App Runner.
Step 5: Complete the migration
After verifying that the ECS Express Mode service handles production traffic correctly and the validation period has passed, complete the migration:
In Route 53, remove the weighted record pointing to App Runner (or set its weight to 0).
Remove the custom domain association from the App Runner service.
Delete the App Runner service:
aws apprunner delete-service --service-arnyour-app-runner-service-arn
Also consider removing any resources that are no longer needed:
Route 53 weighted routing records for App Runner
Unused container images from Amazon Elastic Container Registry
IAM roles created specifically for App Runner, if no longer needed
Note
Do not delete the ECS Express Mode service, its Application Load Balancer, or associated resources if the service is running in production.
Migrating source-based deployments
If your existing App Runner service is deployed from source code rather than a container image, you need to add a
containerization step before deploying to ECS Express Mode. Unlike App Runner, ECS Express Mode requires a container image.
However, you can replicate App Runner's automated deployment experience using CI/CD tools such as GitHub Actions with the
Amazon ECS Deploy Express
Service GitHub Action
The migration workflow has three stages:
Build the container image using a Dockerfile
Push the image to a container registry such as Amazon Elastic Container Registry
Deploy the image to ECS Express Mode
The following diagram shows how this workflow works using GitHub Actions:
Containerize your application
If your application does not already have a Dockerfile, create one in your repository root. The Dockerfile serves as the blueprint for building and packaging your source code into a container image.
Your repository structure should include:
your-app/
├── src/                    # Application source code
├── Dockerfile              # Container build instructions
├── package.json            # Dependencies and scripts
└── .github/                # GitHub configuration
    └── workflows/          # GitHub Actions workflows
        └── deploy.yml      # ECS Express Mode deployment workflow
Set up GitHub Actions for automated deployment
To replicate App Runner's automatic deployment on code push, configure GitHub Actions with the following:
Create an OpenID Connect (OIDC) provider
to allow GitHub Actions to assume an IAM role Create an IAM role with ECS Express Mode
and Amazon Elastic Container Registry permissions Create the two IAM roles required by ECS Express Mode
Create GitHub environment variables for your ECS resources:
ECS_SERVICE,ECS_CLUSTER,AWS_REGION,AWS_ACCOUNT_ID, andECR_REPOSITORY
Example GitHub Actions workflow
Create a workflow file at .github/workflows/deploy.yml:
name: Build and Deploy to ECS

on:
  push:
    branches: [ main ]

env:
  AWS_REGION: ${{ vars.AWS_REGION }}
  AWS_ACCOUNT_ID: ${{ vars.AWS_ACCOUNT_ID }}
  ECR_REPOSITORY: ${{ vars.ECR_REPOSITORY }}
  ECS_SERVICE: ${{ vars.ECS_SERVICE }}
  ECS_CLUSTER: ${{ vars.ECS_CLUSTER }}

jobs:
  deploy:
    name: Deploy
    runs-on: ubuntu-latest
    environment: production
    permissions:
      id-token: write
      contents: read

    steps:
    - name: Checkout
      uses: actions/checkout@v6

    - name: Configure AWS credentials
      uses: aws-actions/configure-aws-credentials@v5
      with:
        aws-region: ${{ env.AWS_REGION }}
        role-to-assume: arn:aws:iam::${{ env.AWS_ACCOUNT_ID }}:role/github-actions-ecs-role
        role-session-name: GitHubActionsECSDeployment

    - name: Login to Amazon ECR
      id: login-ecr
      uses: aws-actions/amazon-ecr-login@v2

    - name: Get short commit hash
      run: echo "IMAGE_TAG=${GITHUB_SHA:0:7}" >> $GITHUB_ENV

    - name: Build, tag, and push image to Amazon ECR
      id: build-image
      env:
        ECR_REGISTRY: ${{ steps.login-ecr.outputs.registry }}
      uses: docker/build-push-action@v6
      with:
        context: .
        push: true
        tags: ${{ env.ECR_REGISTRY }}/${{ env.ECR_REPOSITORY }}:latest,${{ env.ECR_REGISTRY }}/${{ env.ECR_REPOSITORY }}:${{ env.IMAGE_TAG }}

    - name: Deploy to ECS Express Mode
      uses: aws-actions/amazon-ecs-deploy-express-service@v1
      env:
        ECR_REGISTRY: ${{ steps.login-ecr.outputs.registry }}
      with:
        service-name: ${{ env.ECS_SERVICE }}
        image: ${{ env.ECR_REGISTRY }}/${{ env.ECR_REPOSITORY }}:${{ env.IMAGE_TAG }}
        execution-role-arn: arn:aws:iam::${{ env.AWS_ACCOUNT_ID }}:role/ecsTaskExecutionRole
        infrastructure-role-arn: arn:aws:iam::${{ env.AWS_ACCOUNT_ID }}:role/ecsInfrastructureRoleForExpressServices
        cluster: ${{ env.ECS_CLUSTER }}
        container-port: 8080
        environment-variables: |
          [
            {"name": "ENV", "value": "Prod"}
          ]
        cpu: '1024'
        memory: '2048'
        health-check-path: /health
        min-task-count: 1
        max-task-count: 4
        auto-scaling-metric: AVERAGE_CPU
        auto-scaling-target-value: 70
When you push code changes to your main branch, GitHub Actions automatically builds a new container image, pushes it to Amazon Elastic Container Registry, and deploys it to your ECS Express Mode service. This replicates the automated deployment experience you had with App Runner.
Once the ECS Express Mode service is running, follow Steps 3–5 in the migration walkthrough to configure the custom domain, shift traffic using DNS routing, and complete the migration.
Additional resources
