本文為英文版的機器翻譯版本,如內容有任何歧義或不一致之處,概以英文版為準。
# 使用自訂的詞彙
建立自訂詞彙後,您可以包含在轉錄請求中;請參閱以下章節以取得範例。
您要包含在請求中的自訂詞彙的語言,必須與您為媒體指定的語言代碼相符。如果語言不相符,您的自訂詞彙就不會套用至您的轉錄,且不會出現警告或錯誤。
## 在批次轉錄中使用自訂詞彙
若要搭配批次轉錄使用自訂詞彙,請參閱下列範例:
### AWS 管理主控台
1. 登入 [AWS 管理主控台](https://console.aws.amazon.com/transcribe/)。
1. 在導覽窗格中,選擇**轉錄作業**,然後選擇**建立作業**(右上角)。這會開啟**指定作業詳細資訊**頁面。
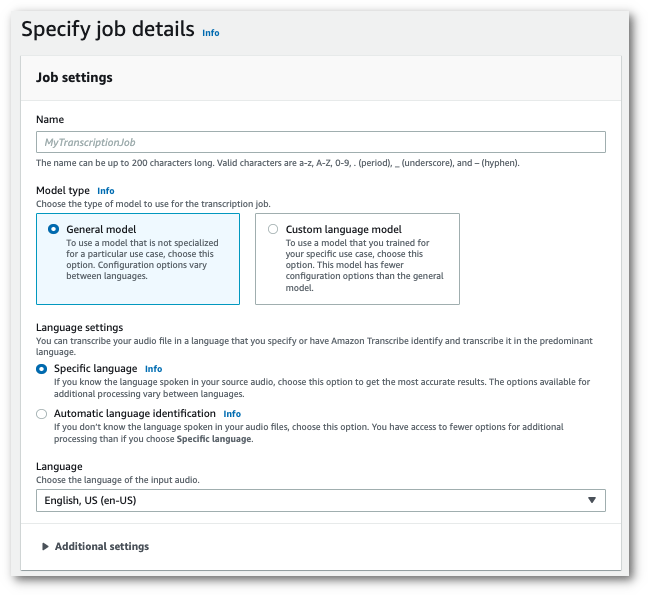
為工作命名並指定輸入媒體。選擇性包含任何其他欄位,然後選擇**下一步**。
1. 在**配置工作**頁面底部的**自訂**面板中,開啟**自訂詞彙**。

1. 從下拉式選單中選擇您的自訂詞彙。
選擇**建立作業**以執行轉錄作業。
### AWS CLI
此範例使用 [start-transcription-job](https://awscli.amazonaws.com/v2/documentation/api/latest/reference/transcribe/start-transcription-job.html) 指令和 `Settings` 參數與 `VocabularyName` 子參數。如需詳細資訊,請參閱 [https://docs.aws.amazon.com/transcribe/latest/APIReference/API_StartTranscriptionJob.html](https://docs.aws.amazon.com/transcribe/latest/APIReference/API_StartTranscriptionJob.html) 和 [https://docs.aws.amazon.com/transcribe/latest/APIReference/API_Settings.html](https://docs.aws.amazon.com/transcribe/latest/APIReference/API_Settings.html)。
```
aws transcribe start-transcription-job \
--region {{us-west-2}} \
--transcription-job-name {{my-first-transcription-job}} \
--media MediaFileUri=s3://{{amzn-s3-demo-bucket}}/{{my-input-files}}/{{my-media-file}}.{{flac}} \
--output-bucket-name {{amzn-s3-demo-bucket}} \
--output-key {{my-output-files}}/ \
--language-code {{en-US}} \
--settings VocabularyName={{my-first-vocabulary}}
```
這是使用 [start-transcription-job](https://awscli.amazonaws.com/v2/documentation/api/latest/reference/transcribe/start-transcription-job.html) 指令的另一個範利,以及包含工作的自訂詞彙的請求主文。
```
aws transcribe start-transcription-job \
--region {{us-west-2}} \
--cli-input-json file://{{my-first-vocabulary-job}}.json
```
檔案 *my-first-vocabulary-job.json* 包含以下請求主文。
```
{
"TranscriptionJobName": "{{my-first-transcription-job}}",
"Media": {
"MediaFileUri": "s3://{{amzn-s3-demo-bucket}}/{{my-input-files}}/{{my-media-file}}.{{flac}}"
},
"OutputBucketName": "{{amzn-s3-demo-bucket}}",
"OutputKey": "{{my-output-files}}/",
"LanguageCode": "{{en-US}}",
"Settings": {
"VocabularyName": "{{my-first-vocabulary}}"
}
}
```
### 適用於 Python (Boto3) 的 AWS SDK
此範例使用 適用於 Python (Boto3) 的 AWS SDK 來包含自訂詞彙,並使用 [start\_transcription\_job](https://boto3.amazonaws.com/v1/documentation/api/latest/reference/services/transcribe.html#TranscribeService.Client.start_transcription_job) 方法的引`Settings`數。如需詳細資訊,請參閱 [https://docs.aws.amazon.com/transcribe/latest/APIReference/API_StartTranscriptionJob.html](https://docs.aws.amazon.com/transcribe/latest/APIReference/API_StartTranscriptionJob.html) 和 [https://docs.aws.amazon.com/transcribe/latest/APIReference/API_Settings.html](https://docs.aws.amazon.com/transcribe/latest/APIReference/API_Settings.html)。
如需使用 AWS SDKs 的其他範例,包括功能特定、案例和跨服務範例,請參閱 [Amazon Transcribe AWS SDKs的程式碼範例](service_code_examples.md)章節。
```
from __future__ import print_function
import time
import boto3
transcribe = boto3.client('transcribe', '{{us-west-2}}')
job_name = "{{my-first-transcription-job}}"
job_uri = "s3://{{amzn-s3-demo-bucket}}/{{my-input-files}}/{{my-media-file}}.{{flac}}"
transcribe.start_transcription_job(
TranscriptionJobName = job_name,
Media = {
'MediaFileUri': job_uri
},
OutputBucketName = '{{amzn-s3-demo-bucket}}',
OutputKey = '{{my-output-files}}/',
LanguageCode = '{{en-US}}',
Settings = {
'VocabularyName': '{{my-first-vocabulary}}'
}
)
while True:
status = transcribe.get_transcription_job(TranscriptionJobName = job_name)
if status['TranscriptionJob']['TranscriptionJobStatus'] in ['COMPLETED', 'FAILED']:
break
print("Not ready yet...")
time.sleep(5)
print(status)
```
## 在串流轉錄中使用自訂詞彙
若要將自訂詞彙與串流轉錄搭配使用,請參閱下列範例:
### AWS 管理主控台
1. 登入 [AWS 管理主控台](https://console.aws.amazon.com/transcribe/)。
1. 在導覽窗格中,選擇 **即時轉錄**。向下捲動至**自訂**,如果此欄位已最小化,請展開此欄位。
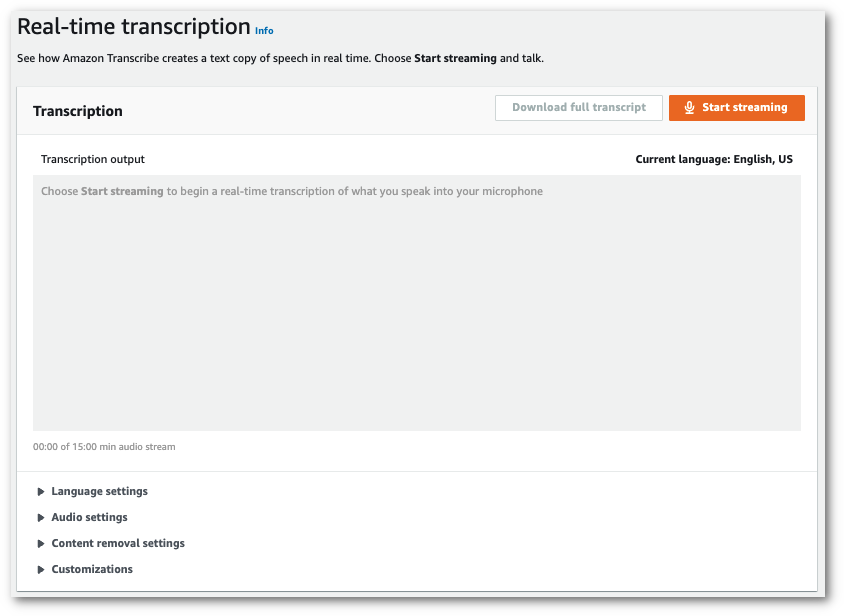
1. 切換 **自訂詞彙**,然後從下拉式選單中選擇自訂詞彙。

加入您要套用到串流的其他設定。
1. 您現在已準備好轉錄串流。選擇**開始串流**並開始說話。若要結束聽寫,選擇**停止串流**。
### HTTP/2 串流
此範例會建立包含您自訂詞彙的 HTTP/2 請求。如需搭配 HTTP/2 串流使用的詳細資訊 Amazon Transcribe,請參閱[設定 HTTP/2 串流](streaming-setting-up.md#streaming-http2)。如需 Amazon Transcribe特定參數和標頭的詳細資訊,請參閱 [https://docs.aws.amazon.com/transcribe/latest/APIReference/API_streaming_StartStreamTranscription.html](https://docs.aws.amazon.com/transcribe/latest/APIReference/API_streaming_StartStreamTranscription.html)。
```
POST /stream-transcription HTTP/2
host: transcribestreaming.{{us-west-2}}.amazonaws.com
X-Amz-Target: com.amazonaws.transcribe.Transcribe.{{StartStreamTranscription}}
Content-Type: application/vnd.amazon.eventstream
X-Amz-Content-Sha256: {{string}}
X-Amz-Date: {{20220208}}T{{235959}}Z
Authorization: AWS4-HMAC-SHA256 Credential={{access-key}}/{{20220208}}/{{us-west-2}}/transcribe/aws4_request, SignedHeaders=content-type;host;x-amz-content-sha256;x-amz-date;x-amz-target;x-amz-security-token, Signature={{string}}
x-amzn-transcribe-language-code: {{en-US}}
x-amzn-transcribe-media-encoding: {{flac}}
x-amzn-transcribe-sample-rate: {{16000}}
x-amzn-transcribe-vocabulary-name: {{my-first-vocabulary}}
transfer-encoding: chunked
```
您可以在 [API 參考](https://docs.aws.amazon.com/transcribe/latest/APIReference/API_Reference.html)中找到參數定義;所有 AWS API 操作常見的參數都列在[通用參數](https://docs.aws.amazon.com/transcribe/latest/APIReference/CommonParameters.html)區段中。
### WebSocket 串流
此範例會建立個預先簽署的 URL,將您的自訂詞彙套用至 WebSocket 串流。已加入分行符號以提高可讀性。如需搭配 WebSocket 串流使用的詳細資訊 Amazon Transcribe,請參閱 [設定 WebSocket 串流](streaming-setting-up.md#streaming-websocket)。如需參數詳細資訊,請參閱 [https://docs.aws.amazon.com/transcribe/latest/APIReference/API_streaming_StartStreamTranscription.html](https://docs.aws.amazon.com/transcribe/latest/APIReference/API_streaming_StartStreamTranscription.html)。
```
GET wss://transcribestreaming.{{us-west-2}}.amazonaws.com:8443/stream-transcription-websocket?
&X-Amz-Algorithm=AWS4-HMAC-SHA256
&X-Amz-Credential={{AKIAIOSFODNN7EXAMPLE}}%2F{{20220208}}%2F{{us-west-2}}%2F{{transcribe}}%2Faws4_request
&X-Amz-Date={{20220208}}T{{235959}}Z
&X-Amz-Expires={{300}}
&X-Amz-Security-Token={{security-token}}
&X-Amz-Signature={{string}}
&X-Amz-SignedHeaders=content-type%3Bhost%3Bx-amz-date
&language-code={{en-US}}
&media-encoding={{flac}}
&sample-rate={{16000}}
&vocabulary-name={{my-first-vocabulary}}
```
您可以在 [API 參考](https://docs.aws.amazon.com/transcribe/latest/APIReference/API_Reference.html)中找到參數定義;所有 AWS API 操作常用的參數都列在[通用參數](https://docs.aws.amazon.com/transcribe/latest/APIReference/CommonParameters.html)區段中。