本文為英文版的機器翻譯版本,如內容有任何歧義或不一致之處,概以英文版為準。
AWS 帳戶 使用 AFT 自動化新 的 Amazon VPC IPAM IPv4 CIDR 配置
Kien Pham 和 Alex Pazik,Amazon Web Services
總結
此模式說明如何 AWS 帳戶 使用 AWS Control Tower Account Factory for Terraform (AFT) 自動化新 的 Amazon VPC IP Address Manager (IPAM) IPv4 CIDR 配置。這是使用帳戶層級自訂來完成的,該自訂會使用 aft-account-customizations模組,將 IPv4 CIDR 區塊從 IPAM 配置到新的虛擬私有雲端 (VPC)。
使用 IPAM,您可以大規模組織、指派、監控和稽核 IP 地址,讓您輕鬆地規劃、追蹤和監控 AWS 工作負載的 IP 地址。您可以建立 IPAM 和 IPAM 集區,以在帳戶販賣程序期間用來將 IPv4 CIDR 區塊配置給新的 VPC。
先決條件和限制
先決條件
在支援的 AWS 區域和部署的 AFT 中 AWS Control Tower 啟用 AWS 帳戶 的作用中
支援的版本控制系統 (VCS) 供應商,例如 BitBucket、GitHub 和 GitHub Enterprise
已安裝 Terraform 命令列界面 (CLI)
執行期環境,您可以在其中執行安裝 AFT 的 Terraform 模組
AWS Command Line Interface (AWS CLI) 已安裝並設定
限制
產品版本
Architecture
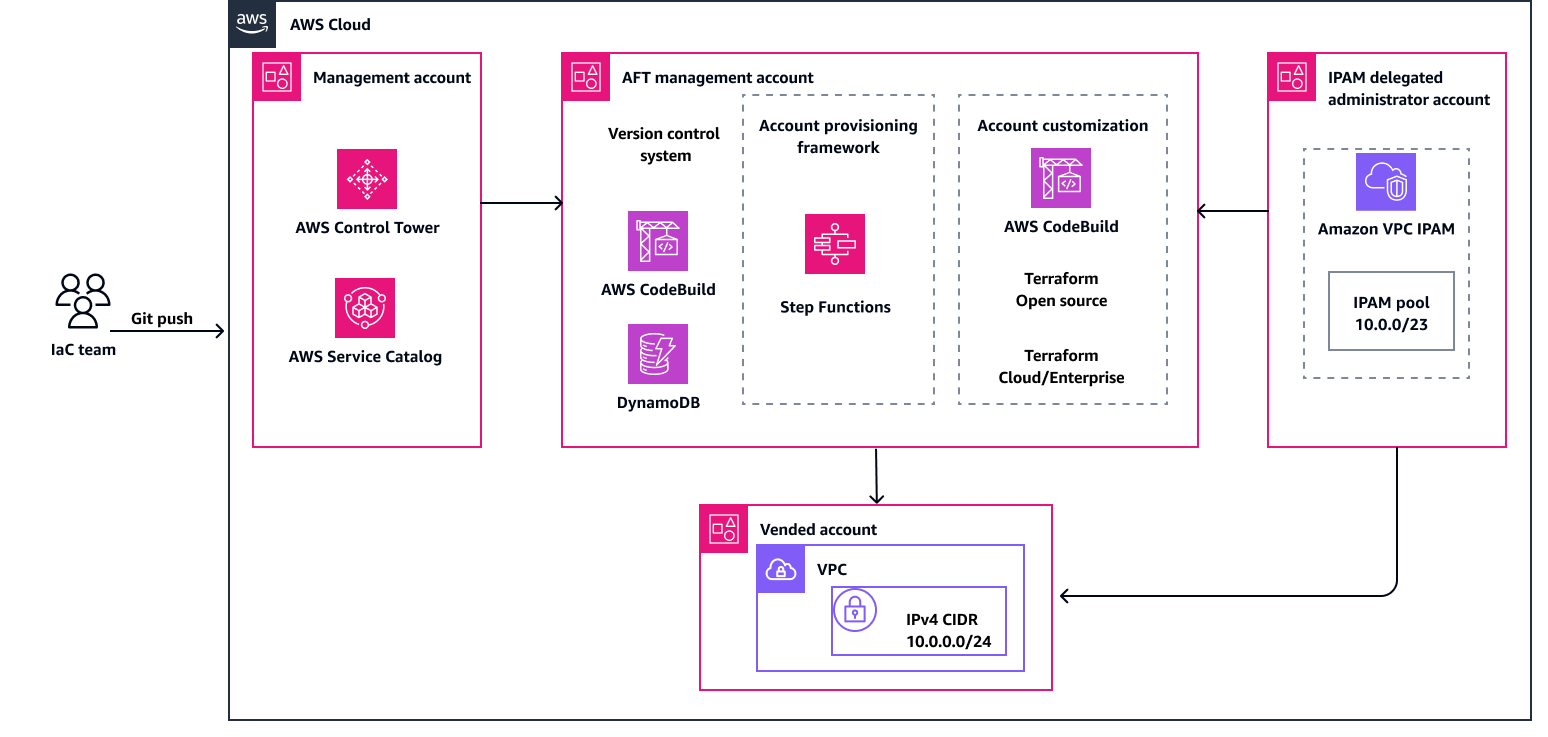
下圖顯示此模式的工作流程和元件。
工作流程包含下列主要任務:
觸發器變更 – Terraform 和 IPAM 自訂的變更會遞交至 GitHub 儲存庫並推送。此任務會自動觸發 AWS CodeBuild 管道。
自動化建置 – 在 CodeBuild 中,會觸發多個建置專案 AWS Step Functions。
套用自訂 – Step Functions 與 CodeBuild 協調,以規劃和套用 Terraform 變更。此任務使用 AFT Terraform 模組來協調 AWS 佈建帳戶的 IPAM 集區 IP 指派。
AWS 服務
其他工具
GitHub 是一種開發人員平台,開發人員可用來建立、存放、管理和共用程式碼。
HashiCorp Terraform 是一種基礎設施即程式碼 (IaC) 工具,可協助您建立和管理雲端和內部部署資源。這包括低階元件,例如運算執行個體、儲存和聯網,以及高階元件,例如 DNS 項目和軟體服務 (SaaS) 功能。
Python 是一種一般用途的電腦程式設計語言。您可以使用它在 上建置應用程式、自動化任務和開發服務AWS 雲端。
程式碼儲存庫
最佳實務
部署 AFT 時,建議您遵循最佳實務,以協助確保安全、有效率且成功的實作。實作和操作 AFT 的重要準則和建議包括下列項目:
徹底檢閱輸入 – 仔細檢閱並了解每個輸入。正確的輸入組態對於 AFT 的設定和運作至關重要。
定期範本更新 – 使用最新 AWS 功能和 Terraform 版本來更新範本。定期更新可協助您利用新功能並維護安全性。
版本控制 – 固定您的 AFT 模組版本,並盡可能使用個別的 AFT 部署進行測試。
範圍 – 僅使用 AFT 來部署基礎設施護欄和自訂。請勿使用它來部署您的應用程式。
內嵌和驗證 – AFT 管道需要內嵌和驗證的 Terraform 組態。在將組態推送至 AFT 儲存庫之前,執行 lint、驗證和測試。
Terraform 模組 – 建置可重複使用的 Terraform 程式碼做為模組,並一律指定 Terraform 和 AWS 提供者版本以符合組織的需求。
史詩
| 任務 | Description | 所需的技能 |
|---|
委派 IPAM 管理員。 | 若要委派 AWS 組織中的 IPAM 管理員帳戶,請使用下列步驟: 使用 AWS Organizations 管理帳戶,在 https://https://console.aws.amazon.com/ipam/ 開啟 IPAM 主控台。 在 中 AWS 管理主控台,選擇您要在 AWS 區域 其中使用 IPAM 的 。 在導覽窗格中,選擇 Organization settings (組織設定)。 選擇委派。委派選項只有在您以 AWS Organizations 管理帳戶身分登入 主控台時才能使用。 輸入 IPAM 帳戶的 AWS 帳戶 ID。IPAM 管理員必須位於 AWS Organizations 成員帳戶中。 選擇儲存變更。
或者,您可以使用 AWS CLI 並執行下列命令: aws ec2 enable-ipam-organization-admin-account \
--delegated-admin-account-id 012345678901
如需詳細資訊,請參閱《Amazon VPC 文件》中的將 IPAM 與 AWS 組織中的帳戶整合,以及《 AWS CLI 命令參考》中的 enable-ipam-organization-admin-account。 若要繼續使用 IPAM,您必須登入委派管理員帳戶。下一個步驟中指定的 SSO 設定檔或 AWS 環境變數必須允許您登入該帳戶,並授予建立 IPAM 頂層和區域集區的許可。 | AWS 管理員 |
建立 IPAM 頂層和區域集區。 | 此模式的 GitHub 儲存庫包含 Terraform 範本,可用來建立 IPAM 頂層集區和區域集區。然後,您可以使用 AWS Resource Access Manager () 與組織、組織單位 (OU) AWS 帳戶或其他資源共用集區AWS RAM。 使用下列步驟: 執行下列命令: # Navigate to the IPAM module
cd ipam/terraform
# Initiate the IPAM module
terraform init
開啟 main.tf 檔案,依照下列註解所述修改程式碼,然後儲存檔案。 terraform {
required_providers {
aws = {
source = "hashicorp/aws"
version = ">= 5.11.0, < 6.0.0"
}
}
}
provider "aws" {
region = "us-east-1" # Replace with the region to create your top-level pool
}
module "ipam" {
source = "aws-ia/ipam/aws"
version = ">= 2.1.0"
top_name = "my-top-level-pool" # Replace with your desired top-level pool name
top_description = "top-level pool" # Replace with your desired top-level level pool description
top_cidr = ["10.0.0.0/16"] # Replace with your desired top-level pool CIDR
pool_configurations = {
my-regional-pool = { # (Optional) Replace with a different resource name
name = "my-regional-pool" # Replace with your desired pool name
description = "regional pool" # Replace with your desired pool description
cidr = ["10.0.0.0/23"] # Replace with your desired pool CIDR
locale = "us-east-1" # Replace with your desired pool locale
ram_share_principals = ["arn:aws:organizations::012345678901:ou/ou-ab1c2de345/ou-ab1c2de345"] # Replace with your desired principal ARN to share with via Resource Access Manager (RAM)
}
}
}
output "my_regional_pool_id" {
description = "The ID of the regional pool"
value = module.ipam.pools_level_1["my-regional-pool"].id # Replace with your desired resource name if changed above
}
# Create the IPAM top-level and resource pool
terraform apply
記下建立後輸出的資源集區 ID。提交帳戶請求時,您將需要 ID。如果您忘記資源集區 ID,可以稍後從 取得 AWS 管理主控台。 請確定建立的集區 CIDRs 不會與您工作區域中的任何其他集區重疊。您可以在沒有 CIDR 的情況下建立集區,但是在為其佈建 CIDR 之前,您將無法使用集區進行配置。您可以隨時編輯集區,將 CIDR 新增至集區。 | AWS 管理員 |
| 任務 | Description | 所需的技能 |
|---|
開始建立帳戶自訂。 | 若要開始新的帳戶自訂,請從終端機執行下列命令: # Default name for customization repo
cd aft-account-customizations # Replace with your actual repo name if different than the default
mkdir -p APG-AFT-IPAM/terraform # Replace APG-AFT-IPAM with your desired customization name
cd APG-AFT-IPAM/terraform
| DevOps 工程師 |
建立 aft-providers.jinja 檔案。 | 將動態程式碼新增至 檔案aft-providers.jinja,指定要使用的 Terraform 後端和提供者。 使用下列步驟: 在 terraform目錄中建立新的aft-providers.jinja檔案。 開啟 檔案,新增下列程式碼,然後儲存檔案。 provider "aws" {
region = "{{ provider_region }}"
assume_role {
role_arn = "{{ target_admin_role_arn }}"
}
default_tags {
tags = {
managed_by = "AFT"
}
}
}
| DevOps 工程師 |
建立 backend.jinja 檔案。 | 將動態程式碼新增至 檔案backend.jinja,指定要使用的 Terraform 後端和提供者。 使用下列步驟: 在 terraform目錄中建立新的backend.jinja檔案。 開啟 檔案,新增下列程式碼,然後儲存檔案。 ## Auto generated backend.tf ##
## Updated on: {{ timestamp }} ##
{% if tf_distribution_type == "oss" -%}
terraform {
required_version = ">= {{ tf_version }}"
backend "s3" {
region = "{{ region }}"
bucket = "{{ bucket }}"
key = "{{ key }}"
dynamodb_table = "{{ dynamodb_table }}"
encrypt = "true"
kms_key_id = "{{ kms_key_id }}"
role_arn = "{{ aft_admin_role_arn }}"
}
}
{% else -%}
terraform {
backend "remote" {
organization = "{{ terraform_org_name }}"
workspaces {
name = "{{ terraform_workspace_name }}"
}
}
}
{% endif %}
| DevOps 工程師 |
建立 main.tf 檔案。 | 建立新的main.tf檔案並新增程式碼,以定義從 AWS Systems Manager (aws_ssm) 擷取兩個值並建立 VPC 的兩個資料來源。 使用下列步驟: 在 terraform目錄中建立新的main.tf檔案。 開啟 檔案,新增下列程式碼,然後儲存檔案。 # Define data sources
data "aws_ssm_parameter" "vpc_ipam_id" {
name = "/aft/account-request/custom-fields/vpc-ipam-id" # Value is defined in the account-request.tf file
}
data "aws_ssm_parameter" "vpc_netmask" {
name = "/aft/account-request/custom-fields/vpc-ipam-netmask" # Value is defined in the account-request.tf file
}
# Create new VPC
resource "aws_vpc" "vpc1" {
ipv4_ipam_pool_id = data.aws_ssm_parameter.vpc_ipam_id.value # Retrieved from SSM - this is how we integrate with IPAM
ipv4_netmask_length = data.aws_ssm_parameter.vpc_netmask.value # Retrieved from SSM
assign_generated_ipv6_cidr_block = var.enable_ipv6 ? true : null
ipv6_cidr_block = var.ipv6_cidr
ipv6_ipam_pool_id = var.ipv6_ipam_pool_id
ipv6_netmask_length = var.ipv6_netmask_length
ipv6_cidr_block_network_border_group = var.ipv6_cidr_block_network_border_group
instance_tenancy = var.instance_tenancy
enable_dns_hostnames = var.enable_dns_hostnames
enable_dns_support = var.enable_dns_support
enable_network_address_usage_metrics = var.enable_network_address_usage_metrics
tags = var.tags
lifecycle {
ignore_changes = [
tags, # Any changes made to VPC tags after creation will not be overwritten - remove to revert these changes during future 'terraform apply' operations
]
}
}
| DevOps 工程師 |
建立 variables.tf 檔案。 | 建立宣告 Terraform 模組所用變數variables.tf的檔案。 使用下列步驟: 在 terraform目錄中建立新的variables.tf檔案。 開啟 檔案,新增下列程式碼,然後儲存檔案。 # Copied from AWS VPC module
# https://github.com/terraform-aws-modules/terraform-aws-vpc/blob/master/variables.tf
variable "name" {
description = "Name to be used on all the resources as identifier"
type = string
default = ""
}
variable "enable_ipv6" {
description = "Requests an Amazon-provided IPv6 CIDR block with a /56 prefix length for the VPC. You cannot specify the range of IP addresses, or the size of the CIDR block"
type = bool
default = false
}
variable "ipv6_cidr" {
description = "(Optional) IPv6 CIDR block to request from an IPAM Pool. Can be set explicitly or derived from IPAM using `ipv6_netmask_length`"
type = string
default = null
}
variable "ipv6_ipam_pool_id" {
description = "(Optional) IPAM Pool ID for a IPv6 pool. Conflicts with `assign_generated_ipv6_cidr_block`"
type = string
default = null
}
variable "ipv6_netmask_length" {
description = "(Optional) Netmask length to request from IPAM Pool. Conflicts with `ipv6_cidr_block`. This can be omitted if IPAM pool as a `allocation_default_netmask_length` set. Valid values: `56`"
type = number
default = null
}
variable "ipv6_cidr_block_network_border_group" {
description = "By default when an IPv6 CIDR is assigned to a VPC a default ipv6_cidr_block_network_border_group will be set to the region of the VPC. This can be changed to restrict advertisement of public addresses to specific Network Border Groups such as LocalZones"
type = string
default = null
}
variable "instance_tenancy" {
description = "A tenancy option for instances launched into the VPC"
type = string
default = "default"
}
variable "enable_dns_hostnames" {
description = "Should be true to enable DNS hostnames in the VPC"
type = bool
default = true
}
variable "enable_dns_support" {
description = "Should be true to enable DNS support in the VPC"
type = bool
default = true
}
variable "enable_network_address_usage_metrics" {
description = "Determines whether network address usage metrics are enabled for the VPC"
type = bool
default = null
}
variable "tags" {
description = "A map of tags to add to all resources"
type = map(string)
default = {}
}
| DevOps 工程師 |
建立 terraform.tfvars 檔案。 | 建立 terraform.tfvars 檔案,定義傳遞至 main.tf 檔案的變數值。 使用下列步驟: 在 terraform目錄中建立新的terraform.tfvars檔案。 開啟 檔案,新增下列程式碼,然後儲存檔案。 name = "demo-ipam"
enable_ipv6 = false
enable_dns_hostnames = true
enable_dns_support = true
| DevOps 工程師 |
建立 outputs.tf 檔案。 | 建立新的outputs.tf檔案,公開 CodeBuild 中的一些值。 使用下列步驟: 在 terraform目錄中建立新的outputs.tf檔案。 開啟 檔案,新增下列程式碼,然後儲存檔案。 # Output VPC ID and ARN in CodeBuild
output "vpc1" {
description = "VPC 1 information"
value = {
id = try(aws_vpc.vpc1.id, null)
arn = try(aws_vpc.vpc1.arn, null)
}
}
| DevOps 工程師 |
遞交自訂項目。 | 若要將新的自訂遞交至帳戶自訂儲存庫,請執行下列命令: # Assumes you are still in the /terraform directory
cd .. # Skip if you are in the account customization root directory (APG-AFT-IPAM)
git add .
git commit -m "APG customization"
git push origin
| DevOps 工程師 |
套用自訂。 | 使用新建立的帳戶自訂,將程式碼新增至請求新帳戶的 account-requests.tf 檔案。自訂欄位會在使用正確 IPAM 配置的 IPv4 CIDR 建立 VPC 所需的付費帳戶中建立 Systems Manager 參數。 使用下列步驟: 從終端機導覽至 aft-account-request/terraform目錄。 開啟 account-requests.tf 檔案,使用值新增和修改下列程式碼,然後儲存檔案。 module "sandbox_account_01" {
source = "./modules/aft-account-request"
control_tower_parameters = {
AccountEmail = "john.doe@example.com"
AccountName = "sandbox-account-01"
# Syntax for top-level OU
ManagedOrganizationalUnit = "Sandbox"
# Syntax for nested OU
# ManagedOrganizationalUnit = "Sandbox (ou-xfe5-a8hb8ml8)"
SSOUserEmail = "john.doe@example.com"
SSOUserFirstName = "John"
SSOUserLastName = "Doe"
}
account_tags = {
"ABC:Owner" = "john.doe@example.com"
"ABC:Division" = "ENT"
"ABC:Environment" = "Dev"
"ABC:CostCenter" = "123456"
"ABC:Vended" = "true"
"ABC:DivCode" = "102"
"ABC:BUCode" = "ABC003"
"ABC:Project" = "123456"
}
change_management_parameters = {
change_requested_by = "John Doe"
change_reason = "testing the account vending process"
}
custom_fields = {
vpc-ipam-id = "ipam-pool-123456ab789041cd2"
vpc-ipam-netmask = "24"
}
account_customizations_name = "APG-AFT-IPAM" # Do not change this value
}
請確定該vpc-ipam-netmask值小於或等於 IPAM 集區配置 netmask,且 IPAM 集區中有足夠的 IPs 可配置給 VPC。 若要將新帳戶遞交至帳戶請求儲存庫,請使用下列命令: git add .
git commit -m 'requested APG account'
git push origin
| AWS DevOps |
驗證自訂。 | 登入新付費帳戶並確認已成功套用自訂。 使用下列步驟: 開啟 AWS IAM Identity Center 您的登入頁面,並以您在 account-requests.tf 檔案中指定的使用者身分進行驗證。 從 IAM Identity Center 帳戶清單中,選擇您先前提供的帳戶,並使用 AWS AdministratorAccess角色登入。 導覽至 VPC 主控台,然後選取您的 VPCs。 選取您剛建立之 VPC 的 VPC ID。 選擇 CIDRs 索引標籤。您應該會看到 IPAM 配置的 IPv4 CIDR。 (選用) 登入您的 IPAM 委派管理員帳戶,並確認配置顯示在 IPAM 主控台中。
| DevOps 工程師 |
疑難排解
| 問題 | 解決方案 |
|---|
由於許可不足,您在資源建立或管理時遇到失敗。 | 檢閱連接到 Step Functions、CodeBuild 和部署所涉及其他服務的 AWS Identity and Access Management (IAM) 角色和政策。確認他們具有必要的許可。如果有許可問題,請調整 IAM 政策以授予必要的存取權。 |
您在部署期間達到 AWS 服務 配額。 | 部署管道之前,請檢查 資源的配額,例如 Amazon Simple Storage Service AWS 服務 (Amazon S3) 儲存貯體、IAM 角色和 AWS Lambda 函數。如有必要,請求增加配額。如需詳細資訊,請參閱《AWS 一般參考》中的AWS 服務 配額。 |
相關資源
AWS 服務 文件
其他資源