本文為英文版的機器翻譯版本,如內容有任何歧義或不一致之處,概以英文版為準。
教學課程: AWS Lambda 搭配 Amazon DocumentDB Streams 使用
在本教學課程中,您將建立一個基礎 Lambda 函數,它會從 Amazon DocumentDB (with MongoDB compatibility) 變更串流中取用事件。完成本教學課程需逐一進行以下階段:
-
設定您的 Amazon DocumentDB 叢集、連線到叢集,然後在叢集上啟用變更串流。
-
建立 Lambda 函數,並將 Amazon DocumentDB 叢集設定為函數的事件來源。
-
將項目插入 Amazon DocumentDB 資料庫中,即可測試設定。
建立 Amazon DocumentDB 叢集
-
開啟 Amazon DocumentDB 主控台。在叢集下,選擇建立。
-
使用下列組態建立叢集:
-
在叢集類型欄位中,選擇執行個體型叢集。此為預設選項。
-
在叢集組態欄位中,確保已選取引擎版本 5.0.0。此為預設選項。
-
在執行個體組態欄位中:
-
在身分驗證欄位中,輸入主要使用者的使用者名稱,然後選擇自我管理。輸入密碼,然後進行確認。
-
請保留所有其他預設設定。
-
選擇 Create Cluster (建立叢集)。
在 Secrets Manager 中建立密碼
當 Amazon DocumentDB 正在建立叢集時,請建立 AWS Secrets Manager 秘密來存放資料庫登入資料。在後續步驟中建立 Lambda 事件來源映射時,您需要提供此秘密。
在 Secrets Manager 中建立密碼
-
開啟 Secrets Manager 主控台,並選擇儲存新密碼。
-
針對選擇密碼類型,選擇以下選項:
-
在基本詳細資訊下:
-
密碼類型:Amazon DocumentDB 資料庫的憑證
-
在憑證欄位中,輸入用於建立 Amazon DocumentDB 叢集的相同使用者名稱與密碼。
-
資料庫:選擇您的 Amazon DocumentDB 叢集。
-
選擇下一步。
-
針對設定密碼,選擇下列選項:
-
秘密名稱:DocumentDBSecret
-
選擇下一步。
-
選擇下一步。
-
選擇儲存。
-
重新整理主控台以確認您已成功儲存 DocumentDBSecret 密碼。
請記錄秘密 ARN。在後續步驟中需要它。
連線至叢集
使用 連線至您的 Amazon DocumentDB 叢集 AWS CloudShell
-
在 Amazon DocumentDB 管理主控台的叢集下,找到已建立的叢集。按一下叢集旁的核取方塊,選擇對應叢集。
-
選擇連線至叢集。CloudShell 執行命令畫面隨即顯示。
-
在新增環境名稱欄位中,輸入唯一名稱 (例如 "test"),然後選擇建立並執行。
-
出現提示時,輸入您的密碼。當提示變為 rs0 [direct: primary] <env-name>>,表示已成功連線至 Amazon DocumentDB 叢集。
啟用變更串流
在本教學課程中,您將追蹤 Amazon DocumentDB 叢集中 docdbdemo 資料庫 products 集合的變更。可以透過啟用變更串流來完成此操作。
在叢集內建立新資料庫
-
執行下列命令,建立名為 docdbdemo 的新資料庫:
use docdbdemo
-
在終端機視窗中,使用下列命令將記錄插入 docdbdemo:
db.products.insertOne({"hello":"world"})
您應該會看到如下所示的輸出:
{
  acknowledged: true,
  insertedId: ObjectId('67f85066ca526410fd531d59')
}
-
接下來,使用以下命令在 docdbdemo 資料庫的 products 集合上啟用變更串流:
db.adminCommand({modifyChangeStreams: 1,
    database: "docdbdemo",
    collection: "products",
    enable: true});
您應該會看到類似下面的輸出:
{ "ok" : 1, "operationTime" : Timestamp(1680126165, 1) }
建立介面 VPC 端點
接下來,建立介面 VPC 端點,以確保 Lambda 和 Secrets Manager (稍後用來儲存我們的叢集存取憑證) 可以連線到您的預設 VPC。
建立介面 VPC 端點
-
開啟 VPC 主控台。在左側選單的虛擬私有雲端下,選擇端點。
-
選擇建立端點。使用下列組態建立端點:
-
針對名稱標籤,輸入 lambda-default-vpc。
-
針對服務類別,選擇 AWS 服務。
-
針對服務,在搜尋方塊中輸入 lambda。選擇格式為 com.amazonaws.<region>.lambda 的服務。
-
在 VPC 欄位中,選擇 Amazon DocumentDB 叢集所在的 VPC。這通常是預設 VPC。
-
針對子網路,請核取每個可用區域旁邊的方塊。請選擇每個可用區域的正確子網路。
-
針對 IP 地址類型,請選擇 IPv4。
-
在安全群組欄位中,選擇 Amazon DocumentDB 叢集所使用的安全群組。這通常是 default 安全群組。
-
請保留所有其他預設設定。
-
選擇建立端點。
-
再次選擇建立端點。使用下列組態建立端點:
-
針對名稱標籤,輸入 secretsmanager-default-vpc。
-
針對服務類別,選擇 AWS 服務。
-
針對服務,在搜尋方塊中輸入 secretsmanager。選擇格式為 com.amazonaws.<region>.secretsmanager 的服務。
-
在 VPC 欄位中,選擇 Amazon DocumentDB 叢集所在的 VPC。這通常是預設 VPC。
-
針對子網路,請核取每個可用區域旁邊的方塊。請選擇每個可用區域的正確子網路。
-
針對 IP 地址類型,請選擇 IPv4。
-
在安全群組欄位中,選擇 Amazon DocumentDB 叢集所使用的安全群組。這通常是 default 安全群組。
-
請保留所有其他預設設定。
-
選擇建立端點。
這就完成了本教學課程的叢集設定部分。
建立執行角色
在接下來的一組步驟中,您將建立 Lambda 函數。首先,您需要建立授予函數存取叢集許可的執行角色。您可先建立 IAM 政策,然後將此政策連接到 IAM 角色。
建立 IAM 政策
-
開啟 IAM 主控台的政策頁面,並選擇建立政策。
-
選擇 JSON 標籤。在下列政策中,將陳述式最後一行中的 Secrets Manager 資源 ARN 取代為先前的密碼 ARN,並將政策複製到編輯器中。
- JSON
-
-
{
    "Version":"2012-10-17",
    "Statement": [
        {
            "Sid": "LambdaESMNetworkingAccess",
            "Effect": "Allow",
            "Action": [
                "ec2:CreateNetworkInterface",
                "ec2:DescribeNetworkInterfaces",
                "ec2:DescribeVpcs",
                "ec2:DeleteNetworkInterface",
                "ec2:DescribeSubnets",
                "ec2:DescribeSecurityGroups",
                "kms:Decrypt"
            ],
            "Resource": "*"
        },
        {
            "Sid": "LambdaDocDBESMAccess",
            "Effect": "Allow",
            "Action": [
                "rds:DescribeDBClusters",
                "rds:DescribeDBClusterParameters",
                "rds:DescribeDBSubnetGroups"
            ],
            "Resource": "*"
        },
        {
            "Sid": "LambdaDocDBESMGetSecretValueAccess",
            "Effect": "Allow",
            "Action": [
                "secretsmanager:GetSecretValue"
            ],
            "Resource": "arn:aws:secretsmanager:us-east-1:123456789012:secret:DocumentDBSecret"
        }
    ]
}
-
選擇下一步:標籤,然後選擇下一步:檢閱。
-
對於 Name (名稱),輸入 AWSDocumentDBLambdaPolicy。
-
選擇建立政策。
建立 IAM 角色
-
開啟 IAM 主控台的角色頁面,然後選擇建立角色。
-
針對選取信任的實體,請選擇以下選項:
-
信任的實體類型: AWS 服務
-
服務或使用案例:Lambda
-
選擇下一步。
-
針對新增許可,請選擇您剛建立的 AWSDocumentDBLambdaPolicy 政策以及 AWSLambdaBasicExecutionRole,授予函數寫入 Amazon CloudWatch Logs 的許可。
-
選擇下一步。
-
在角色名稱中,輸入 AWSDocumentDBLambdaExecutionRole。
-
選擇建立角色。
建立 Lambda 函式
本教學課程使用 Python 3.14 執行時間,但我們也提供其他執行時間的範例程式碼檔案。您可以在下列方塊中選取索引標籤,查看您感興趣的執行期程式碼。
程式碼會接收 Amazon DocumentDB 事件輸入,並處理其包含的訊息。
建立 Lambda 函數
-
開啟 Lambda 主控台中的函數頁面。
-
選擇建立函數。
-
選擇從頭開始撰寫
-
在基本資訊下,請執行下列動作:
-
在函數名稱輸入 ProcessDocumentDBRecords
-
針對執行期,選擇 Python 3.14。
-
對於 Architecture (架構),選擇 x86_64。
-
在變更預設執行角色索引標籤中,執行下列操作:
-
展開索引標籤,然後選擇使用現有角色。
-
選擇您之前建立的 AWSDocumentDBLambdaExecutionRole。
-
選擇建立函數。
部署函數程式碼
-
在以下方塊中選擇 Python 索引標籤,然後複製程式碼。
- .NET
-
- 適用於 .NET 的 SDK
-
GitHub 上提供更多範例。尋找完整範例,並了解如何在無伺服器範例儲存庫中設定和執行。
使用 .NET 搭配 Lambda 使用 Amazon DocumentDB 事件。
using Amazon.Lambda.Core;
using System.Text.Json;
using System;
using System.Collections.Generic;
using System.Text.Json.Serialization;
//Assembly attribute to enable the Lambda function's JSON input to be converted into a .NET class.
[assembly: LambdaSerializer(typeof(Amazon.Lambda.Serialization.SystemTextJson.DefaultLambdaJsonSerializer))]

namespace LambdaDocDb;

public class Function
{

     /// <summary>
    /// Lambda function entry point to process Amazon DocumentDB events.
    /// </summary>
    /// <param name="event">The Amazon DocumentDB event.</param>
    /// <param name="context">The Lambda context object.</param>
    /// <returns>A string to indicate successful processing.</returns>
    public string FunctionHandler(Event evnt, ILambdaContext context)
    {

        foreach (var record in evnt.Events)
        {
            ProcessDocumentDBEvent(record, context);
        }

        return "OK";
    }

     private void ProcessDocumentDBEvent(DocumentDBEventRecord record, ILambdaContext context)
    {

        var eventData = record.Event;
        var operationType = eventData.OperationType;
        var databaseName = eventData.Ns.Db;
        var collectionName = eventData.Ns.Coll;
        var fullDocument = JsonSerializer.Serialize(eventData.FullDocument, new JsonSerializerOptions { WriteIndented = true });

        context.Logger.LogLine($"Operation type: {operationType}");
        context.Logger.LogLine($"Database: {databaseName}");
        context.Logger.LogLine($"Collection: {collectionName}");
        context.Logger.LogLine($"Full document:\n{fullDocument}");
    }


    public class Event
    {
        [JsonPropertyName("eventSourceArn")]
        public string EventSourceArn { get; set; }

        [JsonPropertyName("events")]
        public List<DocumentDBEventRecord> Events { get; set; }

        [JsonPropertyName("eventSource")]
        public string EventSource { get; set; }
    }

    public class DocumentDBEventRecord
    {
        [JsonPropertyName("event")]
        public EventData Event { get; set; }
    }

    public class EventData
    {
        [JsonPropertyName("_id")]
        public IdData Id { get; set; }

        [JsonPropertyName("clusterTime")]
        public ClusterTime ClusterTime { get; set; }

        [JsonPropertyName("documentKey")]
        public DocumentKey DocumentKey { get; set; }

        [JsonPropertyName("fullDocument")]
        public Dictionary<string, object> FullDocument { get; set; }

        [JsonPropertyName("ns")]
        public Namespace Ns { get; set; }

        [JsonPropertyName("operationType")]
        public string OperationType { get; set; }
    }

    public class IdData
    {
        [JsonPropertyName("_data")]
        public string Data { get; set; }
    }

    public class ClusterTime
    {
        [JsonPropertyName("$timestamp")]
        public Timestamp Timestamp { get; set; }
    }

    public class Timestamp
    {
        [JsonPropertyName("t")]
        public long T { get; set; }

        [JsonPropertyName("i")]
        public int I { get; set; }
    }

    public class DocumentKey
    {
        [JsonPropertyName("_id")]
        public Id Id { get; set; }
    }

    public class Id
    {
        [JsonPropertyName("$oid")]
        public string Oid { get; set; }
    }

    public class Namespace
    {
        [JsonPropertyName("db")]
        public string Db { get; set; }

        [JsonPropertyName("coll")]
        public string Coll { get; set; }
    }
}
- Go
-
- SDK for Go V2
-
GitHub 上提供更多範例。尋找完整範例,並了解如何在無伺服器範例儲存庫中設定和執行。
使用 Go 搭配 Lambda 使用 Amazon DocumentDB 事件。
package main

import (
	"context"
	"encoding/json"
	"fmt"

	"github.com/aws/aws-lambda-go/lambda"
)

type Event struct {
	Events []Record `json:"events"`
}

type Record struct {
	Event struct {
		OperationType string `json:"operationType"`
		NS            struct {
			DB   string `json:"db"`
			Coll string `json:"coll"`
		} `json:"ns"`
		FullDocument interface{} `json:"fullDocument"`
	} `json:"event"`
}

func main() {
	lambda.Start(handler)
}

func handler(ctx context.Context, event Event) (string, error) {
	fmt.Println("Loading function")
	for _, record := range event.Events {
		logDocumentDBEvent(record)
	}

	return "OK", nil
}

func logDocumentDBEvent(record Record) {
	fmt.Printf("Operation type: %s\n", record.Event.OperationType)
	fmt.Printf("db: %s\n", record.Event.NS.DB)
	fmt.Printf("collection: %s\n", record.Event.NS.Coll)
	docBytes, _ := json.MarshalIndent(record.Event.FullDocument, "", "  ")
	fmt.Printf("Full document: %s\n", string(docBytes))
}
- Java
-
- SDK for Java 2.x
-
GitHub 上提供更多範例。尋找完整範例,並了解如何在無伺服器範例儲存庫中設定和執行。
使用 Java 搭配 Lambda 使用 Amazon DocumentDB 事件。
import java.util.List;
import java.util.Map;

import com.amazonaws.services.lambda.runtime.Context;
import com.amazonaws.services.lambda.runtime.RequestHandler;

public class Example implements RequestHandler<Map<String, Object>, String> {

    @SuppressWarnings("unchecked")
    @Override
    public String handleRequest(Map<String, Object> event, Context context) {
        List<Map<String, Object>> events = (List<Map<String, Object>>) event.get("events");
        for (Map<String, Object> record : events) {
            Map<String, Object> eventData = (Map<String, Object>) record.get("event");
            processEventData(eventData);
        }

        return "OK";
    }

    @SuppressWarnings("unchecked")
    private void processEventData(Map<String, Object> eventData) {
        String operationType = (String) eventData.get("operationType");
        System.out.println("operationType: %s".formatted(operationType));

        Map<String, Object> ns = (Map<String, Object>) eventData.get("ns");

        String db = (String) ns.get("db");
        System.out.println("db: %s".formatted(db));
        String coll = (String) ns.get("coll");
        System.out.println("coll: %s".formatted(coll));

        Map<String, Object> fullDocument = (Map<String, Object>) eventData.get("fullDocument");
        System.out.println("fullDocument: %s".formatted(fullDocument));
    }

}
- JavaScript
-
- 適用於 JavaScript (v3) 的 SDK
-
GitHub 上提供更多範例。尋找完整範例,並了解如何在無伺服器範例儲存庫中設定和執行。
使用 JavaScript 搭配 Lambda 使用 Amazon DocumentDB 事件。
console.log('Loading function');
exports.handler = async (event, context) => {
    event.events.forEach(record => {
        logDocumentDBEvent(record);
    });
    return 'OK';
};

const logDocumentDBEvent = (record) => {
    console.log('Operation type: ' + record.event.operationType);
    console.log('db: ' + record.event.ns.db);
    console.log('collection: ' + record.event.ns.coll);
    console.log('Full document:', JSON.stringify(record.event.fullDocument, null, 2));
};
使用 TypeScript 搭配 Lambda 使用 Amazon DocumentDB 事件
import { DocumentDBEventRecord, DocumentDBEventSubscriptionContext } from 'aws-lambda';

console.log('Loading function');

export const handler = async (
  event: DocumentDBEventSubscriptionContext,
  context: any
): Promise<string> => {
  event.events.forEach((record: DocumentDBEventRecord) => {
    logDocumentDBEvent(record);
  });
  return 'OK';
};

const logDocumentDBEvent = (record: DocumentDBEventRecord): void => {
  console.log('Operation type: ' + record.event.operationType);
  console.log('db: ' + record.event.ns.db);
  console.log('collection: ' + record.event.ns.coll);
  console.log('Full document:', JSON.stringify(record.event.fullDocument, null, 2));
};
- PHP
-
- 適用於 PHP 的 SDK
-
GitHub 上提供更多範例。尋找完整範例,並了解如何在無伺服器範例儲存庫中設定和執行。
使用 PHP 搭配 Lambda 使用 Amazon DocumentDB 事件。
<?php

require __DIR__.'/vendor/autoload.php';

use Bref\Context\Context;
use Bref\Event\Handler;

class DocumentDBEventHandler implements Handler
{
    public function handle($event, Context $context): string
    {

        $events = $event['events'] ?? [];
        foreach ($events as $record) {
            $this->logDocumentDBEvent($record['event']);
        }
        return 'OK';
    }

    private function logDocumentDBEvent($event): void
    {
        // Extract information from the event record

        $operationType = $event['operationType'] ?? 'Unknown';
        $db = $event['ns']['db'] ?? 'Unknown';
        $collection = $event['ns']['coll'] ?? 'Unknown';
        $fullDocument = $event['fullDocument'] ?? [];

        // Log the event details

        echo "Operation type: $operationType\n";
        echo "Database: $db\n";
        echo "Collection: $collection\n";
        echo "Full document: " . json_encode($fullDocument, JSON_PRETTY_PRINT) . "\n";
    }
}
return new DocumentDBEventHandler();
- Python
-
- 適用於 Python 的 SDK (Boto3)
-
GitHub 上提供更多範例。尋找完整範例,並了解如何在無伺服器範例儲存庫中設定和執行。
使用 Python 搭配 Lambda 使用 Amazon DocumentDB 事件。
import json

def lambda_handler(event, context):
    for record in event.get('events', []):
        log_document_db_event(record)
    return 'OK'

def log_document_db_event(record):
    event_data = record.get('event', {})
    operation_type = event_data.get('operationType', 'Unknown')
    db = event_data.get('ns', {}).get('db', 'Unknown')
    collection = event_data.get('ns', {}).get('coll', 'Unknown')
    full_document = event_data.get('fullDocument', {})

    print(f"Operation type: {operation_type}")
    print(f"db: {db}")
    print(f"collection: {collection}")
    print("Full document:", json.dumps(full_document, indent=2))
- Ruby
-
- SDK for Ruby
-
GitHub 上提供更多範例。尋找完整範例,並了解如何在無伺服器範例儲存庫中設定和執行。
使用 Ruby 搭配 Lambda 使用 Amazon DocumentDB 事件。
require 'json'

def lambda_handler(event:, context:)
  event['events'].each do |record|
    log_document_db_event(record)
  end
  'OK'
end

def log_document_db_event(record)
  event_data = record['event'] || {}
  operation_type = event_data['operationType'] || 'Unknown'
  db = event_data.dig('ns', 'db') || 'Unknown'
  collection = event_data.dig('ns', 'coll') || 'Unknown'
  full_document = event_data['fullDocument'] || {}

  puts "Operation type: #{operation_type}"
  puts "db: #{db}"
  puts "collection: #{collection}"
  puts "Full document: #{JSON.pretty_generate(full_document)}"
end
- Rust
-
- 適用於 Rust 的 SDK
-
GitHub 上提供更多範例。尋找完整範例,並了解如何在無伺服器範例儲存庫中設定和執行。
使用 Rust 搭配 Lambda 使用 Amazon DocumentDB 事件。
use lambda_runtime::{service_fn, tracing, Error, LambdaEvent};
use aws_lambda_events::{
    event::documentdb::{DocumentDbEvent, DocumentDbInnerEvent},
   };


// Built with the following dependencies:
//lambda_runtime = "0.11.1"
//serde_json = "1.0"
//tokio = { version = "1", features = ["macros"] }
//tracing = { version = "0.1", features = ["log"] }
//tracing-subscriber = { version = "0.3", default-features = false, features = ["fmt"] }
//aws_lambda_events = "0.15.0"

async fn function_handler(event: LambdaEvent<DocumentDbEvent>) ->Result<(), Error> {

    tracing::info!("Event Source ARN: {:?}", event.payload.event_source_arn);
    tracing::info!("Event Source: {:?}", event.payload.event_source);

    let records = &event.payload.events;

    if records.is_empty() {
        tracing::info!("No records found. Exiting.");
        return Ok(());
    }

    for record in records{
        log_document_db_event(record);
    }

    tracing::info!("Document db records processed");

    // Prepare the response
    Ok(())

}

fn log_document_db_event(record: &DocumentDbInnerEvent)-> Result<(), Error>{
    tracing::info!("Change Event: {:?}", record.event);

    Ok(())

}

#[tokio::main]
async fn main() -> Result<(), Error> {
    tracing_subscriber::fmt()
    .with_max_level(tracing::Level::INFO)
    .with_target(false)
    .without_time()
    .init();

    let func = service_fn(function_handler);
    lambda_runtime::run(func).await?;
    Ok(())

}
-
在 Lambda 主控台的程式碼來源窗格中,將程式碼貼到程式碼編輯器中,取代 Lambda 建立的程式碼。
-
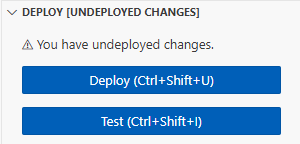
在 DEPLOY 區段中,選擇部署以更新函數的程式碼:
建立 Lambda 事件來源映射
建立可將 Amazon DocumentDB 變更串流與 Lambda 函數建立關聯的事件來源映射。建立此事件來源映射之後, 會 AWS Lambda 立即開始輪詢串流。
建立事件來源映射
-
開啟 Lambda 主控台中的函數頁面。
-
選擇您之前建立的 ProcessDocumentDBRecords 函數。
-
選擇組態索引標籤,然後選擇左側功能表中的觸發程序。
-
選擇 Add trigger (新增觸發條件)。
-
在觸發條件組態下,針對來源選取 Amazon DocumentDB。
-
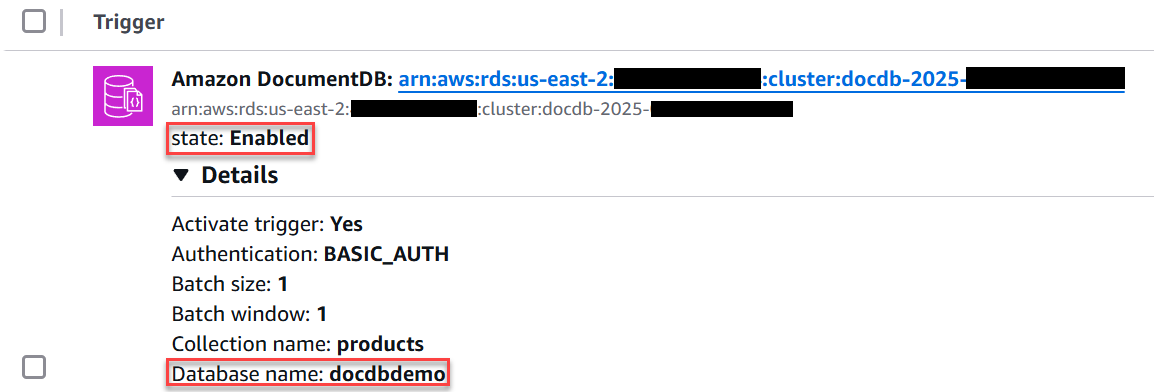
使用下列組態建立事件來源映射:
-
選擇新增。建立事件來源映射可能需要幾分鐘的時間。
測試 函數
等待事件來源映射進入已啟用狀態。這可能需要幾分鐘的時間。接著,透過插入、更新和刪除資料庫記錄來測試端對端設定。開始之前:
將記錄插入到 docdbdemo 資料庫的 products 集合中:
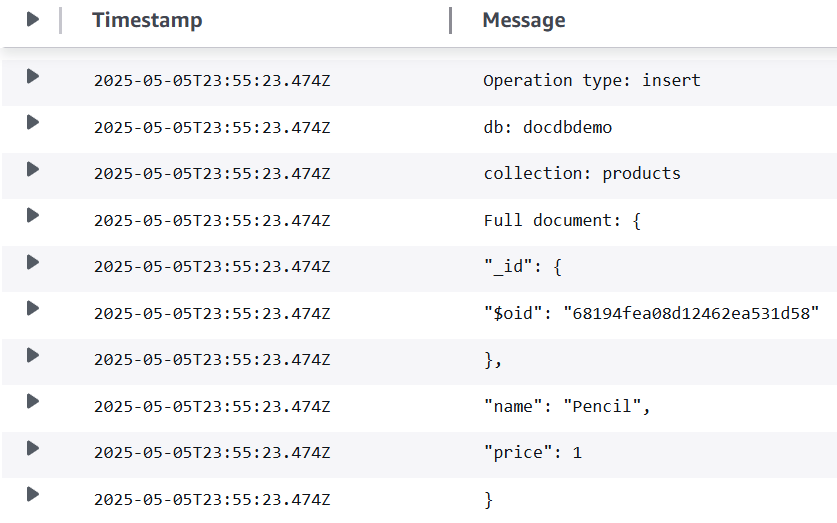
db.products.insertOne({"name":"Pencil", "price": 1.00})
透過檢查 CloudWatch Logs,確認函式已成功處理此事件。您應該會看到如下所示的日誌項目:
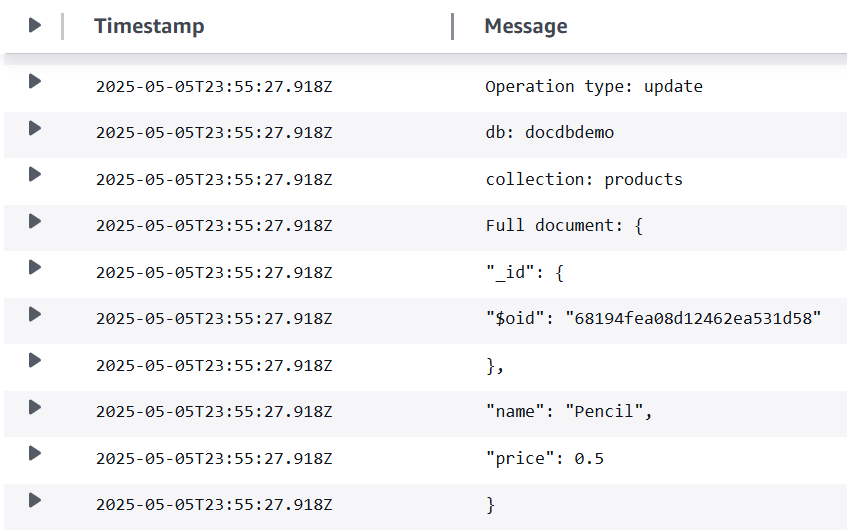
使用下列命令更新剛剛插入的記錄:
db.products.updateOne(
    { "name": "Pencil" },
    { $set: { "price": 0.50 }}
)
透過檢查 CloudWatch Logs,確認函式已成功處理此事件。您應該會看到如下所示的日誌項目:
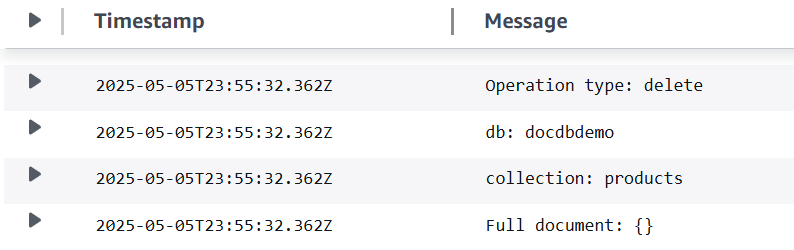
使用下列命令刪除剛剛更新的記錄:
db.products.deleteOne( { "name": "Pencil" } )
透過檢查 CloudWatch Logs,確認函式已成功處理此事件。您應該會看到如下所示的日誌項目:
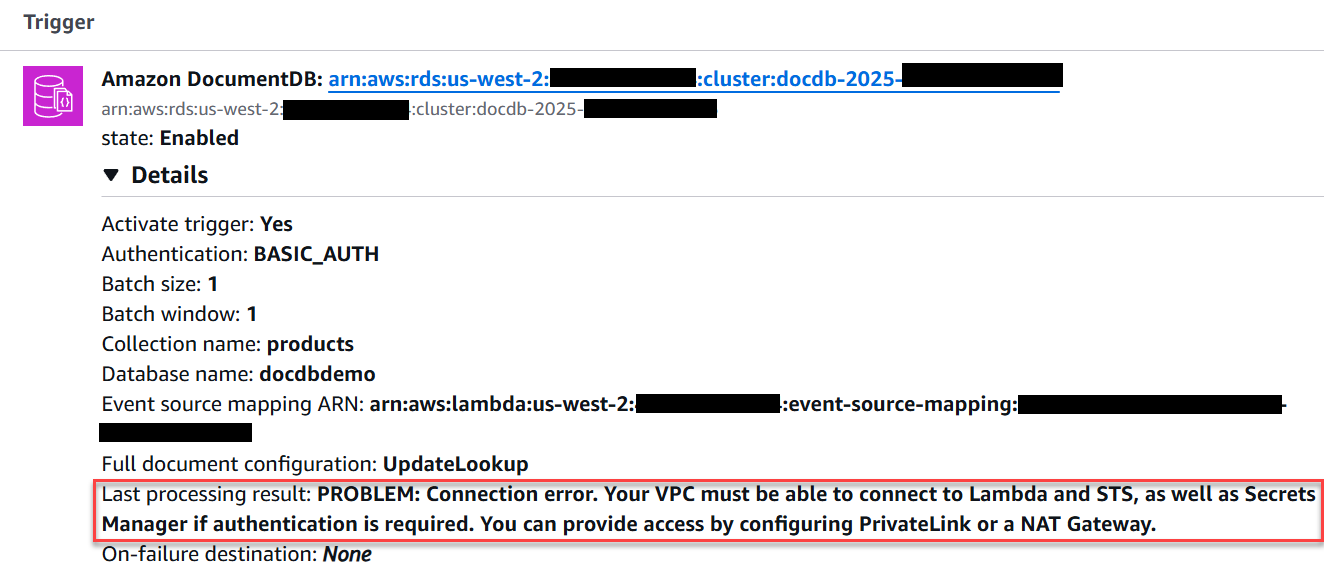
疑難排解
若未在函式的 CloudWatch 日誌中看到任何資料庫事件,請檢查下列項目:
清除您的資源
除非您想要保留為此教學課程建立的資源,否則您現在便可刪除。透過刪除您不再使用的 AWS
資源,可為 AWS 帳戶避免不必要的費用。
若要刪除 Lambda 函數
-
開啟 Lambda 主控台中的 函數頁面。
-
選擇您建立的函數。
-
選擇 Actions (動作)、Delete (刪除)。
-
在文字輸入欄位中輸入 confirm,然後選擇刪除。
刪除執行角色
-
開啟 IAM 主控台中的 角色頁面 。
-
選取您建立的執行角色。
-
選擇刪除。
-
在文字輸入欄位中輸入角色的名稱,然後選擇刪除。
刪除 VPC 端點。
-
開啟 VPC 主控台。在左側選單的虛擬私有雲端下,選擇端點。
-
選擇您建立的端點。
-
選擇 Actions (動作)、Delete VPC endpoints (刪除 VPC 端點)。
-
在文字輸入欄位中輸入 delete。
-
選擇 刪除。
刪除 Amazon DocumentDB 叢集
-
開啟 Amazon DocumentDB 主控台。
-
選擇您為本教學課程建立的 Amazon DocumentDB 叢集,並停用刪除保護。
-
在主叢集頁面中,再次選擇您的 Amazon DocumentDB 叢集。
-
選擇 動作、刪除。
-
針對建立最終叢集快照,請選取否。
-
在文字輸入欄位中輸入 delete。
-
選擇 刪除。
在 Secrets Manager 中刪除密碼
-
開啟 Secrets Manager 主控台。
-
選擇您為此教學課程建立的密碼。
-
選擇動作、刪除機密。
-
選擇 Schedule deletion (排定刪除)。