AWS Systems Manager Incident Manager 不再開放給新客戶。現有客戶可以繼續正常使用該服務。如需詳細資訊,請參閱[AWS Systems Manager Incident Manager 可用性變更](https://docs.aws.amazon.com/incident-manager/latest/userguide/incident-manager-availability-change.html)。
本文為英文版的機器翻譯版本,如內容有任何歧義或不一致之處,概以英文版為準。
# 教學課程:搭配 Incident Manager 使用 Systems Manager Automation Runbook
您可以使用 [AWS Systems Manager Automation](https://docs.aws.amazon.com/systems-manager/latest/userguide/systems-manager-automation.html) Runbook 來簡化 AWS 服務的常見維護、部署和修復任務。在本教學課程中,您將建立自訂 Runbook,以在 Incident Manager 中自動化事件回應。本教學課程的案例涉及指派給 Amazon EC2 指標的 Amazon CloudWatch 警示。 Amazon EC2 當執行個體進入觸發警示的狀態時,Incident Manager 會自動執行下列任務:
1. 在 Incident Manager 中建立事件。
1. 啟動 Runbook,嘗試修復問題。
1. 將 Runbook 結果發佈至 Incident Manager 中的事件詳細資訊頁面。
本教學中描述的程序也可以與 Amazon EventBridge 事件和其他類型的 AWS 資源搭配使用。透過自動化對警示和事件的修補回應,您可以減少事件對組織及其資源的影響。
本教學課程說明如何編輯指派給 Incident Manager 回應計劃的 Amazon EC2 執行個體的 CloudWatch 警示。如果您沒有設定警示、執行個體或回應計劃,建議您在開始之前設定這些資源。如需詳細資訊,請參閱下列主題:
+ 《Amazon CloudWatch 使用者指南》**中的[使用 Amazon CloudWatch 警示](https://docs.aws.amazon.com/AmazonCloudWatch/latest/monitoring/AlarmThatSendsEmail.html)
+ 《[Amazon EC2 使用者指南》中的 Amazon EC2 執行個體](https://docs.aws.amazon.com/AWSEC2/latest/WindowsGuide/Instances.html) *Amazon EC2 *
+ 《[Amazon EC2 使用者指南》中的 Amazon EC2 執行個體](https://docs.aws.amazon.com/AWSEC2/latest/UserGuide/Instances.html) *Amazon EC2 *
+ [在 Incident Manager 中建立和設定回應計劃](response-plans.md)
**重要**
您將透過建立 AWS 資源和使用 Runbook 自動化步驟來產生成本。如需詳細資訊,請參閱 [AWS 定價](https://aws.amazon.com/pricing)。
**Topics**
+ [任務 1:建立 Runbook](#tutorials-runbook-create)
+ [任務 2:建立 IAM 角色](#tutorials-runbook-IAM-role)
+ [任務 3:將 Runbook 連線至您的回應計劃](#tutorials-runbook-response-plan)
+ [任務 4:將 CloudWatch 警示指派給您的回應計劃](#tutorials-runbook-alarm)
+ [任務 5:驗證結果](#tutorials-runbook-verify)
## 任務 1:建立 Runbook
使用下列程序在 Systems Manager 主控台中建立 Runbook。從 Incident Manager 事件調用時, Runbook 會重新啟動 Amazon EC2 執行個體,並使用 Runbook 執行的相關資訊更新事件。開始之前,請確認您具有建立 Runbook 的許可。如需詳細資訊,請參閱《AWS Systems Manager 使用者指南》**中的[設定自動化](https://docs.aws.amazon.com/systems-manager/latest/userguide/automation-setup.html)。
**重要**
檢閱下列有關建立本教學課程 Runbook 的重要詳細資訊:
Runbook 適用於從 CloudWatch 警示來源建立的事件。如果您將此 Runbook 用於其他類型的事件,例如手動建立的事件,則第一個 Runbook 步驟中的時間軸事件將無法找到,且系統會傳回錯誤。
Runbook 需要 CloudWatch 警示包含稱為 的維度`InstanceId`。Amazon EC2 執行個體指標的警示具有此維度。如果您將此 Runbook 與其他指標 (或其他事件來源,例如 EventBridge) 搭配使用,則必須變更`JsonDecode2`步驟以符合案例中擷取的資料。
Runbook 會嘗試透過重新啟動 Amazon EC2 執行個體來修復觸發警示的問題。對於真實的事件,您可能不想重新啟動執行個體。使用您希望系統採取的特定修補動作來更新 Runbook。
如需建立 Runbook 的詳細資訊,請參閱*AWS Systems Manager 《 使用者指南*》中的[使用 Runbook](https://docs.aws.amazon.com/systems-manager/latest/userguide/automation-documents.html)。
**建立 Runbook**
1. 在 https://[https://console.aws.amazon.com/systems-manager/](https://console.aws.amazon.com/systems-manager/) 開啟 AWS Systems Manager 主控台。
1. 在導覽窗格中,選擇 **Documents (文件)**。
1. 選擇**自動化**。
1. 針對**名稱**,輸入 Runbook 的描述性名稱,例如 **IncidentResponseRunbook**。
1. 選擇 **Editor (編輯器)** 標籤,然後選擇 **Edit (編輯)**。
1. 將下方內容貼入編輯工具中:
```
description: This runbook attempts to restart an Amazon EC2 instance that caused an incident.
schemaVersion: '0.3'
parameters:
IncidentRecordArn:
type: String
description: The incident
mainSteps:
- name: ListTimelineEvents
action: 'aws:executeAwsApi'
outputs:
- Selector: '$.eventSummaries[0].eventId'
Name: eventId
Type: String
inputs:
Service: ssm-incidents
Api: ListTimelineEvents
incidentRecordArn: '{{IncidentRecordArn}}'
filters:
- key: eventType
condition:
equals:
stringValues:
- SSM Incident Trigger
description: This step retrieves the ID of the first timeline event with the CloudWatch alarm details.
- name: GetTimelineEvent
action: 'aws:executeAwsApi'
inputs:
Service: ssm-incidents
Api: GetTimelineEvent
incidentRecordArn: '{{IncidentRecordArn}}'
eventId: '{{ListTimelineEvents.eventId}}'
outputs:
- Name: eventData
Selector: $.event.eventData
Type: String
description: This step retrieves the timeline event itself.
- name: JsonDecode
action: 'aws:executeScript'
inputs:
Runtime: python3.8
Handler: script_handler
Script: |-
import json
def script_handler(events, context):
data = json.loads(events["eventData"])
return data
InputPayload:
eventData: '{{GetTimelineEvent.eventData}}'
outputs:
- Name: rawData
Selector: $.Payload.rawData
Type: String
description: This step parses the timeline event data.
- name: JsonDecode2
action: 'aws:executeScript'
inputs:
Runtime: python3.8
Handler: script_handler
Script: |-
import json
def script_handler(events, context):
data = json.loads(events["rawData"])
return data
InputPayload:
rawData: '{{JsonDecode.rawData}}'
outputs:
- Name: InstanceId
Selector: '$.Payload.detail.configuration.metrics[0].metricStat.metric.dimensions.InstanceId'
Type: String
description: This step parses the CloudWatch event data.
- name: RestartInstance
action: 'aws:executeAutomation'
inputs:
DocumentName: AWS-RestartEC2Instance
DocumentVersion: $DEFAULT
RuntimeParameters:
InstanceId: '{{JsonDecode2.InstanceId}}'
description: This step restarts the Amazon EC2 instance
```
1. 選擇 **Create automation (建立自動化)**。
## 任務 2:建立 IAM 角色
使用下列教學課程建立 AWS Identity and Access Management (IAM) 角色,提供 Incident Manager 啟動回應計畫中指定 Runbook 的許可。本教學課程中的 Runbook 會重新啟動 Amazon EC2 執行個體。當您將 Runbook 連接到回應計劃時,您將在下一個任務中指定此 IAM 角色。
**建立從回應計劃啟動 Runbook 的 IAM 角色**
1. 在以下網址開啟 IAM 主控台:[https://console.aws.amazon.com/iam/](https://console.aws.amazon.com/iam/)。
1. 在導覽窗格中,選擇**角色**,然後選擇**建立角色**。
1. 在**信任的實體類型**下,確認已選取**AWS 服務**。
1. 在**使用案例**下,在其他** AWS 服務的使用案例中**,輸入 **Incident Manager**。
1. 選擇 **Incident Manager**,然後選擇**下一步**。
1. 在**新增許可**頁面上,選擇**建立政策**。許可編輯器會在新的瀏覽器視窗或索引標籤中開啟。
1. 在編輯器中,選擇 **JSON** 標籤。
1. 將下列許可政策複製並貼到 JSON 編輯器。以您的 AWS 帳戶 ID 取代 {{account\_ID}}。
------
#### [ JSON ]
****
```
{
"Version":"2012-10-17",
"Statement": [
{
"Effect": "Allow",
"Resource": [
"arn:aws:ssm:*:{{111122223333}}:document/IncidentResponseRunbook",
"arn:aws:ssm:*::document/AWS-RestartEC2Instance",
"arn:aws:ssm:*:{{111122223333}}:automation-execution/*"
],
"Action": "ssm:StartAutomationExecution"
},
{
"Effect": "Allow",
"Resource": "arn:aws:ssm:*:*:automation-execution/*",
"Action": "ssm:GetAutomationExecution"
},
{
"Effect": "Allow",
"Resource": "arn:aws:ssm-incidents:*:*:*",
"Action": "ssm-incidents:*"
},
{
"Effect": "Allow",
"Resource": "arn:aws:iam::*:role/AWS-SystemsManager-AutomationExecutionRole",
"Action": "sts:AssumeRole"
},
{
"Effect": "Allow",
"Resource": "*",
"Action": [
"ec2:StopInstances",
"ec2:DescribeInstanceStatus",
"ec2:StartInstances"
]
}
]
}
```
------
1. 選擇下**一步:標籤**。
1. (選用) 如有需要,請將標籤新增至您的政策。
1. 選擇下**一步:檢閱**。
1. 在**名稱**欄位中,輸入可協助您將此角色識別為用於本教學課程的名稱。
1. (選用) 在描述欄位中輸入**描述**。
1. 選擇**建立政策**。
1. 導覽回您要建立之角色的瀏覽器視窗或索引標籤。隨即顯示**新增許可**頁面。
1. 選擇重新整理按鈕 (位於**建立政策**按鈕旁),然後在篩選條件方塊中輸入您建立的許可政策名稱。
1. 選擇您建立的許可政策,然後選擇**下一步**。
1. 在**名稱、檢閱和建立**頁面上,針對**角色名稱**輸入名稱,協助您將此角色識別為用於本教學課程。
1. (選用) 在描述欄位中輸入**描述**。
1. 檢閱角色詳細資訊,視需要新增標籤,然後選擇**建立角色**。
## 任務 3:將 Runbook 連線至您的回應計劃
透過將 Runbook 連接到 Incident Manager 回應計劃,您可以確保一致、可重複且及時的緩解程序。Runbook 也可做為解析程式判斷下一個動作的起點。
**將 Runbook 指派給您的回應計劃**
1. 開啟 [Incident Manager 主控台](https://console.aws.amazon.com/systems-manager/incidents/home)。
1. 選擇**回應計劃**。
1. 針對**回應計劃**,選擇現有的回應計劃,然後選擇**編輯**。如果您沒有現有的回應計劃,請選擇**建立回應計劃**以建立新的計劃。
完成下列欄位:
1. 在 **Runbook** 區段中,選擇**選取現有的 Runbook**。
1. 對於**擁有者**,確認已選取**我擁有的 **。
1. 針對 **Runbook**,選擇您在 中建立的 Runbook[任務 1:建立 Runbook](#tutorials-runbook-create)。
1. 針對**版本**,**在執行時選擇預設**。
1. 在**輸入**區段中,針對 **IncidentRecordArn** 參數,選擇**事件 ARN**。
1. 在**執行許可**區段中,選擇您在 中建立的 IAM 角色[任務 2:建立 IAM 角色](#tutorials-runbook-IAM-role)。
1. 儲存您的變更。
## 任務 4:將 CloudWatch 警示指派給您的回應計劃
使用下列程序將 Amazon EC2 執行個體的 CloudWatch 警示指派給您的回應計劃。
**將 CloudWatch 警示指派給您的回應計劃**
1. 透過 [https://console.aws.amazon.com/cloudwatch/](https://console.aws.amazon.com/cloudwatch/) 開啟 CloudWatch 主控台。
1. 在導覽窗格中的**警示**下,選擇**所有警示**。
1. 針對您要連線至回應計畫的 Amazon EC2 執行個體,選擇警示。
1. 選擇**動作**,然後選擇**編輯**。確認指標具有稱為 的維度`InstanceId`。
1. 選擇**下一步**。
1. 針對**設定動作精靈**,選擇**新增 Systems Manager 動作**。
1. 選擇**建立事件**。
1. 選擇您在 中建立的回應計畫[任務 3:將 Runbook 連線至您的回應計劃](#tutorials-runbook-response-plan)。
1. 選擇 **Update alarm** (更新警示)。
## 任務 5:驗證結果
若要驗證 CloudWatch 警示是否建立事件,然後處理回應計畫中指定的 Runbook,您必須觸發警示。觸發警示且 Runbook 完成處理後,您可以使用下列程序來驗證 Runbook 的結果。如需有關觸發警示的資訊,請參閱《 *AWS CLI 命令參考*》中的 [set-alarm-state](https://docs.aws.amazon.com/cli/latest/reference/cloudwatch/set-alarm-state.html)。
1. 開啟 [Incident Manager 主控台](https://console.aws.amazon.com/systems-manager/incidents/home)。
1. 選擇 CloudWatch 警示建立的事件。
1. 選擇 **Runbooks** 索引標籤。
1. 在 **Runbook 步驟**區段中檢視在 Amazon EC2 執行個體上執行的動作。
下圖示範如何在 主控台中報告您在本教學課程中建立的 Runbook 所採取的步驟。每個步驟都會列出時間戳記和狀態訊息。
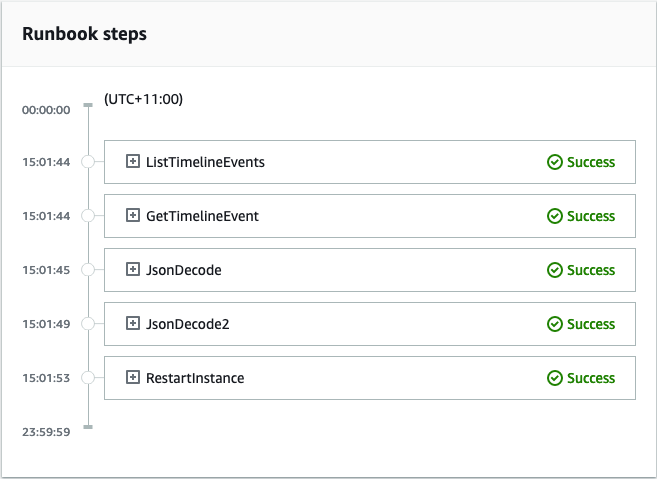
若要檢視 CloudWatch 警示中的所有詳細資訊,請展開 **JsonDecode2** 步驟,然後展開**輸出**。
**重要**
您必須清除在本教學課程中實作且您不想保留的任何資源變更。這包括對 Incident Manager 資源的變更,例如資源計劃和事件、CloudWatch 警示的變更,以及您在本教學課程中建立的 IAM 角色。