Deployment: Dashboard account
Deployment Instructions
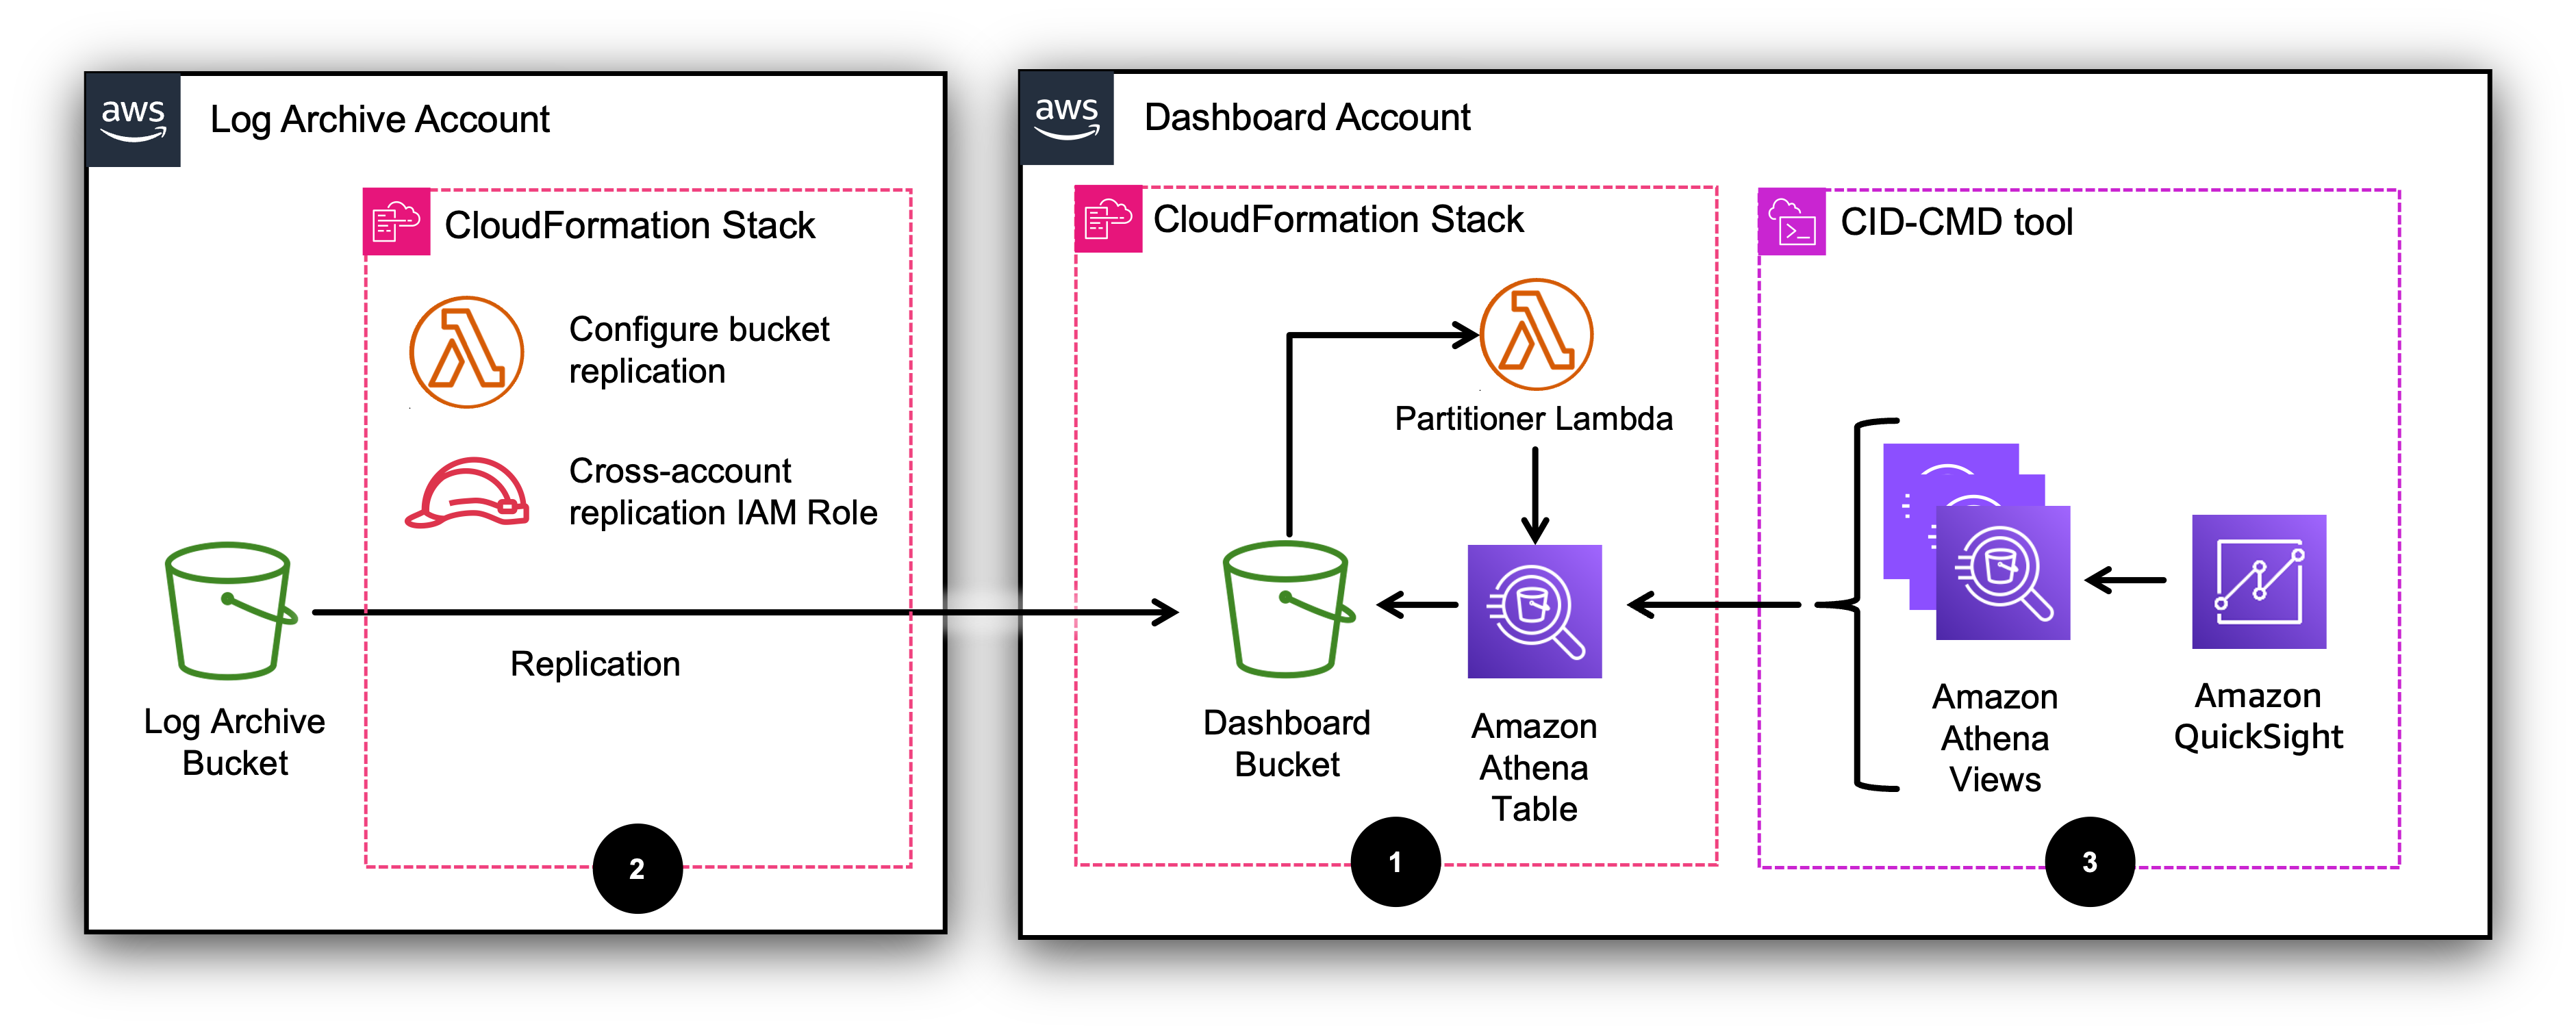
The infrastructure needed to collect and process the data is defined in AWS CloudFormation. The dashboard resources are defined in a template file that can be installed using the CID-CMD
Installation on dedicated Dashboard account
The installation process consists of three steps:
-
On the Dashboard account, deploy data pipeline resources for the dashboard using a CloudFormation stack.
-
On the AWS Config account, configure the S3 replication rule that copies AWS Config files from the AWS Config Logs bucket to the Dashboard bucket using a CloudFormation stack.
-
On the Dashboard account, deploy Quick Sight resources for the dashboard and the necessary Athena views using the CID-CMD
command line tool.
Note
The S3 replication rule configured at step 2 is valid only for new AWS Config files delivered to the AWS Config Logs bucket, i.e. it will not replicate files that previously existed on the AWS Config Logs bucket.
Deployment Steps
Note
Ensure you are in the AWS Region where both your AWS Config Logs bucket and Amazon Quick Sight are deployed.
Step 1 [in Dashboard account]
-
Log into the AWS Management Console for your Dashboard account.
-
Ensure you are in the same Region as the AWS Config Logs bucket.
-
Click the Launch Stack button below to open the stack template in your CloudFormation console. This Stack will create the data pipeline resources for the dashboard.

-
Specify the following parameters:
-
AWS Config account IDEnter the AWS account ID of the AWS Config account. Notice this in not where you are currently logged in (Required). -
AWS Config Logs bucketEnter the name of the Amazon S3 bucket that collects AWS Config data (Required). -
ARN of the KMS key that encrypts the AWS Config Logs bucketIf you encrypt the AWS Config Logs bucket with a KMS key, copy the key’s ARN here.-
If a KMS key ARN is passed here, the CloudFormation template will create a new KMS key and use it to encrypt the the Dashboard bucket.
-
-
Dashboard account IDEnter the AWS account ID where you are currently logged in (Required). -
Dashboard bucketEnter the name of the Amazon S3 bucket that will collect AWS Config data. The CloudFormation template will create this bucket on the Dashboard account (Required). -
ARN of the KMS key that encrypts the Dashboard bucketLeave empty. This parameter is ignored in this deployment mode. -
Configure S3 event notificationLeave at the default value. This parameter is ignored in this deployment mode. -
Configure cross-account replicationLeave at the default value. This parameter is ignored in this deployment mode. -
Is the AWS Organization Data Collection Module of CID Data Collection installed?This is the recommended way to extend the dashboard with account names and organization metadata, make sure the setup of CID Data Collection is complete prior to deploy the dashboard (Required). We recommend to install the dashboard and the CID Data collection module in the same account and Region.-
Select
yesto confirm the AWS Organization Data Collection Module of CID Data Collection is installed. -
Select
nootherwise.
-
-
CID data collection bucketEnter the name of the destination bucket created by the CID Data Collection module. By default, it is the string 'cid-data-' concatenated with the Data Collection account number, e.g. 'cid-data-1234567890'. You can find the exact name on the KeyBucketof the outputs section of the CID Data Collection stack. An ad-hoc Lambda function (calledcrcd-support-configure-account-names) will access the data and prepare your organizational taxonomy for the later steps of deployment. -
Leave all other parameters at their default value.
-
-
Run the CloudFormation template.
-
Note down the output values of the CloudFormation template.
-
If you encrypt the AWS Config Logs bucket with a KMS key, the template will create a KMS key to encrypt the Dashboard bucket. Note down its ARN from the output value
DashboardBucketKmsKeyArn. You will use it at the next step.
Step 2 [in AWS Config account]
-
Log into the AWS Management Console for your AWS Config account.
-
Click the Launch Stack button below to open the stack template in your CloudFormation console. This Stack will create the data pipeline resources for the dashboard.
-
Specify the following parameters:
-
AWS Config account IDEnter the AWS account ID where you are currently logged in (Required). -
AWS Config Logs bucketEnter the name of the Amazon S3 bucket that collects AWS Config data (Required). -
ARN of the KMS key that encrypts the AWS Config Logs bucketIf you encrypt the AWS Config Logs bucket with a KMS key, copy the key’s ARN here. -
Dashboard account IDInsert the ID of the Dashboard account that you specified in this field at Step 1 (Required). -
Dashboard bucketInsert the bucket name that you specified in this field at Step 1 (Required). -
ARN of the KMS key that encrypts the Dashboard bucketThis parameter is used only at this step of the Dashboard account deployment. If you encrypt the AWS Config Logs bucket with a KMS key, insert the ARN of the KMS key created in Step 1 (it’sDashboardBucketKmsKeyArnon the CloudFormation Outputs). -
Configure S3 event notificationLeave at the default value. This parameter is ignored in this deployment mode. -
Configure cross-account replication(Required)-
Select
yesto configure S3 replication from the AWS Config Logs bucket to the Dashboard bucket. -
Select
noif you already have configured S3 replication rules on the AWS Config Logs bucket. You will have to setup S3 replication manually (see below). -
The S3 replication configuration is performed by an ad-hoc Lambda function (Configure bucket replication in the diagram above) that will be called by the CloudFormation template automatically.
Note
If you select
yes, and you have existing S3 replication configurations, the Configure bucket replication function will return an error and the entire stack will fail. In this case you must selectnoand run the stack again.
-
-
Is the AWS Organization Data Collection Module of CID Data Collection installed?selectno. -
Leave all other parameters at their default value.
-
-
Run the CloudFormation template.
-
Note down the output values of the CloudFormation template.
Manual setup of S3 replication
-
Log onto the AWS Config account and open the Amazon S3 console.
-
You can replicate files from the centralized AWS Config Logs bucket to the Dashboard bucket through an Amazon S3 Replication configuration, follow these instructions.
-
Specify the IAM role created by the CloudFormation template at Step 2, as reported in the output value
ReplicationRoleArnof the template.
If your AWS Config Logs bucket is SSE-KMS encrypted, the replication role will have the necessary permissions, no need for additional steps.
Note
The S3 replication rule configured at step 2 is valid only for new AWS Config files delivered to the AWS Config Logs bucket, i.e. it will not replicate files that previously existed on the AWS Config Logs bucket.
Step 3 [in Dashboard account]
Log back into the AWS Management Console for your Dashboard account.
Note
At this step you will specify the tags to be used to display resources in the Resource inventory management part of the dashboard. Use the tags that classify workloads and resources in your organization. Use the Athena query in the dashboard’s FAQ to see the tags that are used across your organization.
-
Navigate to the AWS Management Console and open AWS CloudShell
. Ensure to be in the correct Region. -
Install the latest pip package of the CID-CMD
tool: pip3 install --upgrade cid-cmd
-
Deploy the dashboard by running the following command (replace the parameters accordingly):
-
--tag1The name of the first tag you use to categorize resources. -
--tag2The name of the second tag you use to categorize resources. -
--tag3The name of the third tag you use to categorize resources. -
--tag4The name of the fourth tag you use to categorize resources. -
Notice that tag parameters are case sensitive and cannot be empty. If you do not use a tag, pass a short default value, e.g.
--tag4 'NA'. -
Leave all other parameters at their default value.
cid-cmd deploy \
   --resources 'https://raw.githubusercontent.com/aws-samples/config-resource-compliance-dashboard/refs/heads/main/dashboard_template/cid-crcd.yaml' \
   --dashboard-id 'cid-crcd' \
   --athena-database 'cid_crcd_database' \
   --athena-workgroup 'crcd-dashboard' \
   --tag1 'REPLACE_WITH_CUSTOM_TAG_1' \
   --tag2 'REPLACE_WITH_CUSTOM_TAG_2' \
   --tag3 'REPLACE_WITH_CUSTOM_TAG_3' \
   --tag4 'REPLACE_WITH_CUSTOM_TAG_4'
-
-
The CID-CMD tool will prompt you to select a datasource:
[quicksight-datasource-id] Please choose DataSource (Select the first one if not sure):.-
If you have installed other CID/CUDOS dashboards, select the existing datasource
CID-CMD-Athena. -
Otherwise select
CID-CMD-Athena <CREATE NEW DATASOURCE>.
-
-
When prompted
[quicksight-datasource-role] Please choose a Quick Sight role.selectCidCmdQuickSightDataSourceRole <ADD NEW ROLE>orCidCmdQuickSightDataSourceRole(the second option will appear as default if you have other CID/CUDOS dashboards). -
In certain cases the installer will show an updated IAM policy JSON code and prompt
? [confirm-policy-AthenaAccess] Please confirm:. Selectyes. -
When prompted
[timezone] Please select timezone for datasets scheduled refresh.:select the time zone for dataset scheduled refresh in your Region (it is already preselected). -
When prompted
Select taxonomy fields to add as dashboard filters and group by fieldsselect the organization metadata extracted previously.-
You will see
accountid(Account ID),account_name(Account Name) andregion(Region). Do not add these since they are already part of the dashboard. -
You will see other fields such as
organization_unit(the OU where the account belongs) and one or more fields calledou_tag_<tag name>- for exampleou_tag_application,ou_tag_owner,ou_tag_costcenter. These are the tags added to your OUs and accounts in AWS Organizations on the payer account. -
Add and order fields according to your needs.
-
Select
Looks goodwhen done.
-
-
When prompted
[share-with-account] Share this dashboard with everyone in the account?:select the option that works for you.
Visualize the dashboard
-
Navigate to Quick Sight and then
Dashboards. -
Ensure you are in the correct Region.
-
Click on the AWS Config Resource Compliance Dashboard (CRCD) dashboard.
