本文為英文版的機器翻譯版本,如內容有任何歧義或不一致之處,概以英文版為準。
Amazon Braket 上的量子任務範例
本節逐步解說執行範例量子任務的階段,從選取裝置到檢視結果。作為 Amazon Braket 的最佳實務,建議您先在模擬器上執行電路,例如 SV1。
指定裝置
首先,選取並指定量子任務的裝置。此範例說明如何選擇模擬器 SV1。
from braket.aws import AwsDevice

# Choose the on-demand simulator to run the circuit
device = AwsDevice("arn:aws:braket:::device/quantum-simulator/amazon/sv1")
您可以檢視此裝置的一些屬性,如下所示:
print(device.name)
for iter in device.properties.action['braket.ir.openqasm.program']:
    print(iter)
SV1
('version', ['1.0'])
('actionType', 'braket.ir.openqasm.program')
('supportedOperations', ['ccnot', 'cnot', 'cphaseshift', 'cphaseshift00', 'cphaseshift01', 'cphaseshift10', 'cswap', 'cy', 'cz', 'ecr', 'h', 'i', 'iswap', 'pswap', 'phaseshift', 'rx', 'ry', 'rz', 's', 'si', 'swap', 't', 'ti', 'v', 'vi', 'x', 'xx', 'xy', 'y', 'yy', 'z', 'zz', 'gpi', 'gpi2', 'ms'])
('supportedModifiers', [])
('supportedPragmas', ['braket_unitary_matrix', 'braket_basis_rotation', 'braket_result_type_sample', 'braket_result_type_expectation', 'braket_result_type_variance', 'braket_result_type_probability', 'braket_result_type_amplitude', 'braket_result_type_adjoint_gradient'])
('forbiddenPragmas', ['braket_result_type_state_vector', 'braket_result_type_density_matrix', 'braket_noise_amplitude_damping', 'braket_noise_bit_flip', 'braket_noise_depolarizing', 'braket_noise_kraus', 'braket_noise_pauli_channel', 'braket_noise_generalized_amplitude_damping', 'braket_noise_phase_flip', 'braket_noise_phase_damping', 'braket_noise_two_qubit_dephasing', 'braket_noise_two_qubit_depolarizing'])
('maximumQubitArrays', 1)
('maximumClassicalArrays', 1)
('forbiddenArrayOperations', ['concatenation', 'negativeIndex', 'range', 'rangeWithStep', 'slicing', 'selection'])
('requiresAllQubitsMeasurement', True)
('supportPhysicalQubits', False)
('requiresContiguousQubitIndices', True)
('supportsPartialVerbatimBox', True)
('supportsUnassignedMeasurements', True)
('disabledQubitRewiringSupported', False)
('supportedResultTypes', [ResultType(name='Sample', observables=['x', 'y', 'z', 'h', 'i', 'hermitian'], minShots=1, maxShots=100000), ResultType(name='Expectation', observables=['x', 'y', 'z', 'h', 'i', 'hermitian'], minShots=0, maxShots=100000), ResultType(name='Variance', observables=['x', 'y', 'z', 'h', 'i', 'hermitian'], minShots=0, maxShots=100000), ResultType(name='Probability', observables=None, minShots=1, maxShots=100000), ResultType(name='Amplitude', observables=None, minShots=0, maxShots=0), ResultType(name='AdjointGradient', observables=['x', 'y', 'z', 'h', 'i'], minShots=0, maxShots=0)])
提交範例量子任務
提交範例量子任務以在隨需模擬器上執行。
from braket.circuits import Circuit, Observable

# Create a circuit with a result type
circ = Circuit().rx(0, 1).ry(1, 0.2).cnot(0, 2).variance(observable=Observable.Z(), target=0)
# Add another result type
circ.probability(target=[0, 2])

# Set up S3 bucket (where results are stored)
my_bucket = "amazon-braket-s3-demo-bucket"  # The name of the bucket
my_prefix = "your-folder-name"  # The name of the folder in the bucket
s3_location = (my_bucket, my_prefix)

# Submit the quantum task to run
my_task = device.run(circ, s3_location, shots=1000, poll_timeout_seconds=100, poll_interval_seconds=10)
# The positional argument for the S3 bucket is optional if you want to specify a bucket other than the default

# Get results of the quantum task
result = my_task.result()
device.run() 命令會透過 CreateQuantumTask API 建立量子任務。在短暫初始化時間之後,量子任務會排入佇列,直到容量存在,以在裝置上執行量子任務為止。在此情況下,裝置為 SV1。裝置完成運算後,AmazonRaket 會將結果寫入通話中指定的 Amazon S3 位置。除了本機模擬器之外,所有裝置s3_location都需要位置引數。
注意
Braket 量子任務動作的大小限制為 5MB。
提交參數化任務
Amazon Braket 隨需和本機模擬器和 QPUs 也支援在提交任務時指定免費參數的值。您可以使用 inputs引數對 執行此操作device.run(),如下列範例所示。inputs 必須是字串浮點數對的字典,其中索引鍵是參數名稱。
參數編譯可以改善在某些 QPUs 上執行參數電路的效能。將參數電路做為量子任務提交至支援的 QPU 時,Raket 會編譯電路一次,並快取結果。後續參數更新不會重新編譯至相同電路,導致使用相同電路的任務執行時間更快。編譯電路時,Raket 會自動使用來自硬體供應商的更新校正資料,以確保最高品質的結果。
注意
除了脈衝層級程式Rigetti Computing之外, 的所有超執行、以閘道為基礎的 QPUs都支援參數編譯。
from braket.circuits import Circuit, FreeParameter, Observable

# Create the free parameters
alpha = FreeParameter('alpha')
beta = FreeParameter('beta')

# Create a circuit with a result type
circ = Circuit().rx(0, alpha).ry(1, alpha).cnot(0, 2).xx(0, 2, beta)
circ.variance(observable=Observable.Z(), target=0)

# Add another result type
circ.probability(target=[0, 2])

# Submit the quantum task to run
my_task = device.run(circ, inputs={'alpha': 0.1, 'beta': 0.2}, shots=100)
指定 shots
shots 引數是指所需的測量數量 shots。等模擬器SV1支援兩種模擬模式。
-
對於 shots = 0,模擬器會執行確切的模擬,並傳回所有結果類型的 true 值。
-
對於 的非零值shots,來自輸出分佈的模擬器範例會模擬真實 QPUs的shot雜訊。QPU 裝置僅允許 shots > 0。
如需有關每個量子任務的最大射擊次數的資訊,請參閱 Braket Quotas。
輪詢結果
執行 時my_task.result(),軟體開發套件會使用您在量子任務建立時定義的參數開始輪詢結果:
-
poll_timeout_seconds是在隨需模擬器和/或 QPU 裝置上執行量子任務時,輪詢量子任務逾時之前的秒數。預設值為 432,000 秒,即 5 天。 -
注意:對於 Rigetti和 等 QPU 裝置IonQ,建議您允許幾天的時間。如果您的輪詢逾時太短,則可能無法在輪詢時間內傳回結果。例如,當 QPU 無法使用時,會傳回本機逾時錯誤。
-
poll_interval_seconds是輪詢量子任務的頻率。它會指定您在隨需模擬器和 QPU 裝置上執行量子任務時呼叫 Braket API以取得狀態的頻率。預設值為 1 秒。
此非同步執行有助於與非一律可用的 QPU 裝置互動。例如,裝置在一般維護時段期間可能無法使用。
傳回的結果包含與量子任務相關聯的中繼資料範圍。您可以使用下列命令來檢查測量結果:
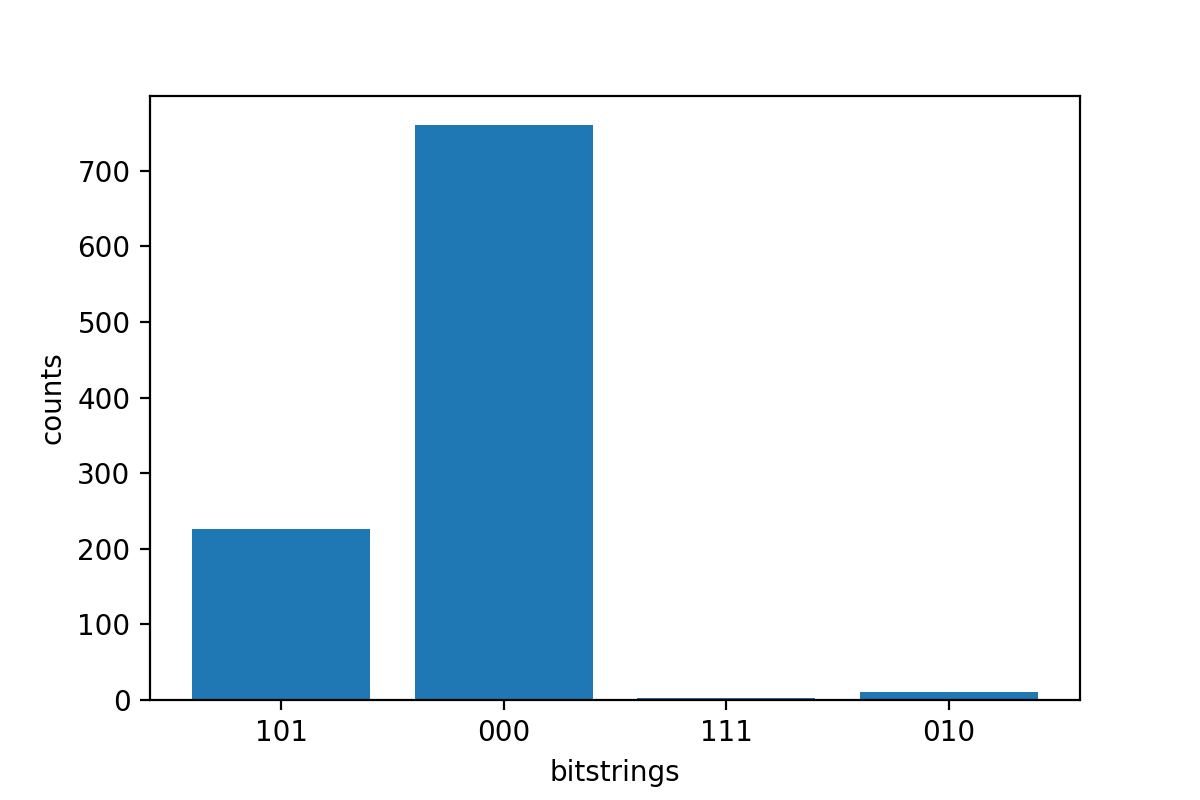
print('Measurement results:\n', result.measurements)
print('Counts for collapsed states:\n', result.measurement_counts)
print('Probabilities for collapsed states:\n', result.measurement_probabilities)
Measurement results:
 [[1 0 1]
 [0 0 0]
 [0 0 0]
 ...
 [0 0 0]
 [0 0 0]
 [1 0 1]]
Counts for collapsed states:
 Counter({'000': 766, '101': 220, '010': 11, '111': 3})
Probabilities for collapsed states:
 {'101': 0.22, '000': 0.766, '010': 0.011, '111': 0.003}
檢視範例結果
由於您已指定 ResultType,因此您可以檢視傳回的結果。結果類型會以新增至電路的順序顯示。
print('Result types include:\n', result.result_types)
print('Variance=', result.values[0])
print('Probability=', result.values[1])

# Plot the result and do some analysis
import matplotlib.pyplot as plt
plt.bar(result.measurement_counts.keys(), result.measurement_counts.values())
plt.xlabel('bitstrings')
plt.ylabel('counts')
Result types include:
 [ResultTypeValue(type=Variance(observable=['z'], targets=[0], type=<Type.variance: 'variance'>), value=0.693084), ResultTypeValue(type=Probability(targets=[0, 2], type=<Type.probability: 'probability'>), value=array([0.777, 0.   , 0.   , 0.223]))]
Variance= 0.693084
Probability= [0.777 0.    0.    0.223]
Text(0, 0.5, 'counts')