使用 OAuth2 與 Google Drive 整合
本入門教學課程將逐步引導您開始為 AI 代理器使用 Amazon Bedrock AgentCore Identity 的基本步驟。您將了解如何設定開發環境、安裝必要的 SDKs、建立您的第一個代理程式身分,並允許您的代理程式安全地存取外部資源。
在本教學課程結束時,您將有一個工作代理程式,可以使用 AgentCore Identity OAuth2 Credential Provider 從 Google 擷取存取權杖,並使用存取權杖從 Google Drive 讀取檔案。如需 OAuth2 流程的詳細資訊,請參閱使用 AgentCore Identity 管理登入資料提供者。
主題
先決條件
開始之前,您需要:
-
具有適當許可 AWS 的帳戶
BedrockAgentCoreFullAccess(例如 ) -
Python 3.10 或更新版本
-
已安裝的最新 AWS CLI
jq -
AWS 已設定的登入資料和區域
aws configure() -
對 Python 程式設計的基本了解
重要
BedrockAgentCoreFullAccess 受管政策授予廣泛的許可,包括 GetWorkloadAccessTokenForUserId,這允許發起人使用任何使用者識別符字串發出工作負載存取字符,而無需 IdP 字符驗證。這適用於開發和測試。對於生產部署,建立遵循最低權限原則的自訂 IAM 政策,並將許可限制為僅所需的特定動作。如果您的應用程式使用 JWT 型身分驗證 (建議用於生產),您可以明確拒絕GetWorkloadAccessTokenForUserId,以確保所有使用者身分通過驗證的 JWT 路徑。如需詳細資訊,請參閱取得工作負載存取字符。
安裝軟體開發套件
若要開始使用,請安裝 bedrock-agentcore套件:
pip install bedrock-agentcore
取得 Google 用戶端 ID 和用戶端秘密
若要允許您的代理程式存取 Google Drive,您需要為您的代理程式取得 Google 用戶端 ID 和用戶端秘密。前往 Google 開發人員主控台
-
在 Google 開發人員主控台中建立專案
-
啟用 Google Drive API
-
設定 OAuth 同意畫面
-
為代理程式建立新的 Web 應用程式,例如「我的代理程式 1」
-
將下列 OAuth 2.0 範圍新增至您的代理程式應用程式:
https://www.googleapis.com/auth/drive.metadata.readonly -
為新的 Web 應用程式建立 OAuth 2.0 登入資料,並儲存產生的 Google 用戶端 ID 和用戶端秘密
步驟 1:設定 OAuth 2.0 登入資料提供者
使用以下 CLI 命令,使用先前取得的 Google 用戶端 ID 和用戶端秘密建立新的 OAuth 2.0 AWS 登入資料提供者:
OAUTH2_CREDENTIAL_PROVIDER_RESPONSE=$(aws bedrock-agentcore-control create-oauth2-credential-provider \
  --region us-east-1 \
  --name "google-provider" \
  --credential-provider-vendor "GoogleOauth2" \
  --oauth2-provider-config-input '{
      "googleOauth2ProviderConfig": {
        "clientId": "<your-google-client-id>",
        "clientSecret": "<your-google-client-secret>"
      }
    }' \
--output json)

OAUTH2_CALLBACK_URL=$(echo $OAUTH2_CREDENTIAL_PROVIDER_RESPONSE | jq -r '.callbackUrl')

echo "OAuth2 Callback URL: $OAUTH2_CALLBACK_URL"
注意
callbackUrl 從上方的 CreateOauth2CredentialProvider 回應取得 ,並將 URI 新增至 Google 應用程式的重新導向 URI 清單。回呼 URL 應如下所示:https://bedrock-agentcore.us-east-1.amazonaws.com/identities/oauth2/callback/********-****-****-****-****************
步驟 2:匯入身分和身分驗證模組
將此匯入陳述式新增至您的 Python 檔案:
from bedrock_agentcore.services.identity import IdentityClient
from bedrock_agentcore.identity.auth import requires_access_token, requires_api_key
步驟 3:取得 OAuth 2.0 存取權杖
在上一個步驟中建立 Google 登入資料提供者之後,請將@requires_access_token裝飾項目新增至需要 Google 存取權杖的代理程式程式碼。從主控台輸出複製授權 URL,然後將其貼到瀏覽器中,然後使用 Google Drive 完成同意流程。
下列程式碼範例旨在整合到您的代理程式程式碼中,以叫用授權工作流程。這不是可以獨立複製和執行的獨立程式碼。
import asyncio

# Injects Google Access Token
@requires_access_token(
    # Uses the same credential provider name created above
    provider_name="google-provider",
    # Requires Google OAuth2 scope to access Google Drive
    scopes=["https://www.googleapis.com/auth/drive.metadata.readonly"],
    # Sets to OAuth 2.0 Authorization Code flow
    auth_flow="USER_FEDERATION",
    # Prints authorization URL to console
    on_auth_url=lambda x: print("\nPlease copy and paste this URL in your browser:\n" + x),
    # If false, caches obtained access token
    force_authentication=False,
    # The callback URL to redirect to after the OAuth 2.0 token retrieval is complete
    callback_url='oauth2_callback_url_for_session_binding',
)
async def write_to_google_drive(*, access_token: str):
    # Prints the access token obtained from Google
    print(access_token)

asyncio.run(write_to_google_drive(access_token=""))
在幕後,@requires_access_token裝飾項目會執行下列順序:
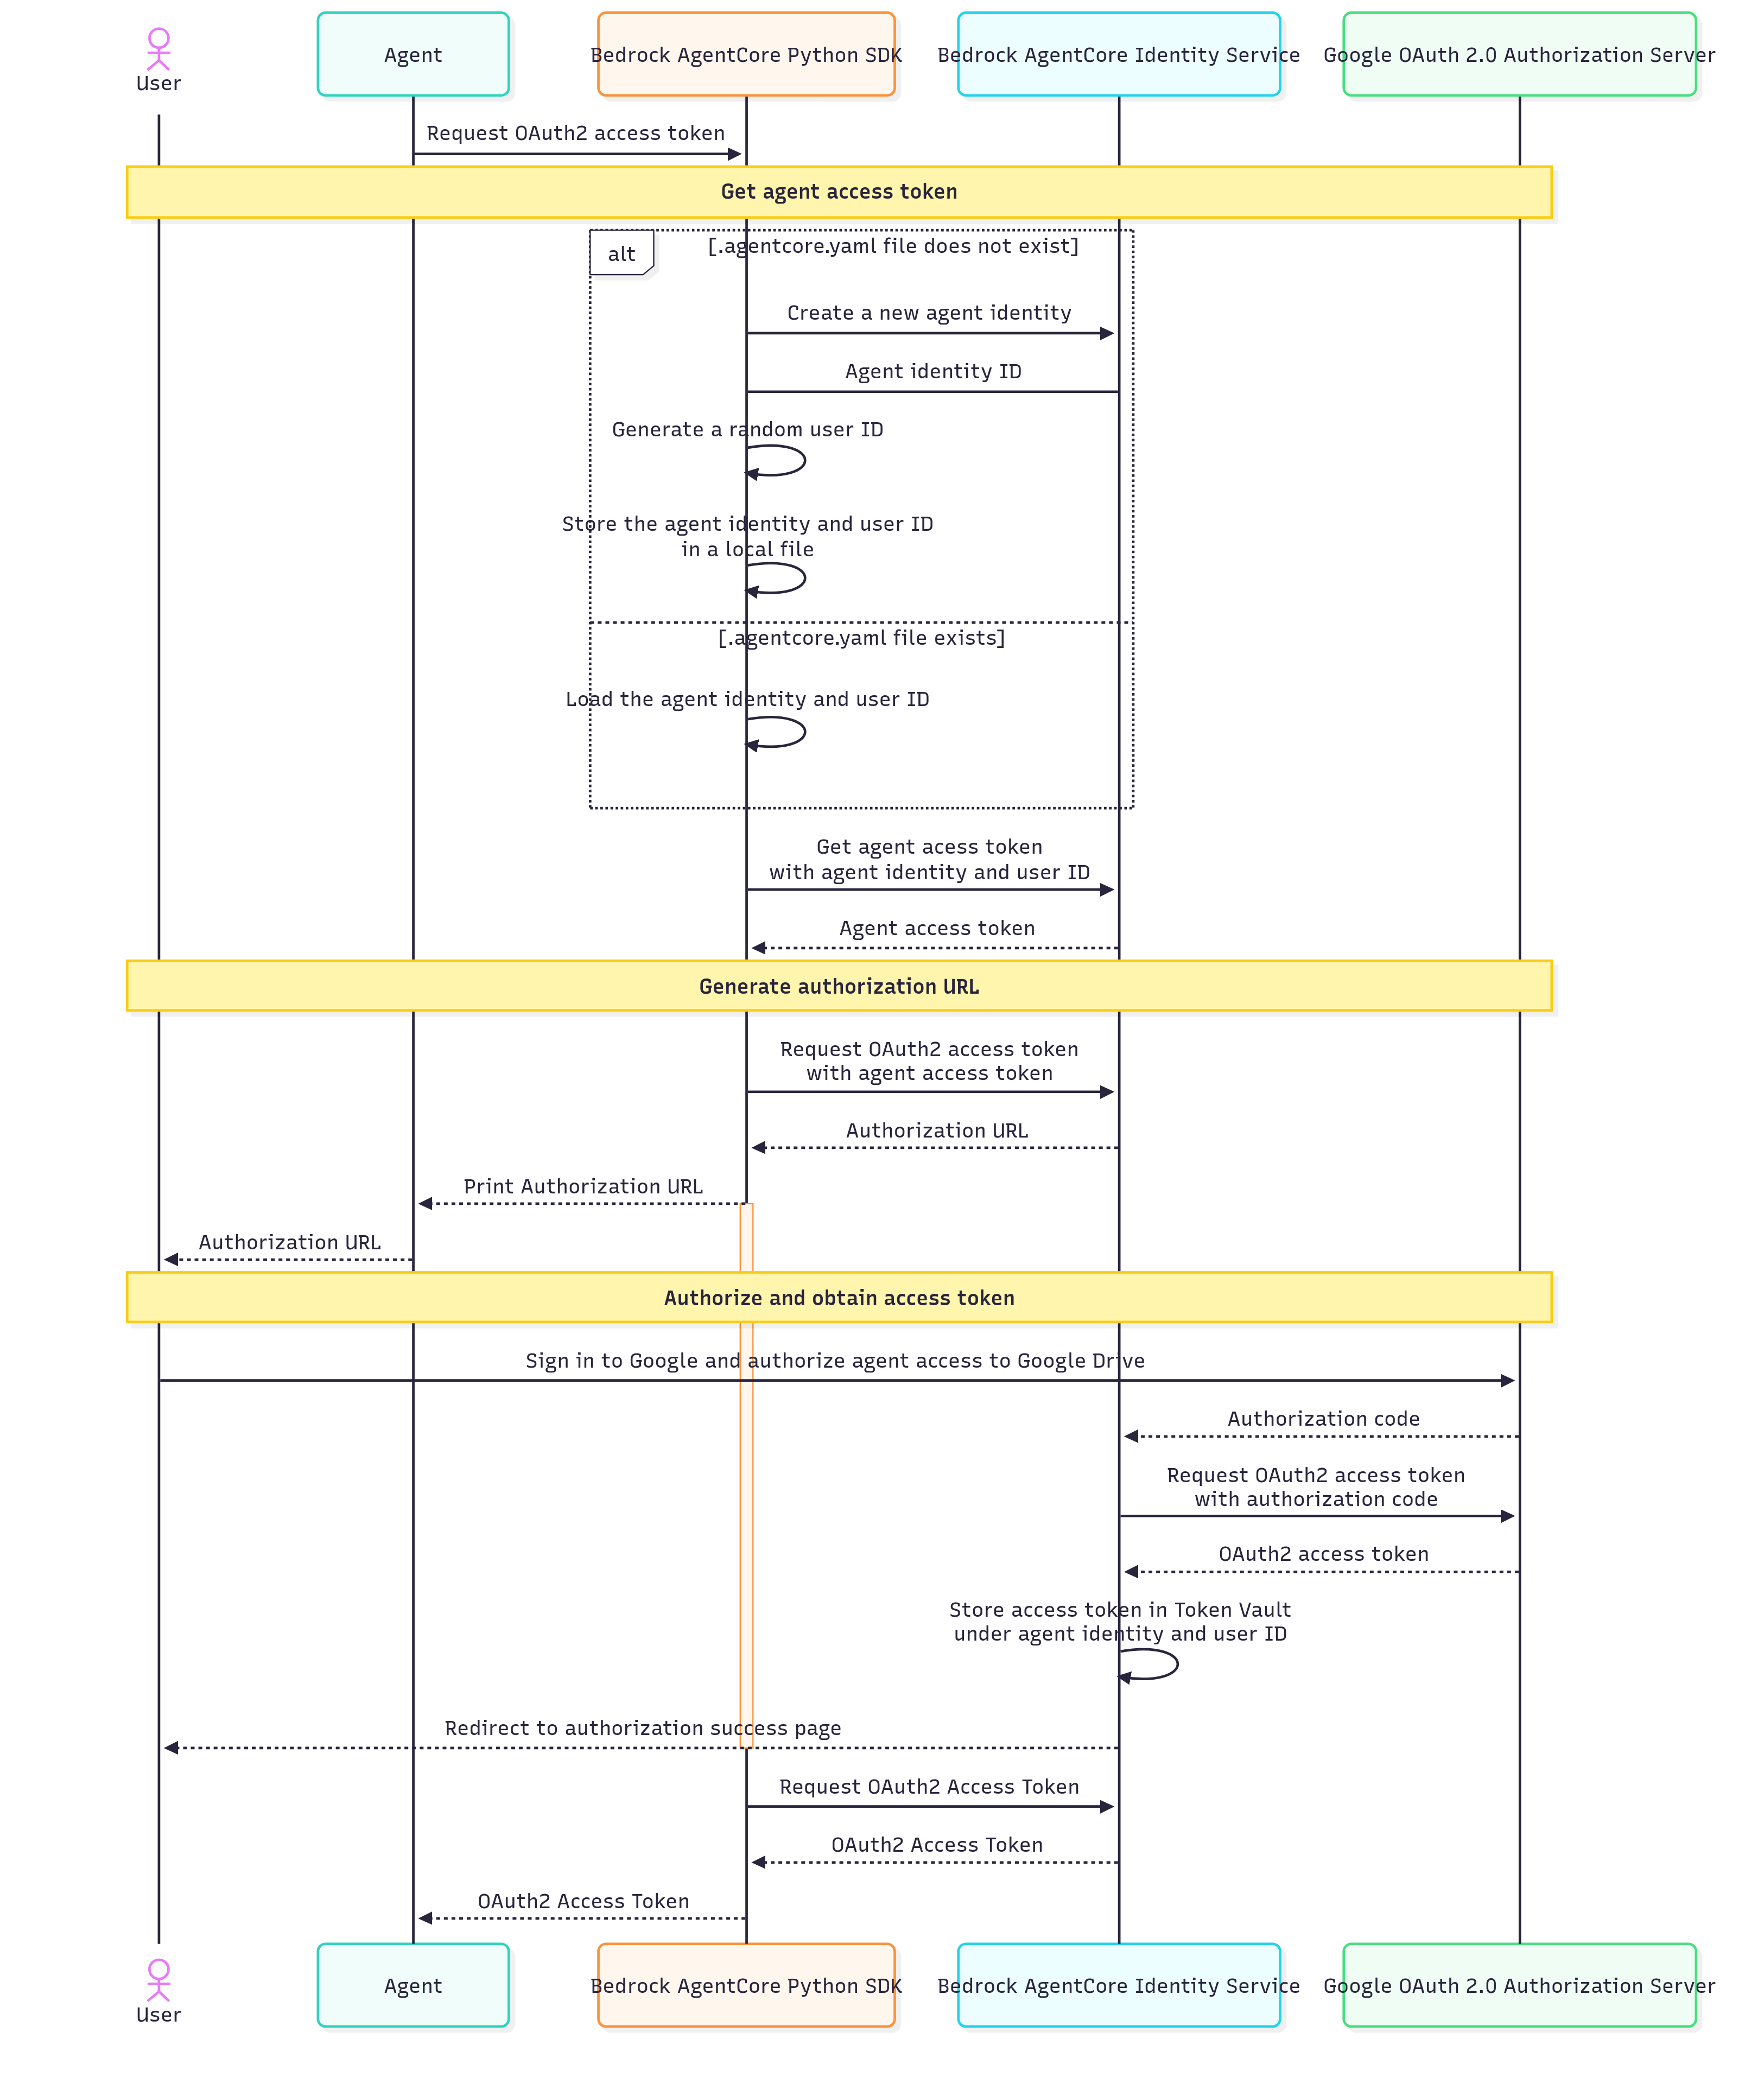
-
SDK 會對
CreateWorkloadIdentity、GetWorkloadAccessToken和 進行 API 呼叫GetResourceOauth2Token。 -
在本機執行代理程式程式碼時,開發套件會自動產生代理程式身分 ID 和隨機使用者 ID 以進行本機測試,並將其存放在名為 的本機檔案中
.bedrock_agentcore.yaml。 -
使用 AgentCore 執行期執行代理程式程式碼時,軟體開發套件不會產生代理程式身分 ID 或隨機使用者 ID。反之,它會使用指派的客服人員身分 ID,以及客服人員發起人傳入的使用者 ID 或 JWT 字符。
-
客服人員存取字符是加密 (不透明) 字符,其中包含客服人員身分 ID 和使用者 ID。
-
AgentCore Identity 服務會將 Google 存取字符存放在代理程式身分 ID 和使用者 ID 下的字符保存庫中。這會在代理程式身分、使用者身分和 Google 存取字符之間建立繫結。
-
在 AgentCore Identity 將 Google 存取權杖傳回給發起人之前,必須先完成工作階段繫結流程。
步驟 4:使用 OAuth2 存取字符來叫用外部資源
一旦代理程式取得具有上述步驟的 Google 存取權杖,就可以使用存取權杖來存取 Google Drive。以下是完整範例,列出使用者可存取的前 10 個檔案的名稱和 IDs。
首先,安裝適用於 Python 的 Google 用戶端程式庫:
pip install --upgrade google-api-python-client google-auth-httplib2 google-auth-oauthlib
然後,複製下列程式碼:
import asyncio
from bedrock_agentcore.identity.auth import requires_access_token, requires_api_key
from google.auth.transport.requests import Request
from google.oauth2.credentials import Credentials
from google_auth_oauthlib.flow import InstalledAppFlow
from googleapiclient.discovery import build
from googleapiclient.errors import HttpError

SCOPES = ["https://www.googleapis.com/auth/drive.metadata.readonly"]

def main(access_token):
    """Shows basic usage of the Drive v3 API.

    Prints the names and ids of the first 10 files the user has access to.
    """
    creds = Credentials(token=access_token, scopes=SCOPES)

    try:
        service = build("drive", "v3", credentials=creds)

        # Call the Drive v3 API
        results = (
            service.files()
            .list(pageSize=10, fields="nextPageToken, files(id, name)")
            .execute()
        )
        items = results.get("files", [])

        if not items:
            print("No files found.")
            return

        print("Files:")
        for item in items:
            print(f"{item['name']} ({item['id']})")

    except HttpError as error:
        # TODO(developer) - Handle errors from drive API.
        print(f"An error occurred: {error}")

if __name__ == "__main__":
    # This annotation helps agent developer to obtain access tokens from external applications
    @requires_access_token(
        provider_name="google-provider",
        # Google OAuth2 scopes
        scopes=["https://www.googleapis.com/auth/drive.metadata.readonly"],
        # 3LO flow
        auth_flow="USER_FEDERATION",
        # prints authorization URL to console
        on_auth_url=lambda x: print("Copy and paste this authorization url to your browser", x),
        force_authentication=True,
        callback_url='oauth2_callback_url_for_session_binding',
    )
    async def read_from_google_drive(*, access_token: str):
        print(access_token)  # You can see the access_token
        # Make API calls...
        main(access_token)

    asyncio.run(read_from_google_drive(access_token=""))
注意
後續步驟?
本節中的範例著重於您可以針對特定使用案例調整的實際實作模式。您可以內嵌程式碼做為代理程式的一部分,或模型內容通訊協定 (MCP) 工具。如果您想要使用 AgentCore 執行期託管您的代理程式程式碼或 MCP 工具,請遵循使用 Amazon Bedrock AgentCore 執行期的主機代理程式或工具,將上述程式碼複製到 AgentCore 執行期。
