本文為英文版的機器翻譯版本,如內容有任何歧義或不一致之處,概以英文版為準。
定義閘道目標組態
目標組態取決於您要新增至閘道的目標類型。如需支援的閘道目標類型的詳細資訊,請參閱 Amazon Bedrock AgentCore 閘道的支援目標。
選取主題以查看新增目標類型的範例:
新增 Lambda 目標
您可以使用 AgentCore CLI 將 Lambda 目標新增至閘道,方法是將 指定--type為 lambda-function-arn並提供 Lambda ARN 和工具結構描述檔案。
目標組態
Lambda 函數的目標組態 (或承載) 包含下列欄位:
如需 Lambda 目標的詳細資訊,請參閱 AWS Lambda 函數目標。
選取下列其中一種方法:
範例
- AgentCore CLI
-
-
若要新增 Lambda 函數做為目標,agentcore add gateway-target請使用 --type lambda-function-arn選項執行 。提供 Lambda ARN 和包含工具結構描述的 JSON 檔案:
agentcore add gateway-target \
  --name MyLambdaTarget \
  --type lambda-function-arn \
  --lambda-arn arn:aws:lambda:us-east-1:123456789012:function:MyFunction \
  --tool-schema-file tools.json \
  --gateway MyGateway
agentcore deploy
針對lambda-function-arn目標,請使用 將工具結構描述提供給 AgentCore CLI--tool-schema-file。針對 AgentCore Python SDK 和 Boto3,請使用 提供工具結構描述inlinePayload。
- AgentCore Python SDK
-
-
使用 AgentCore Python SDK,您可以使用預設組態建立 AWS Lambda 目標。
# Import dependencies
from bedrock_agentcore_starter_toolkit.operations.gateway.client import GatewayClient

# Initialize the client
client = GatewayClient(region_name="us-east-1")

# Create a lambda target.
lambda_target = client.create_mcp_gateway_target(
    gateway=gateway,
    name=None, # If you don't set one, one will be generated.
    target_type="lambda",
    target_payload=None, # Define your own lambda if you pre-created one. Otherwise leave this as None and one will be created for you.
    credentials=None, # If you leave this as None, one will be created for you
)
以下是您可以為 target_payload 提供的範例引數。如果您省略 target_payload引數,則會使用此承載:
{
    "lambdaArn": "<insert your lambda arn>",
    "toolSchema": {
        "inlinePayload": [
            {
                "name": "get_weather",
                "description": "Get weather for a location",
                "inputSchema": {
                    "type": "object",
                    "properties": {
                        "location": {
                            "type": "string",
                            "description": "the location e.g. seattle, wa"
                        }
                    },
                    "required": [
                        "location"
                    ]
                }
            },
            {
                "name": "get_time",
                "description": "Get time for a timezone",
                "inputSchema": {
                    "type": "object",
                    "properties": {
                        "timezone": {
                            "type": "string"
                        }
                    },
                    "required": [
                        "timezone"
                    ]
                }
            }
        ]
    }
}
- Boto3
-
-
下列 Python 程式碼示範如何使用 AWS Python SDK (Boto3) 新增 Lambda 目標:
import boto3

# Create the agentcore client
agentcore_client = boto3.client('bedrock-agentcore-control')

# Create a Lambda target
target = agentcore_client.create_gateway_target(
    gatewayIdentifier="your-gateway-id",
    name="LambdaTarget",
    targetConfiguration={
        "mcp": {
            "lambda": {
                "lambdaArn": "arn:aws:lambda:us-west-2:123456789012:function:YourLambdaFunction",
                "toolSchema": {
                    "inlinePayload": [
                        {
                            "name": "get_weather",
                            "description": "Get weather for a location",
                            "inputSchema": {
                                "type": "object",
                                "properties": {"location": {"type": "string"}},
                                "required": ["location"],
                            },
                        },
                        {
                            "name": "get_time",
                            "description": "Get time for a timezone",
                            "inputSchema": {
                                "type": "object",
                                "properties": {"timezone": {"type": "string"}},
                                "required": ["timezone"],
                            },
                        },
                    ]
                }
            }
        }
    },
    credentialProviderConfigurations=[
        {
            "credentialProviderType": "GATEWAY_IAM_ROLE"
        }
    ]
)
- Interactive
-
-
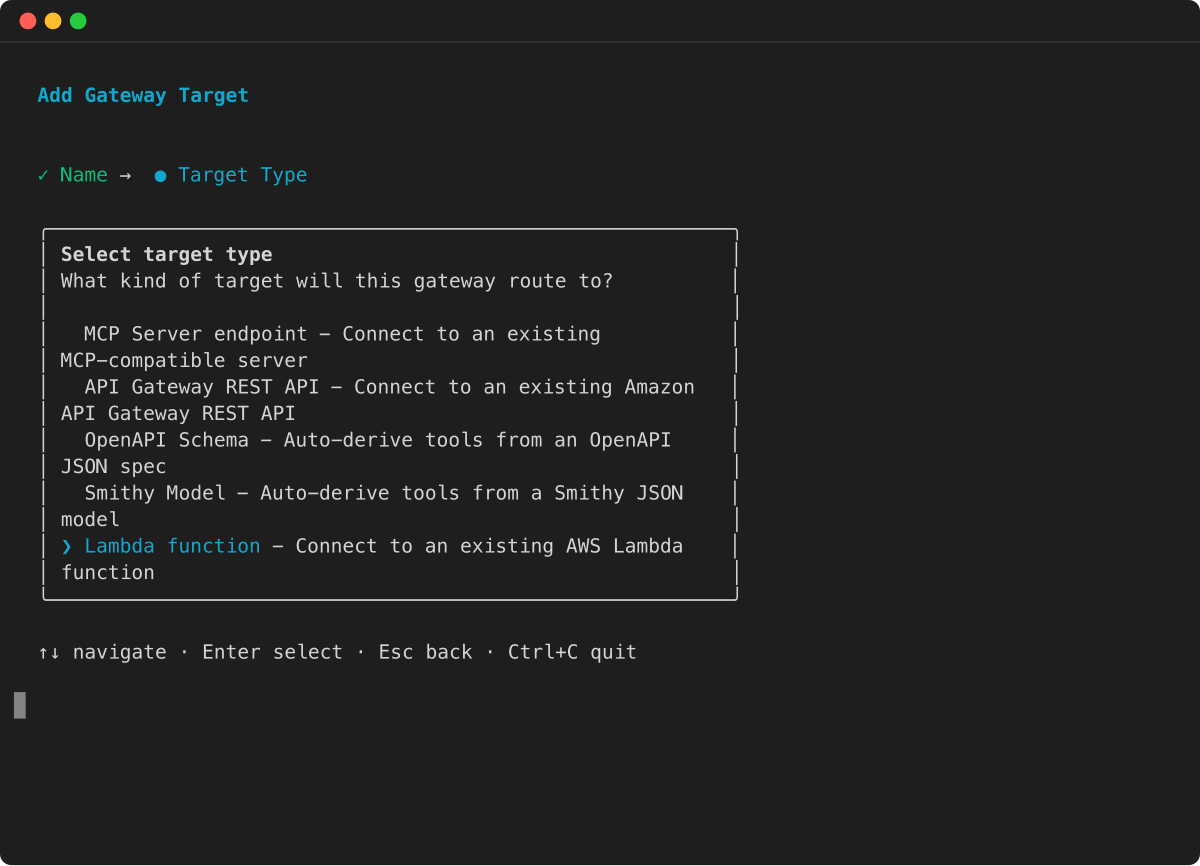
在 AgentCore CLI 互動式終端機 UI 中,執行 agentcore ,選取新增 ,選擇閘道目標 ,然後選取 Lambda 函數 :
然後,精靈會提示您輸入目標名稱、Lambda 函數 ARN、工具結構描述檔案和傳出授權組態。
新增 API Gateway 階段目標
若要新增 API Gateway REST API 的階段做為目標,請指定 API 的 ARN 和階段,並定義設定以篩選 API 閘道中的工具,或覆寫閘道中工具的名稱和描述:
下列範例示範如何新增 API Gateway 目標。也會套用下列組態:
選取下列其中一種方法:
範例
- AgentCore CLI
-
-
若要新增 API Gateway REST API 階段做為目標,agentcore add gateway-target請使用 --type api-gateway選項執行 :
agentcore add gateway-target \
  --name MyAPIGatewayTarget \
  --type api-gateway \
  --rest-api-id your-rest-api-id \
  --stage your-stage \
  --gateway MyGateway
agentcore deploy
- AWS CLI
-
-
下列命令使用 AWS CLI:
aws bedrock-agentcore-control create-gateway-target \
    --gateway-identifier "your-gateway-id" \
    --name "SearchAPITarget" \
    --target-configuration '{
        "mcp": {
            "apiGateway": {
                "restApiId": "your-rest-api-id",
                "stage": "your-stage",
                "apiGatewayToolConfiguration": {
                    "toolFilters": [
                        {
                            "filterPath": "/products",
                            "methods": [
                                "GET",
                                "POST"
                            ]
                        }
                    ],
                    "toolOverrides": [
                        {
                            "path": "/products",
                            "method": "GET",
                            "name": "get_items",
                            "description": "Gets information for items in the list of products."
                        }
                    ]
                }
            }
        }
    }'
    --credential-provider-configurations '[
        {
            "credentialProviderType": "GATEWAY_IAM_ROLE"
        }
    ]'
- Boto3
-
-
下列程式碼顯示 使用 AWS Python SDK (Boto3):
import boto3

# Create the client
agentcore_client = boto3.client('bedrock-agentcore-control')

# Create an API gateway REST API target with gateway service role authentication
target = agentcore_client.create_gateway_target(
    gatewayIdentifier="your-gateway-id",
    name="SearchAPITarget",
    targetConfiguration={
        "mcp": {
            "apiGateway": {
                "restApiId": "your-rest-api-id",
                "stage": "your-stage",
                "apiGatewayToolConfiguration": {
                    "toolFilters": [
                        {
                            "filterPath": "/products",
                            "methods": [
                                "GET",
                                "POST"
                            ]
                        }
                    ],
                    "toolOverrides": [
                        {
                            "path": "/products",
                            "method": "GET",
                            "name": "get_item",
                            "description": "Gets information for a specific item in the product list."
                        }
                    ]
                }
            }
        }
    },
    credentialProviderConfigurations=[
        {
            "credentialProviderType": "GATEWAY_IAM_ROLE"
        }
    ]
)
- Interactive
-
-
在 AgentCore CLI 互動式終端機 UI 中,執行 agentcore ,選取新增 ,選擇閘道目標 ,然後選取 API Gateway REST API :
然後,精靈會提示您輸入目標名稱、REST API ID、階段和傳出授權組態。
新增 OpenAPI 目標
選取下列其中一種方法:
範例
- AgentCore CLI
-
-
若要新增 OpenAPI 結構描述目標,agentcore add gateway-target請使用 --type open-api-schema選項執行 ,並提供 OpenAPI 規格檔案的路徑:
agentcore add gateway-target \
  --name MyOpenAPITarget \
  --type open-api-schema \
  --schema path/to/openapi-spec.json \
  --outbound-auth none|api-key|oauth \
  --gateway MyGateway
agentcore deploy
- Boto3
-
-
下列 Python 程式碼示範如何使用 AWS Python SDK (Boto3) 新增 OpenAPI 目標。結構描述已上傳至 S3 位置,其 URI 已在 target_payload 中參考。目標的傳出授權是透過 API 金鑰進行。
import boto3

# Create the client
agentcore_client = boto3.client('bedrock-agentcore-control')

# Create an OpenAPI target with API Key authentication
target = agentcore_client.create_gateway_target(
    gatewayIdentifier="your-gateway-id",
    name="SearchAPITarget",
    targetConfiguration={
        "mcp": {
            "openApiSchema": {
                "s3": {
                    "uri": "s3://your-bucket/path/to/open-api-spec.json",
                    "bucketOwnerAccountId": "123456789012"
                }
            }
        }
    },
    credentialProviderConfigurations=[
        {
            "credentialProviderType": "API_KEY",
            "credentialProvider": {
                "apiKeyCredentialProvider": {
                    "providerArn": "arn:aws:agent-credential-provider:us-east-1:123456789012:token-vault/default/apikeycredentialprovider/abcdefghijk",
                    "credentialLocation": "HEADER",
                    "credentialParameterName": "X-API-Key"
                }
            }
        }
    ]
)
- Interactive
-
-
在 AgentCore CLI 互動式終端機 UI 中,執行 agentcore ,選取新增 ,選擇閘道目標 ,然後選取 OpenAPI 結構描述 :
然後,精靈會提示您輸入目標名稱、OpenAPI 規格檔案的路徑,以及傳出授權組態。
新增 Smithy 目標
選取下列其中一種方法:
範例
- AgentCore CLI
-
-
若要新增 Smithy 模型目標,agentcore add gateway-target請使用 --type smithy-model選項執行 ,並提供 Smithy 模型檔案的路徑:
agentcore add gateway-target \
  --name MySmithyTarget \
  --type smithy-model \
  --schema path/to/smithy-model.json \
  --gateway MyGateway
agentcore deploy
- Boto3
-
-
下列 Python 程式碼說明如何使用 AWS Python SDK (Boto3) 新增 Smithy 模型目標:
import boto3

# Create the agentcore client
agentcore_client = boto3.client('bedrock-agentcore-control')

# Create a Smithy model target
target = agentcore_client.create_gateway_target(
    gatewayIdentifier="your-gateway-id",
    name="DynamoDBTarget",
    targetConfiguration={
        "mcp": {
            "smithyModel": {
                "s3": {
                    "uri": "s3://your-bucket/path/to/smithy-model.json",
                    "bucketOwnerAccountId": "123456789012"
                }
            }
        }
    },
    credentialProviderConfigurations=[
        {
            "credentialProviderType": "GATEWAY_IAM_ROLE"
        }
    ]
)
- Interactive
-
-
在 AgentCore CLI 互動式終端機 UI 中,執行 agentcore ,選取新增 ,選擇閘道目標 ,然後選取史密斯模型 :
然後,精靈會提示您輸入目標名稱、Smithy 模型檔案的路徑,以及傳出授權組態。
新增 HTTP 執行期目標
您可以將 Amazon Bedrock AgentCore 執行期代理程式新增為閘道的 HTTP 目標。閘道會將流量直接傳送至執行期代理程式,無需彙總或通訊協定轉譯。
如需 HTTP 目標的詳細資訊,請參閱 Amazon Bedrock AgentCore 執行期目標。
選取下列其中一種方法:
範例
- AWS CLI
-
-
下列命令會使用 IAM 授權建立 HTTP 執行期目標:
aws bedrock-agentcore-control create-gateway-target \
    --gateway-identifier "your-gateway-id" \
    --name "MyRuntimeTarget" \
    --description "Runtime gateway target" \
    --target-configuration '{
        "http": {
            "agentcoreRuntime": {
                "arn": "arn:aws:bedrock-agentcore:us-west-2:111122223333:runtime/RUNTIME_ID"
            }
        }
    }' \
    --credential-provider-configurations '[{
        "credentialProviderType": "GATEWAY_IAM_ROLE"
    }]'
- Boto3
-
-
下列 Python 程式碼示範如何使用 AWS Python SDK (Boto3) 新增 HTTP 執行期目標:
import boto3

agentcore_client = boto3.client('bedrock-agentcore-control')

target = agentcore_client.create_gateway_target(
    gatewayIdentifier="your-gateway-id",
    name="MyRuntimeTarget",
    description="Runtime gateway target",
    targetConfiguration={
        "http": {
            "agentcoreRuntime": {
                "arn": "arn:aws:bedrock-agentcore:us-west-2:111122223333:runtime/RUNTIME_ID"
            }
        }
    },
    credentialProviderConfigurations=[
        {
            "credentialProviderType": "GATEWAY_IAM_ROLE"
        }
    ]
)
新增 MCP 伺服器目標
您可以使用 AgentCore CLI 或 AWS Python SDK (Boto3) 新增 MCP 伺服器目標。下列範例示範如何使用不同的傳出授權類型建立 MCP 伺服器目標。
具有 IAM (SigV4) 授權的 MCP 伺服器
下列範例會使用 IAM 授權建立 MCP 伺服器目標。閘道使用 SigV4 搭配閘道服務角色的憑證來簽署對 MCP 伺服器的請求。您必須指定要簽署service的名稱。region 是選用的,預設為閘道的區域。
的值service取決於 MCP 伺服器託管的位置。以下是常見的值:
-
bedrock-agentcore – 適用於託管在 Amazon Bedrock AgentCore 上的 MCP 伺服器,例如執行期 (請參閱在 AgentCore 執行期中部署 MCP 伺服器) 或其他閘道。
-
execute-api – 適用於 Amazon API Gateway 後方的 MCP 伺服器。
-
lambda – 適用於 Lambda 函數 URLs MCP 伺服器。
選取下列其中一種方法:
範例
- AWS CLI
-
-
aws bedrock-agentcore-control create-gateway-target \
    --gateway-identifier "your-gateway-id" \
    --name "MyMCPTarget" \
    --target-configuration '{
        "mcp": {
            "mcpServer": {
                "endpoint": "https://my-server.bedrock-agentcore.us-west-2.api.aws"
            }
        }
    }' \
    --credential-provider-configurations '[{
        "credentialProviderType": "GATEWAY_IAM_ROLE",
        "credentialProvider": {
            "iamCredentialProvider": {
                "service": "bedrock-agentcore",
                "region": "us-west-2"
            }
        }
    }]'
- Interactive
-
-
在 AgentCore CLI 互動式終端機 UI 中,執行 agentcore ,選取新增 ,選擇閘道目標 ,然後選取 MCP 伺服器端點 :
然後,精靈會提示您輸入目標名稱、MCP 伺服器端點 URL 和傳出授權組態。
- Boto3
-
-
import boto3

agentcore_client = boto3.client('bedrock-agentcore-control')

target = agentcore_client.create_gateway_target(
    gatewayIdentifier="your-gateway-id",
    name="MyMCPTarget",
    targetConfiguration={
        "mcp": {
            "mcpServer": {
                "endpoint": "https://my-server.bedrock-agentcore.us-west-2.api.aws"
            }
        }
    },
    credentialProviderConfigurations=[
        {
            "credentialProviderType": "GATEWAY_IAM_ROLE",
            "credentialProvider": {
                "iamCredentialProvider": {
                    "service": "bedrock-agentcore",
                    "region": "us-west-2"
                }
            }
        }
    ]
)
具有 OAuth 授權的 MCP 伺服器
下列範例會使用 OAuth (用戶端登入資料) 授權建立 MCP 伺服器目標。
選取下列其中一種方法:
範例
- AWS CLI
-
-
aws bedrock-agentcore-control create-gateway-target \
    --gateway-identifier "your-gateway-id" \
    --name "MyMCPTarget" \
    --target-configuration '{
        "mcp": {
            "mcpServer": {
                "endpoint": "https://my-mcp-server.example.com"
            }
        }
    }' \
    --credential-provider-configurations '[{
        "credentialProviderType": "OAUTH",
        "credentialProvider": {
            "oauthCredentialProvider": {
                "providerArn": "arn:aws:bedrock-agentcore:us-west-2:123456789012:token-vault/default/oauth2credentialprovider/my-oauth-provider",
                "scopes": []
            }
        }
    }]'
- AgentCore CLI
-
-
若要使用 OAuth 授權新增 MCP 伺服器目標,agentcore add gateway-target請使用 --type mcp-server選項執行 ,並指定 OAuth 憑證:
agentcore add gateway-target \
  --type mcp-server \
  --name MyMCPTarget \
  --endpoint https://my-mcp-server.example.com \
  --gateway MyGateway \
  --outbound-auth oauth \
  --oauth-client-id my-client \
  --oauth-client-secret my-secret \
  --oauth-discovery-url https://auth.example.com/.well-known/openid-configuration
agentcore deploy
- Boto3
-
-
import boto3

agentcore_client = boto3.client('bedrock-agentcore-control')

target = agentcore_client.create_gateway_target(
    gatewayIdentifier="your-gateway-id",
    name="MyMCPTarget",
    targetConfiguration={
        "mcp": {
            "mcpServer": {
                "endpoint": "https://my-mcp-server.example.com"
            }
        }
    },
    credentialProviderConfigurations=[
        {
            "credentialProviderType": "OAUTH",
            "credentialProvider": {
                "oauthCredentialProvider": {
                    "providerArn": "arn:aws:bedrock-agentcore:us-west-2:123456789012:token-vault/default/oauth2credentialprovider/my-oauth-provider",
                    "scopes": []
                }
            }
        }
    ]
)
具有 API 金鑰授權的 MCP 伺服器
下列範例會使用 API 金鑰授權建立 MCP 伺服器目標。
選取下列其中一種方法:
範例
- AWS CLI
-
-
aws bedrock-agentcore-control create-gateway-target \
    --gateway-identifier "your-gateway-id" \
    --name "MyMCPTarget" \
    --target-configuration '{
        "mcp": {
            "mcpServer": {
                "endpoint": "https://my-mcp-server.example.com"
            }
        }
    }' \
    --credential-provider-configurations '[{
        "credentialProviderType": "API_KEY",
        "credentialProvider": {
            "apiKeyCredentialProvider": {
                "providerArn": "arn:aws:bedrock-agentcore:us-west-2:123456789012:token-vault/default/apikeycredentialprovider/my-api-key",
                "credentialLocation": "HEADER",
                "credentialParameterName": "x-api-key",
                "credentialPrefix": ""
            }
        }
    }]'
- Boto3
-
-
import boto3

agentcore_client = boto3.client('bedrock-agentcore-control')

target = agentcore_client.create_gateway_target(
    gatewayIdentifier="your-gateway-id",
    name="MyMCPTarget",
    targetConfiguration={
        "mcp": {
            "mcpServer": {
                "endpoint": "https://my-mcp-server.example.com"
            }
        }
    },
    credentialProviderConfigurations=[
        {
            "credentialProviderType": "API_KEY",
            "credentialProvider": {
                "apiKeyCredentialProvider": {
                    "providerArn": "arn:aws:bedrock-agentcore:us-west-2:123456789012:token-vault/default/apikeycredentialprovider/my-api-key",
                    "credentialLocation": "HEADER",
                    "credentialParameterName": "x-api-key",
                    "credentialPrefix": ""
                }
            }
        }
    ]
)
使用 Amazon Bedrock 受管知識庫新增連接器目標
您可以將 Amazon Bedrock 受管知識庫連接器新增為閘道的目標。
如需 Amazon Bedrock 受管知識庫連接器的詳細資訊,請參閱 Amazon Bedrock 受管知識庫。
設定受管知識庫
連接器會公開兩個工具,每個工具都以其後端操作命名: AgenticRetrieveStream(多步驟、串流代理程式擷取) 和 Retrieve(單一混合搜尋)。您可以為每個工具新增組態項目。
對於 AgenticRetrieveStream,請在 agenticRetrieveConfiguration中設定 retrievers(要查詢的受管知識庫) 和 parameterValues。兩者都是必要的 — 省略 agenticRetrieveConfiguration會導致執行期錯誤。它可以是空的物件 ({}),以接受服務管理的預設值,但指定foundationModelType並rerankingModelType明確組態。客服人員不會在通話時間提供知識庫 IDs。對於 Retrieve,請在 knowledgeBaseId中設定 parameterValues;這是必要的。
連接器僅支援受管知識庫。連接器目標僅支援GATEWAY_IAM_ROLE登入資料提供者類型。
範例
- Boto3
-
-
下列 Python 程式碼說明如何使用 AWS Python SDK (Boto3) 使用 Amazon Bedrock 受管知識庫連接器組態建立閘道目標:
import boto3

gateway_client = boto3.client("bedrock-agentcore-control", region_name="<REGION>")

gateway_client.create_gateway_target(
    name="managed-kb",
    gatewayIdentifier="<GATEWAY_ID>",
    targetConfiguration={
        "mcp": {
            "connector": {
                "source": {"connectorId": "bedrock-knowledge-bases"},
                "configurations": [
                    {
                        "name": "AgenticRetrieveStream",
                        "parameterValues": {
                            "retrievers": [
                                {
                                    "description": "Product documentation",
                                    "configuration": {"knowledgeBase": {"knowledgeBaseId": "<KB_ID_1>"}},
                                },
                                {
                                    "description": "Engineering runbooks",
                                    "configuration": {"knowledgeBase": {"knowledgeBaseId": "<KB_ID_2>"}},
                                },
                            ],
                            "agenticRetrieveConfiguration": {
                                "foundationModelType": "MANAGED",
                                "rerankingModelType": "MANAGED",
                            },
                        },
                    },
                    {
                        "name": "Retrieve",
                        "parameterValues": {"knowledgeBaseId": "<KB_ID>"},
                    },
                ],
            }
        }
    },
    credentialProviderConfigurations=[
        {"credentialProviderType": "GATEWAY_IAM_ROLE"}
    ],
)
- AWS CLI
-
-
下列命令會使用 AWS CLI 建立具有 Amazon Bedrock 受管知識庫連接器組態的閘道目標:
aws bedrock-agentcore-control create-gateway-target \
  --gateway-identifier "<GATEWAY_ID>" \
  --name "managed-kb" \
  --target-configuration '{
    "mcp": {
      "connector": {
        "source": {
          "connectorId": "bedrock-knowledge-bases"
        },
        "configurations": [
          {
            "name": "AgenticRetrieveStream",
            "parameterValues": {
              "retrievers": [
                {
                  "description": "Product documentation",
                  "configuration": {"knowledgeBase": {"knowledgeBaseId": "<KB_ID_1>"}}
                },
                {
                  "description": "Engineering runbooks",
                  "configuration": {"knowledgeBase": {"knowledgeBaseId": "<KB_ID_2>"}}
                }
              ],
              "agenticRetrieveConfiguration": {
                "foundationModelType": "MANAGED",
                "rerankingModelType": "MANAGED"
              }
            }
          },
          {
            "name": "Retrieve",
            "parameterValues": {
              "knowledgeBaseId": "<KB_ID>"
            }
          }
        ]
      }
    }
  }' \
  --credential-provider-configurations '[{"credentialProviderType": "GATEWAY_IAM_ROLE"}]' \
  --region "<REGION>"
- AgentCore CLI
-
-
若要新增受管知識庫連接器目標,agentcore add gateway-target請使用 執行 --type connector --connector bedrock-knowledge-bases:
agentcore add gateway-target \
  --name MyKnowledgeBaseTarget \
  --type connector \
  --connector bedrock-knowledge-bases \
  --knowledge-base-id <KB_ID> \
  --gateway MyGateway
agentcore deploy
- Interactive
-
-
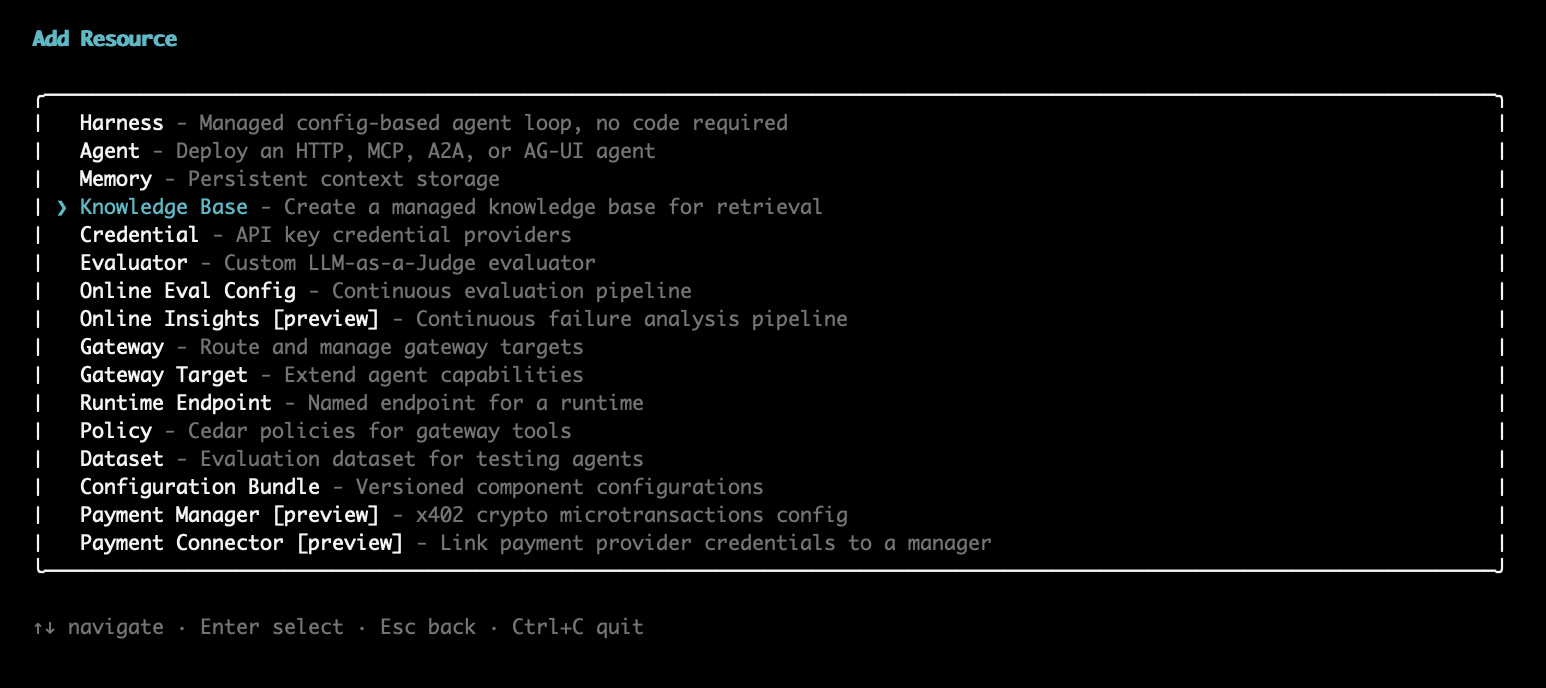
在 AgentCore CLI 互動式終端機 UI 中,執行 agentcore add gateway-target,然後從目標類型選擇器中選取 Amazon Bedrock 知識庫:
精靈會提示您輸入名稱、描述,並允許您選取一或多個來源類型和來源。
在您呼叫 後CreateGatewayTarget,Gateway 會以非同步方式驗證組態 (通常在大約 30 秒內),其中包括對每個繫結知識庫的GetKnowledgeBase檢查。GetGatewayTarget 輪詢直到 status為 READY;FAILED狀態包含描述問題的原因。
若要自訂代理程式擷取 - 例如,限制規劃反覆運算或連接護欄 - 將選用欄位新增至 agenticRetrieveConfiguration。如果您省略它們,則會套用服務管理的預設值。如需所有接受的值,請參閱組態參考。
{
  "name": "AgenticRetrieveStream",
  "parameterValues": {
    "retrievers": [
      { "configuration": { "knowledgeBase": { "knowledgeBaseId": "<KB_ID>" } } }
    ],
    "agenticRetrieveConfiguration": {
      "maxAgentIteration": 5,
      "policyConfiguration": {
        "guardrailConfiguration": {
          "guardrailId": "<GUARDRAIL_ID>",
          "guardrailVersion": "1"
        }
      }
    }
  }
}
控制代理程式可以設定的參數
每個工具組態項目接受兩個參數控制,以決定呼叫客服人員看到的內容,以及閘道傳送至知識庫的內容:
綁knowledgeBaseId定parameterValues並不要公開。
下列組態項目會繫結知識庫、設定預設 10 個結果,並將查詢文字和結果計數公開給代理程式:
{
  "name": "Retrieve",
  "description": "Search the knowledge base for relevant documents.",
  "parameterValues": {
    "knowledgeBaseId": "<KB_ID>",
    "retrievalConfiguration": {
      "managedSearchConfiguration": {
        "numberOfResults": 10
      }
    }
  },
  "parameterOverrides": [
    {
      "path": "$.retrievalQuery.text",
      "description": "The search query. Use specific keywords for best results.",
      "visible": true
    },
    {
      "path": "$.retrievalConfiguration.managedSearchConfiguration.numberOfResults",
      "description": "Number of results to retrieve (1-100).",
      "visible": true
    }
  ]
}
設定閘道服務角色
此連接器使用閘道執行角色 — 您傳遞給 的 IAM 角色 ARNCreateGateway,AgentCore 服務會擔任此角色來代您呼叫後端。這是您建立的角色,而不是服務連結角色。對於 Amazon Bedrock 受管知識庫連接器,其需要下列許可:
-
bedrock:GetKnowledgeBase — 在建立目標時驗證繫結知識庫。範圍限定於 受管知識庫資源。
-
bedrock:Retrieve — 適用於 Retrieve工具。範圍限定於 受管知識庫資源。
-
bedrock:AgenticRetrieveStream — 適用於 AgenticRetrieveStream工具。此動作的範圍不限於受管知識庫資源,因此請在 上授予它*。
Gateway 會將後端呼叫簽署為 bedrock服務。bedrock:GetKnowledgeBase 包含您新增的工具;如果您只新增一個工具,則只包含該工具的擷取動作。
bedrock-agentcore:InvokeGateway 不是執行角色的一部分。該許可屬於發起人 — 呼叫閘道的客服人員或應用程式 — 而非閘道擔任的角色。
將具有下列內容的政策新增至連接至閘道的執行角色:
{
  "Version": "2012-10-17",
  "Statement": [
    {
      "Sid": "ValidateKnowledgeBase",
      "Effect": "Allow",
      "Action": "bedrock:GetKnowledgeBase",
      "Resource": "arn:aws:bedrock:<REGION>:<ACCOUNT_ID>:knowledge-base/<KB_ID>"
    },
    {
      "Sid": "RetrieveFromKnowledgeBase",
      "Effect": "Allow",
      "Action": "bedrock:Retrieve",
      "Resource": "arn:aws:bedrock:<REGION>:<ACCOUNT_ID>:knowledge-base/<KB_ID>"
    },
    {
      "Sid": "AgenticRetrieveStream",
      "Effect": "Allow",
      "Action": "bedrock:AgenticRetrieveStream",
      "Resource": "*"
    }
  ]
}
服務角色也必須信任 AgentCore 服務,才能擔任該角色。連接下列信任政策,並使用 和 aws:SourceArn條件將其限定到您的帳戶aws:SourceAccount和閘道:
{
  "Version": "2012-10-17",
  "Statement": [
    {
      "Sid": "AllowAgentCoreToAssumeRole",
      "Effect": "Allow",
      "Principal": {
        "Service": "bedrock-agentcore.amazonaws.com"
      },
      "Action": "sts:AssumeRole",
      "Condition": {
        "StringEquals": {
          "aws:SourceAccount": "<ACCOUNT_ID>"
        },
        "ArnLike": {
          "aws:SourceArn": "arn:aws:bedrock-agentcore:<REGION>:<ACCOUNT_ID>:gateway/*"
        }
      }
    }
  ]
}
使用 Web 搜尋工具新增連接器目標
您可以將內建連接器新增為閘道的目標。Web 搜尋工具連接器提供受管 Web 搜尋功能,無需自訂基礎設施或 API 金鑰。
如需 Web 搜尋工具連接器的詳細資訊,請參閱 Web 搜尋工具。
設定 Web 搜尋工具
您可以選擇將 version欄位中包含 ,將目標鎖定到特定連接器版本source。如果您省略 version,目標會使用連接器目前的預設版本。如需連接器版本的詳細資訊,請參閱連接器版本。
範例
- Boto3
-
-
下列 Python 程式碼示範如何使用 AWS Python SDK (Boto3) 使用 Web 搜尋工具連接器組態建立閘道目標:
import boto3

gateway_client = boto3.client("bedrock-agentcore-control", region_name="<REGION>")

gateway_client.create_gateway_target(
    name="web-search-tool",
    gatewayIdentifier="<GATEWAY_ID>",
    targetConfiguration={
        "mcp": {
            "connector": {
                "source": {"connectorId": "web-search", "version": "1.1.0"},
                "configurations": [{"name": "WebSearch", "parameterValues": {}}],
            }
        }
    },
    credentialProviderConfigurations=[
        {"credentialProviderType": "GATEWAY_IAM_ROLE"}
    ],
)
- AWS CLI
-
-
下列命令會使用 AWS CLI 建立具有 Web 搜尋工具連接器組態的閘道目標:
aws bedrock-agentcore-control create-gateway-target \
  --gateway-identifier "<GATEWAY_ID>" \
  --name "web-search-tool" \
  --target-configuration '{
    "mcp": {
      "connector": {
        "source": {
          "connectorId": "web-search",
          "version": "1.1.0"
        },
        "configurations": [
          {
            "name": "WebSearch",
            "parameterValues": {}
          }
        ]
      }
    }
  }' \
  --credential-provider-configurations '[{"credentialProviderType": "GATEWAY_IAM_ROLE"}]' \
  --region "<REGION>"
- AgentCore CLI
-
-
若要新增 Web 搜尋工具目標,agentcore add gateway-target請使用 執行 --type connector --connector web-search:
agentcore add gateway-target \
  --name MyWebSearchTarget \
  --type connector \
  --connector web-search \
  --gateway MyGateway
agentcore deploy
- Interactive
-
-
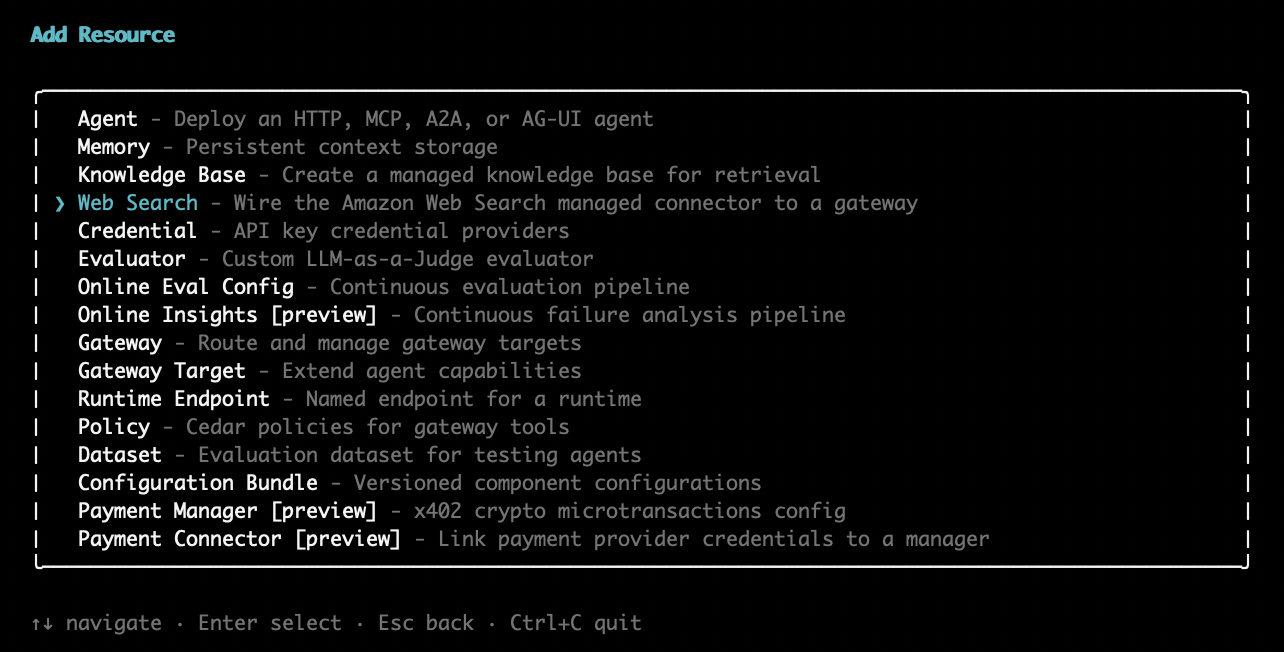
在 AgentCore CLI 互動式終端機 UI 中,執行 agentcore add gateway-target,然後從目標類型選擇器中選取 Amazon Web Search:
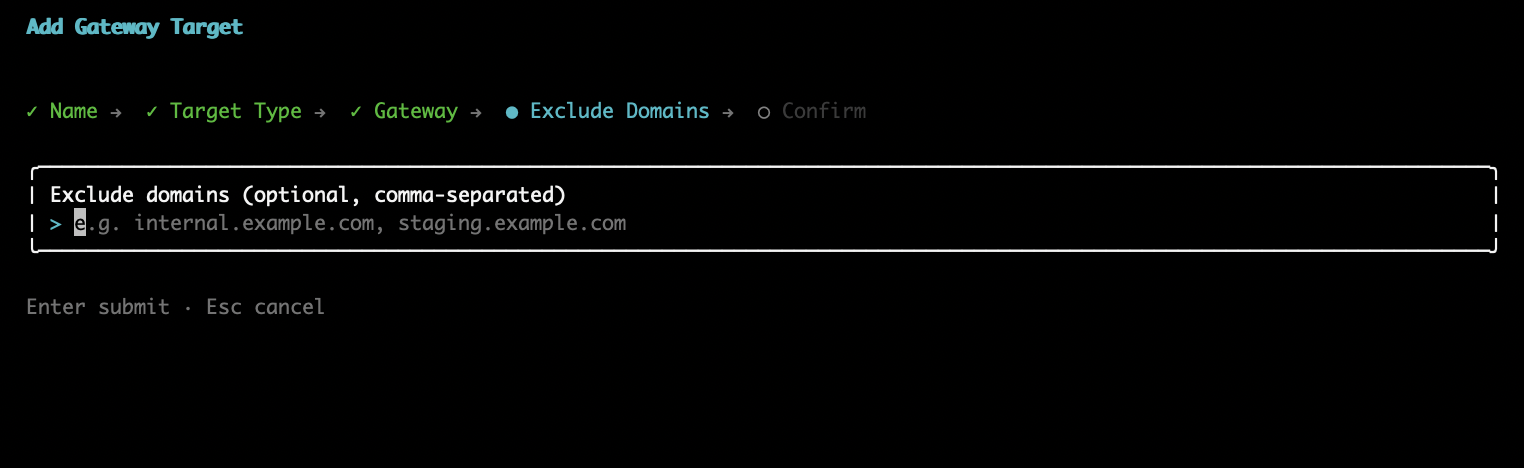
精靈會提示您輸入目標名稱、要連接的閘道,以及要從搜尋結果中排除的選用網域清單。
設定網域篩選
您可以透過設定網域包含或排除清單來限制 Web 搜尋工具允許查詢的網域。這對於想要防止客服人員從特定網站傳回結果的管理員很有用。
-
目標層級網域排除清單 — 從目標上所有搜尋排除的網域清單,使用 在目標建立時設定 parameterValues.domainFilter.exclude。排除清單會在伺服器端強制執行,並從呼叫代理程式中隱藏。
-
目標層級網域包含清單 (連接器版本 1.2.0和更新版本) — 除了排除清單之外,您還可以設定 parameterValues.domainFilter.include,將搜尋限制為一組特定的網域。
連接器版本 1.2.0和更新版本中的呼叫客服人員可以使用請求層級篩選條件 (網域包含/排除和發佈日期範圍)。請求層級篩選條件包含目標層級排除和包含清單:一律套用目標層級排除和包含項目,且代理程式無法放寬這些項目。
下列範例會建立鎖定至 版本的 Web 搜尋工具目標1.2.0,同時包含 和 排除 清單:
範例
- Boto3
-
-
下列 Python 程式碼說明如何使用 AWS Python SDK (Boto3) 建立具有網域篩選的 Web 搜尋工具目標:
import boto3

gateway_client = boto3.client("bedrock-agentcore-control", region_name="<REGION>")

gateway_client.create_gateway_target(
    name="web-search-tool",
    gatewayIdentifier="<GATEWAY_ID>",
    targetConfiguration={
        "mcp": {
            "connector": {
                "source": {"connectorId": "web-search", "version": "1.2.0"},
                "configurations": [
                    {
                        "name": "WebSearch",
                        "parameterValues": {
                            "domainFilter": {
                                "include": ["allowed-website-1.com", "allowed-website-2.com"],
                                "exclude": ["blocked-website-1.com", "blocked-website-2.com"]
                            }
                        },
                    }
                ],
            }
        }
    },
    credentialProviderConfigurations=[
        {"credentialProviderType": "GATEWAY_IAM_ROLE"}
    ],
)
- AWS CLI
-
-
下列命令會使用 CLI AWS 建立具有網域篩選的 Web 搜尋工具目標:
aws bedrock-agentcore-control create-gateway-target \
  --gateway-identifier "<GATEWAY_ID>" \
  --name "web-search-tool" \
  --target-configuration '{
    "mcp": {
      "connector": {
        "source": {
          "connectorId": "web-search",
          "version": "1.2.0"
        },
        "configurations": [
          {
            "name": "WebSearch",
            "parameterValues": {
              "domainFilter": {
                "include": ["allowed-website-1.com", "allowed-website-2.com"],
                "exclude": ["blocked-website-1.com", "blocked-website-2.com"]
              }
            }
          }
        ]
      }
    }
  }' \
  --credential-provider-configurations '[{"credentialProviderType": "GATEWAY_IAM_ROLE"}]' \
  --region "<REGION>"
- AgentCore CLI
-
-
透過 傳遞以逗號分隔的網域清單--exclude-domains:
agentcore add gateway-target \
  --name MyWebSearchTarget \
  --type connector \
  --connector web-search \
  --exclude-domains blocked-website-1.com,blocked-website-2.com \
  --gateway MyGateway
agentcore deploy
- Interactive
-
-
在 AgentCore CLI 互動式終端機 UI 中,新增閘道目標精靈會在您選取 Amazon Web Search 並選擇閘道後,提示選用的以逗號分隔的網域清單,以從搜尋結果中排除。將提示保留空白會建立沒有網域篩選的目標。
您也可以更新現有的目標,以使用 新增或修改網域篩選UpdateGatewayTarget。
設定閘道服務角色
Gateway 需要一個服務角色,允許 AgentCore 服務代表您執行動作。對於 Web 搜尋工具,角色需要下列許可:
將具有下列內容的政策新增至連接至閘道的服務角色:
{
  "Version": "2012-10-17",
  "Statement": [
    {
      "Sid": "InvokeGateway",
      "Effect": "Allow",
      "Action": "bedrock-agentcore:InvokeGateway",
      "Resource": "arn:aws:bedrock-agentcore:<REGION>:<ACCOUNT_ID>:gateway/*"
    },
    {
      "Sid": "InvokeWebSearch",
      "Effect": "Allow",
      "Action": "bedrock-agentcore:InvokeWebSearch",
      "Resource": "arn:aws:bedrock-agentcore:<REGION>:aws:tool/web-search.v1"
    }
  ]
}