Nova Forge 访问与设置
要开始使用 Nova Forge,请遵循以下两个步骤:
步骤 1:订阅 Nova Forge
步骤 2:设置 HyperPod 基础设施
获取 Nova Forge 文档
如需获取 Nova Forge 文档,请按照以下步骤操作:
mkdir NovaForgeHyperpodCLI
cd NovaForgeHyperpodCLI
aws s3 cp s3://nova-forge-c7363-206080352451-us-east-1/v1/ ./ --recursive
pip install -e .
步骤 1:订阅 Nova Forge
快速摘要:
确认您拥有 Amazon Web Services 账户的管理员访问权限。
导航到 SageMaker AI 控制台并请求访问 Nova Forge。
订阅请求获批后,等待 Nova 团队通过电子邮件发送确认信息。
-
使用
forge-subscription标签标记执行角色。此标签是访问 Nova Forge 功能和检查点所必需的。将以下标签添加到执行角色:键:
forge-subscription值:
true
详细指南
要订阅 Nova Forge 并有效使用自定义服务,Amazon Web Services 客户必须拥有其 Amazon Web Services 账户的管理员访问权限,或者由其管理员授予其管理员访问权限。本文档概述了执行以下操作所需的步骤:
获取管理员访问权限
设置用于订阅 Nova Forge 的策略
访问自定义配方
配置自定义
监控工作流
评估自定义模型检查点
选项 A
流程 1:账户用户必须联系账户管理员以请求以下操作:
通过 IAM 将
forge-subscription标签添加到账户(有关步骤,请参阅附录 A)。通过 IAM 添加
ListRoleTags和ListAttachedRolePolicies权限(有关步骤,请参阅附录 B)。

选项 B
流程:账户用户必须联系账户管理员以请求获得账户的管理员访问权限。
获得管理员访问权限后,请按照流程 2 中的步骤进行操作。
流程 2:具有管理员访问权限的亚马逊云科技账户
通过 IAM 将 forge-subscription 标签添加到账户。有关步骤,请参阅附录 A
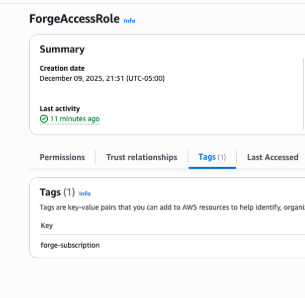
附录 A. 将 forge-subscription 策略添加到 Amazon Web Services 账户
转到 Amazon Web Services IAM 控制面板。单击左侧的“角色”。搜索并选择一个具有管理员权限的角色。

选择 <AssumedRoleToUse>。单击“标签”选项卡。

单击“管理”选项卡。添加新标签。在“键”下输入“forge-subscription”,然后单击“保存更改”

确保“标签”部分显示 forge-subscription 作为键

附录 B. 由管理员将 ListRoleTags 和 ListAttachedPolicies 策略添加到非管理员角色的 Amazon Web Services 账户
转到 Amazon Web Services IAM 控制面板。单击左侧的“角色”。搜索 <AssumedRoleToUse>(例如 ForgeAccessRole)并单击该 <AssumedRoleToUse>(例如 ForgeAccessRole)角色

单击 <AssumedRoleToUse>(例如 ForgeAccessRole)角色并选择“标签”。添加类型为“forge-subscription”的新标签
-
在“权限”下,添加新权限:“添加权限”→“创建内联策略”→“添加以下所列策略”
{
    "Version": "2012-10-17",
    "Statement": [
        {
            "Sid": "VisualEditor0",
            "Effect": "Allow",
            "Action": [
                "iam:ListRoleTags",
                "iam:ListAttachedRolePolicies"
            ],
            "Resource": "*"
        }
    ]
}
步骤 2:设置 HyperPod 基础设施
按照讲习会说明
内容审核设置
如果需要访问 Nova Forge,则 Amazon Nova Lite 1.0 和 Pro 1.0 模型支持可自定义的内容审核设置(CCMS)。CCMS 允许调整内容审核控制,以符合特定的业务需求,同时保持必要的负责任的人工智能保护措施。要确定业务模型是否适合使用 CCMS,请联系 Amazon Web Services 客户经理。
有关使用自定义模型配置和使用 CCMS 的更多信息,请参阅负责任的人工智能工具包和内容审核一节。
