本文属于机器翻译版本。若本译文内容与英语原文存在差异,则一律以英文原文为准。
在中初始化集群 AWS CloudHSM
创建集群并在其中添加硬件安全模块 (HSM) 后 AWS CloudHSM,您可以初始化集群。完成以下主题中的步骤可初始化 群集。
在初始化集群之前,请查看验证集群身份和真实性的过程 HSMs。此过程是可选的,并且仅在初始化集群之前有效。集群初始化后,您无法使用此过程来获取证书或验证。 HSMs
概述
集群初始化过程 HSMs通过基于证书的身份验证系统建立您对集群和您的所有权和控制权。此过程以加密方式证明您是集群 HSMs 中集群的唯一所有者,并奠定了未来与您的 HSMs所有连接所需的信任基础。
本页将向您展示如何执行以下操作:
在您准备好开始使用后,请转到 步骤 1:获取集群 CSR。
步骤 1:获取集群 CSR
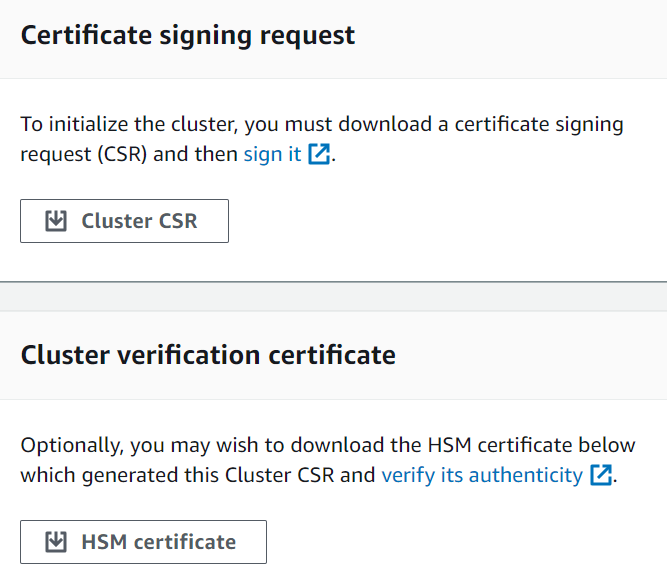
在初始化集群之前,您必须先下载并签署由集群的第一个 HSM 生成的证书签名请求 (CSR)。如果您按照步骤操作来验证您集群的 HSM 的身份,则您已有 CSR 并可以签署。否则,请立即使用AWS CloudHSM 控制台、AWS Command Line Interface (AWS CLI) 或 AWS CloudHSM API 获取 CSR。
- Console
- AWS CLI
-
在命令提示符处,运行以下 describe-clusters 命令,该命令将提取 CSR 并将其保存到文件。<cluster ID>替换为您之前创建的集群的 ID。
$ aws cloudhsmv2 describe-clusters --filters clusterIds=<cluster ID> \
                                   --output text \
                                   --query 'Clusters[].Certificates.ClusterCsr' \
                                   > <cluster ID>_ClusterCsr.csr
- AWS CloudHSM API
步骤 2:为您的根 CA 创建私钥
对于生产集群,您将要创建的密钥应使用可信的随机掩码以安全的方式创建。建议您使用安全的异地和离线 HSM 或等效对象。安全地存储密钥。密钥用于确定集群的身份以及您对集群所含集群的 HSMs 唯一控制权。
在开发和测试期间,您可以使用任何方便的工具 (如 OpenSSL) 来创建和签署集群证书。以下示例为您展示了如何创建密钥。使用密钥创建自签名证书 (见下文) 之后,您应该以安全的方式将其存储起来。要登录您的 AWS CloudHSM 实例,证书必须存在,但私钥不存在。
下表概述了证书生成支持的算法、密钥大小和曲线。
| 算法 |
大小/曲线 |
RSA 5 PKCSv1. |
2048、3072、4096
|
RSA-PSS |
2048、3072、4096
|
ECDSA |
prime256v1、secp384r1、secp521r1 |
摘要 |
SHA-224、SHA-256、SHA-384 和 SHA-512
|
使用以下示例命令为您的自签名 Root CA 创建私钥。
$ openssl genrsa -aes256 -out customerRootCA.key 2048
Generating RSA private key, 2048 bit long modulus
........+++
............+++
e is 65537 (0x10001)
Enter pass phrase for customerRootCA.key:
Verifying - Enter pass phrase for customerRootCA.key:
步骤 3:签署 CSR
在前面的步骤中,您检索了集群的 CSR,并为根 CA 创建了私钥。在此步骤中,您将使用私钥生成签名证书,以便对集群的 CSR 进行签名。以下主题将指导您完成使用 OpenSSL 创建单个自签名证书或证书链的过程。您不需要执行 AWS CLI 此步骤,也无需将外壳与您的 AWS 账户关联。
选择以下方法之一来签署集群的 CSR:
选择您的证书方法
您必须选择以下两种方法之一。不要同时完成这两种方法。
- 选项 A:单一自签名证书
-
创建单个自签名根证书来签署集群的 CSR。这是建立信任的最简单、最直接的方法。
推荐用于:
不需要外部 PKI 的环境
优先考虑简单性的测试和开发环境
前往:创建单个自签名证书
- 选项 B:带有中间 CA 的证书链
-
使用中间证书颁发机构创建证书链。中间证书链允许根证书颁发机构 (CAs) 保持离线状态,同时将证书颁发委托给中间证书颁发机构,从而降低了破坏根 CA 的风险 CAs,从而提高了安全性、可扩展性和灵活性。
推荐用于:
需要外部 PKI 的环境
与 AWS 私有证书颁发机构 (PCA) 集成
AWS PCA 集成示例:您可以使用 AWS 私有证书颁发机构来创建和管理您的中间 CA 证书。这提供了自动化的证书生命周期管理,包括续订和撤销,同时保持根 CA 处于离线状态所带来的安全优势。有关 AWS PCA 的更多信息,请参阅 AWS 私有证书颁发机构用户指南。
前往:创建中间证书颁发机构 (ICA) 链
创建单个自签名证书
您用来为生产集群创建私有密钥的可信硬件还应提供软件工具,以使用该密钥生成自签名证书。以下示例使用 OpenSSL 和您在上一步中创建的私钥来创建自签名的根 CA 签名证书。该证书的有效期为 10 年 (3652 天)。阅读屏幕上的说明,并按照提示操作。
$ openssl req -new -x509 -days 3652 -key customerRootCA.key -out customerRootCA.crt
Enter pass phrase for customerRootCA.key:
You are about to be asked to enter information that will be incorporated
into your certificate request.
What you are about to enter is what is called a Distinguished Name or a DN.
There are quite a few fields but you can leave some blank
For some fields there will be a default value,
If you enter '.', the field will be left blank.
-----
Country Name (2 letter code) [AU]:
State or Province Name (full name) [Some-State]:
Locality Name (eg, city) []:
Organization Name (eg, company) [Internet Widgits Pty Ltd]:
Organizational Unit Name (eg, section) []:
Common Name (e.g. server FQDN or YOUR name) []:
Email Address []:
完成后,此命令将创建一个名为 customerRootCA.crt 的证书文件。将此证书放在要连接到 AWS CloudHSM 集群的每台主机上。如果您为文件指定了不同的名称或将其存储在与主机根不同的路径,则应相应地编辑客户端配置文件。使用您刚创建的证书和私有密钥,在下一步中签署集群证书签名请求 (CSR)。
使用您的自签名根 CA 签署集群 CSR
您用来为生产集群创建私有密钥的可信硬件还应提供工具,以使用该密钥签署 CSR。以下示例使用 OpenSSL 来签署集群的 CSR。以下示例命令使用自签名对 CSR 进行签名 customerRootCA.crt
$ openssl x509 -req -days 3652 -in <cluster ID>_ClusterCsr.csr \
		-CA <customerRootCA>.crt \
		-CAkey <customerRootCA>.key \
		-CAcreateserial \
		-out <cluster ID>_CustomerHsmCertificate.crt
Signature ok
subject=/C=US/ST=CA/O=Cavium/OU=N3FIPS/L=SanJose/CN=HSM:<HSM identifier>:PARTN:<partition number>, for FIPS mode
Getting CA Private Key
Enter pass phrase for <customerRootCA>.key:
完成后,此命令将创建一个名为 <cluster ID>_CustomerHsmCertificate.crt
根据根 CA 验证签名的证书(可选):
$ openssl verify -purpose sslserver -CAfile customerRootCA.crt <cluster ID>_CustomerHsmCertificate.crt
<cluster ID>_CustomerHsmCertificate.crt: OK
使用您的自签名根 CA 生成签名的 HSM 证书后,请转至。步骤 4:初始化集群
创建中间证书颁发机构 (ICA) 链
以下示例将引导您创建长度为 2 的证书链,该链由根证书颁发机构 (CA) 和中间 CA 组成。您将首先创建自签名的根 CA 证书,然后生成由根 CA 签名的中间 CA。最后,您将使用中间 CA 签署集群的 CSR,创建一条从 HSM 证书返回根 CA 的完整信任链。这种方法通过在使用中间 CA 进行 day-to-day证书操作时使根 CA 保持离线状态来增强安全性。
要使用证书链初始化集群,您的证书链必须满足以下要求:
必须对链进行排序,从签署集群 CSR 的中间 CA 开始。按照这个顺序,第一个 ICA 的发行人应该与链中下一个 ICA 的主体相匹配,依此类推。
只有根 CA 应该是自签名的,这意味着其颁发者和主体应相同。
链必须包含不超过 4 个证书(包括末尾的根 CA),并且链的总大小不得超过 16 kb(千字节)。
所有证书颁发机构 (CAs) 都应符合 RFC 5280 指南。
本节提供了使用两种不同方法创建中间证书颁发机构链的示例:用于生成本地证书的 OpenSSL 和用于托管证书服务的 AWS 私有证书颁发机构 (PCA)。选择最适合您的环境和安全要求的方法。
以下示例是一般用例,均使用最基本的配置进行了简化。对于生产环境,请查看特定于您的用例的其他配置选项和安全要求。
- OpenSSL
-
为 CA 创建带有常用 v3 扩展名的 OpenSSL 配置文件:
$ cat > ca-extensions.conf <<EOF
[req]
distinguished_name = req_distinguished_name
[req_distinguished_name]
C = Country Name (2 letter code)
ST = State or Province Name (full name)
L = Locality Name (eg, city)
O = Organization Name (eg, company)
OU = Organizational Unit Name (eg, section)
CN = Common Name (e.g. server FQDN or YOUR name)
[v3_ca]
subjectKeyIdentifier = hash
authorityKeyIdentifier = keyid:always,issuer
basicConstraints = critical,CA:true
keyUsage = critical, keyCertSign, cRLSign, digitalSignature
EOF
使用 OpenSSL 生成自签名的根 CA:
$ openssl req -new -x509 -days 3652 -key customerRootCA.key -out customerRootCA.crt -extensions v3_ca -config ca-extensions.conf
Enter pass phrase for customerRootCA.key:
You are about to be asked to enter information that will be incorporated
into your certificate request.
What you are about to enter is what is called a Distinguished Name or a DN.
There are quite a few fields but you can leave some blank
For some fields there will be a default value,
If you enter '.', the field will be left blank.
-----
Country Name (2 letter code) [AU]:
State or Province Name (full name) [Some-State]:
Locality Name (eg, city) []:
Organization Name (eg, company) [Internet Widgits Pty Ltd]:
Organizational Unit Name (eg, section) []:
Common Name (e.g. server FQDN or YOUR name) []:
Email Address []:
生成中间 CA 密钥:
$ openssl genrsa -aes256 -out intermediateCA.key 2048
Generating RSA private key, 2048 bit long modulus
........+++
............+++
e is 65537 (0x10001)
Enter pass phrase for intermediateCA.key:
Verifying - Enter pass phrase for intermediateCA.key:
创建中间 CA 证书签名请求 (CSR):
$ openssl req -new -key intermediateCA.key -out intermediateCA.csr
Enter pass phrase for intermediateCA.key:
You are about to be asked to enter information that will be incorporated
into your certificate request.
What you are about to enter is what is called a Distinguished Name or a DN.
There are quite a few fields but you can leave some blank
For some fields there will be a default value,
If you enter '.', the field will be left blank.
-----
Country Name (2 letter code) [AU]:
State or Province Name (full name) [Some-State]:
Locality Name (eg, city) []:
Organization Name (eg, company) [Internet Widgits Pty Ltd]:
Organizational Unit Name (eg, section) []:
Common Name (e.g. server FQDN or YOUR name) []:
Email Address []:
使用自签名的根 CA 创建中间 CA 证书:
$ openssl x509 -req -in intermediateCA.csr \
		-CA customerRootCA.crt \
		-CAkey customerRootCA.key \
		-CAcreateserial \
		-days 3652 \
		-extensions v3_ca \
		-extfile ca-extensions.conf \
		-out intermediateCA.crt

Certificate request self-signature ok
subject=C= , ST= , L= , O= , OU=
将证书合并成一个链文件:
$ cat intermediateCA.crt customerRootCA.crt > chainCA.crt

-----BEGIN CERTIFICATE-----
[Intermediate CA]
-----END CERTIFICATE-----
...
...
-----BEGIN CERTIFICATE-----
[Root CA]
-----END CERTIFICATE-----
使用您的中间 CA 签署集群 CSR:
$ openssl x509 -req -days 3652 -in <cluster ID>_ClusterCsr.csr \
			-CA intermediateCA.crt \
			-CAkey intermediateCA.key \
			-CAcreateserial \
			-out <cluster ID>_CustomerHsmCertificate.crt
Signature ok
subject=/C=US/ST=CA/O=Cavium/OU=N3FIPS/L=SanJose/CN=HSM:<HSM identifier>:PARTN:<partition number>, for FIPS mode
Getting CA Private Key
Enter pass phrase for intermediateCA.key:
- AWS PCA
-
使用 AWS 私有证书颁发机构创建并激活根 CA:
$ # 1. Create Root CA
aws acm-pca create-certificate-authority \
    --certificate-authority-configuration \
        "KeyAlgorithm=RSA_4096,
        SigningAlgorithm=SHA256WITHRSA,
        Subject={Country=US,Organization=MyOrg,OrganizationalUnit=IT,CommonName=RootCA}" \
    --certificate-authority-type ROOT

# Store the Root CA Authority ARN from the previous output
ROOT_CA_AUTHORITY_ARN="arn:aws:acm-pca:<region>:<account-id>:certificate-authority/<ca-authority-id>"

# 2. Generate Root CA CSR
aws acm-pca get-certificate-authority-csr \
    --certificate-authority-arn $ROOT_CA_AUTHORITY_ARN \
    --output text > customerRootCA.csr

# 3. Self-sign Root CA Certificate
aws acm-pca issue-certificate \
    --certificate-authority-arn $ROOT_CA_AUTHORITY_ARN \
    --csr fileb://customerRootCA.csr \
    --signing-algorithm SHA256WITHRSA \
	--template-arn arn:aws:acm-pca:::template/RootCACertificate/V1 \
    --validity Value=3652,Type=DAYS

# Store the Root CA certificate ARN from the previous output
ROOT_CA_ARN="arn:aws:acm-pca:<region>:<account-id>:certificate-authority/<ca-authority-id>/certificate/<cert-id>"

# 4. Retrieve the Root CA certificate
aws acm-pca get-certificate \
    --certificate-authority-arn $ROOT_CA_AUTHORITY_ARN \
    --certificate-arn $ROOT_CA_ARN \
    --output text > customerRootCA.crt

# 5. Import the Root CA Certificate
aws acm-pca import-certificate-authority-certificate \
    --certificate-authority-arn $ROOT_CA_AUTHORITY_ARN \
    --certificate fileb://customerRootCA.crt
创建并激活从属 CA(也称为中间 CA):
$ # 6. Create Subordinate CA
aws acm-pca create-certificate-authority \
    --certificate-authority-configuration \
        "KeyAlgorithm=RSA_4096,
        SigningAlgorithm=SHA256WITHRSA,
        Subject={Country=US,Organization=MyOrg,OrganizationalUnit=IT,CommonName=SubordinateCA}" \
    --certificate-authority-type SUBORDINATE

# Store the Subordinate CA Authority ARN from the previous output
SUB_CA_AUTHORITY_ARN="arn:aws:acm-pca:<region>:<account-id>:certificate-authority/<sub-ca-authority-id>"

# 7. Generate Subordinate CA CSR
aws acm-pca get-certificate-authority-csr \
    --certificate-authority-arn $SUB_CA_AUTHORITY_ARN \
    --output text > intermediateCA.csr

# 8. Issue Subordinate CA Certificate using Root CA
aws acm-pca issue-certificate \
    --certificate-authority-arn $ROOT_CA_AUTHORITY_ARN \
    --csr fileb://intermediateCA.csr \
    --signing-algorithm SHA256WITHRSA \
    --template-arn arn:aws:acm-pca:::template/SubordinateCACertificate_PathLen0/V1 \
    --validity Value=3651,Type=DAYS

# Store the Subordinate CA certificate ARN from the previous output
SUB_CA_ARN="arn:aws:acm-pca:<region>:<account-id>:certificate-authority/<sub-ca-authority-id>"

# 9. Retrieve Subordinate CA Certificate
aws acm-pca get-certificate \
    --certificate-authority-arn $ROOT_CA_AUTHORITY_ARN \
    --certificate-arn $SUB_CA_ARN \
    --query 'Certificate' \
    --output text > intermediateCA.crt

# 10. Import the Subordinate CA Certificate
aws acm-pca import-certificate-authority-certificate \
    --certificate-authority-arn $SUB_CA_AUTHORITY_ARN \
    --certificate fileb://intermediateCA.crt \
    --certificate-chain fileb://customerRootCA.crt
将证书合并成一个链文件:
$ cat intermediateCA.crt customerRootCA.crt > chainCA.crt

-----BEGIN CERTIFICATE-----
[Intermediate CA]
-----END CERTIFICATE-----
...
...
-----BEGIN CERTIFICATE-----
[Root CA]
-----END CERTIFICATE-----
使用 AWS PCA 签署集群 CSR:
$ aws acm-pca issue-certificate \
    --certificate-authority-arn $SUB_CA_AUTHORITY_ARN \
    --csr fileb://<cluster ID>_ClusterCsr.csr \
    --signing-algorithm SHA256WITHRSA \
    --template-arn arn:aws:acm-pca:::template/EndEntityCertificate/V1 \
    --validity Value=3650,Type=DAYS

# Store your cluster's cert ARN from the previous output
CLUSTER_CERT_ARN="arn:aws:acm-pca:<region>:<account-id>:certificate-authority/<cluster-cert-arn>"
下载已签名的集群证书:
$ aws acm-pca get-certificate \
    --certificate-authority-arn $SUB_CA_AUTHORITY_ARN \
    --certificate-arn $CLUSTER_CERT_ARN \
    --output text --query Certificate > <cluster ID>_CustomerHsmCertificate.crt
完成后,此命令将创建一个名为 <cluster ID>_CustomerHsmCertificate.crt
根据证书链验证签名的证书(可选):
$ openssl verify -purpose sslserver -CAfile chainCA.crt <cluster ID>_CustomerHsmCertificate.crt
<cluster ID>_CustomerHsmCertificate.crt: OK
使用中间 CA 生成签名的 HSM 证书后,请转至。步骤 4:初始化集群
步骤 4:初始化集群
使用已签名 HSM 证书和您的签名证书来初始化集群。您可以使用AWS CloudHSM 控制台AWS CLI、或 AWS CloudHSM API。
- Console
初始化群集(控制台)
在家中打开https://console.aws.amazon.com/cloudhsm/主 AWS CloudHSM机。
-
选中要验证的 HSM 的集群 ID 旁边的单选按钮。
-
选择操作。从下拉菜单中,选择初始化。
-
如果您未完成旨在创建 HSM 的 上一步 操作,则请为正在创建的 HSM 选择可用区(AZ)。然后选择 创建。
-
在下载证书签名请求页面上,选择下一步。如果下一步不可用,请先选择一个 CSR 或证书链接。然后选择下一步。
-
在签署证书签名请求(CSR)页面上,选择下一步。
-
在上传证书页面上,执行以下操作:
-
在集群证书旁边,选择上传文件。然后找到并选中您之前签署的 HSM 证书。如果您完成了以上部分中的步骤,请选择名为 <cluster
ID>_CustomerHsmCertificate.crt
-
在颁发证书旁边,选择上传文件。然后根据您选择的方法选择您的签名证书:
-
选择上传并初始化。
- AWS CLI
-
在命令提示符下,运行 initialize-cluster 命令。提供以下项:
$ aws cloudhsmv2 initialize-cluster --cluster-id <cluster ID> \
                                    --signed-cert file://<cluster ID>_CustomerHsmCertificate.crt \
                                    --trust-anchor file://<customerRootCA.crt OR chainCA.crt>
{
    "State": "INITIALIZE_IN_PROGRESS",
    "StateMessage": "Cluster is initializing. State will change to INITIALIZED upon completion."
}
- AWS CloudHSM API