This whitepaper is for historical reference only. Some content might be outdated and some links might not be available.
Registering the wireless device and integration with AWS IoT Core
AWS IoT Core for LoRaWAN service profiles describes the parameters the device needs to communicate with the LoRaWAN application server.
-
For the purposes of this demonstration, create a service profile with default configuration parameters under Wireless connectivity > Profiles.

Figure 13 – Adding a service profile
Device profiles contain the parameters the device needs to communicate with the LoRaWAN network server.
-
Select the LoRa frequency band in your Region, the desired media access control (MAC) version, the Regional parameters version, and the maximum equivalent isotropic radiated power (EIRP) value.

Figure 14 – Adding a device profile
AWS IoT Core for LoRaWAN destinations found in Wireless connectivity > Destinations describe the AWS IoT rule that processes a device's data for use by other AWS services.
-
Provision a destination that identifies the AWS IoT rule that will be created later, and also associate this destination with an IAM role.
-
Attach this IAM role to an IAM policy that has the ability to send messages to the rule.
Note
Before proceeding with the creation of the destination, follow the steps described in the AWS IoT Core Developer Guide to create an IAM role that gives AWS IoT Core for LoRaWAN the permissions necessary to send data to the rule.
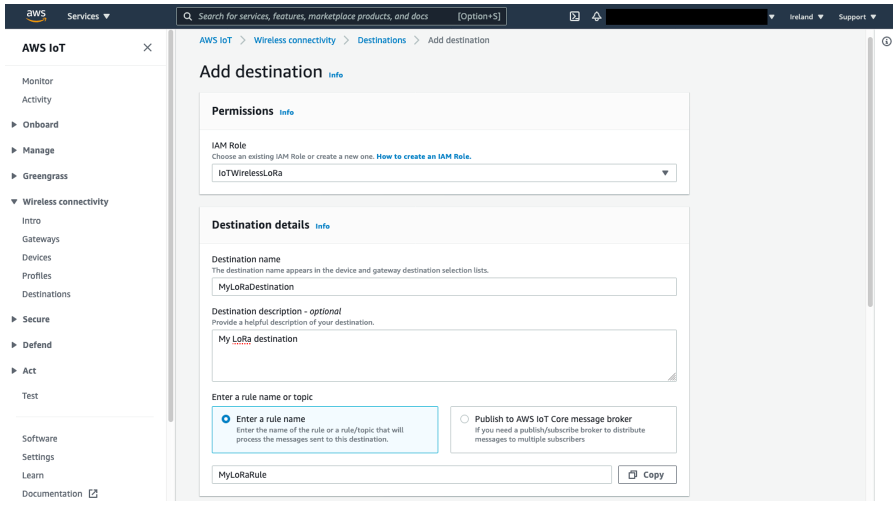
Figure 15 – Adding a destination
Note
This architecture can be modified to take advantage of basic ingest to optimize messaging costs. By creating a destination with the option
Publish to AWS IoT Core
              message broker
, with a destination MQTT topic of$aws/rules/(whererule-namerule-name -
Register the microcontroller you are using in the console as a wireless device under Wireless connectivity > Devices. You will use the OTAA v1.1 wireless device specification.
-
Enter further unique identifiers and security keys related to the wireless device, as specified in the dialog. These parameters must match the actual configurations set on the microcontroller, as this is the method through which the arriving payload is mapped to your registered wireless device.
Note
Although AWS IoT Core for LoRaWAN supports both Activation by Personalization (ABP) and Over the Air Activation (OTAA), it is recommended that you use OTAA for better security posture.

Figure 16 – Adding a wireless device
-
When registering the wireless device, link it to the previously created wireless device and service profiles.

Figure 17 – Associating a wireless device with profiles
-
Assign the device to the destination you created earlier.

Figure 18 – Choosing a destination for the wireless device
If the microcontroller is already broadcasting OTAA join requests over LoRaWAN, the newly registered device is now able to join the network, and its status reflects the last uplink data received.

Figure 19 – Confirming uplink from wireless device
You are now ready to complete the final step required for your LoRaWAN payloads to be forwarded to other AWS services.
