# Configure Windows Server as an AWS Site-to-Site VPN customer gateway device
You can configure a server running Windows Server as a customer gateway device for your VPC. Use the following process whether you are running Windows Server on an EC2 instance in a VPC, or on your own server. The following procedures apply to Windows Server 2012 R2 and later.
**Topics**
+ [Configuring your Windows instance](#cgw-device-windows-server-configure-instance)
+ [Step 1: Create a VPN connection and configure your VPC](#cgw-device-windows-server-vpn)
+ [Step 2: Download the configuration file for the VPN connection](#cgw-device-windows-server-config)
+ [Step 3: Configure the Windows Server](#cgw-device-windows-server-configure)
+ [Step 4: Set up the VPN tunnel](#cgw-device-windows-server-setup-tunnel)
+ [Step 5: Enable dead gateway detection](#cgw-device-windows-server-gateway-detection)
+ [Step 6: Test the VPN connection](#cgw-device-windows-server-test-connection)
## Configuring your Windows instance
If you are configuring Windows Server on an EC2 instance that you launched from a Windows AMI, do the following:
+ Disable source/destination checking for the instance:
1. Open the Amazon EC2 console at [https://console.aws.amazon.com/ec2/](https://console.aws.amazon.com/ec2/).
1. Select your Windows instance, and choose **Actions**, **Networking**, **Change source/destination check**. Choose **Stop**, and then choose **Save**.
+ Update your adapter settings so that you can route traffic from other instances:
1. Connect to your Windows instance. For more information, see [Connecting to your Windows instance](https://docs.aws.amazon.com/AWSEC2/latest/UserGuide/connecting_to_windows_instance.html).
1. Open the Control Panel, and start the Device Manager.
1. Expand the **Network adapters** node.
1. Select the network adapter (depending on the instance type, this might be Amazon Elastic Network Adapter or Intel 82599 Virtual Function), and choose **Action**, **Properties**.
1. On the **Advanced** tab, disable the **IPv4 Checksum Offload**, **TCP Checksum Offload (IPv4)**, and **UDP Checksum Offload (IPv4)** properties, and then choose **OK**.
+ Allocate an Elastic IP address to your account and associate it with the instance. For more information, see [Elastic IP addresses](https://docs.aws.amazon.com/AWSEC2/latest/UserGuide/elastic-ip-addresses-eip.html) in the *Amazon EC2 User Guide*. Take note of this address — you need it when you create the customer gateway.
+ Ensure that the instance's security group rules allow outbound IPsec traffic. By default, a security group allows all outbound traffic. However, if the security group's outbound rules have been modified from their original state, you must create the following outbound custom protocol rules for IPsec traffic: IP protocol 50, IP protocol 51, and UDP 500.
Take note of the CIDR range of the network in which your Windows instance is located, for example, `172.31.0.0/16`.
## Step 1: Create a VPN connection and configure your VPC
To create a VPN connection from your VPC, do the following:
1. Create a virtual private gateway and attach it to your VPC. For more information, see [Create a virtual private gateway](SetUpVPNConnections.md#vpn-create-vpg).
1. Create a VPN connection and new customer gateway. For the customer gateway, specify the public IP address of your Windows Server. For the VPN connection, choose static routing, and then enter the CIDR range for your network in which the Windows Server is located, for example, `172.31.0.0/16`. For more information, see [Step 5: Create a VPN connection](SetUpVPNConnections.md#vpn-create-vpn-connection).
After you create the VPN connection, configure the VPC to enable communication over the VPN connection.
**To configure your VPC**
+ Create a private subnet in your VPC (if you don't have one already) for launching instances to communicate with the Windows Server. For more information, see [Creating a subnet in your VPC](https://docs.aws.amazon.com/vpc/latest/userguide/create-vpc.html#AddaSubnet).
**Note**
A private subnet is a subnet that does not have a route to an internet gateway. The routing for this subnet is described in the next item.
+ Update your route tables for the VPN connection:
+ Add a route to your private subnet's route table with the virtual private gateway as the target, and the Windows Server's network (CIDR range) as the destination. For more information, see [Adding and removing routes from a route table](https://docs.aws.amazon.com/vpc/latest/userguide/WorkWithRouteTables.html#AddRemoveRoutes) in the *Amazon VPC User Guide*.
+ Enable route propagation for the virtual private gateway. For more information, see [(Virtual private gateway) Enable route propagation in your route table](SetUpVPNConnections.md#vpn-configure-routing).
+ Create a security group for your instances that allows communication between your VPC and network:
+ Add rules that allow inbound RDP or SSH access from your network. This enables you to connect to instances in your VPC from your network. For example, to allow computers in your network to access Linux instances in your VPC, create an inbound rule with a type of SSH, and the source set to the CIDR range of your network (for example, `172.31.0.0/16`). For more information, see [Security groups for your VPC](https://docs.aws.amazon.com/vpc/latest/userguide/vpc-security-groups.html) in the *Amazon VPC User Guide*.
+ Add a rule that allows inbound ICMP access from your network. This enables you to test your VPN connection by pinging an instance in your VPC from your Windows Server.
## Step 2: Download the configuration file for the VPN connection
You can use the Amazon VPC console to download a Windows Server configuration file for your VPN connection.
**To download the configuration file**
1. Open the Amazon VPC console at [https://console.aws.amazon.com/vpc/](https://console.aws.amazon.com/vpc/).
1. In the navigation pane, choose **Site-to-Site VPN Connections**.
1. Select your VPN connection and choose **Download Configuration**.
1. Select **Microsoft** as the vendor, **Windows Server** as the platform, and **2012 R2** as the software. Choose **Download**. You can open the file or save it.
The configuration file contains a section of information similar to the following example. You see this information presented twice, one time for each tunnel.
```
vgw-1a2b3c4d Tunnel1
--------------------------------------------------------------------
Local Tunnel Endpoint: 203.0.113.1
Remote Tunnel Endpoint: 203.83.222.237
Endpoint 1: [Your_Static_Route_IP_Prefix]
Endpoint 2: [Your_VPC_CIDR_Block]
Preshared key: xCjNLsLoCmKsakwcdoR9yX6GsEXAMPLE
```
`Local Tunnel Endpoint`
The IP address that you specified for the customer gateway when you created the VPN connection.
`Remote Tunnel Endpoint`
One of two IP addresses for the virtual private gateway that terminates the VPN connection on the AWS side of the connection.
`Endpoint 1`
The IP prefix that you specified as a static route when you created the VPN connection. These are the IP addresses in your network that are allowed to use the VPN connection to access your VPC.
`Endpoint 2`
The IP address range (CIDR block) of the VPC that is attached to the virtual private gateway (for example 10.0.0.0/16).
`Preshared key`
The pre-shared key that is used to establish the IPsec VPN connection between `Local Tunnel Endpoint` and `Remote Tunnel Endpoint`.
We suggest that you configure both tunnels as part of the VPN connection. Each tunnel connects to a separate Site-to-Site VPN Concentrator on the Amazon side of the VPN connection. Although only one tunnel at a time is up, the second tunnel automatically establishes itself if the first tunnel goes down. Having redundant tunnels ensure continuous availability in the case of a device failure. Because only one tunnel is available at a time, the Amazon VPC console indicates that one tunnel is down. This is expected behavior, so there's no action required from you.
With two tunnels configured, if a device failure occurs within AWS, your VPN connection automatically fails over to the second tunnel of the virtual private gateway within a matter of minutes. When you configure your customer gateway device, it's important that you configure both tunnels.
**Note**
From time to time, AWS performs routine maintenance on the virtual private gateway. This maintenance might disable one of the two tunnels of your VPN connection for a brief period of time. Your VPN connection automatically fails over to the second tunnel while we perform this maintenance.
Additional information regarding the Internet Key Exchange (IKE) and IPsec Security Associations (SA) is presented in the downloaded configuration file.
```
MainModeSecMethods: DHGroup2-AES128-SHA1
MainModeKeyLifetime: 480min,0sess
QuickModeSecMethods: ESP:SHA1-AES128+60min+100000kb
QuickModePFS: DHGroup2
```
`MainModeSecMethods`
The encryption and authentication algorithms for the IKE SA. These are the suggested settings for the VPN connection, and are the default settings for Windows Server IPsec VPN connections.
`MainModeKeyLifetime`
The IKE SA key lifetime. This is the suggested setting for the VPN connection, and is the default setting for Windows Server IPsec VPN connections.
`QuickModeSecMethods`
The encryption and authentication algorithms for the IPsec SA. These are the suggested settings for the VPN connection, and are the default settings for Windows Server IPsec VPN connections.
`QuickModePFS`
We suggest that you use master key perfect forward secrecy (PFS) for your IPsec sessions.
## Step 3: Configure the Windows Server
Before you set up the VPN tunnel, you must install and configure Routing and Remote Access Services on Windows Server. That allows remote users to access resources on your network.
**To install Routing and Remote Access Services**
1. Log on to your Windows Server.
1. Go to the **Start** menu, and choose **Server Manager**.
1. Install Routing and Remote Access Services:
1. From the **Manage** menu, choose **Add Roles and Features**.
1. On the **Before You Begin** page, verify that your server meets the prerequisites, and then choose **Next**.
1. Choose **Role-based or feature-based installation**, and then choose **Next**.
1. Choose **Select a server from the server pool**, select your Windows Server, and then choose **Next**.
1. Select **Network Policy and Access Services** in the list. In the dialog box that displays, choose **Add Features** to confirm the features that are required for this role.
1. In the same list, choose **Remote Access**, **Next**.
1. On the **Select features** page, choose **Next**.
1. On the **Network Policy and Access Services** page, choose **Next**.
1. On the **Remote Access** page, choose **Next**. On the next page, select **DirectAccess and VPN (RAS)**. In the dialog box that displays, choose **Add Features** to confirm the features that are required for this role service. In the same list, select **Routing**, and then choose **Next**.
1. On the **Web Server Role (IIS)** page, choose **Next**. Leave the default selection, and choose **Next**.
1. Choose **Install**. When the installation completes, choose **Close**.
**To configure and enable Routing and Remote Access Server**
1. On the dashboard, choose **Notifications** (the flag icon). There should be a task to complete the post-deployment configuration. Choose the **Open the Getting Started Wizard** link.
1. Choose **Deploy VPN only**.
1. In the **Routing and Remote Access** dialog box, choose the server name, choose **Action**, and then select **Configure and Enable Routing and Remote Access**.
1. In the **Routing and Remote Access Server Setup Wizard**, on the first page, choose **Next**.
1. On the **Configuration** page, choose **Custom Configuration**, **Next**.
1. Choose **LAN routing**, **Next**, **Finish**.
1. When prompted by the **Routing and Remote Access** dialog box, choose **Start service**.
## Step 4: Set up the VPN tunnel
You can configure the VPN tunnel by running the netsh scripts included in the downloaded configuration file, or by using the Windows Server user interface.
**Important**
We suggest that you use master key perfect forward secrecy (PFS) for your IPsec sessions. If you choose to run the netsh script, it includes a parameter to enable PFS (`qmpfs=dhgroup2`). You cannot enable PFS using the Windows user interface — you must enable it using the command line.
**Topics**
+ [Option 1: Run the netsh script](#cgw-device-windows-server-run-netsh)
+ [Option 2: Use the Windows Server user interface](#cgw-device-windows-server-ui)
### Option 1: Run the netsh script
Copy the netsh script from the downloaded configuration file and replace the variables. The following is an example script.
```
netsh advfirewall consec add rule Name="vgw-1a2b3c4d Tunnel 1" ^
Enable=Yes Profile=any Type=Static Mode=Tunnel ^
LocalTunnelEndpoint={{Windows_Server_Private_IP_address}} ^
RemoteTunnelEndpoint=203.83.222.236 Endpoint1={{Your_Static_Route_IP_Prefix}} ^
Endpoint2={{Your_VPC_CIDR_Block}} Protocol=Any Action=RequireInClearOut ^
Auth1=ComputerPSK Auth1PSK=xCjNLsLoCmKsakwcdoR9yX6GsEXAMPLE ^
QMSecMethods=ESP:SHA1-AES128+60min+100000kb ^
ExemptIPsecProtectedConnections=No ApplyAuthz=No QMPFS=dhgroup2
```
**Name**: You can replace the suggested name (`vgw-1a2b3c4d Tunnel 1)` with a name of your choice.
**LocalTunnelEndpoint**: Enter the private IP address of the Windows Server on your network.
**Endpoint1**: The CIDR block of your network on which the Windows Server resides, for example, `172.31.0.0/16`. Surround this value with double quotes (").
**Endpoint2**: The CIDR block of your VPC or a subnet in your VPC, for example, `10.0.0.0/16`. Surround this value with double quotes (").
Run the updated script in a command prompt window on your Windows Server. (The ^ enables you to cut and paste wrapped text at the command line.) To set up the second VPN tunnel for this VPN connection, repeat the process using the second netsh script in the configuration file.
When you are done, go to [Configure the Windows firewall](#cgw-device-windows-server-firewall).
For more information about the netsh parameters, see [Netsh AdvFirewall Consec Commands](https://learn.microsoft.com/en-us/previous-versions/windows/it-pro/windows-server-2008-R2-and-2008/dd736198(v=ws.10)?redirectedfrom=MSDN#BKMK_2_set) in the *Microsoft TechNet Library*.
### Option 2: Use the Windows Server user interface
You can also use the Windows Server user interface to set up the VPN tunnel.
**Important**
You can't enable master key perfect forward secrecy (PFS) using the Windows Server user interface. You must enable PFS using the command line, as described in [Enable master key perfect forward secrecy](#cgw-device-windows-server-enable-pfs).
**Topics**
+ [Configure a security rule for a VPN tunnel](#cgw-device-windows-server-security-rule)
+ [Confirm the tunnel configuration](#cgw-device-windows-server-confirm-tunnel)
+ [Enable master key perfect forward secrecy](#cgw-device-windows-server-enable-pfs)
+ [Configure the Windows firewall](#cgw-device-windows-server-firewall)
#### Configure a security rule for a VPN tunnel
In this section, you configure a security rule on your Windows Server to create a VPN tunnel.
**To configure a security rule for a VPN tunnel**
1. Open Server Manager, choose **Tools**, and then select **Windows Defender Firewall with Advanced Security**.
1. Select **Connection Security Rules**, choose **Action**, and then **New Rule**.
1. In the **New Connection Security Rule** wizard, on the **Rule Type** page, choose **Tunnel**, and then choose **Next**.
1. On the **Tunnel Type** page, under **What type of tunnel would you like to create**, choose **Custom configuration**. Under **Would you like to exempt IPsec-protected connections from this tunnel**, leave the default value checked (**No. Send all network traffic that matches this connection security rule through the tunnel**), and then choose **Next**.
1. On the **Requirements** page, choose **Require authentication for inbound connections. Do not establish tunnels for outbound connections**, and then choose **Next**.
1. On the **Tunnel Endpoints** page, under **Which computers are in Endpoint 1**, choose **Add**. Enter the CIDR range of your network (behind your Windows Server customer gateway device; for example, `172.31.0.0/16`), and then choose **OK**. The range can include the IP address of your customer gateway device.
1. Under **What is the local tunnel endpoint (closest to computer in Endpoint 1)**, choose **Edit**. In the **IPv4 address** field, enter the private IP address of your Windows Server, and then choose **OK**.
1. Under **What is the remote tunnel endpoint (closest to computers in Endpoint 2)**, choose **Edit**. In the **IPv4 address** field, enter the IP address of the virtual private gateway for Tunnel 1 from the configuration file (see `Remote Tunnel Endpoint`), and then choose **OK**.
**Important**
If you are repeating this procedure for Tunnel 2, be sure to select the endpoint for Tunnel 2.
1. Under **Which computers are in Endpoint 2**, choose **Add**. In the **This IP address or subnet field**, enter the CIDR block of your VPC, and then choose **OK**.
**Important**
You must scroll in the dialog box until you locate **Which computers are in Endpoint 2**. Do not choose **Next** until you have completed this step, or you won't be able to connect to your server.
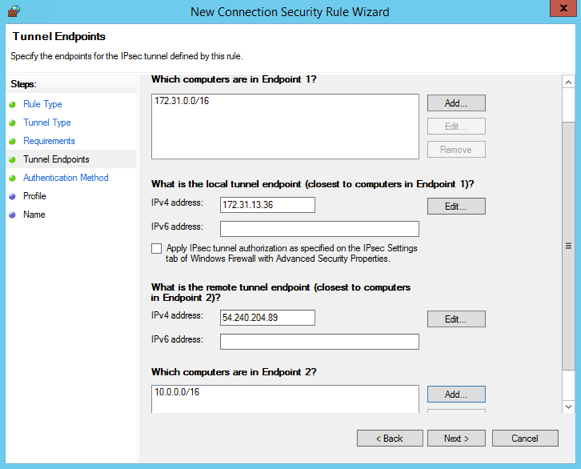
1. Confirm that all of the settings you've specified are correct and then choose **Next**.
1. On the **Authentication Method** page, select **Advanced** and choose **Customize**.
1. Under **First authentication methods**, choose **Add**.
1. Select **Preshared key**, enter the pre-shared key value from the configuration file and then choose **OK**.
**Important**
If you are repeating this procedure for Tunnel 2, be sure to select the pre-shared key for Tunnel 2.
1. Ensure that **First authentication is optional** is not selected, and choose **OK**.
1. Choose **Next**.
1. On the **Profile** page, select all three check boxes: **Domain**, **Private**, and **Public**. Choose **Next**.
1. On the **Name** page, enter a name for your connection rule; for example, `VPN to Tunnel 1`, and then choose **Finish**.
Repeat the preceding procedure, specifying the data for Tunnel 2 from your configuration file.
After you've finished, you’ll have two tunnels configured for your VPN connection.
#### Confirm the tunnel configuration
**To confirm the tunnel configuration**
1. Open Server Manager, choose **Tools**, select **Windows Firewall with Advanced Security**, and then select **Connection Security Rules**.
1. Verify the following for both tunnels:
+ **Enabled** is `Yes`
+ **Endpoint 1** is the CIDR block for your network
+ **Endpoint 2** is the CIDR block of your VPC
+ **Authentication mode** is `Require inbound and clear outbound`
+ **Authentication method** is `Custom`
+ **Endpoint 1 port** is `Any`
+ **Endpoint 2 port** is `Any`
+ **Protocol** is `Any`
1. Select the first rule and choose **Properties**.
1. On the **Authentication** tab, under **Method**, choose **Customize**. Verify that **First authentication methods** contains the correct pre-shared key from your configuration file for the tunnel, and then choose **OK**.
1. On the **Advanced** tab, verify that **Domain**, **Private**, and **Public** are all selected.
1. Under **IPsec tunneling**, choose **Customize**. Verify the following IPsec tunneling settings, and then choose **OK** and **OK** again to close the dialog box.
+ **Use IPsec tunneling** is selected.
+ **Local tunnel endpoint (closest to Endpoint 1)** contains the IP address of your Windows Server. If your customer gateway device is an EC2 instance, this is the instance's private IP address.
+ **Remote tunnel endpoint (closest to Endpoint 2)** contains the IP address of the virtual private gateway for this tunnel.
1. Open the properties for your second tunnel. Repeat steps 4 to 7 for this tunnel.
#### Enable master key perfect forward secrecy
You can enable master key perfect forward secrecy by using the command line. You cannot enable this feature using the user interface.
**To enable master key perfect forward secrecy**
1. In your Windows Server, open a new command prompt window.
1. Enter the following command, replacing `rule_name` with the name that you gave the first connection rule.
```
netsh advfirewall consec set rule name="{{rule_name}}" new QMPFS=dhgroup2 QMSecMethods=ESP:SHA1-AES128+60min+100000kb
```
1. Repeat step 2 for the second tunnel, this time replacing `rule_name` with the name that you gave the second connection rule.
#### Configure the Windows firewall
After setting up your security rules on your server, configure some basic IPsec settings to work with the virtual private gateway.
**To configure the Windows firewall**
1. Open Server Manager, choose **Tools**, select **Windows Defender Firewall with Advanced Security**, and then choose **Properties**.
1. On the **IPsec Settings** tab, under **IPsec exemptions**, verify that **Exempt ICMP from IPsec** is **No (default)**. Verify that **IPsec tunnel authorization** is **None**.
1. Under **IPsec defaults**, choose **Customize**.
1. Under **Key exchange (Main Mode)**, select **Advanced** and then choose **Customize**.
1. In **Customize Advanced Key Exchange Settings**, under **Security methods**, verify that the following default values are used for the first entry:
+ Integrity: SHA-1
+ Encryption: AES-CBC 128
+ Key exchange algorithm: Diffie-Hellman Group 2
+ Under **Key lifetimes**, verify that **Minutes** is `480` and **Sessions** is `0`.
These settings correspond to these entries in the configuration file.
```
MainModeSecMethods: DHGroup2-AES128-SHA1,DHGroup2-3DES-SHA1
MainModeKeyLifetime: 480min,0sec
```
1. Under **Key exchange options**, select **Use Diffie-Hellman for enhanced security**, and then choose **OK**.
1. Under **Data protection (Quick Mode)**, select **Advanced**, and then choose **Customize**.
1. Select **Require encryption for all connection security rules that use these settings**.
1. Under **Data integrity and encryption**, leave the default values:
+ Protocol: ESP
+ Integrity: SHA-1
+ Encryption: AES-CBC 128
+ Lifetime: 60 minutes
These values correspond to the following entry from the configuration file.
```
QuickModeSecMethods:
ESP:SHA1-AES128+60min+100000kb
```
1. Choose **OK** to return to the **Customize IPsec Settings** dialog box and choose **OK** again to save the configuration.
## Step 5: Enable dead gateway detection
Next, configure TCP to detect when a gateway becomes unavailable. You can do this by modifying this registry key: `HKLM\SYSTEM\CurrentControlSet\Services\Tcpip\Parameters`. Do not perform this step until you’ve completed the preceding sections. After you change the registry key, you must reboot the server.
**To enable dead gateway detection**
1. From your Windows Server, launch the command prompt or a PowerShell session, and enter **regedit** to start Registry Editor.
1. Expand **HKEY\_LOCAL\_MACHINE**, expand **SYSTEM**, expand **CurrentControlSet**, expand **Services**, expand **Tcpip**, and then expand **Parameters**.
1. From the **Edit** menu, select **New** and select **DWORD (32-bit) Value**.
1. Enter the name **EnableDeadGWDetect**.
1. Select **EnableDeadGWDetect** and choose **Edit**, **Modify**.
1. In **Value data**, enter **1**, and then choose **OK**.
1. Close the Registry Editor and reboot the server.
For more information, see [EnableDeadGWDetect](https://learn.microsoft.com/en-us/previous-versions/windows/it-pro/windows-2000-server/cc960464(v=technet.10)?redirectedfrom=MSDN) in the *Microsoft TechNet Library*.
## Step 6: Test the VPN connection
To test that the VPN connection is working correctly, launch an instance into your VPC, and ensure that it does not have an internet connection. After you've launched the instance, ping its private IP address from your Windows Server. The VPN tunnel comes up when traffic is generated from the customer gateway device. Therefore, the ping command also initiates the VPN connection.
For steps to test the VPN connection, see [Test an AWS Site-to-Site VPN connection](HowToTestEndToEnd_Linux.md).
If the `ping` command fails, check the following information:
+ Ensure that you have configured your security group rules to allow ICMP to the instance in your VPC. If your Windows Server is an EC2 instance, ensure that its security group's outbound rules allow IPsec traffic. For more information, see [Configuring your Windows instance](#cgw-device-windows-server-configure-instance).
+ Ensure that the operating system on the instance you are pinging is configured to respond to ICMP. We recommend that you use one of the Amazon Linux AMIs.
+ If the instance you are pinging is a Windows instance, connect to the instance and enable inbound ICMPv4 on the Windows firewall.
+ Ensure that you have configured the route tables correctly for your VPC or your subnet. For more information, see [Step 1: Create a VPN connection and configure your VPC](#cgw-device-windows-server-vpn).
+ If your customer gateway device is an EC2 instance, ensure that you've disabled source/destination checking for the instance. For more information, see [Configuring your Windows instance](#cgw-device-windows-server-configure-instance).
In the Amazon VPC console, on the **VPN Connections** page, select your VPN connection. The first tunnel is in the UP state. The second tunnel should be configured, but it isn't used unless the first tunnel goes down. It may take a few moments to establish the encrypted tunnels.