Amazon S3 buckets
Topics
Mount an Amazon S3 bucket
Research and Engineering Studio (RES) supports mounting Amazon S3 buckets to Linux Virtual Desktop Infrastructure (VDI) instances. RES Administrators can onboard S3 buckets to RES, attach them to projects, edit their configuration, and remove buckets in the S3 buckets tab under Environment Management.
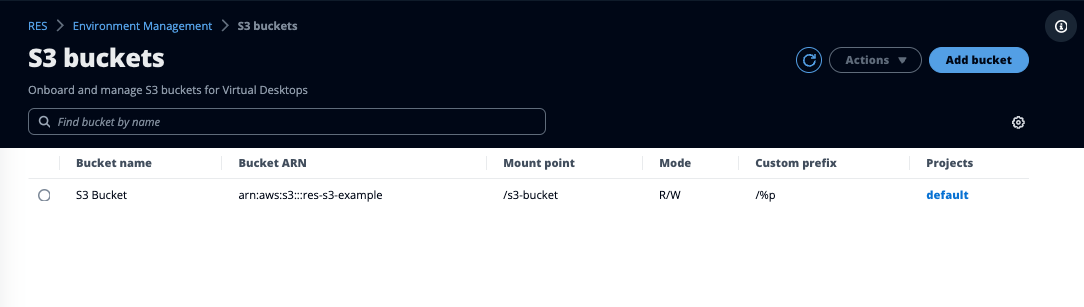
The S3 buckets dashboard provides a list of onboarded S3 buckets available to you. From the S3 buckets dashboard, you can:
-
Use Add bucket to onboard an S3 bucket to RES.
-
Select an S3 bucket and use the Actions menu to:
-
Edit a bucket
-
Remove a bucket
-
-
Use the search field to search by Bucket name and find onboarded S3 buckets.
Add an Amazon S3 bucket
To add an S3 bucket to your RES environment:
-
Choose Add bucket.
-
Enter the bucket details such as bucket name, ARN, and mount point.
Important
-
The bucket ARN, mount point, and mode provided cannot be changed after creation.
-
The bucket ARN can contain a prefix which will isolate the onboarded S3 bucket to that prefix.
-
-
Select a mode in which to onboard your bucket.
Important
-
See Data Isolation for more information related to data isolation with specific modes.
-
-
Under Advanced Options, you may provide an IAM role ARN to mount the buckets for cross account access. Follow the steps in Cross account bucket access to create the required IAM role for cross account access.
-
(Optional) Associate the bucket with projects, which can be changed later. However, an S3 bucket cannot be mounted to a project's existing VDI sessions. Only sessions launched after the project has been associated with the bucket will mount the bucket.
-
Choose Submit.
Edit an Amazon S3 bucket
-
Select an S3 bucket in the S3 buckets list.
-
From the Actions menu, choose Edit.
-
Enter your updates.
Important
-
Associating a project with an S3 bucket will not mount the bucket to that project's existing virtual desktop infrastructure (VDI) instances. The bucket will only be mounted to VDI sessions launched in a project after the bucket has been associated with that project.
-
Disassociating a project from an S3 bucket will not impact the data in the S3 bucket, but will result in desktop users losing access to that data.
-
-
Choose Save bucket setup.
Remove an Amazon S3 bucket
-
Select an S3 bucket in the S3 buckets list.
-
From the Actions menu, choose Remove.
Important
-
You must first remove all project associations from the bucket.
-
The remove operation does not impact the data in the S3 bucket. It only removes the S3 bucket’s association with RES.
-
Removing a bucket will cause existing VDI sessions to lose access to the contents of that bucket at the expiration of that session’s credentials (~1 hour).
-
Data Isolation
When you add an S3 bucket to RES, you have options to isolate the data within the bucket to specific projects and users. On the Add Bucket page, you can choose a mode of Read Only (R) or Read and Write (R/W).
Read Only
If Read Only (R)
is selected, data isolation is enforced based on the prefix of
the bucket ARN (Amazon Resource Name). For example, if an admin adds a bucket to RES using the ARN
arn:aws:s3:::
and associates this bucket with Project A and Project B, then users launching VDIs from within
Project A and Project B can only read the data located in bucket-name
/example-data
/bucket-name
under the path /example-data
. They will not have access
to data outside of that path. If there is no prefix appended to the bucket ARN, the entire bucket
will be made available to any project associated with it.
Read and Write
If Read and Write (R/W)
is selected, data isolation is still enforced based on
the prefix of the bucket ARN, as described above. This mode has additional options to allow admins
to provide variable-based prefixing for the S3 bucket. When Read and Write (R/W)
is
selected, a Custom Prefix section becomes available that offers a dropdown menu with the following
options:
No custom prefix
/%p
/%p/%u

- No custom data isolation
-
When
No custom prefix
is selected for Custom Prefix, the bucket is added without any custom data isolation. This allows any projects associated with the bucket to have read and write access. For example, if an admin adds a bucket to RES using the ARNarn:aws:s3:::
withbucket-name
No custom prefix
selected and associates this bucket with Project A and Project B, users launching VDIs from within Project A and Project B will have unrestricted read and write access to the bucket. - Data isolation on a per-project level
-
When
/%p
is selected for Custom Prefix, data in the bucket is isolated to each specific project associated with it. The%p
variable represents the project code. For example, if an admin adds a bucket to RES using the ARNarn:aws:s3:::
withbucket-name
/%p
selected and a Mount Point of/bucket
, and associates this bucket with Project A and Project B, then User A in Project A can write a file to/bucket
. User B in Project A can also see the file that User A wrote in/bucket
. However, if User B launches a VDI in Project B and looks in/bucket
, they will not see the file that User A wrote, as the data is isolated by project. The file User A wrote is found in the S3 bucket under the prefix/ProjectA
while User B can only access/ProjectB
when using their VDIs from Project B. - Data isolation on a per-project, per-user level
-
When
/%p/%u
is selected for Custom Prefix, data in the bucket is isolated to each specific project and user associated with that project. The%p
variable represents the project code, and%u
represents the username. For example, an admin adds a bucket to RES using the ARNarn:aws:s3:::
withbucket-name
/%p/%u
selected and a Mount Point of/bucket
. This bucket is associated with Project A and Project B. User A in Project A can write a file to/bucket
. Unlike the prior scenario with only%p
isolation, User B in this case will not see the file User A wrote in Project A in/bucket
, as the data is isolated by both project and user. The file User A wrote is found in the S3 bucket under the prefix/ProjectA/UserA
while User B can only access/ProjectA/UserB
when using their VDIs in Project A.
Cross account bucket access
RES has the ability to mount buckets from other AWS accounts, provided these buckets have the right permissions. In the following scenario, a RES environment in Account A wants to mount an S3 bucket in Account B.
Step 1: Create an IAM Role in the account that RES is deployed in (this will be referred to as Account A):
-
Sign in to the AWS Management Console for the RES account that needs access to the S3 bucket (Account A).
-
Open the IAM Console:
-
Navigate to the IAM dashboard.
-
In the navigation pane, select Policies.
-
-
Create a Policy:
-
Select Create policy.
-
Choose the JSON tab.
-
Paste the following JSON policy (replace
<BUCKET-NAME>
with the name of the S3 bucket located in Account B): -
Select Next.
-
-
Review and create the policy:
-
Provide a name for the policy (for example, "S3AccessPolicy").
-
Add an optional description to explain the purpose of the policy.
-
Review the policy and select Create policy.
-
-
Open the IAM Console:
-
Navigate to the IAM dashboard.
-
In the navigation pane, select Roles.
-
-
Create a Role:
-
Select Create role.
-
Choose Custom trust policy as the type of trusted entity.
-
Paste the following JSON policy (replace
<ACCOUNT_ID>
with the actual account ID of Account A,<ENVIRONMENT_NAME>
with the environment name of the RES deployment, and<REGION>
with the AWS region RES is deployed to): -
Select "Next".
-
-
Attach Permissions Policies:
-
Search for and select the policy you created earlier.
-
Select "Next".
-
-
Tag, Review, and Create the Role:
-
Enter a role name (for example, "S3AccessRole").
-
Under Step 3, select Add Tag, then enter the following key and value:
-
Key:
res:Resource
-
Value:
s3-bucket-iam-role
-
-
Review the role and select Create role.
-
-
Use the IAM Role in RES:
-
Copy the IAM role ARN that you created.
-
Log into the RES console.
-
In the left navigation pane, select S3 Bucket.
-
Select Add Bucket and fill out the form with the cross-account S3 bucket ARN.
-
Select the Advanced settings - optional dropdown.
-
Enter the role ARN in the IAM role ARN field.
-
Select Add Bucket.
-
Step 2: Modify the bucket policy in Account B
-
Sign in to the AWS Management Console for Account B.
-
Open the S3 Console:
-
Navigate to the S3 dashboard.
-
Select the bucket you want to grant access to.
-
-
Edit the Bucket Policy:
-
Choose the Permissions tab and select Bucket policy.
-
Add the following policy to grant the IAM role from Account A access to the bucket (replace
<AccountA_ID>
with the actual account ID of Account A and<BUCKET-NAME>
with the name of the S3 bucket): -
Select Save.
-
Preventing data exfiltration in a private VPC
To prevent users from exfiltrating data from secure S3 buckets into their own S3 buckets in their account, you can attach a VPC endpoint to secure your private VPC. The following steps show how to create a VPC endpoint for the S3 service that supports access to S3 buckets within your account, as well as any additional accounts that have cross-account buckets.
-
Open the Amazon VPC Console:
-
Sign in to the AWS Management Console.
-
Open the Amazon VPC console at https://console.aws.amazon.com/vpc/
.
-
-
Create a VPC Endpoint for S3:
-
In the left navigation pane, select Endpoints.
-
Select Create Endpoint.
-
For Service category, ensure that AWS services is selected.
-
In the Service Name field, enter
com.amazonaws.
(replace<region>
.s3<region>
with your AWS region) or search for "S3". -
Select the S3 service from the list.
-
-
Configure Endpoint Settings:
-
For VPC, select the VPC where you want to create the endpoint.
-
For Subnets, select both the private subnets used for the VDI Subnets during deployment.
-
For Enable DNS name, ensure that the option is checked. This allows the private DNS hostname to be resolved to the endpoint network interfaces.
-
-
Configure the Policy to Restrict Access:
-
Under Policy, select Custom.
-
In the policy editor, enter a policy that restricts access to resources within your account or a specific account. Here's an example policy (replace
mybucket
with your S3 bucket name and111122223333
and444455556666
with the appropriate AWS account IDs that you want to have access):
-
-
Create the Endpoint:
-
Review your settings.
-
Select Create endpoint.
-
-
Verify the Endpoint:
-
Once the endpoint is created, navigate to the Endpoints section in the VPC console.
-
Select the newly created endpoint.
-
Verify that the State is Available.
-
By following these steps, you create a VPC endpoint that allows S3 access that is restricted to resources within your account or a specified account ID.
Troubleshooting
How to check if a bucket fails to mount on a VDI
If a bucket fails to mount on a VDI, there are a few locations where you can check for errors. Follow the steps below.
-
Check the VDI Logs:
-
Log into the AWS Management Console.
-
Open the EC2 Console and navigate to Instances.
-
Select the VDI instance you launched.
-
Connect to the VDI via the Session Manager.
-
Run the following commands:
sudo su cd ~/bootstrap/logs
Here, you'll find the bootstrap logs. The details of any failure will be located in the
configure.log.{time}
file.Additionally, check the
/etc/message
log for more details.
-
-
Check Custom Credential Broker Lambda CloudWatch Logs:
-
Log into the AWS Management Console.
-
Open the CloudWatch Console and navigate to Log groups.
-
Search for the log group
/aws/lambda/
.<stack-name>
-vdc-custom-credential-broker-lambda -
Examine the first available log group and locate any errors within the logs. These logs will contain details regarding potential issues providing temporary custom credentials for mounting S3 buckets.
-
-
Check Custom Credential Broker API Gateway CloudWatch Logs:
-
Log into the AWS Management Console.
-
Open the CloudWatch Console and navigate to Log groups.
-
Search for the log group
.<stack-name>
-vdc-custom-credential-broker-lambdavdccustomcredentialbrokerapigatewayaccesslogs<nonce> -
Examine the first available log group and locate any errors within the logs. These logs will contain details regarding any requests and responses to the API Gateway for custom credentials needed to mount the S3 buckets.
-
How to edit a bucket's IAM role configuration after onboarding
-
Sign in to the AWS DynamoDB Console
. -
Select the Table:
-
In the left navigation pane, select Tables.
-
Find and select
.<stack-name>
.cluster-settings
-
-
Scan the Table:
-
Select Explore table items.
-
Ensure Scan is selected.
-
-
Add a Filter:
-
Select Filters to open the filter entry section.
-
Set the filter to match your key-
-
Attribute: Enter the key.
-
Condition: Choose Begins with.
-
Value: Enter
shared-storage.
replacing<filesystem_id>
.s3_bucket.iam_role_arn<filesystem_id>
with the value of the filesystem that needs to be modified.
-
-
-
Execute the Scan:
Select Run to run the scan with the filter.
-
Check the value:
If the entry exists, ensure the value is correctly set with the right IAM role ARN.
If the entry does not exist:
-
Select Create item.
-
Enter the item details:
-
For the key attribute, enter
shared-storage.
.<filesystem_id>
.s3_bucket.iam_role_arn -
Add the correct IAM role ARN.
-
-
Select Save to add the item.
-
-
Restart the VDI instances:
Reboot the instance to ensure the VDIs that are affected by the incorrect IAM role ARN are mounted again.
Enabling CloudTrail
To enable CloudTrail in your account using the CloudTrail console, follow the instructions provided in Creating a trail with the CloudTrail console in the AWS CloudTrail User Guide. CloudTrail will log the access to S3 buckets by recording the IAM role that accessed it. This can be linked back to an instance ID, which is linked to a project or user.