Amazon Redshift will no longer support the use of Python UDFs after June 30, 2026.
We will start enforcing it in phases. For more information on the details of Python end of life
and migration options, see the
blog post
Migrating a provisioned cluster to Amazon Redshift Serverless
You can migrate your existing provisioned clusters to Amazon Redshift Serverless, enabling on-demand and automatic scaling of compute resources. Migrating a provisioned cluster to Amazon Redshift Serverless allows you to optimize costs by paying only for the resources you use and automatically scaling capacity based on workload demands. Common use cases for the migration include running ad-hoc queries, periodic data processing jobs, or handling unpredictable workloads without over-provisioning resources. Perform the following set of tasks to migrate your provisioned Amazon Redshift cluster to the serverless deployment option.
Creating a snapshot of your provisioned cluster
Note
Amazon Redshift automatically converts interleaved keys to compound keys when you restore a provisioned cluster snapshot to a serverless namespace.
To transfer data from your provisioned cluster to Amazon Redshift Serverless, create a snapshot of your provisioned cluster, and then restore the snapshot in Amazon Redshift Serverless.
Note
Before you migrate your data to a serverless workgroup, ensure that your provisioned cluster needs are compatible with the amount of RPU you choose in Amazon Redshift Serverless.
To create a snapshot of your provisioned cluster
Sign in to the AWS Management Console and open the Amazon Redshift console at https://console.aws.amazon.com/redshiftv2/
. -
On the navigation menu, choose Clusters, Snapshots, and then choose Create snapshot.
-
Enter the properties of the snapshot definition, then choose Create snapshot. It might take some time for the snapshot to be available.
To restore a provisioned cluster snapshot to a serverless namespace:
Sign in to the AWS Management Console and open the Amazon Redshift console at https://console.aws.amazon.com/redshiftv2/
. -
Start on the Amazon Redshift provisioned cluster console and navigate to the Clusters, Snapshots page.
-
Choose a snapshot to use.
-
Choose Restore snapshot, Restore to serverless namespace.
-
Choose a namespace to restore your snapshot to.
-
Confirm you want to restore from your snapshot. This action replaces all the databases in your serverless endpoint with the data from your provisioned cluster. Choose Restore.
For more information about provisioned cluster snapshots, see Amazon Redshift snapshots.
Connecting to Amazon Redshift Serverless using a driver
To connect to Amazon Redshift Serverless with your preferred SQL client, you can use the Amazon Redshift provided JDBC driver version 2.x. We recommend connecting to Amazon Redshift using the latest version of the Amazon Redshift JDBC driver version 2.x. The port number is optional. If you don’t include it, Amazon Redshift Serverless defaults to port number 5439. You can change to another port from the port range of 5431-5455 or 8191-8215. To change the default port for a serverless endpoint, use the AWS CLI and Amazon Redshift API.
To find the exact endpoint to use for the JDBC, ODBC, or Python driver, see
Workgroup configuration in Amazon Redshift Serverless. You can also use the
Amazon Redshift Serverless API operation GetWorkgroup or the AWS CLI operation
get-workgroups to return information about your workgroup, and then
connect.
Connecting using password-based authentication
To establish a connection using the Amazon Redshift JDBC driver version 2.x with password-based authentication, use the following syntax:
jdbc:redshift://<workgroup-name>.<account-number>.<aws-region>.redshift-serverless.amazonaws.com:5439/?username=username&password=password
To establish a connection using the Amazon Redshift Python connector with password-based authentication, use the following syntax:
import redshift_connector
with redshift_connector.connect(
    host='<workgroup-name>.<account-number>.<aws-region>.redshift-serverless.amazonaws.com',
    database='<database-name>',
    user='username',
    password='password'
    # port value of 5439 is specified by default
) as conn:
    pass
To establish a connection using the Amazon Redshift ODBC driver version 2.x with password-based authentication, use the following syntax:
Driver={Amazon Redshift ODBC Driver (x64)}; Server=<workgroup-name>.<account-number>.<aws-region>.redshift-serverless.amazonaws.com; Database=database-name; User=username; Password=password
Connecting using IAM
If you prefer logging in with IAM, use the Amazon Redshift Serverless
GetCredentials API operation.
To use IAM authentication, add iam: to the Amazon Redshift JDBC URL
following jdbc:redshift:, as shown in the following example.
jdbc:redshift:iam://<workgroup-name>.<account-number>.<aws-region>.redshift-serverless.amazonaws.com:5439/<database-name>
This Amazon Redshift Serverless endpoint doesn’t support customizing dbUser, dbGroup, or auto-create. By default, the driver automatically creates database users at login. It then assigns the users to Amazon Redshift database roles based on the tags specified in IAM, or based on the groups defined in your identity provider (IdP).
Ensure that your AWS identity has the correct IAM policy for the
redshift-serverless:GetCredentials action. The following is an
example IAM policy that grants the correct permissions to an AWS identity to
connect to Amazon Redshift Serverless. For more information about IAM permissions, see Adding and removing IAM identity permissions in the IAM User Guide.
To establish a connection using the Amazon Redshift Python connector with IAM based authentication,
use iam=true in your code, as shown in the following syntax:
import redshift_connector
with redshift_connector.connect(
    iam=True,
    host='<workgroup-name>.<account-number>.<aws-region>.redshift-serverless.amazonaws.com',
    database='<database-name>'
    <IAM credentials>
) as conn:
    pass
For IAM credentials, you can use any credentials, including the following:
-
AWS profile configuration.
-
IAM credentials (an access key ID, secret access key, and optionally a session token).
-
Identity provider federation.
To establish a connection using the Amazon Redshift ODBC driver version 2.x with IAM based authentication and a profile, use the following syntax:
Driver={Amazon Redshift ODBC Driver (x64)}; IAM=true; Server=<workgroup-name>.<account-number>.<aws-region>.redshift-serverless.amazonaws.com; Database=database-name; Profile=aws-profile-name;
Connecting using IAM with the GetClusterCredentials API
Note
When connecting to Amazon Redshift Serverless, we recommend that you use the GetCredentials API.
This API offers comprehensive role-based access control (RBAC) functionality as well as other new features that
aren't available in GetClusterCredentials. We support the GetClusterCredentials API to simplify the transition from
provisioned clusters to serverless workgroups, but we strongly recommend migrating to using
GetCredentials as soon as possible for optimal compatibility.
You can establish a connection to Amazon Redshift Serverless using the GetClusterCredentials API. To implement this authentication method,
modify your client or application by incorporating the following parameters:
iam=trueclusterid/cluster_identifier=redshift-serverless-<workgroup-name>region=<aws-region>
The following examples demonstrate the BrowserSAML plugin across all three drivers. This represents one of several available authentication approaches. The examples can be modified to use alternative authentication methods or plugins according to your specific requirements.
IAM policy permissions for GetClusterCredentials
Following is a sample IAM policy with the permissions required to use GetClusterCredentials with Amazon Redshift Serverless:
To establish a connection using the Amazon Redshift JDBC driver version 2.x with GetClusterCredentials, use the following syntax:
jdbc:redshift:iam://redshift-serverless-<workgroup-name>:<aws-region>/<database-name>?plugin_name=com.amazon.redshift.plugin.BrowserSamlCredentialsProvider&login_url=<single sign-on URL from IdP>"
To establish a connection using the Amazon Redshift Python connector with GetClusterCredentials, use the following syntax:
import redshift_connector
with redshift_connector.connect(
    iam=True,
    cluster_identifier='redshift-serverless-<workgroup-name>',
    region='<aws-region>',
    database='<database-name>',
    credentials_provider='BrowserSamlCredentialsProvider'
    login_url='<single sign-on URL from IdP>'
    # port value of 5439 is specified by default
) as conn:
    pass
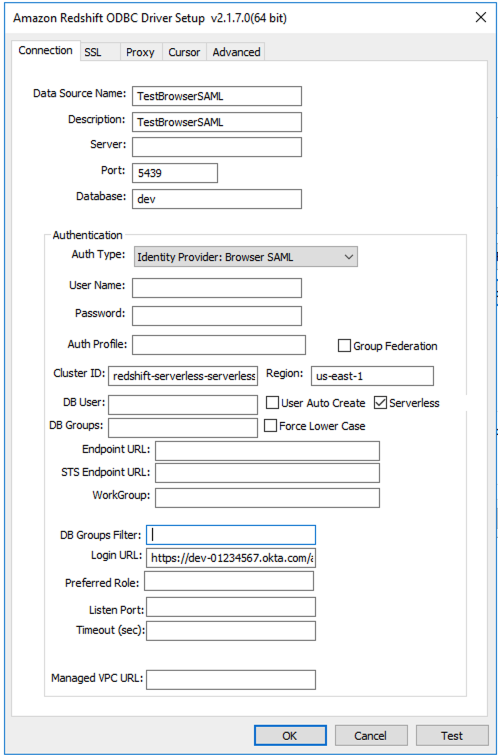
To establish a connection using the Amazon Redshift ODBC driver version 2.x with GetClusterCredentials, use the following syntax:
Driver= {Amazon Redshift ODBC Driver (x64)}; IAM=true; isServerless=true; ClusterId=redshift-serverless-<workgroup-name>; region=<aws-region>; plugin_name=BrowserSAML;login_url=<single sign-on URL from IdP>
Following is an example ODBC DSN configuration in Windows:
Using the Amazon Redshift Serverless SDK
If you wrote any management scripts using the Amazon Redshift SDK, you must use the new Amazon Redshift Serverless SDK to manage Amazon Redshift Serverless and associated resources. For more information about available API operations, see the Amazon Redshift Serverless API Reference guide.
