review-walkthroughs
Topics
Remediate DNS scavenging issue
The following shows this change type in the AMS console.

How it works:
Navigate to the Create RFC page: In the left navigation pane of the AMS console click RFCs to open the RFCs list page, and then click Create RFC.
Choose a popular change type (CT) in the default Browse change types view, or select a CT in the Choose by category view.
Browse by change type: You can click on a popular CT in the Quick create area to immediately open the Run RFC page. Note that you cannot choose an older CT version with quick create.
To sort CTs, use the All change types area in either the Card or Table view. In either view, select a CT and then click Create RFC to open the Run RFC page. If applicable, a Create with older version option appears next to the Create RFC button.
Choose by category: Select a category, subcategory, item, and operation and the CT details box opens with an option to Create with older version if applicable. Click Create RFC to open the Run RFC page.
On the Run RFC page, open the CT name area to see the CT details box. A Subject is required (this is filled in for you if you choose your CT in the Browse change types view). Open the Additional configuration area to add information about the RFC.
In the Execution configuration area, use available drop-down lists or enter values for the required parameters. To configure optional execution parameters, open the Additional configuration area.
When finished, click Run. If there are no errors, the RFC successfully created page displays with the submitted RFC details, and the initial Run output.
Open the Run parameters area to see the configurations you submitted. Refresh the page to update the RFC execution status. Optionally, cancel the RFC or create a copy of it with the options at the top of the page.
How it works:
Use either the Inline Create (you issue a
create-rfccommand with all RFC and execution parameters included), or Template Create (you create two JSON files, one for the RFC parameters and one for the execution parameters) and issue thecreate-rfccommand with the two files as input. Both methods are described here.Submit the RFC:
aws amscm submit-rfc --rfc-idcommand with the returned RFC ID.IDMonitor the RFC:
aws amscm get-rfc --rfc-idcommand.ID
To check the change type version, use this command:
aws amscm list-change-type-version-summaries --filter Attribute=ChangeTypeId,Value=CT_ID
Note
You can use any CreateRfc parameters with any RFC whether or not they are part of the schema for the
change type. For example, to get notifications when the RFC status changes, add this line, --notification "{\"Email\": {\"EmailRecipients\" : [\"email@example.com\"]}}" to the
RFC parameters part of the request (not the execution parameters). For a list of all CreateRfc parameters, see the
AMS Change Management API Reference.
INLINE CREATE:
Issue the create RFC command with execution parameters provided inline (escape quotation marks when providing execution parameters inline) and then submit the returned RFC ID. For example, you can replace the contents with something like this:
aws amscm create-rfc --change-type-id "ct-3k67klld7cimj" --change-type-version "1.0" --title "Remediate DNS scavenging issue" --execution-parameters "{\"DocumentName\":\"AWSManagedServices-UpdateClusterNodeRecordPermissions-Admin\",\"Parameters\":{\"ClusterCNOName\":[\"CLUSTER_CNO_NAME\"],\"ClusterNodeComputerNames\":[\"NODE_NAME_1\",\"NODE_NAME_2\"],\"ClusterVCONames\":[\"VCO_NAME_1\",\"VCO_NAME_2\"]},\"Region\":\"us-east-1\"}"
TEMPLATE CREATE:
Output the execution parameters JSON schema for this change type; this example names it RemediateDnsScavengingParams.json:
aws amscm get-change-type-version --change-type-id "ct-3k67klld7cimj" --query "ChangeTypeVersion.ExecutionInputSchema" --output text > RemediateDnsScavengingParams.jsonModify and save the execution parameters JSON file. For example, you can replace the contents with something like this:
{
  "DocumentName": "AWSManagedServices-UpdateClusterNodeRecordPermissions-Admin",
  "Region": "us-east-1",
  "Parameters": {
    "ClusterCNOName": ["CLUSTER_CNO_NAME"],
    "ClusterNodeComputerNames": ["NODE_NAME_1", "NODE_NAME_2"],
    "ClusterVCONames": ["VCO_NAME_1", "VCO_NAME_2"]
  }
}
Output the RFC template JSON file; this example names it RemediateDnsScavengingRfc.json:
aws amscm create-rfc --generate-cli-skeleton > RemediateDnsScavengingRfc.jsonModify and save the RemediateDnsScavengingRfc.json file. For example, you can replace the contents with something like this:
{
  "ChangeTypeVersion" : "1.0",
  "ChangeTypeId" : "ct-3k67klld7cimj",
  "Title" : "Remediate DNS scavenging issue"
}
Create the RFC, specifying the RemediateDnsScavengingRfc file and the RemediateDnsScavengingParams file:
aws amscm create-rfc --cli-input-json file://RemediateDnsScavengingRfc.json --execution-parameters file://RemediateDnsScavengingParams.jsonYou receive the ID of the new RFC in the response and can use it to submit and monitor the RFC. Until you submit it, the RFC remains in the editing state and does not start.
Delete VPC route
The following shows this change type in the AMS console.

How it works:
Navigate to the Create RFC page: In the left navigation pane of the AMS console click RFCs to open the RFCs list page, and then click Create RFC.
Choose a popular change type (CT) in the default Browse change types view, or select a CT in the Choose by category view.
Browse by change type: You can click on a popular CT in the Quick create area to immediately open the Run RFC page. Note that you cannot choose an older CT version with quick create.
To sort CTs, use the All change types area in either the Card or Table view. In either view, select a CT and then click Create RFC to open the Run RFC page. If applicable, a Create with older version option appears next to the Create RFC button.
Choose by category: Select a category, subcategory, item, and operation and the CT details box opens with an option to Create with older version if applicable. Click Create RFC to open the Run RFC page.
On the Run RFC page, open the CT name area to see the CT details box. A Subject is required (this is filled in for you if you choose your CT in the Browse change types view). Open the Additional configuration area to add information about the RFC.
In the Execution configuration area, use available drop-down lists or enter values for the required parameters. To configure optional execution parameters, open the Additional configuration area.
When finished, click Run. If there are no errors, the RFC successfully created page displays with the submitted RFC details, and the initial Run output.
Open the Run parameters area to see the configurations you submitted. Refresh the page to update the RFC execution status. Optionally, cancel the RFC or create a copy of it with the options at the top of the page.
How it works:
Use either the Inline Create (you issue a
create-rfccommand with all RFC and execution parameters included), or Template Create (you create two JSON files, one for the RFC parameters and one for the execution parameters) and issue thecreate-rfccommand with the two files as input. Both methods are described here.Submit the RFC:
aws amscm submit-rfc --rfc-idcommand with the returned RFC ID.IDMonitor the RFC:
aws amscm get-rfc --rfc-idcommand.ID
To check the change type version, use this command:
aws amscm list-change-type-version-summaries --filter Attribute=ChangeTypeId,Value=CT_ID
Note
You can use any CreateRfc parameters with any RFC whether or not they are part of the schema for the
change type. For example, to get notifications when the RFC status changes, add this line, --notification "{\"Email\": {\"EmailRecipients\" : [\"email@example.com\"]}}" to the
RFC parameters part of the request (not the execution parameters). For a list of all CreateRfc parameters, see the
AMS Change Management API Reference.
INLINE CREATE:
Issue the create RFC command with execution parameters provided inline (escape quotation marks when providing execution parameters inline) and then submit the returned RFC ID. For example, you can replace the contents with something like this:
aws amscm create-rfc --change-type-id "ct-1nusoameibz5p" --change-type-version "1.0" --title "Delete VPC route" --execution-parameters "{\"DocumentName\":\"AWSManagedServices-DeleteRoute\",\"Region\":\"us-east-1\",\"Parameters\":{\"RouteTableId\":\"rtb-1234abcd12345abcd\",\"DestinationCidrBlock\":\"10.0.0.0/8\"}}"
TEMPLATE CREATE:
Output the execution parameters JSON schema for this change type; this example names it DeleteVPCRouteParams.json:
aws amscm get-change-type-version --change-type-id "ct-1nusoameibz5p" --query "ChangeTypeVersion.ExecutionInputSchema" --output text > DeleteVPCRouteParams.jsonModify and save the execution parameters JSON file. For example, you can replace the contents with something like this:
{
  "DocumentName": "AWSManagedServices-DeleteRoute",
  "Region": "us-east-1",
  "Parameters": {
    "RouteTableId": "rtb-1234abcd12345abcd",
    "DestinationCidrBlock": "10.0.0.0/8",
    "DestinationPrefixListId": "pl-abcd1234"
  }
}
Output the RFC template JSON file; this example names it DeleteVPCRouteRfc.json:
aws amscm create-rfc --generate-cli-skeleton > DeleteVPCRouteRfc.jsonModify and save the DeleteVPCRouteRfc.json file. For example, you can replace the contents with something like this:
{
  "ChangeTypeVersion" : "1.0",
  "ChangeTypeId" : "ct-1nusoameibz5p",
  "Title" : "Delete VPC route"
}
Create the RFC, specifying the DeleteVPCRouteRfc file and the DeleteVPCRouteParams file:
aws amscm create-rfc --cli-input-json file://DeleteVPCRouteRfc.json --execution-parameters file://DeleteVPCRouteParams.jsonYou receive the ID of the new RFC in the response and can use it to submit and monitor the RFC. Until you submit it, the RFC remains in the editing state and does not start.
Update parameter group of DB instance or cluster
The following shows this change type in the AMS console.

How it works:
Navigate to the Create RFC page: In the left navigation pane of the AMS console click RFCs to open the RFCs list page, and then click Create RFC.
Choose a popular change type (CT) in the default Browse change types view, or select a CT in the Choose by category view.
Browse by change type: You can click on a popular CT in the Quick create area to immediately open the Run RFC page. Note that you cannot choose an older CT version with quick create.
To sort CTs, use the All change types area in either the Card or Table view. In either view, select a CT and then click Create RFC to open the Run RFC page. If applicable, a Create with older version option appears next to the Create RFC button.
Choose by category: Select a category, subcategory, item, and operation and the CT details box opens with an option to Create with older version if applicable. Click Create RFC to open the Run RFC page.
On the Run RFC page, open the CT name area to see the CT details box. A Subject is required (this is filled in for you if you choose your CT in the Browse change types view). Open the Additional configuration area to add information about the RFC.
In the Execution configuration area, use available drop-down lists or enter values for the required parameters. To configure optional execution parameters, open the Additional configuration area.
When finished, click Run. If there are no errors, the RFC successfully created page displays with the submitted RFC details, and the initial Run output.
Open the Run parameters area to see the configurations you submitted. Refresh the page to update the RFC execution status. Optionally, cancel the RFC or create a copy of it with the options at the top of the page.
How it works:
Use either the Inline Create (you issue a
create-rfccommand with all RFC and execution parameters included), or Template Create (you create two JSON files, one for the RFC parameters and one for the execution parameters) and issue thecreate-rfccommand with the two files as input. Both methods are described here.Submit the RFC:
aws amscm submit-rfc --rfc-idcommand with the returned RFC ID.IDMonitor the RFC:
aws amscm get-rfc --rfc-idcommand.ID
To check the change type version, use this command:
aws amscm list-change-type-version-summaries --filter Attribute=ChangeTypeId,Value=CT_ID
Note
You can use any CreateRfc parameters with any RFC whether or not they are part of the schema for the
change type. For example, to get notifications when the RFC status changes, add this line, --notification "{\"Email\": {\"EmailRecipients\" : [\"email@example.com\"]}}" to the
RFC parameters part of the request (not the execution parameters). For a list of all CreateRfc parameters, see the
AMS Change Management API Reference.
INLINE CREATE:
Issue the create RFC command with execution parameters provided inline (escape quotation marks when providing execution parameters inline) and then submit the returned RFC ID. For example, you can replace the contents with something like this:
aws amscm create-rfc --change-type-id "ct-0p1oqt4xcp1cv" --change-type-version "1.0" --title "Change Parameter Group" --execution-parameters "{\"DocumentName\":\"AWSManagedServices-UpdateDBParameterGroup\",\"Region\":\"us-east-1\",\"Parameters\":{\"DBArn\":\"arn:aws:rds:us-east-1:945533541580:db:database-1\",\"ParameterGroupName\":\"minlz-parameter-group-mysql\"}}"
TEMPLATE CREATE:
Output the execution parameters JSON schema for this change type; this example names it UpdateDBParameterGroupParams.json:
aws amscm get-change-type-version --change-type-id "ct-0p1oqt4xcp1cv" --query "ChangeTypeVersion.ExecutionInputSchema" --output text > UpdateDBParameterGroupParams.jsonModify and save the execution parameters JSON file. For example, you can replace the contents with something like this:
{
  "DocumentName": "AWSManagedServices-UpdateDBParameterGroup",
  "Region": "us-east-1",
  "Parameters": {
    "DBArn": "arn:aws:rds:us-east-1:945533541580:db:database-1",
    "ParameterGroupName": "minlz-parameter-group-mysql"
  }
}
Output the RFC template JSON file; this example names it UpdateDBParameterGroupRFC.json:
aws amscm create-rfc --generate-cli-skeleton > UpdateDBParameterGroupRFC.jsonModify and save the UpdateDBParameterGroupRFC.json file. For example, you can replace the contents with something like this:
{
  "ChangeTypeVersion" : "1.0",
  "ChangeTypeId" : "ct-0p1oqt4xcp1cv",
  "Title" : "Change Parameter Group"
}
Create the RFC, specifying the UpdateDBParameterGroupRFC file and the UpdateDBParameterGroupParams file:
aws amscm create-rfc --cli-input-json file://UpdateDBParameterGroupRFC.json --execution-parameters file://UpdateDBParameterGroupParams.jsonYou receive the ID of the new RFC in the response and can use it to submit and monitor the RFC. Until you submit it, the RFC remains in the editing state and does not start.
Replace Site-to-Site VPN tunnel
The following shows this change type in the AMS console.

How it works:
Navigate to the Create RFC page: In the left navigation pane of the AMS console click RFCs to open the RFCs list page, and then click Create RFC.
Choose a popular change type (CT) in the default Browse change types view, or select a CT in the Choose by category view.
Browse by change type: You can click on a popular CT in the Quick create area to immediately open the Run RFC page. Note that you cannot choose an older CT version with quick create.
To sort CTs, use the All change types area in either the Card or Table view. In either view, select a CT and then click Create RFC to open the Run RFC page. If applicable, a Create with older version option appears next to the Create RFC button.
Choose by category: Select a category, subcategory, item, and operation and the CT details box opens with an option to Create with older version if applicable. Click Create RFC to open the Run RFC page.
On the Run RFC page, open the CT name area to see the CT details box. A Subject is required (this is filled in for you if you choose your CT in the Browse change types view). Open the Additional configuration area to add information about the RFC.
In the Execution configuration area, use available drop-down lists or enter values for the required parameters. To configure optional execution parameters, open the Additional configuration area.
When finished, click Run. If there are no errors, the RFC successfully created page displays with the submitted RFC details, and the initial Run output.
Open the Run parameters area to see the configurations you submitted. Refresh the page to update the RFC execution status. Optionally, cancel the RFC or create a copy of it with the options at the top of the page.
How it works:
Use either the Inline Create (you issue a
create-rfccommand with all RFC and execution parameters included), or Template Create (you create two JSON files, one for the RFC parameters and one for the execution parameters) and issue thecreate-rfccommand with the two files as input. Both methods are described here.Submit the RFC:
aws amscm submit-rfc --rfc-idcommand with the returned RFC ID.IDMonitor the RFC:
aws amscm get-rfc --rfc-idcommand.ID
To check the change type version, use this command:
aws amscm list-change-type-version-summaries --filter Attribute=ChangeTypeId,Value=CT_ID
Note
You can use any CreateRfc parameters with any RFC whether or not they are part of the schema for the
change type. For example, to get notifications when the RFC status changes, add this line, --notification "{\"Email\": {\"EmailRecipients\" : [\"email@example.com\"]}}" to the
RFC parameters part of the request (not the execution parameters). For a list of all CreateRfc parameters, see the
AMS Change Management API Reference.
INLINE CREATE:
Issue the create RFC command with execution parameters provided inline (escape quotation marks when providing execution parameters inline) and then submit the returned RFC ID. For example, you can replace the contents with something like this:
aws amscm create-rfc --change-type-id "ct-2sav5hzk5twk4" --change-type-version "1.0" --title "Replace S2S VPN Tunnel" --execution-parameters "{\"Region\":\"us-east-1\",\"VpnId\":\"vpn-01234567890abcdef\",\"VpnTunnelOutsideIpAddress\":\"203.0.113.1\",\"ApplyPendingMaintenance\":true,\"Priority\":\"High\"}"
TEMPLATE CREATE:
Output the execution parameters JSON schema for this change type; this example names it ReplaceS2SVpnTunnelParams.json:
aws amscm get-change-type-version --change-type-id "ct-2sav5hzk5twk4" --query "ChangeTypeVersion.ExecutionInputSchema" --output text > ReplaceS2SVpnTunnelParams.jsonModify and save the execution parameters JSON file. For example, you can replace the contents with something like this:
{ "Region": "us-east-1", "VpnId": "vpn-01234567890abcdef", "VpnTunnelOutsideIpAddress": "203.0.113.1", "ApplyPendingMaintenance":true, "Priority": "High" }Output the RFC template JSON file; this example names it ReplaceS2SVpnTunnelRFC.json:
aws amscm create-rfc --generate-cli-skeleton > ReplaceS2SVpnTunnelRFC.jsonModify and save the ReplaceS2SVpnTunnelRFC.json file. For example, you can replace the contents with something like this:
{
  "ChangeTypeVersion": "1.0",
  "ChangeTypeId": "ct-2sav5hzk5twk4",
  "Title": "Replace S2S VPN Tunnel"
}
Create the RFC, specifying the ReplaceS2SVpnTunnelRFC file and the ReplaceS2SVpnTunnelParams file:
aws amscm create-rfc --cli-input-json file://ReplaceS2SVpnTunnelRFC.json --execution-parameters file://ReplaceS2SVpnTunnelParams.jsonYou receive the ID of the new RFC in the response and can use it to submit and monitor the RFC. Until you submit it, the RFC remains in the editing state and does not start.
Create a DHCP option set
The following shows this change type in the AMS console.

How it works:
Navigate to the Create RFC page: In the left navigation pane of the AMS console click RFCs to open the RFCs list page, and then click Create RFC.
Choose a popular change type (CT) in the default Browse change types view, or select a CT in the Choose by category view.
Browse by change type: You can click on a popular CT in the Quick create area to immediately open the Run RFC page. Note that you cannot choose an older CT version with quick create.
To sort CTs, use the All change types area in either the Card or Table view. In either view, select a CT and then click Create RFC to open the Run RFC page. If applicable, a Create with older version option appears next to the Create RFC button.
Choose by category: Select a category, subcategory, item, and operation and the CT details box opens with an option to Create with older version if applicable. Click Create RFC to open the Run RFC page.
On the Run RFC page, open the CT name area to see the CT details box. A Subject is required (this is filled in for you if you choose your CT in the Browse change types view). Open the Additional configuration area to add information about the RFC.
In the Execution configuration area, use available drop-down lists or enter values for the required parameters. To configure optional execution parameters, open the Additional configuration area.
When finished, click Run. If there are no errors, the RFC successfully created page displays with the submitted RFC details, and the initial Run output.
Open the Run parameters area to see the configurations you submitted. Refresh the page to update the RFC execution status. Optionally, cancel the RFC or create a copy of it with the options at the top of the page.
How it works:
Use either the Inline Create (you issue a
create-rfccommand with all RFC and execution parameters included), or Template Create (you create two JSON files, one for the RFC parameters and one for the execution parameters) and issue thecreate-rfccommand with the two files as input. Both methods are described here.Submit the RFC:
aws amscm submit-rfc --rfc-idcommand with the returned RFC ID.IDMonitor the RFC:
aws amscm get-rfc --rfc-idcommand.ID
To check the change type version, use this command:
aws amscm list-change-type-version-summaries --filter Attribute=ChangeTypeId,Value=CT_ID
Note
You can use any CreateRfc parameters with any RFC whether or not they are part of the schema for the
change type. For example, to get notifications when the RFC status changes, add this line, --notification "{\"Email\": {\"EmailRecipients\" : [\"email@example.com\"]}}" to the
RFC parameters part of the request (not the execution parameters). For a list of all CreateRfc parameters, see the
AMS Change Management API Reference.
INLINE CREATE:
Issue the create RFC command with execution parameters provided inline (escape quotation marks when providing execution parameters inline) and then submit the returned RFC ID. For example, you can replace the contents with something like this:
aws amscm create-rfc --change-type-id "ct-18rsjua1zosvo" --change-type-version "1.0" --title "AWSManagedServices-CreateDhcpOptionSet" --execution-parameters "{\"DocumentName\": \"AWSManagedServices-CreateDhcpOptionSet\",\"Region\": \"us-east-1\",\"Parameters\": {\"DomainName\": \"example.com\",\"DomainNameServers\": [\"1.2.3.4\"],\"NtpServers\": [\"4.5.6.7\"],\"NetBiosNameServers\": [\"3.4.5.6\"],\"NetBiosNodeType\": \"1\",\"Ipv6AddressPreferredLeaseTime\": \"140\",\"DhcpOptionSetName\": \"optionsetname\"}}"
TEMPLATE CREATE:
Output the execution parameters JSON schema for this change type; this example names it CreateDhcpOptionSetParams.json:
aws amscm get-change-type-version --change-type-id "ct-18rsjua1zosvo" --query "ChangeTypeVersion.ExecutionInputSchema" --output text > CreateDhcpOptionSetParams.jsonModify and save the execution CreateDhcpOptionSetParams.json file. For example, you can replace the contents with something like this:
{
"DomainName": "example.com",
"DomainNameServers": [
"1.2.3.4"
],
"NtpServers": [
"4.5.6.7"
],
"NetBiosNameServers": [
"3.4.5.6"
],
"NetBiosNodeType": "1",
"Ipv6AddressPreferredLeaseTime": "140",
"DhcpOptionSetName": "optionsetname"
"Priority": "Medium"
}
Output the RFC template JSON file; this example names it CreateDhcpOptionSet.json:
aws amscm create-rfc --generate-cli-skeleton > CreateDhcpOptionSet.jsonModify and save the CreateDhcpOptionSet.json file. For example, you can replace the contents with something like this:
{
"ChangeTypeVersion": "1.0",
"ChangeTypeId": "ct-18rsjua1zosvo",
"Title": "Create Dhcp Option Set"
}
Create the RFC, specifying the CreateDhcpOptionSet file and the CreateDhcpOptionSetParams file:
aws amscm create-rfc --cli-input-json file://CreateDhcpOptionSet.json --execution-parameters file://CreateDhcpOptionSetParams.jsonYou receive the ID of the new RFC in the response and can use it to submit and monitor the RFC. Until you submit it, the RFC remains in the editing state and does not start.
For information about VPCs, see Virtual private clouds (VPC).
Create ELB Listener Rule
Screenshot of this change type in the AMS console:

How it works:
Navigate to the Create RFC page: In the left navigation pane of the AMS console click RFCs to open the RFCs list page, and then click Create RFC.
Choose a popular change type (CT) in the default Browse change types view, or select a CT in the Choose by category view.
Browse by change type: You can click on a popular CT in the Quick create area to immediately open the Run RFC page. Note that you cannot choose an older CT version with quick create.
To sort CTs, use the All change types area in either the Card or Table view. In either view, select a CT and then click Create RFC to open the Run RFC page. If applicable, a Create with older version option appears next to the Create RFC button.
Choose by category: Select a category, subcategory, item, and operation and the CT details box opens with an option to Create with older version if applicable. Click Create RFC to open the Run RFC page.
On the Run RFC page, open the CT name area to see the CT details box. A Subject is required (this is filled in for you if you choose your CT in the Browse change types view). Open the Additional configuration area to add information about the RFC.
In the Execution configuration area, use available drop-down lists or enter values for the required parameters. To configure optional execution parameters, open the Additional configuration area.
When finished, click Run. If there are no errors, the RFC successfully created page displays with the submitted RFC details, and the initial Run output.
Open the Run parameters area to see the configurations you submitted. Refresh the page to update the RFC execution status. Optionally, cancel the RFC or create a copy of it with the options at the top of the page.
How it works:
Use either the Inline Create (you issue a
create-rfccommand with all RFC and execution parameters included), or Template Create (you create two JSON files, one for the RFC parameters and one for the execution parameters) and issue thecreate-rfccommand with the two files as input. Both methods are described here.Submit the RFC:
aws amscm submit-rfc --rfc-idcommand with the returned RFC ID.IDMonitor the RFC:
aws amscm get-rfc --rfc-idcommand.ID
To check the change type version, use this command:
aws amscm list-change-type-version-summaries --filter Attribute=ChangeTypeId,Value=CT_ID
Note
You can use any CreateRfc parameters with any RFC whether or not they are part of the schema for the
change type. For example, to get notifications when the RFC status changes, add this line, --notification "{\"Email\": {\"EmailRecipients\" : [\"email@example.com\"]}}" to the
RFC parameters part of the request (not the execution parameters). For a list of all CreateRfc parameters, see the
AMS Change Management API Reference.
INLINE CREATE:
Issue the create RFC command with execution parameters provided inline (escape quotation marks when providing execution parameters inline), and then submit the returned RFC ID. For example, you can replace the contents with something like this:
aws amscm create-rfc --change-type-id "ct-18weo4vv83ynk" --change-type-version "1.0" --title "Create ALB Listener Rule" --execution-parameters "{\"DocumentName\":\"AWSManagedServices-CreateListenerRule\",\"Parameters\":{\"ListenerArn\":[\"LISTENER_ARN\"],\"Conditions\":[\"{\\\"Field\\\":\\\"path-pattern\\\",\\\"PathPatternConfig\\\":{\\\"Values\\\":[\\\"/img/*\\\"]}}\"],\"RuleType\":[\"redirect\"],\"Priority\":[\"200\"],\"TargetGroups\":[\"{}\"],\"TargetGroupStickinessConfig\":[\"\"],\"TargetGroupStickinessDuration\":[\"\"],\"RedirectProtocol\":[\"HTTP\"],\"RedirectPort\":[\"85\"],\"RedirectHost\":[\"www.example.com\"],\"RedirectPath\":[\"/new-path\"],\"RedirectQuery\":[\"page1\"],\"RedirectStatusCode\":[\"HTTP_301\"]},\"Region\":\"REGION\""}"
aws amscm create-rfc --change-type-id "ct-18weo4vv83ynk" --change-type-version "1.0" --title "Create ALB Listener Rule" --execution-parameters "{\"DocumentName\":\"AWSManagedServices-CreateListenerRule\",\"Parameters\":{\"ListenerArn\":[\"LISTENER_ARN\"],\"Conditions\":[\"{\\\"Field\\\":\\\"path-pattern\\\",\\\"PathPatternConfig\\\":{\\\"Values\\\":[\\\"/img/*\\\"]}}\"],\"RuleType\":[\"forward\"],\"Priority\":[\"125\"],\"TargetGroups\":[\"{\\\"TargetGroupArn\\\":\\\"TARGET_GROUP_ARN\\\",\\\"Weight\\\":\\\"20\\\"}\"],\"TargetGroupStickinessConfig\":[\"Enabled\"],\"TargetGroupStickinessDuration\":[\"15\"],\"RedirectProtocol\":[\"\"],\"RedirectPort\":[\"\"],\"RedirectHost\":[\"\"],\"RedirectPath\":[\"\"],\"RedirectQuery\":[\"\"],\"RedirectStatusCode\":[\"\"]},\"Region\":\"REGION\"}"
TEMPLATE CREATE:
Output the execution parameters for this change type to a JSON file named validateCreateRule.Actions.json.
aws amscm get-change-type-version --change-type-id "ct-18weo4vv83ynk" --query "ChangeTypeVersion.ExecutionInputSchema" --output text > validateCreateRule.Actions.jsonModify and save the execution parameters JSON file. For example, you can replace the contents with something like this:
All parameters example:
{
"DocumentName": "AWSManagedServices-CreateListenerRule",
"Region": "us-west-2",
"Parameters": {
  "ListenerArn": ["LISTENER_ARN"],
  "Conditions": ["{\"Field\":\"host-header\",\"HostHeaderConfig\":{\"Values\":[\"example.com\"]}}"],
  "RuleType": ["forward"],
  "Priority": ["200"],
  "TargetGroups": ["{\"TargetGroupArn\":\"TARGET_GROUP_ARN\",\"Weight\":\"100\"}"],
  "TargetGroupStickinessConfig": ["Enabled"],
  "TargetGroupStickinessDuration": ["86400"],
  "RedirectProtocol": [""],
  "RedirectPort": [""],
  "RedirectHost": [""],
  "RedirectPath": [""],
  "RedirectQuery": [""],
  "RedirectStatusCode": [""],
  "Priority": "High"
}
}
{ "DocumentName": "AWSManagedServices-CreateListenerRule", "Parameters": { "ListenerArn": [ "LISTENER_ARN" ], "Conditions": [ "{\"Field\":\"path-pattern\",\"PathPatternConfig\":{\"Values\":[\"/img/*\"]}}" ], "RuleType": [ "forward" ], "Priority": [ "125" ], "TargetGroups": [ "{\"TargetGroupArn\":\"TARGET_GROUP_ARN\",\"Weight\":\"20\"}" ], "TargetGroupStickinessConfig": [ "Enabled" ], "TargetGroupStickinessDuration": [ "15" ], "RedirectProtocol": [ "" ], "RedirectPort": [ "" ], "RedirectHost": [ "" ], "RedirectPath": [ "" ], "RedirectQuery": [ "" ], "RedirectStatusCode": [ "" ] }, "Region": "REGION", "Priority": "High" }Output the JSON template to a file in your current folder; this example names it CreateListenerRuleRfc.json:
aws amscm create-rfc --generate-cli-skeleton > CreateListenerRuleRfc.jsonModify and save the CreateListenerRuleRfc.json file. For example, you can replace the contents with something like this:
{
"ChangeTypeVersion": "1.0",
"ChangeTypeId": "ct-18weo4vv83ynk",
"Title": "Create ALB Listener Rule"
}
Create the RFC, specifying the execution parameters file and the validateCreateRule file:
aws amscm create-rfc --cli-input-json file://CreateListenerRuleRfc.json --execution-parameters file://validateCreateRule.jsonYou receive the ID of the new RFC in the response and can use it to submit and monitor the RFC. Until you submit it, the RFC remains in the editing state and does not start.
To learn more about AWS Application Load Balancers, see What Is an Application Load Balancer?
Update VPC Endpoint Policy
The following shows this change type in the AMS console.

How it works:
Navigate to the Create RFC page: In the left navigation pane of the AMS console click RFCs to open the RFCs list page, and then click Create RFC.
Choose a popular change type (CT) in the default Browse change types view, or select a CT in the Choose by category view.
Browse by change type: You can click on a popular CT in the Quick create area to immediately open the Run RFC page. Note that you cannot choose an older CT version with quick create.
To sort CTs, use the All change types area in either the Card or Table view. In either view, select a CT and then click Create RFC to open the Run RFC page. If applicable, a Create with older version option appears next to the Create RFC button.
Choose by category: Select a category, subcategory, item, and operation and the CT details box opens with an option to Create with older version if applicable. Click Create RFC to open the Run RFC page.
On the Run RFC page, open the CT name area to see the CT details box. A Subject is required (this is filled in for you if you choose your CT in the Browse change types view). Open the Additional configuration area to add information about the RFC.
In the Execution configuration area, use available drop-down lists or enter values for the required parameters. To configure optional execution parameters, open the Additional configuration area.
When finished, click Run. If there are no errors, the RFC successfully created page displays with the submitted RFC details, and the initial Run output.
Open the Run parameters area to see the configurations you submitted. Refresh the page to update the RFC execution status. Optionally, cancel the RFC or create a copy of it with the options at the top of the page.
How it works:
Use either the Inline Create (you issue a
create-rfccommand with all RFC and execution parameters included), or Template Create (you create two JSON files, one for the RFC parameters and one for the execution parameters) and issue thecreate-rfccommand with the two files as input. Both methods are described here.Submit the RFC:
aws amscm submit-rfc --rfc-idcommand with the returned RFC ID.IDMonitor the RFC:
aws amscm get-rfc --rfc-idcommand.ID
To check the change type version, use this command:
aws amscm list-change-type-version-summaries --filter Attribute=ChangeTypeId,Value=CT_ID
Note
You can use any CreateRfc parameters with any RFC whether or not they are part of the schema for the
change type. For example, to get notifications when the RFC status changes, add this line, --notification "{\"Email\": {\"EmailRecipients\" : [\"email@example.com\"]}}" to the
RFC parameters part of the request (not the execution parameters). For a list of all CreateRfc parameters, see the
AMS Change Management API Reference.
INLINE CREATE:
Issue the create RFC command with execution parameters provided inline (escape quotation marks when providing execution parameters inline) and then submit the returned RFC ID. For example, you can replace the contents with something like this:
aws amscm create-rfc --change-type-id "ct-128mp7mbxobd0" --change-type-version "1.0" --title "Update VPC Endpoint Policy" --execution-parameters "{\"Region\":\"us-east-1\",\"VpcEndpointId\":\"vpce-1a2b3c4d5e6f7g8h9\",\"PolicyDocument\":\"Example endpoint policy\",\"PolicyAction\":\"Append\",\"Priority\":\"High\"}
TEMPLATE CREATE:
Output the execution parameters JSON schema for this change type; this example names it UpdateVPCEndpointPolicyParams.json:
aws amscm get-change-type-version --change-type-id "ct-128mp7mbxobd0" --query "ChangeTypeVersion.ExecutionInputSchema" --output text > UpdateVPCEndpointPolicyParams.jsonModify and save the execution parameters JSON file. For example, you can replace the contents with something like this:
{
"Region": "us-east-1",
"VpcEndpointId": "vpce-1a2b3c4d5e6f7g8h9",
"PolicyDocument":"Example endpoint policy"
"PolicyAction" : "Append",
"Priority": "High"
}
Output the RFC template JSON file; this example names it UpdateVPCEndpointPolicyRFC.json:
aws amscm create-rfc --generate-cli-skeleton > UpdateVPCEndpointPolicyRFC.jsonModify and save the UpdateVPCEndpointPolicyRFC.json file. For example, you can replace the contents with something like this:
{
"ChangeTypeVersion": "1.0",
"ChangeTypeId": "ct-128mp7mbxobd0",
"Title": "Update VPC Endpoint Policy"
}
Create the RFC, specifying the UpdateVPCEndpointPolicyRFC file and the UpdateVPCEndpointPolicyParams file:
aws amscm create-rfc --cli-input-json file://UpdateVPCEndpointPolicyRFC.json --execution-parameters file://UpdateVPCEndpointPolicyParams.jsonYou receive the ID of the new RFC in the response and can use it to submit and monitor the RFC. Until you submit it, the RFC remains in the editing state and does not start.
This is a manual change type (an AMS operator must review and run the CT), which means that the RFC can take longer to run and you might have to communicate with AMS through the RFC details page correspondance option. Additionally, if you schedule a manual change type RFC, be sure to allow at least 24 hours, if approval does not happen before the scheduled start time, the RFC is rejected automatically.
Delete NAT gateway (Managed Automation)
This operation requires manual review and approval before its completed successfully.

How it works:
Navigate to the Create RFC page: In the left navigation pane of the AMS console click RFCs to open the RFCs list page, and then click Create RFC.
Choose a popular change type (CT) in the default Browse change types view, or select a CT in the Choose by category view.
Browse by change type: You can click on a popular CT in the Quick create area to immediately open the Run RFC page. Note that you cannot choose an older CT version with quick create.
To sort CTs, use the All change types area in either the Card or Table view. In either view, select a CT and then click Create RFC to open the Run RFC page. If applicable, a Create with older version option appears next to the Create RFC button.
Choose by category: Select a category, subcategory, item, and operation and the CT details box opens with an option to Create with older version if applicable. Click Create RFC to open the Run RFC page.
On the Run RFC page, open the CT name area to see the CT details box. A Subject is required (this is filled in for you if you choose your CT in the Browse change types view). Open the Additional configuration area to add information about the RFC.
In the Execution configuration area, use available drop-down lists or enter values for the required parameters. To configure optional execution parameters, open the Additional configuration area.
When finished, click Run. If there are no errors, the RFC successfully created page displays with the submitted RFC details, and the initial Run output.
Open the Run parameters area to see the configurations you submitted. Refresh the page to update the RFC execution status. Optionally, cancel the RFC or create a copy of it with the options at the top of the page.
How it works:
Use either the Inline Create (you issue a
create-rfccommand with all RFC and execution parameters included), or Template Create (you create two JSON files, one for the RFC parameters and one for the execution parameters) and issue thecreate-rfccommand with the two files as input. Both methods are described here.Submit the RFC:
aws amscm submit-rfc --rfc-idcommand with the returned RFC ID.IDMonitor the RFC:
aws amscm get-rfc --rfc-idcommand.ID
To check the change type version, use this command:
aws amscm list-change-type-version-summaries --filter Attribute=ChangeTypeId,Value=CT_ID
Note
You can use any CreateRfc parameters with any RFC whether or not they are part of the schema for the
change type. For example, to get notifications when the RFC status changes, add this line, --notification "{\"Email\": {\"EmailRecipients\" : [\"email@example.com\"]}}" to the
RFC parameters part of the request (not the execution parameters). For a list of all CreateRfc parameters, see the
AMS Change Management API Reference.
INLINE CREATE:
Issue the create RFC command with execution parameters provided inline (escape quotation marks when providing execution parameters inline), and then submit the returned RFC ID. For example, you can replace the contents with something like this:
aws amscm create-rfc --change-type-id "ct-1rexstryxye1b" --change-type-version "1.0" --title "Delete NAT Gateway" --execution-parameters "{\"Region\":\"us-east-1\",\"NatGatewayId\":[\"nat-1234567890abcdef0\"],\"Priority\":\"High\"}"
TEMPLATE CREATE:
Output the execution parameters JSON schema to a file in your current folder. This example names it DeleteNATGatewayParams.json.
aws amscm get-change-type-version --change-type-id "ct-1rexstryxye1b" --query "ChangeTypeVersion.ExecutionInputSchema" --output text > DeleteNATGatewayParams.jsonModify and save the DeleteNATGatewayParams.json file. For example, you can replace the contents with something like this:
{
"Region": "us-west-1",
"NatGatewayId": "nat-1234567890abcdef0"
"Priority": "High"
}
Output the RFC template to a file in your current folder. This example names it DeleteNATGatewayRfc.json.
aws amscm create-rfc --generate-cli-skeleton > DeleteNATGatewayRfc.jsonModify and save the DeleteNATGatewayRfc.json file.
The internal quotation marks in the
ExecutionParametersJSON extension must be escaped with a backslash (\). Example:{ "ChangeTypeVersion": "1.0", "ChangeTypeId": "ct-1rexstryxye1b", "Title": "Delete-NAT-Gateway" }Create the RFC:
aws amscm create-rfc --cli-input-json file://DeleteNATGatewayRfc.json --execution-parameters file://DeleteNATGatewayParams.jsonYou receive the ID of the new RFC in the response and can use it to submit and monitor the RFC. Until you submit it, the RFC remains in the editing state and does not start.
This is a manual change type (an AMS operator must review and run the CT), which means that the RFC can take longer to run and you might have to communicate with AMS through the RFC details page correspondance option. Additionally, if you schedule a manual change type RFC, be sure to allow at least 24 hours, if approval does not happen before the scheduled start time, the RFC is rejected automatically.
Update EC2 Instance Metadata Service (IMDS) Region Setting
The following shows this change type in the AMS console.

How it works:
Navigate to the Create RFC page: In the left navigation pane of the AMS console click RFCs to open the RFCs list page, and then click Create RFC.
Choose a popular change type (CT) in the default Browse change types view, or select a CT in the Choose by category view.
Browse by change type: You can click on a popular CT in the Quick create area to immediately open the Run RFC page. Note that you cannot choose an older CT version with quick create.
To sort CTs, use the All change types area in either the Card or Table view. In either view, select a CT and then click Create RFC to open the Run RFC page. If applicable, a Create with older version option appears next to the Create RFC button.
Choose by category: Select a category, subcategory, item, and operation and the CT details box opens with an option to Create with older version if applicable. Click Create RFC to open the Run RFC page.
On the Run RFC page, open the CT name area to see the CT details box. A Subject is required (this is filled in for you if you choose your CT in the Browse change types view). Open the Additional configuration area to add information about the RFC.
In the Execution configuration area, use available drop-down lists or enter values for the required parameters. To configure optional execution parameters, open the Additional configuration area.
When finished, click Run. If there are no errors, the RFC successfully created page displays with the submitted RFC details, and the initial Run output.
Open the Run parameters area to see the configurations you submitted. Refresh the page to update the RFC execution status. Optionally, cancel the RFC or create a copy of it with the options at the top of the page.
How it works:
Use either the Inline Create (you issue a
create-rfccommand with all RFC and execution parameters included), or Template Create (you create two JSON files, one for the RFC parameters and one for the execution parameters) and issue thecreate-rfccommand with the two files as input. Both methods are described here.Submit the RFC:
aws amscm submit-rfc --rfc-idcommand with the returned RFC ID.IDMonitor the RFC:
aws amscm get-rfc --rfc-idcommand.ID
To check the change type version, use this command:
aws amscm list-change-type-version-summaries --filter Attribute=ChangeTypeId,Value=CT_ID
Note
You can use any CreateRfc parameters with any RFC whether or not they are part of the schema for the
change type. For example, to get notifications when the RFC status changes, add this line, --notification "{\"Email\": {\"EmailRecipients\" : [\"email@example.com\"]}}" to the
RFC parameters part of the request (not the execution parameters). For a list of all CreateRfc parameters, see the
AMS Change Management API Reference.
INLINE CREATE:
Issue the create RFC command with execution parameters provided inline (escape quotation marks when providing execution parameters inline), and then submit the returned RFC ID. For example, you can replace the contents with something like this:
aws amscm create-rfc --change-type-id "ct-2o1knqxw39mkc" --change-type-version "1.0" --title "Update IMDS region-level default settings" --execution-parameters "{\"Region\":\"us-west-2\",\"HttpEndpoint\":\"Enabled\",\"HttpTokens\":\"Required\",\"InstanceMetadataTags\":\"Enabled\",\"HttpPutResponseHopLimit\":1,\"Priority\":\"High\"}"
TEMPLATE CREATE:
Output the execution parameters for this change type to a JSON file; this example names it UPdateEC2ImdsRegionParams.json:
aws amscm get-change-type-version --change-type-id "ct-2o1knqxw39mkc" --query "ChangeTypeVersion.ExecutionInputSchema" --output text > UpdateEC2ImdsRegionParams.jsonModify and save the UPdateEC2ImdsRegionParams file, retaining only the parameters that you want to change. For example, you can replace the contents with something like this:
{ "Region": "us-west-2", "HttpEndpoint": "Enabled", "HttpTokens":"Required" "InstanceMetadataTags" : "Enabled", "HttpPutResponseHopLimit":1, "Priority": "High" }Output the RFC template to a file in your current folder; this example names it UPdateEC2ImdsRegionRfc.json:
aws amscm create-rfc --generate-cli-skeleton > UPdateEC2ImdsRegionRfc.jsonModify and save the UPdateEC2ImdsRegionRfc.json file. For example, you can replace the contents with something like this:
{
"ChangeTypeVersion": "1.0",
"ChangeTypeId": "ct-2o1knqxw39mkc",
"Title": "Update IMDS region-level default settings"
}
Create the RFC, specifying the UPdateEC2ImdsRegionRfc file and the UPdateEC2ImdsRegionParams file:
aws amscm create-rfc --cli-input-json file://UPdateEC2ImdsRegionRfc.json --execution-parameters file://UPdateEC2ImdsRegionParams.jsonYou receive the ID of the new RFC in the response and can use it to submit and monitor the RFC. Until you submit it, the RFC remains in the editing state and does not start.
You can set default values for the instance metadata options at the account level for each AWS Region. When an instance is launched, the instance metadata options are automatically set to the account-level values. You can change these values at launch. Account-level default values do not affect existing instances. For more information about Amazon EC2 IMDS settings, see Where to configure instance metadata options
Create a computer object's SPN
The following shows this change type in the AMS console.

How it works:
Navigate to the Create RFC page: In the left navigation pane of the AMS console click RFCs to open the RFCs list page, and then click Create RFC.
Choose a popular change type (CT) in the default Browse change types view, or select a CT in the Choose by category view.
Browse by change type: You can click on a popular CT in the Quick create area to immediately open the Run RFC page. Note that you cannot choose an older CT version with quick create.
To sort CTs, use the All change types area in either the Card or Table view. In either view, select a CT and then click Create RFC to open the Run RFC page. If applicable, a Create with older version option appears next to the Create RFC button.
Choose by category: Select a category, subcategory, item, and operation and the CT details box opens with an option to Create with older version if applicable. Click Create RFC to open the Run RFC page.
On the Run RFC page, open the CT name area to see the CT details box. A Subject is required (this is filled in for you if you choose your CT in the Browse change types view). Open the Additional configuration area to add information about the RFC.
In the Execution configuration area, use available drop-down lists or enter values for the required parameters. To configure optional execution parameters, open the Additional configuration area.
When finished, click Run. If there are no errors, the RFC successfully created page displays with the submitted RFC details, and the initial Run output.
Open the Run parameters area to see the configurations you submitted. Refresh the page to update the RFC execution status. Optionally, cancel the RFC or create a copy of it with the options at the top of the page.
How it works:
Use either the Inline Create (you issue a
create-rfccommand with all RFC and execution parameters included), or Template Create (you create two JSON files, one for the RFC parameters and one for the execution parameters) and issue thecreate-rfccommand with the two files as input. Both methods are described here.Submit the RFC:
aws amscm submit-rfc --rfc-idcommand with the returned RFC ID.IDMonitor the RFC:
aws amscm get-rfc --rfc-idcommand.ID
To check the change type version, use this command:
aws amscm list-change-type-version-summaries --filter Attribute=ChangeTypeId,Value=CT_ID
Note
You can use any CreateRfc parameters with any RFC whether or not they are part of the schema for the
change type. For example, to get notifications when the RFC status changes, add this line, --notification "{\"Email\": {\"EmailRecipients\" : [\"email@example.com\"]}}" to the
RFC parameters part of the request (not the execution parameters). For a list of all CreateRfc parameters, see the
AMS Change Management API Reference.
INLINE CREATE:
Issue the create RFC command with execution parameters provided inline (escape quotation marks when providing execution parameters inline), and then submit the returned RFC ID. For example, you can replace the contents with something like this:
aws amscm create-rfc --change-type-id "ct-0ulaleq7ohuyq" --change-type-version "1.0" --title "Create service principal names" --execution-parameters "{ \"DocumentName\": \"AWSManagedServices-CreateADSPN-Admin\", \"Region\": \"us-east-1\", \"Parameters\": { \"ServiceType\": \"MSSQLSvc\", \"Hostnames\": \"server1,server2\", \"ServiceAccountName\": \"gmsa_sql\" } }"
TEMPLATE CREATE:
Output the execution parameters JSON schema for this change type to a file; this example names it ComputerObjectCreateSpnParams.json:
aws amscm get-change-type-version --change-type-id "ct-0ulaleq7ohuyq" --query "ChangeTypeVersion.ExecutionInputSchema" --output text > ComputerObjectCreateSpnParams.jsonModify and save the ComputerObjectCreateSpnParams file. For example, you can replace the contents with something like this:
{
    "DocumentName": "AWSManagedServices-CreateADSPN-Admin",
    "Region": "us-east-1",
    "Parameters": {
      "ServiceType": ["HOST"],
      "Hostnames": "server1",
      "ServiceAccountName": "gmsa_host",
      "Port": ["1433"],
      "ApplicationAccountId": "123456789012"
    }
}
Output the RFC template to a file in your current folder; this example names it ComputerObjectCreateSpnRfc.json:
aws amscm create-rfc --generate-cli-skeleton > ComputerObjectCreateSpnRfc.jsonModify and save the ComputerObjectCreateSpnRfc.json file. For example, you can replace the contents with something like this:
{
"ChangeTypeVersion": "1.0",
"ChangeTypeId": "ct-0ulaleq7ohuyq",
"Title": "Create service principal names"
}
Create the RFC, specifying the ComputerObjectCreateSpnRfc file and the ComputerObjectCreateSpnParams file:
aws amscm create-rfc --cli-input-json file://ComputerObjectCreateSpnRfc.json --execution-parameters file://ComputerObjectCreateSpnParams.jsonYou receive the ID of the new RFC in the response and can use it to submit and monitor the RFC. Until you submit it, the RFC remains in the editing state and does not start.
For multi-account landing zone (MALZ), use this change type in the shared services account.
For information about Directory Service, see the Directory Service Admin Guide.
Delete target groups (Managed Automation)
Screenshot of this change type in the AMS console:

Note
When using manual CTs, AMS recommends that you use the ASAP Scheduling option (choose ASAP in the console, leave start and end time blank in the API/CLI) as these CTs require an AMS operator to examine the RFC, and possibly communicate with you before it can be approved and run. If you schedule these RFCs, be sure to allow at least 24 hours. If approval does not happen before the scheduled start time, the RFC is rejected automatically.
How it works:
Navigate to the Create RFC page: In the left navigation pane of the AMS console click RFCs to open the RFCs list page, and then click Create RFC.
Choose a popular change type (CT) in the default Browse change types view, or select a CT in the Choose by category view.
Browse by change type: You can click on a popular CT in the Quick create area to immediately open the Run RFC page. Note that you cannot choose an older CT version with quick create.
To sort CTs, use the All change types area in either the Card or Table view. In either view, select a CT and then click Create RFC to open the Run RFC page. If applicable, a Create with older version option appears next to the Create RFC button.
Choose by category: Select a category, subcategory, item, and operation and the CT details box opens with an option to Create with older version if applicable. Click Create RFC to open the Run RFC page.
On the Run RFC page, open the CT name area to see the CT details box. A Subject is required (this is filled in for you if you choose your CT in the Browse change types view). Open the Additional configuration area to add information about the RFC.
In the Execution configuration area, use available drop-down lists or enter values for the required parameters. To configure optional execution parameters, open the Additional configuration area.
When finished, click Run. If there are no errors, the RFC successfully created page displays with the submitted RFC details, and the initial Run output.
Open the Run parameters area to see the configurations you submitted. Refresh the page to update the RFC execution status. Optionally, cancel the RFC or create a copy of it with the options at the top of the page.
How it works:
Use either the Inline Create (you issue a
create-rfccommand with all RFC and execution parameters included), or Template Create (you create two JSON files, one for the RFC parameters and one for the execution parameters) and issue thecreate-rfccommand with the two files as input. Both methods are described here.Submit the RFC:
aws amscm submit-rfc --rfc-idcommand with the returned RFC ID.IDMonitor the RFC:
aws amscm get-rfc --rfc-idcommand.ID
To check the change type version, use this command:
aws amscm list-change-type-version-summaries --filter Attribute=ChangeTypeId,Value=CT_ID
Note
You can use any CreateRfc parameters with any RFC whether or not they are part of the schema for the
change type. For example, to get notifications when the RFC status changes, add this line, --notification "{\"Email\": {\"EmailRecipients\" : [\"email@example.com\"]}}" to the
RFC parameters part of the request (not the execution parameters). For a list of all CreateRfc parameters, see the
AMS Change Management API Reference.
INLINE CREATE:
Issue the create RFC command with execution parameters provided inline (escape quotation marks when providing execution parameters inline), and then submit the returned RFC ID. For example, you can replace the contents with something like this:
aws amscm create-rfc --change-type-id "ct-0akjahmgqhu4u" --change-type-version "1.0" --title "Delete Target Group" --execution-parameters "{\"Region\":\"us-west-2\",\"TargetGroupArns\":[\"arn:aws:elasticloadbalancing:us-west-2:123456789012:targetgroup/my-targets/73e2d6bc24d8a067\"],\"Priority\":\"High\"}"
TEMPLATE CREATE:
Output the execution parameters JSON schema for this change type to a JSON file; this example names it TgDeleteParams.json.
aws amscm get-change-type-version --change-type-id "ct-0akjahmgqhu4u" --query "ChangeTypeVersion.ExecutionInputSchema" --output text > TgDeleteParams.jsonModify and save the TgDeleteParams file. For example, you can replace the contents with something like this:
{
"Region": "us-west-2",
"TargetGroupArns": "arn:aws:elasticloadbalancing:us-west-2:123456789012:targetgroup/my-targets/73e2d6bc24d8a067"
"Priority": "High"
}
Output the RFC template to a file in your current folder named TgDeleteRfc.json:
aws amscm create-rfc --generate-cli-skeleton > TgDeleteRfc.jsonModify and save the TgDeleteRfc.json file. For example, you can replace the contents with something like this:
{
"ChangeTypeVersion": "1.0",
"ChangeTypeId": "ct-0akjahmgqhu4u",
"Title": "Delete Target Group"
}
Create the RFC, specifying the TgDeleteRfc file and the TgDeleteParams file:
aws amscm create-rfc --cli-input-json file://TgDeleteRfc.json --execution-parameters file://TgDeleteParams.jsonYou receive the ID of the new RFC in the response and can use it to submit and monitor the RFC. Until you submit it, the RFC remains in the editing state and does not start.
This is a manual change type (an AMS operator must review and run the CT), which means that the RFC can take longer to run and you might have to communicate with AMS through the RFC details page correspondance option. Additionally, if you schedule a manual change type RFC, be sure to allow at least 24 hours, if approval does not happen before the scheduled start time, the RFC is rejected automatically.
Deleting a target group also deletes any associated health checks.
Deleting a target group does not affect its registered targets.
For information about target groups, see ELB Target Groups.
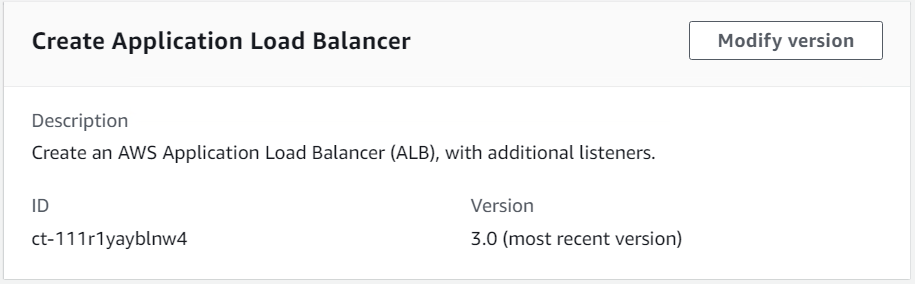
Create application load balancer (ALB)
The following shows this change type in the AMS console.
How it works:
Navigate to the Create RFC page: In the left navigation pane of the AMS console click RFCs to open the RFCs list page, and then click Create RFC.
Choose a popular change type (CT) in the default Browse change types view, or select a CT in the Choose by category view.
Browse by change type: You can click on a popular CT in the Quick create area to immediately open the Run RFC page. Note that you cannot choose an older CT version with quick create.
To sort CTs, use the All change types area in either the Card or Table view. In either view, select a CT and then click Create RFC to open the Run RFC page. If applicable, a Create with older version option appears next to the Create RFC button.
Choose by category: Select a category, subcategory, item, and operation and the CT details box opens with an option to Create with older version if applicable. Click Create RFC to open the Run RFC page.
On the Run RFC page, open the CT name area to see the CT details box. A Subject is required (this is filled in for you if you choose your CT in the Browse change types view). Open the Additional configuration area to add information about the RFC.
In the Execution configuration area, use available drop-down lists or enter values for the required parameters. To configure optional execution parameters, open the Additional configuration area.
When finished, click Run. If there are no errors, the RFC successfully created page displays with the submitted RFC details, and the initial Run output.
Open the Run parameters area to see the configurations you submitted. Refresh the page to update the RFC execution status. Optionally, cancel the RFC or create a copy of it with the options at the top of the page.
How it works:
Use either the Inline Create (you issue a
create-rfccommand with all RFC and execution parameters included), or Template Create (you create two JSON files, one for the RFC parameters and one for the execution parameters) and issue thecreate-rfccommand with the two files as input. Both methods are described here.Submit the RFC:
aws amscm submit-rfc --rfc-idcommand with the returned RFC ID.IDMonitor the RFC:
aws amscm get-rfc --rfc-idcommand.ID
To check the change type version, use this command:
aws amscm list-change-type-version-summaries --filter Attribute=ChangeTypeId,Value=CT_ID
Note
You can use any CreateRfc parameters with any RFC whether or not they are part of the schema for the
change type. For example, to get notifications when the RFC status changes, add this line, --notification "{\"Email\": {\"EmailRecipients\" : [\"email@example.com\"]}}" to the
RFC parameters part of the request (not the execution parameters). For a list of all CreateRfc parameters, see the
AMS Change Management API Reference.
INLINE CREATE:
Issue the create RFC command with execution parameters provided inline (escape quotation marks when providing execution parameters inline), and then submit the returned RFC ID. For example, you can replace the contents with something like this:
aws amscm --profile saml --region us-east-1 create-rfc --change-type-id "ct-111r1yayblnw4" --change-type-version "3.0" --title 'Create ALB' --description "My Test ALB" --execution-parameters ""{\"Description\":\"Test ALB\",\"VpcId\":\"VPC_ID\",\"Name\":\"TestStack\",\"StackTemplateId\":\"stm-sd7uv500000000000\",\"TimeoutInMinutes\":360,\"LoadBalancer\":{\"SecurityGroups\":[\"SG_ID\"],\"SubnetIds\":[\"SUBNET_ID\",\"SUBNET_ID\"]},\"Listener1\":{\"Port\":\"443\",\"Protocol\":\"HTTPS\"}}"
TEMPLATE CREATE:
Output the execution parameters JSON schema for this change type to a JSON file. For example, you can replace the contents with something like this:
aws amscm get-change-type-version --change-type-id "ct-111r1yayblnw4" --query "ChangeTypeVersion.ExecutionInputSchema" --output text > CreateAlbParams.jsonModify and save the CreateAlbParams file. For example:
{
"Description":      "ALB-Create",
"VpcId":            "VPC_ID",
"Name":             "My-ALB",
"StackTemplateId":  "stm-sd7uv500000000000",
"TimeoutInMinutes" : 360,
"LoadBalancer" : {
    "SecurityGroups" : ["SG_ID"],
    "SubnetIds" : ["SUBNET_ID", "SUBNET_ID"]
  },
  "Listener1" : {
    "Port" : "443",
    "Protocol" : "HTTPS"
  }
}
Output the RFC template to a file in your current folder. For example, you can replace the contents with something like this:
aws amscm create-rfc --generate-cli-skeleton > CreateAlbRfc.jsonModify and save the CreateAlbRfc.json file. For example:
{
"ChangeTypeVersion":    "3.0",
"ChangeTypeId":         "ct-111r1yayblnw4",
"Title":                "ALB-Create-RFC"
}
Create the RFC, specifying the CreateAlbRfc file and the CreateAlbParams file:
aws amscm create-rfc --cli-input-json file://CreateAlbRfc.json --execution-parameters file://CreateAlbParams.jsonYou receive the ID of the new RFC in the response and can use it to submit and monitor the RFC. Until you submit it, the RFC remains in the editing state and does not start.
Note
As of version 3.0, you can also configure four CloudWatch alarms with customized alarm thresholds.
Note
To open ports and associate all the load balancer resources, submit a Management | Advanced stack components | Security groups | Update RFC.
To learn more about AWS Application Load Balancers, see What Is an Application Load Balancer?
To create an Application Load Balancer target group, see Target Group | Create (For ALB).
Update application load balancer (ALB)
The following shows this change type in the AMS console.

How it works:
Navigate to the Create RFC page: In the left navigation pane of the AMS console click RFCs to open the RFCs list page, and then click Create RFC.
Choose a popular change type (CT) in the default Browse change types view, or select a CT in the Choose by category view.
Browse by change type: You can click on a popular CT in the Quick create area to immediately open the Run RFC page. Note that you cannot choose an older CT version with quick create.
To sort CTs, use the All change types area in either the Card or Table view. In either view, select a CT and then click Create RFC to open the Run RFC page. If applicable, a Create with older version option appears next to the Create RFC button.
Choose by category: Select a category, subcategory, item, and operation and the CT details box opens with an option to Create with older version if applicable. Click Create RFC to open the Run RFC page.
On the Run RFC page, open the CT name area to see the CT details box. A Subject is required (this is filled in for you if you choose your CT in the Browse change types view). Open the Additional configuration area to add information about the RFC.
In the Execution configuration area, use available drop-down lists or enter values for the required parameters. To configure optional execution parameters, open the Additional configuration area.
When finished, click Run. If there are no errors, the RFC successfully created page displays with the submitted RFC details, and the initial Run output.
Open the Run parameters area to see the configurations you submitted. Refresh the page to update the RFC execution status. Optionally, cancel the RFC or create a copy of it with the options at the top of the page.
How it works:
Use either the Inline Create (you issue a
create-rfccommand with all RFC and execution parameters included), or Template Create (you create two JSON files, one for the RFC parameters and one for the execution parameters) and issue thecreate-rfccommand with the two files as input. Both methods are described here.Submit the RFC:
aws amscm submit-rfc --rfc-idcommand with the returned RFC ID.IDMonitor the RFC:
aws amscm get-rfc --rfc-idcommand.ID
To check the change type version, use this command:
aws amscm list-change-type-version-summaries --filter Attribute=ChangeTypeId,Value=CT_ID
Note
You can use any CreateRfc parameters with any RFC whether or not they are part of the schema for the
change type. For example, to get notifications when the RFC status changes, add this line, --notification "{\"Email\": {\"EmailRecipients\" : [\"email@example.com\"]}}" to the
RFC parameters part of the request (not the execution parameters). For a list of all CreateRfc parameters, see the
AMS Change Management API Reference.
INLINE CREATE:
Issue the create RFC command with execution parameters provided inline (escape quotation marks when providing execution parameters inline), and then submit the returned RFC ID. For example, you can replace the contents with something like this:
aws amscm create-rfc --titleTest-Update-ALB--change-type-id ct-1a1zzgi2nb83d --change-type-version 3.0 --execution-parameters '{"Description":"Updating Test ALB","VpcId":"VPC_ID","StackTemplateId":"stm-sd7uv500000000000","Name":"Test-Application-LoadBalancer","TimeoutInMinutes":360,"Parameters":{"TargetGroupHealthCheckPath": "/myAppHealth"}}'
TEMPLATE CREATE:
Output the execution parameters JSON schema for this change type to a JSON file. For example, you can replace the contents with something like this:
aws amscm get-change-type-version --change-type-id "ct-111r1yayblnw4" --query "ChangeTypeVersion.ExecutionInputSchema" --output text > UpdateAlbParams.jsonModify and save the UpdateAlbParams file. For example:
{ "Description": "ALB-Update", "VpcId": "VPC_ID", "Name": "My-ALB", "StackTemplateId": "stm-sd7uv500000000000", "TimeoutInMinutes" :360, "Parameters": { "LoadBalancerSecurityGroups": [ "sg-1234567890abcdef0" ], "LoadBalancerSubnetIds": [ "subnet-1234567890abcdef0", "subnet-1234567890abcdef1" ], "LoadBalancerDeletionProtection": "false", "LoadBalancerIdleTimeout": "60", "Listener1Port": "443", "Listener1Protocol": "HTTPS", "Listener1SSLCertificateArn": "arn:aws:acm:ap-southeast-2:012345678912:certificate/e23c3545-e92d-4542-83b8-63483505b5a5", "Listener1SSLPolicy": "ELBSecurityPolicy-TLS-1-2-Ext-2018-06", "Listener2Port": "8080", "Listener2Protocol": "HTTP", "TargetGroupHealthCheckInterval": "10", "TargetGroupHealthCheckPath": "/thing/index.html", "TargetGroupHealthCheckPort": "8080", "TargetGroupHealthCheckProtocol": "HTTP", "TargetGroupHealthCheckTimeout": "10", "TargetGroupHealthyThreshold": "2", "TargetGroupUnhealthyThreshold": "10", "TargetGroupValidHTTPCode": "200", "TargetGroupDeregistrationDelayTimeout": "300", "TargetGroupSlowStartDuration": "30", "TargetGroupCookieExpirationPeriod": "20" } }Output the RFC template to a file in your current folder. For example, you can replace the contents with something like this:
aws amscm create-rfc --generate-cli-skeleton > UpdateAlbRfc.jsonModify and save the UpdateAlbRfc.json file. For example:
{
"ChangeTypeVersion":    "3.0",
"ChangeTypeId":         "ct-111r1yayblnw4",
"Title":                "ALB-Update-RFC"
}
Create the RFC, specifying the UpdateAlbRfc file and the UpdateAlbParams file:
aws amscm create-rfc --cli-input-json file://UpdateAlbRfc.json --execution-parameters file://UpdateAlbParams.jsonYou receive the ID of the new RFC in the response and can use it to submit and monitor the RFC. Until you submit it, the RFC remains in the editing state and does not start.
Note
This change type is version 3.0, and can be used with the version 3.0 of the Create ALB change type (ct-111r1yayblnw4).
To learn more about AWS Application Load Balancers, see What Is an Application Load Balancer?
Create listener
Screenshot of this change type in the AMS console:

How it works:
Navigate to the Create RFC page: In the left navigation pane of the AMS console click RFCs to open the RFCs list page, and then click Create RFC.
Choose a popular change type (CT) in the default Browse change types view, or select a CT in the Choose by category view.
Browse by change type: You can click on a popular CT in the Quick create area to immediately open the Run RFC page. Note that you cannot choose an older CT version with quick create.
To sort CTs, use the All change types area in either the Card or Table view. In either view, select a CT and then click Create RFC to open the Run RFC page. If applicable, a Create with older version option appears next to the Create RFC button.
Choose by category: Select a category, subcategory, item, and operation and the CT details box opens with an option to Create with older version if applicable. Click Create RFC to open the Run RFC page.
On the Run RFC page, open the CT name area to see the CT details box. A Subject is required (this is filled in for you if you choose your CT in the Browse change types view). Open the Additional configuration area to add information about the RFC.
In the Execution configuration area, use available drop-down lists or enter values for the required parameters. To configure optional execution parameters, open the Additional configuration area.
When finished, click Run. If there are no errors, the RFC successfully created page displays with the submitted RFC details, and the initial Run output.
Open the Run parameters area to see the configurations you submitted. Refresh the page to update the RFC execution status. Optionally, cancel the RFC or create a copy of it with the options at the top of the page.
How it works:
Use either the Inline Create (you issue a
create-rfccommand with all RFC and execution parameters included), or Template Create (you create two JSON files, one for the RFC parameters and one for the execution parameters) and issue thecreate-rfccommand with the two files as input. Both methods are described here.Submit the RFC:
aws amscm submit-rfc --rfc-idcommand with the returned RFC ID.IDMonitor the RFC:
aws amscm get-rfc --rfc-idcommand.ID
To check the change type version, use this command:
aws amscm list-change-type-version-summaries --filter Attribute=ChangeTypeId,Value=CT_ID
Note
You can use any CreateRfc parameters with any RFC whether or not they are part of the schema for the
change type. For example, to get notifications when the RFC status changes, add this line, --notification "{\"Email\": {\"EmailRecipients\" : [\"email@example.com\"]}}" to the
RFC parameters part of the request (not the execution parameters). For a list of all CreateRfc parameters, see the
AMS Change Management API Reference.
INLINE CREATE:
Issue the create RFC command with execution parameters provided inline (escape quotation marks when providing execution parameters inline), and then submit the returned RFC ID. For example, you can replace the contents with something like this:
aws --profile saml --region us-east-1 amscm create-rfc --change-type-id "ct-14yjom3kvpinu" --change-type-version "2.0" --title "TITLE" --execution-parameters "{\"Description\":\"DESCRIPTION\", \"VpcId\":\"VPC_ID\", \"StackTemplateId\": \"stm-u5n0r6aacdvdwthhm\", \"Name\":\"NAME\", \"TimeoutInMinutes\":60, \"Parameters\": {\"LoadBalancerArn\":\"LB-ARN",\"DefaultActionTargetGroupArn\":\"TARGET-GROUP-ARN",\"Port\":\"80\",\"Protocol\":\"HTTP\"}}"
TEMPLATE CREATE:
Output the execution parameters JSON schema for this change type to a JSON file; this example names it CreateListenerParams.json:
aws amscm get-change-type-version --change-type-id "ct-14yjom3kvpinu" --query "ChangeTypeVersion.ExecutionInputSchema" --output text > CreateListenerParams.jsonModify and save the CreateListenerParams file. For example, you can replace the contents with something like this:
{ "Description": "Listener-Create", "VpcId": "VPC_ID", "StackTemplateId": "stm-u5n0r6aacdvdwthhm", "Name": "My-Listener", "Parameters": { "LoadBalancerArn":ARN, "DefaultActionTargetGroupArn":ARN, "Port":PORT, "Protocol":Protocol" } }Output the RFC template to a file in your current folder; this example names it CreateListenerRfc.json:
aws amscm create-rfc --generate-cli-skeleton > CreateListenerRfc.jsonModify and save the CreateListenerRfc.json file. For example, you can replace the contents with something like this:
{
"ChangeTypeVersion":    "2.0",
"ChangeTypeId":         "ct-14yjom3kvpinu",
"Title":                "Listener-Create-RFC"
}
Create the RFC, specifying the CreateListenerRfc file and the CreateListenerParams file:
aws amscm create-rfc --cli-input-json file://CreateListenerRfc.json --execution-parameters file://CreateListenerParams.jsonYou receive the ID of the new RFC in the response and can use it to submit and monitor the RFC. Until you submit it, the RFC remains in the editing state and does not start.
Next Steps: Submit a Management | Other | Other | Update change type to open ports and associate security groups, see Other | Other requests.
Note
You can specify up to four Target IDs, Ports, and Availability Zones.
High availability one-tier stacks: Creating

How it works:
Navigate to the Create RFC page: In the left navigation pane of the AMS console click RFCs to open the RFCs list page, and then click Create RFC.
Choose a popular change type (CT) in the default Browse change types view, or select a CT in the Choose by category view.
Browse by change type: You can click on a popular CT in the Quick create area to immediately open the Run RFC page. Note that you cannot choose an older CT version with quick create.
To sort CTs, use the All change types area in either the Card or Table view. In either view, select a CT and then click Create RFC to open the Run RFC page. If applicable, a Create with older version option appears next to the Create RFC button.
Choose by category: Select a category, subcategory, item, and operation and the CT details box opens with an option to Create with older version if applicable. Click Create RFC to open the Run RFC page.
On the Run RFC page, open the CT name area to see the CT details box. A Subject is required (this is filled in for you if you choose your CT in the Browse change types view). Open the Additional configuration area to add information about the RFC.
In the Execution configuration area, use available drop-down lists or enter values for the required parameters. To configure optional execution parameters, open the Additional configuration area.
When finished, click Run. If there are no errors, the RFC successfully created page displays with the submitted RFC details, and the initial Run output.
Open the Run parameters area to see the configurations you submitted. Refresh the page to update the RFC execution status. Optionally, cancel the RFC or create a copy of it with the options at the top of the page.
How it works:
Use the Template Create method (you create two JSON files, one for the RFC parameters and one for the execution parameters) and issue the
create-rfccommand with the two files as input. Both methods are described here.Submit the RFC:
aws amscm submit-rfc --rfc-idcommand with the returned RFC ID.IDMonitor the RFC:
aws amscm get-rfc --rfc-idcommand.ID
To check the change type version, use this command:
aws amscm list-change-type-version-summaries --filter Attribute=ChangeTypeId,Value=CT_ID
Note
You can use any CreateRfc parameters with any RFC whether or not they are part of the schema for the
change type. For example, to get notifications when the RFC status changes, add this line, --notification "{\"Email\": {\"EmailRecipients\" : [\"email@example.com\"]}}" to the
RFC parameters part of the request (not the execution parameters). For a list of all CreateRfc parameters, see the
AMS Change Management API Reference.
TEMPLATE CREATE:
Output the execution parameters JSON schema for this change type to a file in your current folder; this example names it CreateOnetierStackParams.json.
aws amscm get-change-type-version --change-type-id "ct-09t6q7j9v5hrn" --query "ChangeTypeVersion.ExecutionInputSchema" --output text > CreateOnetierStackParams.jsonModify the schema, replacing the
variablesas appropriate.{ "Description": "HA-One-Tier-Stack", "Name": "One-Tier-Stack", "TimeoutInMinutes": "360", "VpcId": "VPC_ID", "ApplicationLoadBalancer": { "SubnetIds": [ "SUBNET_ID", "SUBNET_ID" ] }, "AutoScalingGroup": { "AmiId": "AMI-ID" "SubnetIds": [ "SUBNET_ID", "SUBNET_ID" ] } }Output the CreateRfc JSON template to a file in your current folder; example names it CreateOnetierStackRfc.json:
aws amscm create-rfc --generate-cli-skeleton > CreateOnetierStackRfc.jsonModify the RFC template as appropriate and save it. Reset the start and end times for a scheduled RFC, or leave off for an ASAP RFC.
{ "ChangeTypeVersion":2.0", "ChangeTypeId": "ct-09t6q7j9v5hrn", "Title": "HA-One-Tier-RFC", "RequestedStartTime": "2019-04-28T22:45:00Z", "RequestedEndTime": "2019-04-28T22:45:00Z" }Create the RFC, specifying the CreateOnetierStackRfc.json file and the CreateOnetierStackParams.json execution parameters file:
aws amscm create-rfc --cli-input-json file://CreateOnetierStackRfc.json --execution-parameters file://CreateOnetierStackParams.jsonYou receive the ID of the new RFC in the response and can use it to submit and monitor the RFC. Until you submit it, the RFC remains in the editing state and does not start.
Note
This is a large provisioning of resources, especially if you add UserData. The load balancer Amazon resource name (ARN) can be found through the Load Balancer page of the EC2 console by searching with the load balancer stack ID returned in the RFC execution output.
Create IAM entity or policy (Managed Automation)

How it works:
Navigate to the Create RFC page: In the left navigation pane of the AMS console click RFCs to open the RFCs list page, and then click Create RFC.
Choose a popular change type (CT) in the default Browse change types view, or select a CT in the Choose by category view.
Browse by change type: You can click on a popular CT in the Quick create area to immediately open the Run RFC page. Note that you cannot choose an older CT version with quick create.
To sort CTs, use the All change types area in either the Card or Table view. In either view, select a CT and then click Create RFC to open the Run RFC page. If applicable, a Create with older version option appears next to the Create RFC button.
Choose by category: Select a category, subcategory, item, and operation and the CT details box opens with an option to Create with older version if applicable. Click Create RFC to open the Run RFC page.
On the Run RFC page, open the CT name area to see the CT details box. A Subject is required (this is filled in for you if you choose your CT in the Browse change types view). Open the Additional configuration area to add information about the RFC.
In the Execution configuration area, use available drop-down lists or enter values for the required parameters. To configure optional execution parameters, open the Additional configuration area.
When finished, click Run. If there are no errors, the RFC successfully created page displays with the submitted RFC details, and the initial Run output.
Open the Run parameters area to see the configurations you submitted. Refresh the page to update the RFC execution status. Optionally, cancel the RFC or create a copy of it with the options at the top of the page.
How it works:
Use either the Inline Create (you issue a
create-rfccommand with all RFC and execution parameters included), or Template Create (you create two JSON files, one for the RFC parameters and one for the execution parameters) and issue thecreate-rfccommand with the two files as input. Both methods are described here.Submit the RFC:
aws amscm submit-rfc --rfc-idcommand with the returned RFC ID.IDMonitor the RFC:
aws amscm get-rfc --rfc-idcommand.ID
To check the change type version, use this command:
aws amscm list-change-type-version-summaries --filter Attribute=ChangeTypeId,Value=CT_ID
Note
You can use any CreateRfc parameters with any RFC whether or not they are part of the schema for the
change type. For example, to get notifications when the RFC status changes, add this line, --notification "{\"Email\": {\"EmailRecipients\" : [\"email@example.com\"]}}" to the
RFC parameters part of the request (not the execution parameters). For a list of all CreateRfc parameters, see the
AMS Change Management API Reference.
Note
When pasting in a policy document, note that the RFC only accepts policy pastes up to 20,480 characters. If your file has more than 20,480 characters, create a service request to upload the policy and then refer to that service request in the RFC that you open for IAM.
INLINE CREATE:
Issue the create RFC command with execution parameters provided inline (escape quotes when providing execution parameters inline), and then submit the returned RFC ID. For example, you can replace the contents with something like this:
aws amscm create-rfc --change-type-id "ct-3dpd8mdd9jn1r" --change-type-version "1.0" --title "TestIamCreate" --execution-parameters "{\"UseCase\":\"IAM_RESOURCE_DETAILS\",\"IAM Role\":[{\"RoleName\":\"ROLE_NAME\",\"TrustPolicy\":\"TRUST_POLICY\",\"RolePermissions\":\"ROLE_PERMISSIONS\"}],\"Operation\":\"Create\"}"
TEMPLATE CREATE:
Output the execution parameters JSON schema for this change type to a file; example names it CreateIamResourceParams.json:
aws amscm get-change-type-version --change-type-id "ct-3dpd8mdd9jn1r" --query "ChangeTypeVersion.ExecutionInputSchema" --output text > CreateIamResourceParams.jsonModify and save the CreateIamResourceParams file; example creates an IAM Role with policy documents pasted inline.
{
  "UseCase": "IAM_RESOURCE_DETAILS",
  "IAM Role": [
    {
      "RoleName": "codebuild_ec2_test_role",
      "TrustPolicy": {
        "Version": "2008-10-17",
        "Statement": [
          {
            "Effect": "Allow",
            "Principal": {
              "Service": "codebuild.amazonaws.com"
            },
            "Action": "sts:AssumeRole"
          }
        ]
      },
      "RolePermissions": {
        "Version": "2012-10-17",
        "Statement": [
          {
            "Effect": "Allow",
            "Action": [
              "ec2:DescribeInstanceStatus"
            ],
            "Resource": "*"
          }
        ]
      }
    }
  ],
  "Operation": "Create"
}
Output the RFC template JSON file to a file named CreateIamResourceRfc.json:
aws amscm create-rfc --generate-cli-skeleton > CreateIamResourceRfc.jsonModify and save the CreateIamResourceRfc.json file. For example, you can replace the contents with something like this:
{
"ChangeTypeVersion": "1.0",
"ChangeTypeId": "ct-3dpd8mdd9jn1r",
"Title": "Create IAM Role"
}
Create the RFC, specifying the CreateIamResourceRfc file and the CreateIamResourceParams file:
aws amscm create-rfc --cli-input-json file://CreateIamResourceRfc.json --execution-parameters file://CreateIamResourceParams.jsonYou receive the ID of the new RFC in the response and can use it to submit and monitor the RFC. Until you submit it, the RFC remains in the editing state and does not start.
After an IAM role is provisioned in your account, you must onboard the role in your federation solution.
When pasting in a policy document, note that the RFC only accepts policy pastes up to 20,480 characters. If your policy has more than 20,480 characters, create a service request to upload the policy, and then refer to that service request in the RFC that you open for IAM.
This is a manual change type (an AMS operator must review and run the CT), which means that the RFC can take longer to run and you might have to communicate with AMS through the RFC details page correspondance option. Additionally, if you schedule a manual change type RFC, be sure to allow at least 24 hours, if approval does not happen before the scheduled start time, the RFC is rejected automatically.
For information about AWS Identity and Access Management, see AWS Identity and Access Management (IAM)
and for policy information, see Managed policies and inline policies. For information about AMS permissions, see Deploying IAM resources.
Continue rollback on custom CloudFormation stack
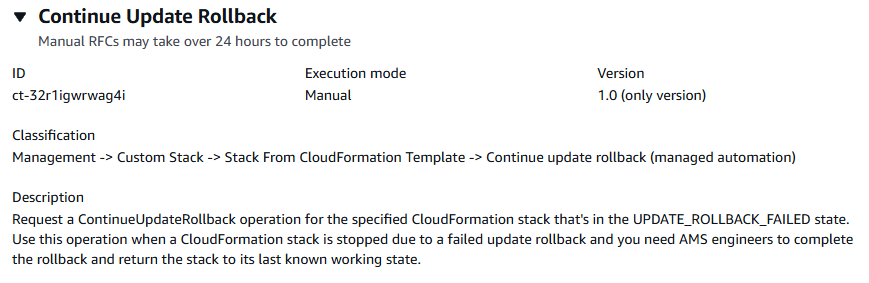
Navigate to the Create RFC page: In the left navigation pane of the AMS console click RFCs to open the RFCs list page, and then click Create RFC.
Choose a popular change type (CT) in the default Browse change types view, or select a CT in the Choose by category view.
Browse by change type: You can click on a popular CT in the Quick create area to immediately open the Run RFC page. Note that you cannot choose an older CT version with quick create.
To sort CTs, use the All change types area in either the Card or Table view. In either view, select a CT and then click Create RFC to open the Run RFC page. If applicable, a Create with older version option appears next to the Create RFC button.
Choose by category: Select a category, subcategory, item, and operation and the CT details box opens with an option to Create with older version if applicable. Click Create RFC to open the Run RFC page.
On the Run RFC page, open the CT name area to see the CT details box. A Subject is required (this is filled in for you if you choose your CT in the Browse change types view). Open the Additional configuration area to add information about the RFC.
In the Execution configuration area, use available drop-down lists or enter values for the required parameters. To configure optional execution parameters, open the Additional configuration area.
When finished, click Run. If there are no errors, the RFC successfully created page displays with the submitted RFC details, and the initial Run output.
Open the Run parameters area to see the configurations you submitted. Refresh the page to update the RFC execution status. Optionally, cancel the RFC or create a copy of it with the options at the top of the page.
Use either the Inline Create (you issue a
create-rfccommand with all RFC and execution parameters included), or Template Create (you create two JSON files, one for the RFC parameters and one for the execution parameters) and issue thecreate-rfccommand with the two files as input. Both methods are described here.Submit the RFC:
aws amscm submit-rfc --rfc-idcommand with the returned RFC ID.IDMonitor the RFC:
aws amscm get-rfc --rfc-idcommand.ID
To check the change type version, use this command:
aws amscm list-change-type-version-summaries --filter Attribute=ChangeTypeId,Value=CT_ID
Note
You can use any CreateRfc parameters with any RFC whether or not they are part of the schema for the
change type. For example, to get notifications when the RFC status changes, add this line, --notification "{\"Email\": {\"EmailRecipients\" : [\"email@example.com\"]}}" to the
RFC parameters part of the request (not the execution parameters). For a list of all CreateRfc parameters, see the
AMS Change Management API Reference.
INLINE CREATE:
Issue the create RFC command with execution parameters provided inline (escape quotation marks when providing execution parameters inline), and then submit the returned RFC ID. For example, you can replace the contents with something like this:
aws amscm create-rfc --change-type-id "ct-32r1igwrwag4i" --change-type-version "1.0" --title "Continue Update Rollback" --execution-parameters "{\"StackId\":\"STACK_ID\",\"Region\":\"REGION\"}"
TEMPLATE CREATE:
Output the execution parameters JSON schema for this change type to a file in your current folder; this example names it ContinueRollbackParams.json:
aws amscm get-change-type-version --change-type-id "ct-32r1igwrwag4i" --query "ChangeTypeVersion.ExecutionInputSchema" --output text > ContinueRollbackParams.jsonModify and save the ContinueRollbackParams.json file. For example, you can replace the contents with something like this:
{
    "StackId": "stack-a1b2c3d4e5f67890e",
    "Region": "us-east-1",
    "Priority": "High"
}
Output the JSON template for CreateRfc to a file in your current folder; this example names it ContinueRollbackRfc.json:
aws amscm create-rfc --generate-cli-skeleton > ContinueRollbackRfc.jsonModify and save the ContinueRollbackRfc.json file. For example, you can replace the contents with something like this:
{
  "ChangeTypeVersion": "1.0",
  "ChangeTypeId": "ct-32r1igwrwag4i",
  "Title": "Continue Update Rollback"
}
Create the RFC, specifying the ContinueRollbackRfc file and the execution parameters file:
aws amscm create-rfc --cli-input-json file://ContinueRollbackRfc.json --execution-parameters file://ContinueRollbackParams.jsonYou receive the ID of the new RFC in the response and can use it to submit and monitor the RFC. Until you submit it, the RFC remains in the editing state and does not start.
For more information see Continue rolling back an update.
Manage the VPC Subnet IPv4 Address Auto Assigment
The following shows this change type in the AMS console.

How it works:
Navigate to the Create RFC page: In the left navigation pane of the AMS console click RFCs to open the RFCs list page, and then click Create RFC.
Choose a popular change type (CT) in the default Browse change types view, or select a CT in the Choose by category view.
Browse by change type: You can click on a popular CT in the Quick create area to immediately open the Run RFC page. Note that you cannot choose an older CT version with quick create.
To sort CTs, use the All change types area in either the Card or Table view. In either view, select a CT and then click Create RFC to open the Run RFC page. If applicable, a Create with older version option appears next to the Create RFC button.
Choose by category: Select a category, subcategory, item, and operation and the CT details box opens with an option to Create with older version if applicable. Click Create RFC to open the Run RFC page.
On the Run RFC page, open the CT name area to see the CT details box. A Subject is required (this is filled in for you if you choose your CT in the Browse change types view). Open the Additional configuration area to add information about the RFC.
In the Execution configuration area, use available drop-down lists or enter values for the required parameters. To configure optional execution parameters, open the Additional configuration area.
When finished, click Run. If there are no errors, the RFC successfully created page displays with the submitted RFC details, and the initial Run output.
Open the Run parameters area to see the configurations you submitted. Refresh the page to update the RFC execution status. Optionally, cancel the RFC or create a copy of it with the options at the top of the page.
How it works:
Use either the Inline Create (you issue a
create-rfccommand with all RFC and execution parameters included), or Template Create (you create two JSON files, one for the RFC parameters and one for the execution parameters) and issue thecreate-rfccommand with the two files as input. Both methods are described here.Submit the RFC:
aws amscm submit-rfc --rfc-idcommand with the returned RFC ID.IDMonitor the RFC:
aws amscm get-rfc --rfc-idcommand.ID
To check the change type version, use this command:
aws amscm list-change-type-version-summaries --filter Attribute=ChangeTypeId,Value=CT_ID
Note
You can use any CreateRfc parameters with any RFC whether or not they are part of the schema for the
change type. For example, to get notifications when the RFC status changes, add this line, --notification "{\"Email\": {\"EmailRecipients\" : [\"email@example.com\"]}}" to the
RFC parameters part of the request (not the execution parameters). For a list of all CreateRfc parameters, see the
AMS Change Management API Reference.
INLINE CREATE:
Issue the create RFC command with execution parameters provided inline (escape quotation marks when providing execution parameters inline) and then submit the returned RFC ID. For example, you can replace the contents with something like this:
aws amscm create-rfc --change-type-id "ct-1pqxczuw5uwu6" --change-type-version "1.0" --title "AWSManagedServices-ManageSubnetPublicIpv4AutoAssign" --execution-parameters "{\"DocumentName\": \"AWSManagedServices-ManageSubnetPublicIpv4AutoAssign\",\"Region\": \"us-east-1\",\"Parameters\": {\"SubnetId\": \"subnet-0a1b2c3d4e5f67890\", \"MapPublicIpOnLaunch\":true, \"AcknowledgeNetworkImpact\": [\"Yes\"]}}"
TEMPLATE CREATE:
Output the execution parameters JSON schema for this change type; this example names it ManageSubnetAutoAddressParams.json:
aws amscm get-change-type-version --change-type-id "ct-1pqxczuw5uwu6" --query "ChangeTypeVersion.ExecutionInputSchema" --output text > ManageSubnetAutoAddressParams.jsonModify and save the execution parameters JSON file. For example, you can replace the contents with something like this:
{ "DocumentName": "AWSManagedServices-ManageSubnetPublicIpv4AutoAssign", "Region": "us-east-1", "Parameters": { "SubnetId": "subnet-0a1b2c3d4e5f67890", "MapPublicIpOnLaunch":true, "AcknowledgeNetworkImpact": [ "Yes" ] } }Output the RFC template JSON file; this example names it ManageSubnetAutoAddressRfc.json:
aws amscm create-rfc --generate-cli-skeleton > ManageSubnetAutoAddressRfc.jsonModify and save the ManageSubnetAutoAddressRfc.json file. For example, you can replace the contents with something like this:
{
  "ChangeTypeVersion" : "1.0",
  "ChangeTypeId" : "ct-1pqxczuw5uwu6",
  "Title" : "ManageSubnetAutoAddress"
}
Create the RFC, specifying the ManageSubnetAutoAddressRfc file and the ManageSubnetAutoAddressParams file:
aws amscm create-rfc --cli-input-json file://ManageSubnetAutoAddressRfc.json --execution-parameters file://ManageSubnetAutoAddressParams.jsonYou receive the ID of the new RFC in the response and can use it to submit and monitor the RFC. Until you submit it, the RFC remains in the editing state and does not start.
For general information on VPCs and subnet addressing, see IP addressing for your VPCs and subnets.
Schedule add
The following shows this change type in the AMS console.

How it works:
Navigate to the Create RFC page: In the left navigation pane of the AMS console click RFCs to open the RFCs list page, and then click Create RFC.
Choose a popular change type (CT) in the default Browse change types view, or select a CT in the Choose by category view.
Browse by change type: You can click on a popular CT in the Quick create area to immediately open the Run RFC page. Note that you cannot choose an older CT version with quick create.
To sort CTs, use the All change types area in either the Card or Table view. In either view, select a CT and then click Create RFC to open the Run RFC page. If applicable, a Create with older version option appears next to the Create RFC button.
Choose by category: Select a category, subcategory, item, and operation and the CT details box opens with an option to Create with older version if applicable. Click Create RFC to open the Run RFC page.
On the Run RFC page, open the CT name area to see the CT details box. A Subject is required (this is filled in for you if you choose your CT in the Browse change types view). Open the Additional configuration area to add information about the RFC.
In the Execution configuration area, use available drop-down lists or enter values for the required parameters. To configure optional execution parameters, open the Additional configuration area.
When finished, click Run. If there are no errors, the RFC successfully created page displays with the submitted RFC details, and the initial Run output.
Open the Run parameters area to see the configurations you submitted. Refresh the page to update the RFC execution status. Optionally, cancel the RFC or create a copy of it with the options at the top of the page.
How it works:
Use either the Inline Create (you issue a
create-rfccommand with all RFC and execution parameters included), or Template Create (you create two JSON files, one for the RFC parameters and one for the execution parameters) and issue thecreate-rfccommand with the two files as input. Both methods are described here.Submit the RFC:
aws amscm submit-rfc --rfc-idcommand with the returned RFC ID.IDMonitor the RFC:
aws amscm get-rfc --rfc-idcommand.ID
To check the change type version, use this command:
aws amscm list-change-type-version-summaries --filter Attribute=ChangeTypeId,Value=CT_ID
Note
You can use any CreateRfc parameters with any RFC whether or not they are part of the schema for the
change type. For example, to get notifications when the RFC status changes, add this line, --notification "{\"Email\": {\"EmailRecipients\" : [\"email@example.com\"]}}" to the
RFC parameters part of the request (not the execution parameters). For a list of all CreateRfc parameters, see the
AMS Change Management API Reference.
INLINE CREATE:
Issue the create RFC command with execution parameters provided inline (escape quotes when providing execution parameters inline), and then submit the returned RFC ID. For example, you can replace the contents with something like this:
aws amscm create-rfc --change-type-id "ct-2bxelbn765ive" --change-type-version "1.0" --title "Add a schedule for AMS Resource Scheduler" --execution-parameters "{\"DocumentName\":\"AWSManagedServices-AddOrUpdateSchedule\",\"Region\":\"us-east-1\",\"Parameters\":{\"Action\":[\"add\"],\"Name\":[\"Schedule01\"],\"Description\":[\"Test schedule\"],\"Hibernate\":[\"true\"],\"Enforced\":[\"false\"],\"OverrideStatus\":[\"running\"],\"Periods\":[\"period01\",\"period02\"],\"RetainRunning\":[\"false\"],\"StopNewInstances\":[\"true\"],\"SSMMaintenanceWindow\":[\"window01\"],\"TimeZone\":[\"Australia/Sydney\"],\"UseMaintenanceWindow\":[\"true\"],\"UseMetrics\":[\"false\"]}}"
TEMPLATE CREATE:
Output the execution parameters JSON schema for this change type to a JSON file; this example names it AddScheduleParams.json:
aws amscm get-change-type-version --change-type-id "ct-2bxelbn765ive" --query "ChangeTypeVersion.ExecutionInputSchema" --output text > AddScheduleParams.jsonModify and save the AddScheduleParams file.
{
  "DocumentName" : "AWSManagedServices-AddOrUpdateSchedule",
  "Region" : "us-east-1",
  "Parameters" : {
    "Action" : ["add"],
    "Name" : ["Schedule01"],
    "Description" : ["Test schedule"],
    "Hibernate" : ["true"],
    "Enforced" : ["false"],
    "OverrideStatus" : ["running"],
    "Periods" : [
      "period01",
      "period02"
    ],
    "RetainRunning" : ["false"],
    "StopNewInstances" : ["true"],
    "SSMMaintenanceWindow" : ["window01"],
    "TimeZone" : ["Australia/Sydney"],
    "UseMaintenanceWindow" : ["true"],
    "UseMetrics" : ["false"]
  }
}
Output the RFC template to a file in your current folder; this example names it AddScheduleRfc.json:
aws amscm create-rfc --generate-cli-skeleton > AddScheduleRfc.jsonModify and save the AddScheduleRfc.json file. For example, you can replace the contents with something like this:
{
"ChangeTypeVersion":    "1.0",
"ChangeTypeId":         "ct-2bxelbn765ive",
"Title":                "Add a schedule for AMS Resource Scheduler"
}
Create the RFC, specifying the AddScheduleRfc file and the AddScheduleParams file:
aws amscm create-rfc --cli-input-json file://AddScheduleRfc.json --execution-parameters file://AddScheduleParams.jsonYou receive the ID of the new RFC in the response and can use it to submit and monitor the RFC. Until you submit it, the RFC remains in the editing state and does not start.
Do not begin the maintenance window name with 'mw-'.
For more information, see How the AMS Resource Scheduler works.
AMS Resource Scheduler is based on the AWS Instance Scheduler; to learn more, see AWS Instance Scheduler.
Delete EBS snapshot (Managed Automation)
Use when you need extra help or communications about the snapshots to delete.

How it works:
Navigate to the Create RFC page: In the left navigation pane of the AMS console click RFCs to open the RFCs list page, and then click Create RFC.
Choose a popular change type (CT) in the default Browse change types view, or select a CT in the Choose by category view.
Browse by change type: You can click on a popular CT in the Quick create area to immediately open the Run RFC page. Note that you cannot choose an older CT version with quick create.
To sort CTs, use the All change types area in either the Card or Table view. In either view, select a CT and then click Create RFC to open the Run RFC page. If applicable, a Create with older version option appears next to the Create RFC button.
Choose by category: Select a category, subcategory, item, and operation and the CT details box opens with an option to Create with older version if applicable. Click Create RFC to open the Run RFC page.
On the Run RFC page, open the CT name area to see the CT details box. A Subject is required (this is filled in for you if you choose your CT in the Browse change types view). Open the Additional configuration area to add information about the RFC.
In the Execution configuration area, use available drop-down lists or enter values for the required parameters. To configure optional execution parameters, open the Additional configuration area.
When finished, click Run. If there are no errors, the RFC successfully created page displays with the submitted RFC details, and the initial Run output.
Open the Run parameters area to see the configurations you submitted. Refresh the page to update the RFC execution status. Optionally, cancel the RFC or create a copy of it with the options at the top of the page.
How it works:
Use either the Inline Create (you issue a
create-rfccommand with all RFC and execution parameters included), or Template Create (you create two JSON files, one for the RFC parameters and one for the execution parameters) and issue thecreate-rfccommand with the two files as input. Both methods are described here.Submit the RFC:
aws amscm submit-rfc --rfc-idcommand with the returned RFC ID.IDMonitor the RFC:
aws amscm get-rfc --rfc-idcommand.ID
To check the change type version, use this command:
aws amscm list-change-type-version-summaries --filter Attribute=ChangeTypeId,Value=CT_ID
Note
You can use any CreateRfc parameters with any RFC whether or not they are part of the schema for the
change type. For example, to get notifications when the RFC status changes, add this line, --notification "{\"Email\": {\"EmailRecipients\" : [\"email@example.com\"]}}" to the
RFC parameters part of the request (not the execution parameters). For a list of all CreateRfc parameters, see the
AMS Change Management API Reference.
INLINE CREATE:
Issue the create RFC command with execution parameters provided inline (escape quotes when providing execution parameters inline), and then submit the returned RFC ID. For example, you can replace the contents with something like this:
aws amscm create-rfc --change-type-id "ct-1vrnixswq1uwf" --change-type-version "1.0" --title "Delete EBS Snapshot (managed automation)" --execution-parameters "{\"SnapshotIds\": [\"snap-0a1b2c3d4e5f67890\",\"snap-1a2b3c4d5e6f78901\"], \"AMI\": \"No\", \"Region\": \"us-east-1\", \"Priority\": \"Medium\"}"
TEMPLATE CREATE:
Output the execution parameters JSON schema for this change type to a file; this example names it DeleteEbsSnpshtRrParams.json:
aws amscm get-change-type-version --change-type-id "ct-1vrnixswq1uwf" --query "ChangeTypeVersion.ExecutionInputSchema" --output text > DeleteEbsSnpshtRrParams.jsonModify and save the DeleteEbsSnpshtRrParams file. For example, you can replace the contents with something like this:
{
  "SnapshotIds": [
    "snap-0a1b2c3d4e5f67890",
    "snap-1a2b3c4d5e6f78901"
  ],
  "AMI": "No",
  "Region": "us-east-1",
  "Priority": "Medium"
}
Output the RFC template JSON file to a file; this example names it DeleteEbsSnpshtRrRfc.json:
aws amscm create-rfc --generate-cli-skeleton > DeleteEbsSnpshtRrRfc.jsonModify and save the DeleteEbsSnpshtRrRfc.json file. For example, you can replace the contents with something like this:
{
"ChangeTypeVersion":    "1.0",
"ChangeTypeId":         "ct-1vrnixswq1uwf",
"Title":                "EBS-Snapshot-Delete-RR-RFC"
}
Create the RFC, specifying the DeleteEbsSnpshtRrRfc file and the DeleteEbsSnpshtRrParams file:
aws amscm create-rfc --cli-input-json file://DeleteEbsSnpshtRrRfc.json --execution-parameters file://DeleteEbsSnpshtRrParams.jsonYou receive the ID of the new RFC in the response and can use it to submit and monitor the RFC. Until you submit it, the RFC remains in the editing state and does not start.
To learn more about Amazon EBS snapshots, see Amazon EBS Snapshots.
Update SNS topic
Screenshot of this change type in the AMS console:

How it works:
Navigate to the Create RFC page: In the left navigation pane of the AMS console click RFCs to open the RFCs list page, and then click Create RFC.
Choose a popular change type (CT) in the default Browse change types view, or select a CT in the Choose by category view.
Browse by change type: You can click on a popular CT in the Quick create area to immediately open the Run RFC page. Note that you cannot choose an older CT version with quick create.
To sort CTs, use the All change types area in either the Card or Table view. In either view, select a CT and then click Create RFC to open the Run RFC page. If applicable, a Create with older version option appears next to the Create RFC button.
Choose by category: Select a category, subcategory, item, and operation and the CT details box opens with an option to Create with older version if applicable. Click Create RFC to open the Run RFC page.
On the Run RFC page, open the CT name area to see the CT details box. A Subject is required (this is filled in for you if you choose your CT in the Browse change types view). Open the Additional configuration area to add information about the RFC.
In the Execution configuration area, use available drop-down lists or enter values for the required parameters. To configure optional execution parameters, open the Additional configuration area.
When finished, click Run. If there are no errors, the RFC successfully created page displays with the submitted RFC details, and the initial Run output.
Open the Run parameters area to see the configurations you submitted. Refresh the page to update the RFC execution status. Optionally, cancel the RFC or create a copy of it with the options at the top of the page.
How it works:
Use either the Inline Create (you issue a
create-rfccommand with all RFC and execution parameters included), or Template Create (you create two JSON files, one for the RFC parameters and one for the execution parameters) and issue thecreate-rfccommand with the two files as input. Both methods are described here.Submit the RFC:
aws amscm submit-rfc --rfc-idcommand with the returned RFC ID.IDMonitor the RFC:
aws amscm get-rfc --rfc-idcommand.ID
To check the change type version, use this command:
aws amscm list-change-type-version-summaries --filter Attribute=ChangeTypeId,Value=CT_ID
Note
You can use any CreateRfc parameters with any RFC whether or not they are part of the schema for the
change type. For example, to get notifications when the RFC status changes, add this line, --notification "{\"Email\": {\"EmailRecipients\" : [\"email@example.com\"]}}" to the
RFC parameters part of the request (not the execution parameters). For a list of all CreateRfc parameters, see the
AMS Change Management API Reference.
INLINE CREATE (minimal parameters):
Issue the create RFC command with execution parameters provided inline (escape quotes when providing execution parameters inline), and then submit the returned RFC ID. For example, you can replace the contents with something like this:
aws amscm create-rfc --change-type-id "ct-0zzf0fjz76jmb" --change-type-version "1.0" --title "Update SNS Topic" --execution-parameters "{\"TopicArn\": \"arn:aws:sns:us-east-1:123456789101:My-SNS-Topic\", \"Priority\": \"Medium\", \"Parameters\": {\"DisplayName\": \"My-SNS-Topic\", \"KmsMasterKeyId\": \"arn:aws:kms:us-east-1:123456789101:key/cfe0542d-3be9-4166-9eac-d0cd6af61445\"}}"
TEMPLATE CREATE (all parameters):
Output the execution parameters JSON schema for this change type to a file; this example names it SnsUpdateParams.json.
aws amscm get-change-type-version --change-type-id "ct-3rcl9u1k017wu" --query "ChangeTypeVersion.ExecutionInputSchema" --output text > SnsUpdateParams.jsonModify and save the SnsUpdateParams file. For example, you can replace the contents with something like this:
{
  "TopicArn": "arn:aws:sns:us-east-1:123456789101:Test-Stack",
  "Parameters": {
    "DisplayName": "My-Test-Stack",
    "DeliveryPolicy": "{\"http\":{\"defaultHealthyRetryPolicy\":{\"minDelayTarget\":20,\"maxDelayTarget\":20,\"numRetries\":3,\"numMaxDelayRetries\":0,\"numNoDelayRetries\":0,\"numMinDelayRetries\":0,\"backoffFunction\":\"linear\"},\"disableSubscriptionOverrides\":false,\"defaultRequestPolicy\":{\"headerContentType\":\"text/plain; charset=UTF-8\"}}}",
    "DataProtectionPolicy": "{\"Name\":\"__example_data_protection_policy\",\"Description\":\"Exampledataprotectionpolicy\",\"Version\":\"2021-06-01\",\"Statement\":[{\"DataDirection\":\"Inbound\",\"Principal\":[\"arn:aws:iam::123456789101:user/ExampleUser\"],\"DataIdentifier\":[\"arn:aws:dataprotection::aws:data-identifier/CreditCardNumber\"],\"Operation\":{\"Deidentify\":{\"MaskConfig\":{\"MaskWithCharacter\":\"#\"}}}}]}",
    "KmsMasterKeyARN": "arn:aws:kms:ap-southeast-2:123456789101:key/bb43bd18-3a75-482e-822d-d0d3a5544dc8",
    "TracingConfig": "Active"
  },
  "Priority": "Medium"
}
Output the RFC template JSON file to a file named SnsUpdateRfc.json:
aws amscm create-rfc --generate-cli-skeleton > SnsUpdateRfc.jsonModify and save the SnsUpdateRfc.json file. For example, you can replace the contents with something like this:
{
"ChangeTypeVersion":    "1.0",
"ChangeTypeId":         "ct-0zzf0fjz76jmb",
"Title":                "Update-SNS-RFC"
}
Create the RFC, specifying the SnsUpdate Rfc file and the SnsUpdateParams file:
aws amscm create-rfc --cli-input-json file://SnsUpdateRfc.json --execution-parameters file://SnsUpdateParams.jsonYou receive the ID of the new RFC in the response and can use it to submit and monitor the RFC. Until you submit it, the RFC remains in the editing state and does not start.
To learn more about AWS Simple Notification Service (SNS), see
Amazon Simple Notification Service
Create an S3 access point
Screenshot of this change type in the AMS console:

How it works:
Navigate to the Create RFC page: In the left navigation pane of the AMS console click RFCs to open the RFCs list page, and then click Create RFC.
Choose a popular change type (CT) in the default Browse change types view, or select a CT in the Choose by category view.
Browse by change type: You can click on a popular CT in the Quick create area to immediately open the Run RFC page. Note that you cannot choose an older CT version with quick create.
To sort CTs, use the All change types area in either the Card or Table view. In either view, select a CT and then click Create RFC to open the Run RFC page. If applicable, a Create with older version option appears next to the Create RFC button.
Choose by category: Select a category, subcategory, item, and operation and the CT details box opens with an option to Create with older version if applicable. Click Create RFC to open the Run RFC page.
On the Run RFC page, open the CT name area to see the CT details box. A Subject is required (this is filled in for you if you choose your CT in the Browse change types view). Open the Additional configuration area to add information about the RFC.
In the Execution configuration area, use available drop-down lists or enter values for the required parameters. To configure optional execution parameters, open the Additional configuration area.
When finished, click Run. If there are no errors, the RFC successfully created page displays with the submitted RFC details, and the initial Run output.
Open the Run parameters area to see the configurations you submitted. Refresh the page to update the RFC execution status. Optionally, cancel the RFC or create a copy of it with the options at the top of the page.
How it works:
Use either the Inline Create (you issue a
create-rfccommand with all RFC and execution parameters included), or Template Create (you create two JSON files, one for the RFC parameters and one for the execution parameters) and issue thecreate-rfccommand with the two files as input. Both methods are described here.Submit the RFC:
aws amscm submit-rfc --rfc-idcommand with the returned RFC ID.IDMonitor the RFC:
aws amscm get-rfc --rfc-idcommand.ID
To check the change type version, use this command:
aws amscm list-change-type-version-summaries --filter Attribute=ChangeTypeId,Value=CT_ID
INLINE CREATE:
Issue the create RFC command with execution parameters provided inline (escape quotation marks when providing execution parameters inline), and then submit the returned RFC ID. For example, you can replace the contents with something like this:
aws amscm create-rfc --title="Add Static Route" --description="Create an access point and associate it with the specified S3 bucket." --ct-id="ct-1elb1vtam0ka5" --ct-version="1.0" --input-params="{\"Access Point Name\":\"accesspoint1\",\"Bucket Name\":\"s3bucket1\",\"Network Origin\":\"VPC\"}"
TEMPLATE CREATE:
Output the execution parameters JSON schema for this change type to a file; this example names it CreateS3AccessPointParams.json.
aws amscm get-change-type-version --change-type-id "ct-1elb1vtam0ka5" --query "ChangeTypeVersion.ExecutionInputSchema" --output text > CreateS3AccessPointParams.json\"Access Point Policy\":\"Example access point policy\"Modify and save the CreateS3AccessPointParams file.
{
"Access Point Name": "accesspoint1",
"Bucket Name": "s3bucket1",
"Network Origin": "VPC",
"Vpc Id": "vpc-12345678"
"Access Point Policy": "Example access point policy"
}
Output the RFC template JSON file to a file named CreateS3AccessPointRfc.json:
aws amscm create-rfc --generate-cli-skeleton > CreateS3AccessPointRfc.jsonModify and save the CreateS3AccessPointRfc.json file. For example, you can replace the contents with something like this:
{
"ChangeTypeVersion":    "1.0",
"ChangeTypeId":         "ct-1elb1vtam0ka5",
"Title":                "S3-Accesspoint-Create-RFC"
}
Create the RFC, specifying the CreateS3AccessPointRfc file and the CreateS3AccessPointParams file:
aws amscm create-rfc --cli-input-json file://CreateS3AccesspointRfc.json --execution-parameters file://CreateS3AccesspointParams.jsonYou receive the ID of the new RFC in the response and can use it to submit and monitor the RFC. Until you submit it, the RFC remains in the editing state and does not start.
To learn more about Amazon S3, see Amazon Simple Storage Service Documentation
Create Custom RDS Parameter Group
The following shows this change type in the AMS console.

How it works:
Navigate to the Create RFC page: In the left navigation pane of the AMS console click RFCs to open the RFCs list page, and then click Create RFC.
Choose a popular change type (CT) in the default Browse change types view, or select a CT in the Choose by category view.
Browse by change type: You can click on a popular CT in the Quick create area to immediately open the Run RFC page. Note that you cannot choose an older CT version with quick create.
To sort CTs, use the All change types area in either the Card or Table view. In either view, select a CT and then click Create RFC to open the Run RFC page. If applicable, a Create with older version option appears next to the Create RFC button.
Choose by category: Select a category, subcategory, item, and operation and the CT details box opens with an option to Create with older version if applicable. Click Create RFC to open the Run RFC page.
On the Run RFC page, open the CT name area to see the CT details box. A Subject is required (this is filled in for you if you choose your CT in the Browse change types view). Open the Additional configuration area to add information about the RFC.
In the Execution configuration area, use available drop-down lists or enter values for the required parameters. To configure optional execution parameters, open the Additional configuration area.
When finished, click Run. If there are no errors, the RFC successfully created page displays with the submitted RFC details, and the initial Run output.
Open the Run parameters area to see the configurations you submitted. Refresh the page to update the RFC execution status. Optionally, cancel the RFC or create a copy of it with the options at the top of the page.
How it works:
Use either the Inline Create (you issue a
create-rfccommand with all RFC and execution parameters included), or Template Create (you create two JSON files, one for the RFC parameters and one for the execution parameters) and issue thecreate-rfccommand with the two files as input. Both methods are described here.Submit the RFC:
aws amscm submit-rfc --rfc-idcommand with the returned RFC ID.IDMonitor the RFC:
aws amscm get-rfc --rfc-idcommand.ID
To check the change type version, use this command:
aws amscm list-change-type-version-summaries --filter Attribute=ChangeTypeId,Value=CT_ID
Note
You can use any CreateRfc parameters with any RFC whether or not they are part of the schema for the
change type. For example, to get notifications when the RFC status changes, add this line, --notification "{\"Email\": {\"EmailRecipients\" : [\"email@example.com\"]}}" to the
RFC parameters part of the request (not the execution parameters). For a list of all CreateRfc parameters, see the
AMS Change Management API Reference.
INLINE CREATE:
Issue the create RFC command with execution parameters provided inline (escape quotation marks when providing execution parameters inline), and then submit the returned RFC ID. For example, you can replace the contents with something like this:
aws amscm create-rfc --change-type-id "ct-3da2lxapopb86" --change-type-version "1.0" --title "Create Custom RDS Parameter Group" --execution-parameters "{\"ParameterGroupName\": \"my-db-parameter-group\", \"ParameterGroupFamily\": \"mysql5.6\", \"Description\": \"A meaningful description of the parameter group\", \"Priority\": \"Medium\", \"Parameters\": [{\"ParameterName\": \"max_connections\", \"ParameterValue\": \"100\"}], \"RDSInstanceName\": \"my-test-db\"}"
TEMPLATE CREATE:
Output the execution parameters JSON schema for this change type to a file; this example names it RDSCreateParameterGroupParams.json:
aws amscm get-change-type-version --change-type-id "ct-3da2lxapopb86" --query "ChangeTypeVersion.ExecutionInputSchema" --output text > RDSCreateParameterGroupParams.jsonModify and save the RDSCreateParameterGroupParams file. For example, you can replace the contents with something like this:
{
  "ParameterGroupName": "my-db-parameter-group",
  "ParameterGroupFamily": "mysql5.6",
  "Description": "A meaningful description of the parameter group",
  "Priority": "Medium",
  "Parameters": [
    {
      "ParameterName": "max_connections",
      "ParameterValue": "100"
    }
  ],
  "RDSInstanceName": "my-test-db"
}
Output the RFC template to a file in your current folder; this example names it RDSCreateParameterGroupRfc.json:
aws amscm create-rfc --generate-cli-skeleton > RDSCreateParameterGroupRfc.jsonModify and save the RDSCreateParameterGroupRfc.json file. For example, you can replace the contents with something like this:
{
"ChangeTypeId":         "ct-3da2lxapopb86",
"ChangeTypeVersion":    "1.0",
"Title":                "Create Custom RDS Parameter Group"
}
Create the RFC, specifying the RDSCreateParameterGroupRfc file and the GRDSCreateParameterGroupParams file:
aws amscm create-rfc --cli-input-json file://RDSCreateParameterGroupRfc.json --execution-parameters file://RDSCreateParameterGroupParams.jsonYou receive the ID of the new RFC in the response and can use it to submit and monitor the RFC. Until you submit it, the RFC remains in the editing state and does not start.
Add event notification to an Amazon S3 bucket
The following is a screenshot of this change type in the AMS console:

How it works:
Navigate to the Create RFC page: In the left navigation pane of the AMS console click RFCs to open the RFCs list page, and then click Create RFC.
Choose a popular change type (CT) in the default Browse change types view, or select a CT in the Choose by category view.
Browse by change type: You can click on a popular CT in the Quick create area to immediately open the Run RFC page. Note that you cannot choose an older CT version with quick create.
To sort CTs, use the All change types area in either the Card or Table view. In either view, select a CT and then click Create RFC to open the Run RFC page. If applicable, a Create with older version option appears next to the Create RFC button.
Choose by category: Select a category, subcategory, item, and operation and the CT details box opens with an option to Create with older version if applicable. Click Create RFC to open the Run RFC page.
On the Run RFC page, open the CT name area to see the CT details box. A Subject is required (this is filled in for you if you choose your CT in the Browse change types view). Open the Additional configuration area to add information about the RFC.
In the Execution configuration area, use available drop-down lists or enter values for the required parameters. To configure optional execution parameters, open the Additional configuration area.
When finished, click Run. If there are no errors, the RFC successfully created page displays with the submitted RFC details, and the initial Run output.
Open the Run parameters area to see the configurations you submitted. Refresh the page to update the RFC execution status. Optionally, cancel the RFC or create a copy of it with the options at the top of the page.
How it works:
Use either the Inline Create (you issue a
create-rfccommand with all RFC and execution parameters included), or Template Create (you create two JSON files, one for the RFC parameters and one for the execution parameters) and issue thecreate-rfccommand with the two files as input. Both methods are described here.Submit the RFC:
aws amscm submit-rfc --rfc-idcommand with the returned RFC ID.IDMonitor the RFC:
aws amscm get-rfc --rfc-idcommand.ID
To check the change type version, use this command:
aws amscm list-change-type-version-summaries --filter Attribute=ChangeTypeId,Value=CT_ID
Note
You can use any CreateRfc parameters with any RFC whether or not they are part of the schema for the
change type. For example, to get notifications when the RFC status changes, add this line, --notification "{\"Email\": {\"EmailRecipients\" : [\"email@example.com\"]}}" to the
RFC parameters part of the request (not the execution parameters). For a list of all CreateRfc parameters, see the
AMS Change Management API Reference.
INLINE CREATE:
Issue the create RFC command with execution parameters provided inline (escape quotation marks when providing execution parameters inline), and then submit the returned RFC ID. For example, you can replace the contents with something like this:
aws amscm create-rfc --change-type-id "ct-0o4zi9bzg74lp" --change-type-version "1.0" --title "Add event notification" --execution-parameters "{ \"DocumentName\": \"AWSManagedServices-AddBucketEventNotification\", \"Region\": \"us-east-1\", \"Parameters\": { \"BucketName\": \"bucketname\", \"EventName\": \"eventname\", \"Prefix\": \"foo\", \"Suffix\": \".bar\", \"EventTypes\": [ \"s3:ObjectCreated:Post\", \"s3:ObjectCreated:Put\" ], \"DestinationARN\": \"arn:aws:lambda:us-east-1:123456789012:function:functionname\" } }"
TEMPLATE CREATE:
Output the execution parameters JSON schema for this change type to a file; this example names it AddEventNotificationS3Params.json.
aws amscm get-change-type-version --change-type-id "ct-220bdb8blaixf" --query "ChangeTypeVersion.ExecutionInputSchema" --output text > AddEventNotificationS3Params.jsonModify and save the AddEventNotificationS3Params file. For example, you can replace the contents with something like this:
{
  "DocumentName": "AWSManagedServices-AddBucketEventNotification",
  "Region": "us-east-1",
  "Parameters": {
    "BucketName": "bucketname",
    "EventName": "eventname",
    "Prefix": "foo",
    "Suffix": ".bar",
    "EventTypes": [
      "s3:ObjectCreated:Post",
      "s3:ObjectCreated:Put"
    ],
    "DestinationARN": "arn:aws:lambda:us-east-1:123456789012:function:functionname"
  }
}
Output the RFC template JSON file to a file named AddEventNotificationS3Rfc.json:
aws amscm create-rfc --generate-cli-skeleton > AddEventNotificationS3Rfc.jsonModify and save the AddS3LifecycleConfigRfc.json file. For example, you can replace the contents with something like this:
{
"ChangeTypeVersion": "1.0",
"ChangeTypeId": "ct-0o4zi9bzg74lp",
"Title": "Add Event Notification"
}
Create the RFC, specifying the AddEventNotificationS3Rfc file and the AddEventNotificationS3Params file:
aws amscm create-rfc --cli-input-json file://AddEventNotificationS3Rfc.json --execution-parameters file://AddEventNotificationS3Params.jsonYou receive the ID of the new RFC in the response and can use it to submit and monitor the RFC. Until you submit it, the RFC remains in the editing state and does not start.
Update custom deny list for AMS Automated IAM Provisioning
Screenshot of this change type in the AMS console:

How it works:
Navigate to the Create RFC page: In the left navigation pane of the AMS console click RFCs to open the RFCs list page, and then click Create RFC.
Choose a popular change type (CT) in the default Browse change types view, or select a CT in the Choose by category view.
Browse by change type: You can click on a popular CT in the Quick create area to immediately open the Run RFC page. Note that you cannot choose an older CT version with quick create.
To sort CTs, use the All change types area in either the Card or Table view. In either view, select a CT and then click Create RFC to open the Run RFC page. If applicable, a Create with older version option appears next to the Create RFC button.
Choose by category: Select a category, subcategory, item, and operation and the CT details box opens with an option to Create with older version if applicable. Click Create RFC to open the Run RFC page.
On the Run RFC page, open the CT name area to see the CT details box. A Subject is required (this is filled in for you if you choose your CT in the Browse change types view). Open the Additional configuration area to add information about the RFC.
In the Execution configuration area, use available drop-down lists or enter values for the required parameters. To configure optional execution parameters, open the Additional configuration area.
When finished, click Run. If there are no errors, the RFC successfully created page displays with the submitted RFC details, and the initial Run output.
Open the Run parameters area to see the configurations you submitted. Refresh the page to update the RFC execution status. Optionally, cancel the RFC or create a copy of it with the options at the top of the page.
How it works:
Use either the Inline Create (you issue a
create-rfccommand with all RFC and execution parameters included), or Template Create (you create two JSON files, one for the RFC parameters and one for the execution parameters) and issue thecreate-rfccommand with the two files as input. Both methods are described here.Submit the RFC:
aws amscm submit-rfc --rfc-idcommand with the returned RFC ID.IDMonitor the RFC:
aws amscm get-rfc --rfc-idcommand.ID
To check the change type version, use this command:
aws amscm list-change-type-version-summaries --filter Attribute=ChangeTypeId,Value=CT_ID
Note
You can use any CreateRfc parameters with any RFC whether or not they are part of the schema for the
change type. For example, to get notifications when the RFC status changes, add this line, --notification "{\"Email\": {\"EmailRecipients\" : [\"email@example.com\"]}}" to the
RFC parameters part of the request (not the execution parameters). For a list of all CreateRfc parameters, see the
AMS Change Management API Reference.
INLINE CREATE:
Issue the create RFC command with execution parameters provided inline (escape quotes when providing execution parameters inline), and then submit the returned RFC ID. For example, you can replace the contents with something like this:
aws amscm create-rfc --change-type-id "ct-2r9xvd3sdsic0" --change-type-version "1.0" --title "Update custom deny list for Automated IAM Provisioning" --execution-parameters "{\"CustomerCustomDenyActionsList1\":\"ec2:RunInstances,s3:PutBucket,sagemaker:*\",\"Priority\":\"High\"}"
TEMPLATE CREATE:
Output the execution parameters for this change type to a JSON file named CustomerCustomDenyActionsList.json.
aws amscm get-change-type-version --change-type-id "ct-2r9xvd3sdsic0" --query "ChangeTypeVersion.ExecutionInputSchema" --output text > CustomerCustomDenyActionsList.jsonModify and save the execution parameters JSON file. For example, you can replace the contents with something like this:
{
    "DocumentName": "AWSManagedServices-CustomerCustomDenyActionsList",
    "Region": "us-east-1",
    "Parameters": {
  "CustomerCustomDenyActionsList1": "ec2:RunInstances,s3:PutBucket,sagemaker:*",
  "Priority": "High"
}
}
Output the RFC template to a file in your current folder; this example names it CustomerCustomDenyActionsListRfc.json:
aws amscm create-rfc --generate-cli-skeleton > CustomerCustomDenyActionsListRfc.jsonModify and save the CustomerCustomDenyActionsListRfc.json file. For example, you can replace the contents with something like this:
{
  "ChangeTypeVersion": "1.0",
  "ChangeTypeId": "ct-2r9xvd3sdsic0",
  "Title": "Update custom deny list for Automated IAM Provisioning"
}
Create the RFC, specifying the CreateAcmPublicRfc file and the CreateAcmPublicParams file:
aws amscm create-rfc --cli-input-json file://CustomerCustomDenyActionsListRfc.json --execution-parameters file://CustomerCustomDenyActionsListParams.jsonYou receive the ID of the new RFC in the response and can use it to submit and monitor the RFC. Until you submit it, the RFC remains in the editing state and does not start.
Migrate AWS Managed Account DNS resolver to Route 53 for SALZ accounts (Managed Automation)
The following shows this change type in the AMS console.

How it works:
Navigate to the Create RFC page: In the left navigation pane of the AMS console click RFCs to open the RFCs list page, and then click Create RFC.
Choose a popular change type (CT) in the default Browse change types view, or select a CT in the Choose by category view.
Browse by change type: You can click on a popular CT in the Quick create area to immediately open the Run RFC page. Note that you cannot choose an older CT version with quick create.
To sort CTs, use the All change types area in either the Card or Table view. In either view, select a CT and then click Create RFC to open the Run RFC page. If applicable, a Create with older version option appears next to the Create RFC button.
Choose by category: Select a category, subcategory, item, and operation and the CT details box opens with an option to Create with older version if applicable. Click Create RFC to open the Run RFC page.
On the Run RFC page, open the CT name area to see the CT details box. A Subject is required (this is filled in for you if you choose your CT in the Browse change types view). Open the Additional configuration area to add information about the RFC.
In the Execution configuration area, use available drop-down lists or enter values for the required parameters. To configure optional execution parameters, open the Additional configuration area.
When finished, click Run. If there are no errors, the RFC successfully created page displays with the submitted RFC details, and the initial Run output.
Open the Run parameters area to see the configurations you submitted. Refresh the page to update the RFC execution status. Optionally, cancel the RFC or create a copy of it with the options at the top of the page.
How it works:
Use either the Inline Create (you issue a
create-rfccommand with all RFC and execution parameters included), or Template Create (you create two JSON files, one for the RFC parameters and one for the execution parameters) and issue thecreate-rfccommand with the two files as input. Both methods are described here.Submit the RFC:
aws amscm submit-rfc --rfc-idcommand with the returned RFC ID.IDMonitor the RFC:
aws amscm get-rfc --rfc-idcommand.ID
To check the change type version, use this command:
aws amscm list-change-type-version-summaries --filter Attribute=ChangeTypeId,Value=CT_ID
Note
You can use any CreateRfc parameters with any RFC whether or not they are part of the schema for the
change type. For example, to get notifications when the RFC status changes, add this line, --notification "{\"Email\": {\"EmailRecipients\" : [\"email@example.com\"]}}" to the
RFC parameters part of the request (not the execution parameters). For a list of all CreateRfc parameters, see the
AMS Change Management API Reference.
INLINE CREATE:
Issue the create RFC command with execution parameters provided inline (escape quotes when providing execution parameters inline), and then submit the returned RFC ID. For example, you can replace the contents with something like this:
Required parameters only:
aws amscm create-rfc --change-type-id "ct-2tqi3kjcusen4" --change-type-version "1.0" --title "Migrate AWS managed Microsoft AD to Route 53 DNS resolver for SALZ accounts" --execution-parameters "{}"
All required and optional parameters:
aws amscm create-rfc --change-type-id "ct-2tqi3kjcusen4" --change-type-version "1.0" --title "Migrate AWS managed Microsoft AD to Route 53 DNS resolver for SALZ accounts" --execution-parameters "{\"Priority\":\"Medium\"}"
TEMPLATE CREATE:
Output the execution parameters for this change type to a JSON file named CreateMigrateToRoute53RequiredParams.json.
aws amscm get-change-type-version --change-type-id "ct-2tqi3kjcusen4" --query "ChangeTypeVersion.ExecutionInputSchema" --output text > CreateMigrateToRoute53RequiredParams.jsonModify and save the execution parameters JSON file. For example, you can replace the contents with something like this:
{
  "Priority": "Medium"
}
Output the RFC template to a file in your current folder; this example names it CreateMigrateToRoute53RequiredRfc.json:
aws amscm create-rfc --generate-cli-skeleton > CreateMigrateToRoute53RequiredRfc.jsonModify and save the CreateMigrateToRoute53RequiredRfc.json file. For example, you can replace the contents with something like this:
{
"ChangeTypeId":         "ct-2tqi3kjcusen4",
"ChangeTypeVersion":    "1.0",
"Title":                "Migrate AWS managed Microsoft AD to Route 53 DNS resolver for SALZ accounts"
}
Create the RFC, specifying the CreateMigrateToRoute53RequiredRfc file and the CreateMigrateToRoute53RequiredParams file:
aws amscm create-rfc --cli-input-json file://CreateMigrateToRoute53RequiredRfc.json --execution-parameters file://CreateMigrateToRoute53RequiredParams.jsonYou receive the ID of the new RFC in the response and can use it to submit and monitor the RFC. Until you submit it, the RFC remains in the editing state and does not start.
This is a manual change type (an AMS operator must review and run the CT), which means that the RFC can take longer to run and you might have to communicate with AMS through the RFC details page correspondance option. Additionally, if you schedule a manual change type RFC, be sure to allow at least 24 hours, if approval does not happen before the scheduled start time, the RFC is rejected automatically.
Disassociate resolver rules from VPC
The following shows this change type in the AMS console.

How it works:
Navigate to the Create RFC page: In the left navigation pane of the AMS console click RFCs to open the RFCs list page, and then click Create RFC.
Choose a popular change type (CT) in the default Browse change types view, or select a CT in the Choose by category view.
Browse by change type: You can click on a popular CT in the Quick create area to immediately open the Run RFC page. Note that you cannot choose an older CT version with quick create.
To sort CTs, use the All change types area in either the Card or Table view. In either view, select a CT and then click Create RFC to open the Run RFC page. If applicable, a Create with older version option appears next to the Create RFC button.
Choose by category: Select a category, subcategory, item, and operation and the CT details box opens with an option to Create with older version if applicable. Click Create RFC to open the Run RFC page.
On the Run RFC page, open the CT name area to see the CT details box. A Subject is required (this is filled in for you if you choose your CT in the Browse change types view). Open the Additional configuration area to add information about the RFC.
In the Execution configuration area, use available drop-down lists or enter values for the required parameters. To configure optional execution parameters, open the Additional configuration area.
When finished, click Run. If there are no errors, the RFC successfully created page displays with the submitted RFC details, and the initial Run output.
Open the Run parameters area to see the configurations you submitted. Refresh the page to update the RFC execution status. Optionally, cancel the RFC or create a copy of it with the options at the top of the page.
How it works:
Use either the Inline Create (you issue a
create-rfccommand with all RFC and execution parameters included), or Template Create (you create two JSON files, one for the RFC parameters and one for the execution parameters) and issue thecreate-rfccommand with the two files as input. Both methods are described here.Submit the RFC:
aws amscm submit-rfc --rfc-idcommand with the returned RFC ID.IDMonitor the RFC:
aws amscm get-rfc --rfc-idcommand.ID
To check the change type version, use this command:
aws amscm list-change-type-version-summaries --filter Attribute=ChangeTypeId,Value=CT_ID
Note
You can use any CreateRfc parameters with any RFC whether or not they are part of the schema for the
change type. For example, to get notifications when the RFC status changes, add this line, --notification "{\"Email\": {\"EmailRecipients\" : [\"email@example.com\"]}}" to the
RFC parameters part of the request (not the execution parameters). For a list of all CreateRfc parameters, see the
AMS Change Management API Reference.
INLINE CREATE:
Issue the create RFC command with execution parameters provided inline (escape quotation marks when providing execution parameters inline), and then submit the returned RFC ID. For example, you can replace the contents with something like this:
aws --profile saml --region us-east-1 amscm create-rfc --change-type-id "ct-3e3prksxmdhw8" --change-type-version "2.0" --title "AMI-Create-IC" --execution-parameters "{\"AMIName\":\"MyAmi\",\"VpcId\":\"VPC_ID\",\"EC2InstanceId\":\"INSTANCE_ID\"}"
TEMPLATE CREATE:
Output the execution parameters JSON schema for this change type to a file; this example names it CreateAmiFromAsgParams.json:
aws amscm create-rfc --change-type-id "ct-3e3prksxmdhw8" --change-type-version "1.0" --title "Create AMI from an Auto Scaling group" --execution-parameters "{\"DocumentName\": \"AWSManagedServices-CreateAmiInAutoScalingGroup\",\"Region\": \"us-east-1\",\"Parameters\": {\"AutoScalingGroupName\": [\"stack-ab0123cdef-ASG-1ABC2345\"],\"Sysprep\": [\"False\"],\"StopInstance\": [\"False\"]}}"Modify and save the execution parameters CreateAmiFromAsgParams.json file. For example, you can replace the contents with something like this:
{
  "DocumentName": "AWSManagedServices-CreateAmiInAutoScalingGroup",
  "Region": "us-east-1",
  "Parameters": {
    "AutoScalingGroupName": [
      "stack-ab0123cdef-ASG-1ABC2345"
    ],
    "Sysprep": [
      "False"
    ],
    "StopInstance": [
      "False"
    ]
  }
}
Output the RFC template JSON file to a file in your current folder; this example names it CreateAmiFromAsgRfc.json:
aws amscm create-rfc --generate-cli-skeleton > CreateAmiFromAsgRfc.jsonModify and save the CreateAmiFromAsgRfc.json file. For example, you can replace the contents with something like this:
{
  "ChangeTypeVersion": "1.0",
  "ChangeTypeId": "ct-3e3prksxmdhw8",
  "Title": "Create AMI from an Auto Scaling group"
}
Create the RFC, specifying the CreateAmiFromAsgRfc file and the CreateAmiFromAsgParams file:
aws amscm create-rfc --cli-input-json file://CreateAmiFromAsgRfc.json --execution-parameters file://CreateAmiFromAsgParams.jsonYou receive the ID of the new RFC in the response and can use it to submit and monitor the RFC. Until you submit it, the RFC remains in the editing state and does not start.
Update Enhanced Monitoring
The following shows this change type in the AMS console.

How it works:
Navigate to the Create RFC page: In the left navigation pane of the AMS console click RFCs to open the RFCs list page, and then click Create RFC.
Choose a popular change type (CT) in the default Browse change types view, or select a CT in the Choose by category view.
Browse by change type: You can click on a popular CT in the Quick create area to immediately open the Run RFC page. Note that you cannot choose an older CT version with quick create.
To sort CTs, use the All change types area in either the Card or Table view. In either view, select a CT and then click Create RFC to open the Run RFC page. If applicable, a Create with older version option appears next to the Create RFC button.
Choose by category: Select a category, subcategory, item, and operation and the CT details box opens with an option to Create with older version if applicable. Click Create RFC to open the Run RFC page.
On the Run RFC page, open the CT name area to see the CT details box. A Subject is required (this is filled in for you if you choose your CT in the Browse change types view). Open the Additional configuration area to add information about the RFC.
In the Execution configuration area, use available drop-down lists or enter values for the required parameters. To configure optional execution parameters, open the Additional configuration area.
When finished, click Run. If there are no errors, the RFC successfully created page displays with the submitted RFC details, and the initial Run output.
Open the Run parameters area to see the configurations you submitted. Refresh the page to update the RFC execution status. Optionally, cancel the RFC or create a copy of it with the options at the top of the page.
How it works:
Use either the Inline Create (you issue a
create-rfccommand with all RFC and execution parameters included), or Template Create (you create two JSON files, one for the RFC parameters and one for the execution parameters) and issue thecreate-rfccommand with the two files as input. Both methods are described here.Submit the RFC:
aws amscm submit-rfc --rfc-idcommand with the returned RFC ID.IDMonitor the RFC:
aws amscm get-rfc --rfc-idcommand.ID
To check the change type version, use this command:
aws amscm list-change-type-version-summaries --filter Attribute=ChangeTypeId,Value=CT_ID
Note
You can use any CreateRfc parameters with any RFC whether or not they are part of the schema for the
change type. For example, to get notifications when the RFC status changes, add this line, --notification "{\"Email\": {\"EmailRecipients\" : [\"email@example.com\"]}}" to the
RFC parameters part of the request (not the execution parameters). For a list of all CreateRfc parameters, see the
AMS Change Management API Reference.
INLINE CREATE:
Issue the create RFC command with execution parameters provided inline (escape quotation marks when providing execution parameters inline), and then submit the returned RFC ID. For example, you can replace the contents with something like this:
aws amscm create-rfc --change-type-id "ct-3jx80fquylzhf" --change-type-version "1.0" --title "Update Enhanced Monitoring" --execution-parameters "{\"DocumentName\":\"AWSManagedServices-UpdateRDSEnhancedMonitoring\",\"Region\":\"us-east-1\",\"Parameters\": {\"DBIdentifierArn\":[\"arn:aws:rds:us-east-1:000000000000:db:testdbinstance\"], \"MonitoringInterval\": [\"60\"],,\"MonitoringRoleName\": \"ds-monitoring-role\"}}"
TEMPLATE CREATE:
Output the execution parameters for this change type to a JSON file named RotateRdsCertParams.json.
aws amscm get-change-type-version --change-type-id "ct-3jx80fquylzhf" --query "ChangeTypeVersion.ExecutionInputSchema" --output text > UpdateRDSEnhancedMonitoringParams.jsonModify and save the execution parameters JSON file. For example, you can replace the contents with something like this:
{
    "DocumentName": "AWSManagedServices-UpdateRDSEnhancedMonitoring",
    "Region": "us-east-1",
    "Parameters": {
        "DBIdentifierArn": "arn:aws:rds:us-east-1:000000000000:db:testdbinstance",
        "MonitoringInterval": "60",
        "MonitoringRoleName": [
            "rds-monitoring-role"
        ]
    }
}
Output the JSON template to a file in your current folder; this example names it UpdateRDSEnhancedMonitoringRfc.json:
aws amscm create-rfc --generate-cli-skeleton > UpdateRDSEnhancedMonitoringRfc.jsonModify and save the UpdateRDSEnhancedMonitoringRfc.json file. For example, you can replace the contents with something like this:
{
"ChangeTypeVersion":    "1.0",
"ChangeTypeId":         "ct-3jx80fquylzhf",
"Title":                "Update Enhanced Monitoring"
}
Create the RFC, specifying the execution parameters file and the UpdateRDSEnhancedMonitoringRfc file:
aws amscm create-rfc --cli-input-json file://UpdateRDSEnhancedMonitoringRfc.json --execution-parameters file://UpdateRDSEnhancedMonitoringParams.jsonYou receive the ID of the new RFC in the response and can use it to submit and monitor the RFC. Until you submit it, the RFC remains in the editing state and does not start.
Associate VPC with Resolver Rule
The following shows this change type in the AMS console.

How it works:
Navigate to the Create RFC page: In the left navigation pane of the AMS console click RFCs to open the RFCs list page, and then click Create RFC.
Choose a popular change type (CT) in the default Browse change types view, or select a CT in the Choose by category view.
Browse by change type: You can click on a popular CT in the Quick create area to immediately open the Run RFC page. Note that you cannot choose an older CT version with quick create.
To sort CTs, use the All change types area in either the Card or Table view. In either view, select a CT and then click Create RFC to open the Run RFC page. If applicable, a Create with older version option appears next to the Create RFC button.
Choose by category: Select a category, subcategory, item, and operation and the CT details box opens with an option to Create with older version if applicable. Click Create RFC to open the Run RFC page.
On the Run RFC page, open the CT name area to see the CT details box. A Subject is required (this is filled in for you if you choose your CT in the Browse change types view). Open the Additional configuration area to add information about the RFC.
In the Execution configuration area, use available drop-down lists or enter values for the required parameters. To configure optional execution parameters, open the Additional configuration area.
When finished, click Run. If there are no errors, the RFC successfully created page displays with the submitted RFC details, and the initial Run output.
Open the Run parameters area to see the configurations you submitted. Refresh the page to update the RFC execution status. Optionally, cancel the RFC or create a copy of it with the options at the top of the page.
How it works:
Use either the Inline Create (you issue a
create-rfccommand with all RFC and execution parameters included), or Template Create (you create two JSON files, one for the RFC parameters and one for the execution parameters) and issue thecreate-rfccommand with the two files as input. Both methods are described here.Submit the RFC:
aws amscm submit-rfc --rfc-idcommand with the returned RFC ID.IDMonitor the RFC:
aws amscm get-rfc --rfc-idcommand.ID
To check the change type version, use this command:
aws amscm list-change-type-version-summaries --filter Attribute=ChangeTypeId,Value=CT_ID
Note
You can use any CreateRfc parameters with any RFC whether or not they are part of the schema for the
change type. For example, to get notifications when the RFC status changes, add this line, --notification "{\"Email\": {\"EmailRecipients\" : [\"email@example.com\"]}}" to the
RFC parameters part of the request (not the execution parameters). For a list of all CreateRfc parameters, see the
AMS Change Management API Reference.
INLINE CREATE:
Issue the create RFC command with execution parameters provided inline (escape quotation marks when providing execution parameters inline) and then submit the returned RFC ID. For example, you can replace the contents with something like this:
aws amscm create-rfc --title="Associate VPC with Resolver Rule" --ct-id="ct-2pbqoffhclpek" --ct-version="1.0" --execution-parameters "{\"Description\":\"Associate VPC with Resolver Rule\",\"ResolverRuleId\":\"rslvr-rr-974b1666869a4d27b\",\"VPCId\":\"vpc-02a18ed0cd3c17e71\"}"
TEMPLATE CREATE:
Output the execution parameters JSON schema for this change type; this example names it VPCAssociateResolverRule.json:
aws amscm get-change-type-version --change-type-id "ct-2pbqoffhclpek" --query "ChangeTypeVersion.ExecutionInputSchema" --output text > VPCAssociateResolverRule.jsonModify and save the execution parameters as VPCAssociateResolverRuleParams.json. For example, you can replace the contents with something like this:
{
  "DocumentName": "AWSManagedServices-AssociateVPCWithResolverRule",
  "Region": "us-east-1",
  "Parameters": {
    "Name": "resolver-rule-associate-vpc-test",
    "ResolverRuleId": "rslvr-rr-1234567890abcdefg",
    "VPCId": "vpc-1a2b3c4d"
  }
}
Output the RFC template JSON file; this example names it VPCAssociateResolverRuleRfc.json:
aws amscm create-rfc --generate-cli-skeleton > VPCAssociateResolverRuleRfc.jsonModify and save the VPCAssociateResolverRuleRfc.json file. For example, you can replace the contents with something like this:
{ "ChangeTypeVersion" : "1.0", "ChangeTypeId" : "ct-2pbqoffhclpek", "Title" : "Associate VPC with Resolver Rule" }Create the RFC, specifying the VPCAssociateResolverRuleRfc file and the VPCAssociateResolverRuleParams file:
aws amscm create-rfc --cli-input-json file://VPCAssociateResolverRuleRfc.json --execution-parameters file:/VPCAssociateResolverRuleParams.jsonYou receive the ID of the new RFC in the response and can use it to submit and monitor the RFC. Until you submit it, the RFC remains in the editing state and does not start.
Deploy AMS pattern (Managed Automation)
Screenshot of this change type in the AMS console:
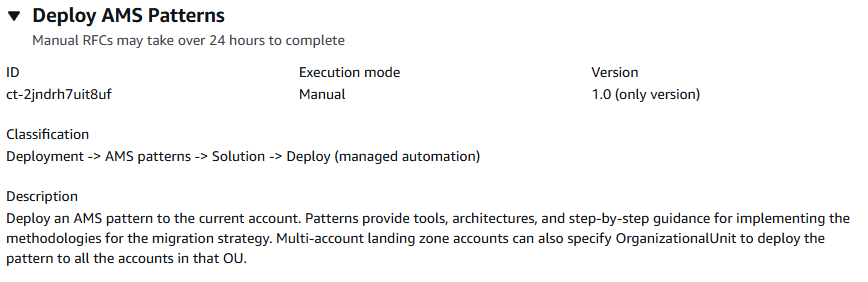
How it works:
Navigate to the Create RFC page: In the left navigation pane of the AMS console click RFCs to open the RFCs list page, and then click Create RFC.
Choose a popular change type (CT) in the default Browse change types view, or select a CT in the Choose by category view.
Browse by change type: You can click on a popular CT in the Quick create area to immediately open the Run RFC page. Note that you cannot choose an older CT version with quick create.
To sort CTs, use the All change types area in either the Card or Table view. In either view, select a CT and then click Create RFC to open the Run RFC page. If applicable, a Create with older version option appears next to the Create RFC button.
Choose by category: Select a category, subcategory, item, and operation and the CT details box opens with an option to Create with older version if applicable. Click Create RFC to open the Run RFC page.
On the Run RFC page, open the CT name area to see the CT details box. A Subject is required (this is filled in for you if you choose your CT in the Browse change types view). Open the Additional configuration area to add information about the RFC.
In the Execution configuration area, use available drop-down lists or enter values for the required parameters. To configure optional execution parameters, open the Additional configuration area.
When finished, click Run. If there are no errors, the RFC successfully created page displays with the submitted RFC details, and the initial Run output.
Open the Run parameters area to see the configurations you submitted. Refresh the page to update the RFC execution status. Optionally, cancel the RFC or create a copy of it with the options at the top of the page.
How it works:
Use either the Inline Create (you issue a
create-rfccommand with all RFC and execution parameters included), or Template Create (you create two JSON files, one for the RFC parameters and one for the execution parameters) and issue thecreate-rfccommand with the two files as input. Both methods are described here.Submit the RFC:
aws amscm submit-rfc --rfc-idcommand with the returned RFC ID.IDMonitor the RFC:
aws amscm get-rfc --rfc-idcommand.ID
To check the change type version, use this command:
aws amscm list-change-type-version-summaries --filter Attribute=ChangeTypeId,Value=CT_ID
Note
You can use any CreateRfc parameters with any RFC whether or not they are part of the schema for the
change type. For example, to get notifications when the RFC status changes, add this line, --notification "{\"Email\": {\"EmailRecipients\" : [\"email@example.com\"]}}" to the
RFC parameters part of the request (not the execution parameters). For a list of all CreateRfc parameters, see the
AMS Change Management API Reference.
INLINE CREATE:
Issue the create RFC command with execution parameters provided inline (escape quotation marks when providing execution parameters inline) and then submit the returned RFC ID. For example, you can replace the contents with something like this:
aws amscm create-rfc --change-type-id "ct-2jndrh7uit8uf" --change-type-version "1.0" --title "Deploy AMS Patterns" --execution-parameters "{\"PatternName\": \"amsEbsVolumeSnapshotTagger\",\"PatternParameters\": "{\"ExcludedTags\":\"BackupProd,Backup\",\"ASMGuardRail\":\"enabled\"}", \"OrganizationalUnit\": \"ou-9dyd-s2vptest\"}"
TEMPLATE CREATE:
Output the execution parameters JSON schema for this change type; this example names it DeployAMSPatternsParams.json:
aws amscm get-change-type-version --change-type-id "ct-2jndrh7uit8uf" --query "ChangeTypeVersion.ExecutionInputSchema" --output text > DeployAMSPatternsParams.jsonModify and save the execution parameters JSON file. For example, you can replace the contents with something like this:
{
  "PatternName": "amsEbsVolumeSnapshotTagger",
  "ExcludeAccounts": ["123456789012"],
  "OrganizationalUnitIds": ["ou-9dyd-jvsei4yg"],
  "Priority": "Medium",
  "PatternParameters": [
    {
      "Name": "Foo",
      "Value": "Bar"
    }
  ]
}
Output the RFC template JSON file; this example names it DeployAMSPatternsRfc.json:
aws amscm create-rfc --generate-cli-skeleton > DeployAMSPatternsRfc.jsonModify and save the DeployAMSPatternsRfc.json file. For example, you can replace the contents with something like this:
{
"ChangeTypeVersion":    "1.0",
"ChangeTypeId":         "ct-2jndrh7uit8uf",
"Title":                "Deploy AMS Patterns"
}
Create the RFC, specifying the DeployAMSPatternsRfc file and the DeployAMSPatternsParams file:
aws amscm create-rfc --cli-input-json file://DeployAMSPatternsRfc.json --execution-parameters file://DeployAMSPatternsParams.jsonYou receive the ID of the new RFC in the response and can use it to submit and monitor the RFC. Until you submit it, the RFC remains in the editing state and does not start.
Share AWS KMS Key
The following shows this change type in the AMS console.

How it works:
Navigate to the Create RFC page: In the left navigation pane of the AMS console click RFCs to open the RFCs list page, and then click Create RFC.
Choose a popular change type (CT) in the default Browse change types view, or select a CT in the Choose by category view.
Browse by change type: You can click on a popular CT in the Quick create area to immediately open the Run RFC page. Note that you cannot choose an older CT version with quick create.
To sort CTs, use the All change types area in either the Card or Table view. In either view, select a CT and then click Create RFC to open the Run RFC page. If applicable, a Create with older version option appears next to the Create RFC button.
Choose by category: Select a category, subcategory, item, and operation and the CT details box opens with an option to Create with older version if applicable. Click Create RFC to open the Run RFC page.
On the Run RFC page, open the CT name area to see the CT details box. A Subject is required (this is filled in for you if you choose your CT in the Browse change types view). Open the Additional configuration area to add information about the RFC.
In the Execution configuration area, use available drop-down lists or enter values for the required parameters. To configure optional execution parameters, open the Additional configuration area.
When finished, click Run. If there are no errors, the RFC successfully created page displays with the submitted RFC details, and the initial Run output.
Open the Run parameters area to see the configurations you submitted. Refresh the page to update the RFC execution status. Optionally, cancel the RFC or create a copy of it with the options at the top of the page.
How it works:
Use either the Inline Create (you issue a
create-rfccommand with all RFC and execution parameters included), or Template Create (you create two JSON files, one for the RFC parameters and one for the execution parameters) and issue thecreate-rfccommand with the two files as input. Both methods are described here.Submit the RFC:
aws amscm submit-rfc --rfc-idcommand with the returned RFC ID.IDMonitor the RFC:
aws amscm get-rfc --rfc-idcommand.ID
To check the change type version, use this command:
aws amscm list-change-type-version-summaries --filter Attribute=ChangeTypeId,Value=CT_ID
Note
You can use any CreateRfc parameters with any RFC whether or not they are part of the schema for the
change type. For example, to get notifications when the RFC status changes, add this line, --notification "{\"Email\": {\"EmailRecipients\" : [\"email@example.com\"]}}" to the
RFC parameters part of the request (not the execution parameters). For a list of all CreateRfc parameters, see the
AMS Change Management API Reference.
INLINE CREATE:
Issue the create RFC command with execution parameters provided inline (escape quotation marks when providing execution parameters inline), and then submit the returned RFC ID. For example, you can replace the contents with something like this:
aws amscm create-rfc --title="Add Static Route" --description="Share KMS Key" --ct-id="ct-05yb337abq3x5" --ct-version="1.0" --input-params="{\"KMSKeyArn\":\"arn:aws:kms:us-east-1:111122223333:key/06506094-64e2-47f3-94bd-f919eefa22f5\",\"TargetAccountId\":\"000000000000\",\"IncludeKeyGrantOperations\":\"false\",\"IAMUserOrRole\":\"arn:aws:iam::000000000000:role/role-name\", \"Priority\":\"High\"}"
TEMPLATE CREATE:
Output the execution parameters JSON schema for this change type to a file; this example names it ShareKmsKeyParams.json:
aws amscm get-change-type-version --change-type-id "ct-05yb337abq3x5" --query "ChangeTypeVersion.ExecutionInputSchema" --output text > ShareKmsKeyParams.jsonModify and save the ShareKmsKeyParams file. For example, you can replace the contents with something like this:
{
  "Description": "Share KMS Key",
  "Parameters": {
    "KMSKeyArn": "arn:aws:kms:us-east-1:111122223333:key/06506094-64e2-47f3-94bd-f919eefa22f5",
    "TargetAccountId": "000000000000",
    "IncludeKeyGrantOperations": "false"
    "IAMUserOrRole": "arn:aws:iam::000000000000:role/role-name"
  }
}
Output the RFC template to a file in your current folder; this example names it ShareKmsKeyParamsRfc.json:
aws amscm create-rfc --generate-cli-skeleton > ShareKmsKeyParamsRfc.jsonModify and save the ShareKmsKeyParams.json file. For example, you can replace the contents with something like this:
{
"ChangeTypeId": {
  "ChangeTypeVersion":    "1.0",
  "ChangeTypeId":         "ct-05yb337abq3x5",
  "Title":                "Share KMS Key"
}
Create the RFC, specifying the ShareKmsKeyParamsRfc file and the ShareKmsKeyParams file:
aws amscm create-rfc --cli-input-json file://ShareKmsKeyParamsRfc.json --execution-parameters file://ShareKmsKeyParams.jsonYou receive the ID of the new RFC in the response and can use it to submit and monitor the RFC. Until you submit it, the RFC remains in the editing state and does not start.
To log in to the instance through a bastion, follow the next procedure, Instance access examples.
Create Active Directory Trust
The following shows this change type in the AMS console.

How it works:
Navigate to the Create RFC page: In the left navigation pane of the AMS console click RFCs to open the RFCs list page, and then click Create RFC.
Choose a popular change type (CT) in the default Browse change types view, or select a CT in the Choose by category view.
Browse by change type: You can click on a popular CT in the Quick create area to immediately open the Run RFC page. Note that you cannot choose an older CT version with quick create.
To sort CTs, use the All change types area in either the Card or Table view. In either view, select a CT and then click Create RFC to open the Run RFC page. If applicable, a Create with older version option appears next to the Create RFC button.
Choose by category: Select a category, subcategory, item, and operation and the CT details box opens with an option to Create with older version if applicable. Click Create RFC to open the Run RFC page.
On the Run RFC page, open the CT name area to see the CT details box. A Subject is required (this is filled in for you if you choose your CT in the Browse change types view). Open the Additional configuration area to add information about the RFC.
In the Execution configuration area, use available drop-down lists or enter values for the required parameters. To configure optional execution parameters, open the Additional configuration area.
When finished, click Run. If there are no errors, the RFC successfully created page displays with the submitted RFC details, and the initial Run output.
Open the Run parameters area to see the configurations you submitted. Refresh the page to update the RFC execution status. Optionally, cancel the RFC or create a copy of it with the options at the top of the page.
How it works:
Use either the Inline Create (you issue a
create-rfccommand with all RFC and execution parameters included), or Template Create (you create two JSON files, one for the RFC parameters and one for the execution parameters) and issue thecreate-rfccommand with the two files as input. Both methods are described here.Submit the RFC:
aws amscm submit-rfc --rfc-idcommand with the returned RFC ID.IDMonitor the RFC:
aws amscm get-rfc --rfc-idcommand.ID
To check the change type version, use this command:
aws amscm list-change-type-version-summaries --filter Attribute=ChangeTypeId,Value=CT_ID
Note
You can use any CreateRfc parameters with any RFC whether or not they are part of the schema for the
change type. For example, to get notifications when the RFC status changes, add this line, --notification "{\"Email\": {\"EmailRecipients\" : [\"email@example.com\"]}}" to the
RFC parameters part of the request (not the execution parameters). For a list of all CreateRfc parameters, see the
AMS Change Management API Reference.
INLINE CREATE:
Issue the create RFC command with execution parameters provided inline (escape quotation marks when providing execution parameters inline), and then submit the returned RFC ID. For example, you can replace the contents with something like this:
aws amscm create-rfc --change-type-id "ct-0x6dylrnfjgz5" --change-type-version "1.0" --title "Create AD Trust" --execution-parameters '
{"DocumentName":"AWSManagedServices-CreateADTrust","Region":"ap-southeast-2","Parameters":{"DirectoryId":["d-976774e42f"],"RemoteDomainName":["onprem.local"],"SecretArn":["arn:aws:secretsmanager:ap-southeast-2:996606605561:secret:customer-shared/CorrectTPW-BI79uu"],"TrustType":["External"],"ConditionalForwarderIpAddresses":["10.153.28.39"]}}"
TEMPLATE CREATE:
Output the execution parameters JSON schema for this change type to a file; this example names it CreateADTrustParams.json:
aws amscm get-change-type-version --change-type-id "ct-0x6dylrnfjgz5" --query "ChangeTypeVersion.ExecutionInputSchema" --output text > CreateADTrustParams.jsonModify and save the CreateADTrustParams.json file. For example, you can replace the contents with something like this:
{
  "DocumentName": "AWSManagedServices-CreateADTrust",
  "Region": "ap-southeast-2",
  "Parameters": {
    "DirectoryId": [
      "d-976774e42f"
    ],
    "RemoteDomainName": [
      "onprem.local"
    ],
    "SecretArn": [
      "arn:aws:secretsmanager:ap-southeast-2:996606605561:secret:customer-shared/CorrectTPW-BI79uu"
    ],
    "TrustType": [
      "External"
    ],
    "ConditionalForwarderIpAddresses": [
      "10.153.28.39"
    ]
  }
}
Output the RFC template to a file in your current folder; this example names it CreateADTrustRfc.json:
aws amscm create-rfc --generate-cli-skeleton > CreateADTrustRfc.jsonModify and save the CreateADTrustRfc.json file. For example, you can replace the contents with something like this:
{
  "ChangeTypeId": "ct-0x6dylrnfjgz5",
  "ChangeTypeVersion": "1.0",
  "Title": "Active Directory Trust"
}
Create the RFC, specifying the CreateADTrustRfc file and the CreateADTrustParams file:
aws amscm create-rfc --cli-input-json file://CreateADTrustRfc.json --execution-parameters file://CreateADTrustParams.jsonYou receive the ID of the new RFC in the response and can use it to submit and monitor the RFC. Until you submit it, the RFC remains in the editing state and does not start.
For information about Directory Service, see the Directory Service Admin Guide.
Override Stack Access Duration (Managed automation)
Screenshot of this change type in the AMS console:
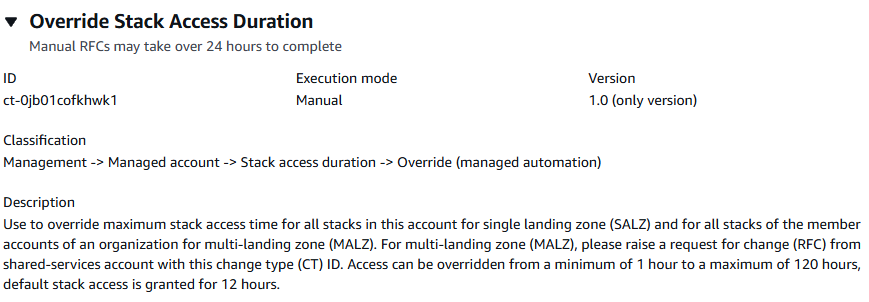
How it works:
Navigate to the Create RFC page: In the left navigation pane of the AMS console click RFCs to open the RFCs list page, and then click Create RFC.
Choose a popular change type (CT) in the default Browse change types view, or select a CT in the Choose by category view.
Browse by change type: You can click on a popular CT in the Quick create area to immediately open the Run RFC page. Note that you cannot choose an older CT version with quick create.
To sort CTs, use the All change types area in either the Card or Table view. In either view, select a CT and then click Create RFC to open the Run RFC page. If applicable, a Create with older version option appears next to the Create RFC button.
Choose by category: Select a category, subcategory, item, and operation and the CT details box opens with an option to Create with older version if applicable. Click Create RFC to open the Run RFC page.
On the Run RFC page, open the CT name area to see the CT details box. A Subject is required (this is filled in for you if you choose your CT in the Browse change types view). Open the Additional configuration area to add information about the RFC.
In the Execution configuration area, use available drop-down lists or enter values for the required parameters. To configure optional execution parameters, open the Additional configuration area.
When finished, click Run. If there are no errors, the RFC successfully created page displays with the submitted RFC details, and the initial Run output.
Open the Run parameters area to see the configurations you submitted. Refresh the page to update the RFC execution status. Optionally, cancel the RFC or create a copy of it with the options at the top of the page.
How it works:
Use either the Inline Create (you issue a
create-rfccommand with all RFC and execution parameters included), or Template Create (you create two JSON files, one for the RFC parameters and one for the execution parameters) and issue thecreate-rfccommand with the two files as input. Both methods are described here.Submit the RFC:
aws amscm submit-rfc --rfc-idcommand with the returned RFC ID.IDMonitor the RFC:
aws amscm get-rfc --rfc-idcommand.ID
To check the change type version, use this command:
aws amscm list-change-type-version-summaries --filter Attribute=ChangeTypeId,Value=CT_ID
Note
You can use any CreateRfc parameters with any RFC whether or not they are part of the schema for the
change type. For example, to get notifications when the RFC status changes, add this line, --notification "{\"Email\": {\"EmailRecipients\" : [\"email@example.com\"]}}" to the
RFC parameters part of the request (not the execution parameters). For a list of all CreateRfc parameters, see the
AMS Change Management API Reference.
INLINE CREATE:
Issue the create RFC command with execution parameters provided inline (escape quotation marks when providing execution parameters inline), and then submit the returned RFC ID. For example, you can replace the contents with something like this:
aws amscm create-rfc --title="Override Stack Access Duration" --description="Override Stack Access Duration" --ct-id="ct-0jb01cofkhwk1" --ct-version="1.0" --input-params="{\"TimeRequestedInHours\":15,\"Priority\":\"High\"}"
TEMPLATE CREATE:
Output the execution parameters JSON schema for this change type to a file. This example names it OverrideStackAccessDurationParameters.json:
aws amscm get-change-type-version --change-type-id "ct-0jb01cofkhwk1" --query "ChangeTypeVersion.ExecutionInputSchema" --output text > OverrideStackAccessDurationParameters.jsonModify and save the OverrideStackAccessDurationParameters.json file. For example, you can replace the contents with something like this:
{ "TimeRequestedInHours":15, "Priority": "High" }-
Output the RFC template JSON file to a file named OverrideStackAccessDuration.json:
aws amscm create-rfc --generate-cli-skeleton > OverrideStackAccessDuration.json -
Modify and save the OverrideStackAccessDuration.json file. For example, you can replace the contents with something like this:
{
  "ChangeTypeVersion": "1.0",
  "ChangeTypeId": "ct-0jb01cofkhwk1",
  "Title": "Override Stack Access Duration"
}
Create the RFC:
aws amscm create-rfc --cli-input-json file://OverrideStackAccessDuration.json --execution-parameters file://OverrideStackAccessDurationParameters.jsonYou receive the ID of the new RFC in the response and can use it to submit and monitor the RFC. Until you submit it, the RFC remains in the editing state and does not start.
Enable automated IAM provisioning with read-write permissions
Screenshot of this change type in the AMS console:

How it works:
Navigate to the Create RFC page: In the left navigation pane of the AMS console click RFCs to open the RFCs list page, and then click Create RFC.
Choose a popular change type (CT) in the default Browse change types view, or select a CT in the Choose by category view.
Browse by change type: You can click on a popular CT in the Quick create area to immediately open the Run RFC page. Note that you cannot choose an older CT version with quick create.
To sort CTs, use the All change types area in either the Card or Table view. In either view, select a CT and then click Create RFC to open the Run RFC page. If applicable, a Create with older version option appears next to the Create RFC button.
Choose by category: Select a category, subcategory, item, and operation and the CT details box opens with an option to Create with older version if applicable. Click Create RFC to open the Run RFC page.
On the Run RFC page, open the CT name area to see the CT details box. A Subject is required (this is filled in for you if you choose your CT in the Browse change types view). Open the Additional configuration area to add information about the RFC.
In the Execution configuration area, use available drop-down lists or enter values for the required parameters. To configure optional execution parameters, open the Additional configuration area.
When finished, click Run. If there are no errors, the RFC successfully created page displays with the submitted RFC details, and the initial Run output.
Open the Run parameters area to see the configurations you submitted. Refresh the page to update the RFC execution status. Optionally, cancel the RFC or create a copy of it with the options at the top of the page.
How it works:
Use either the Inline Create (you issue a
create-rfccommand with all RFC and execution parameters included), or Template Create (you create two JSON files, one for the RFC parameters and one for the execution parameters) and issue thecreate-rfccommand with the two files as input. Both methods are described here.Submit the RFC:
aws amscm submit-rfc --rfc-idcommand with the returned RFC ID.IDMonitor the RFC:
aws amscm get-rfc --rfc-idcommand.ID
To check the change type version, use this command:
aws amscm list-change-type-version-summaries --filter Attribute=ChangeTypeId,Value=CT_ID
Note
You can use any CreateRfc parameters with any RFC whether or not they are part of the schema for the
change type. For example, to get notifications when the RFC status changes, add this line, --notification "{\"Email\": {\"EmailRecipients\" : [\"email@example.com\"]}}" to the
RFC parameters part of the request (not the execution parameters). For a list of all CreateRfc parameters, see the
AMS Change Management API Reference.
INLINE CREATE:
Issue the create RFC command with execution parameters provided inline (escape quotes when providing execution parameters inline), and then submit the returned RFC ID. For example, you can replace the contents with something like this:
aws amscm create-rfc --change-type-id "ct-1706xvvk6j9hf" --change-type-version "1.0" --title "Enable (managed automation)" --execution-parameters "{\"SAMLIdentityProviderArns\": [\"arn:aws:iam::123456789012:saml-provider/customer-saml\"], \"IamEntityArns\": [\"arn:aws:iam::123456789012:role/test-role-one\", \"arn:aws:iam::123456789012:role/test-role-two\"], \"Priority\": \"High\"}"
TEMPLATE CREATE:
Output the execution parameters JSON schema for this change type to a file; this example names it EnableAutomatedIAMProvisioningParams.json.
aws amscm get-change-type-version --change-type-id "ct-1706xvvk6j9hf" --query "ChangeTypeVersion.ExecutionInputSchema" --output text > EnableAutomatedIAMProvisioningParams.jsonModify and save the EnableAutomatedIAMProvisioningParams file. For example, you can replace the contents with something like this:
{
  "SAMLIdentityProviderArns": ["arn:aws:iam::123456789012:saml-provider/customer-saml"],
  "IamEntityArns": ["arn:aws:iam::123456789012:role/test-role-one", "arn:aws:iam::123456789012:role/test-role-two"],
  "Priority": "High"
}
Output the RFC template JSON file to a file named EnableAutomatedIAMProvisioningRfc.json:
aws amscm create-rfc --generate-cli-skeleton > EnableAutomatedIAMProvisioningRfc.jsonModify and save the EnableAutomatedIAMProvisioningRfc.json file. For example, you can replace the contents with something like this:
{
"ChangeTypeVersion":    "1.0",
"ChangeTypeId":         "ct-1706xvvk6j9hf",
"Title":                "Enable-Automated-IAM-Provisioning-RFC"
}
Create the RFC, specifying the UpdateSecurityPolicy Rfc file and the UpdateSecurityPolicyParams file:
aws amscm create-rfc --cli-input-json file://EnableAutomatedIAMProvisioningRfc.json --execution-parameters file://EnableAutomatedIAMProvisioningParams.jsonYou receive the ID of the new RFC in the response and can use it to submit and monitor the RFC. Until you submit it, the RFC remains in the editing state and does not start.
Add VPC static route (Managed Automation)
The following shows this change type in the AMS console.

How it works:
Navigate to the Create RFC page: In the left navigation pane of the AMS console click RFCs to open the RFCs list page, and then click Create RFC.
Choose a popular change type (CT) in the default Browse change types view, or select a CT in the Choose by category view.
Browse by change type: You can click on a popular CT in the Quick create area to immediately open the Run RFC page. Note that you cannot choose an older CT version with quick create.
To sort CTs, use the All change types area in either the Card or Table view. In either view, select a CT and then click Create RFC to open the Run RFC page. If applicable, a Create with older version option appears next to the Create RFC button.
Choose by category: Select a category, subcategory, item, and operation and the CT details box opens with an option to Create with older version if applicable. Click Create RFC to open the Run RFC page.
On the Run RFC page, open the CT name area to see the CT details box. A Subject is required (this is filled in for you if you choose your CT in the Browse change types view). Open the Additional configuration area to add information about the RFC.
In the Execution configuration area, use available drop-down lists or enter values for the required parameters. To configure optional execution parameters, open the Additional configuration area.
When finished, click Run. If there are no errors, the RFC successfully created page displays with the submitted RFC details, and the initial Run output.
Open the Run parameters area to see the configurations you submitted. Refresh the page to update the RFC execution status. Optionally, cancel the RFC or create a copy of it with the options at the top of the page.
How it works:
Use either the Inline Create (you issue a
create-rfccommand with all RFC and execution parameters included), or Template Create (you create two JSON files, one for the RFC parameters and one for the execution parameters) and issue thecreate-rfccommand with the two files as input. Both methods are described here.Submit the RFC:
aws amscm submit-rfc --rfc-idcommand with the returned RFC ID.IDMonitor the RFC:
aws amscm get-rfc --rfc-idcommand.ID
To check the change type version, use this command:
aws amscm list-change-type-version-summaries --filter Attribute=ChangeTypeId,Value=CT_ID
Note
You can use any CreateRfc parameters with any RFC whether or not they are part of the schema for the
change type. For example, to get notifications when the RFC status changes, add this line, --notification "{\"Email\": {\"EmailRecipients\" : [\"email@example.com\"]}}" to the
RFC parameters part of the request (not the execution parameters). For a list of all CreateRfc parameters, see the
AMS Change Management API Reference.
INLINE CREATE:
Issue the create RFC command with execution parameters provided inline (escape quotation marks when providing execution parameters inline) and then submit the returned RFC ID. For example, you can replace the contents with something like this:
aws amscm create-rfc --title="Add Static Route" --description="Add static route" --ct-id="ct-06bwg93ukgg8t" --ct-version="1.0" --input-params="{\"RouteTableId\":\"rtb-0123abcd\",\"DestinationCidrBlock\":\"172.31.0.0/16\",\"Target\":\"pcx-0123456789abcdefg\",\"Priority\":\"High\"}"
TEMPLATE CREATE:
Output the execution parameters JSON schema for this change type; this example names it EncryptAmiParams.json:
aws amscm get-change-type-version --change-type-id "ct-06bwg93ukgg8t" --query "ChangeTypeVersion.ExecutionInputSchema" --output text > AddStaticRouteParams.jsonModify and save the execution AddStaticRouteParams.json file. For example, you can replace the contents with something like this:
{
    "RouteTableId": "rtb-0123abcd",
    "DestinationCidrBlock": "172.31.0.0/16",
    "Target": "pcx-0123456789abcdefg",
    "Priority": "High"
}
Output the RFC template JSON file; this example names it AddStaticRouteRfc.json:
aws amscm create-rfc --generate-cli-skeleton > AddStaticRouteRfc.jsonModify and save the AddStaticRouteRfc.json file. For example, you can replace the contents with something like this:
{
  "ChangeTypeVersion": "1.0",
  "ChangeTypeId": "ct-06bwg93ukgg8t",
  "Title": "Add static route"
}
Create the RFC, specifying the AddStaticRouteRfc file and the AddStaticRouteParams file:
aws amscm create-rfc --cli-input-json file://AddStaticRouteRfc.json --execution-parameters file://AddStaticRouteParams.jsonYou receive the ID of the new RFC in the response and can use it to submit and monitor the RFC. Until you submit it, the RFC remains in the editing state and does not start.
For information about VPCs, see Virtual private clouds (VPC).
Create IAM entity or policy

How it works:
Navigate to the Create RFC page: In the left navigation pane of the AMS console click RFCs to open the RFCs list page, and then click Create RFC.
Choose a popular change type (CT) in the default Browse change types view, or select a CT in the Choose by category view.
Browse by change type: You can click on a popular CT in the Quick create area to immediately open the Run RFC page. Note that you cannot choose an older CT version with quick create.
To sort CTs, use the All change types area in either the Card or Table view. In either view, select a CT and then click Create RFC to open the Run RFC page. If applicable, a Create with older version option appears next to the Create RFC button.
Choose by category: Select a category, subcategory, item, and operation and the CT details box opens with an option to Create with older version if applicable. Click Create RFC to open the Run RFC page.
On the Run RFC page, open the CT name area to see the CT details box. A Subject is required (this is filled in for you if you choose your CT in the Browse change types view). Open the Additional configuration area to add information about the RFC.
In the Execution configuration area, use available drop-down lists or enter values for the required parameters. To configure optional execution parameters, open the Additional configuration area.
When finished, click Run. If there are no errors, the RFC successfully created page displays with the submitted RFC details, and the initial Run output.
Open the Run parameters area to see the configurations you submitted. Refresh the page to update the RFC execution status. Optionally, cancel the RFC or create a copy of it with the options at the top of the page.
How it works:
Use either the Inline Create (you issue a
create-rfccommand with all RFC and execution parameters included), or Template Create (you create two JSON files, one for the RFC parameters and one for the execution parameters) and issue thecreate-rfccommand with the two files as input. Both methods are described here.Submit the RFC:
aws amscm submit-rfc --rfc-idcommand with the returned RFC ID.IDMonitor the RFC:
aws amscm get-rfc --rfc-idcommand.ID
To check the change type version, use this command:
aws amscm list-change-type-version-summaries --filter Attribute=ChangeTypeId,Value=CT_ID
Note
You can use any CreateRfc parameters with any RFC whether or not they are part of the schema for the
change type. For example, to get notifications when the RFC status changes, add this line, --notification "{\"Email\": {\"EmailRecipients\" : [\"email@example.com\"]}}" to the
RFC parameters part of the request (not the execution parameters). For a list of all CreateRfc parameters, see the
AMS Change Management API Reference.
INLINE CREATE:
Issue the create RFC command with execution parameters provided inline (escape quotes when providing execution parameters inline), and then submit the returned RFC ID. For example, you can replace the contents with something like this:
aws amscm create-rfc --change-type-id "ct-1n9gfnog5x7fl" --change-type-version "1.0" --title "Create role or policy" --execution-parameters '{"DocumentName":"AWSManagedServices-HandleAutomatedIAMProvisioningCreate-Admin","Region":"us-east-1","Parameters":{"ValidateOnly":"No"},"RoleDetails":{"Roles":[{"RoleName":"RoleTest01","Description":"This is a test role","AssumeRolePolicyDocument":"{"Version": "2012-10-17", "Statement":[{"Effect":"Allow","Principal":{"AWS":"arn:aws:iam::123456789012:root"},"Action":"sts:AssumeRole"}]}","ManagedPolicyArns":["arn:aws:iam::123456789012:policy/policy01","arn:aws:iam::123456789012:policy/policy02"],"Path":"/","MaxSessionDuration":"7200","PermissionsBoundary":"arn:aws:iam::123456789012:policy/permission_boundary01","InstanceProfile":"No"}]},"ManagedPolicyDetails":{"Policies":[{"ManagedPolicyName":"TestPolicy01","Description":"This is customer policy","Path":"/test/","PolicyDocument":"{"}'Version":"2012-10-17","Statement":[{"Sid":"AllQueueActions","Effect":"Allow","Action":"sqs:ListQueues","Resource":"*","Condition":{"ForAllValues:StringEquals":{"aws:tagKeys":["temporary"]}}}]}"}]}
TEMPLATE CREATE:
Output the execution parameters JSON schema for this change type to a file; example names it CreateIamResourceParams.json:
aws amscm get-change-type-version --change-type-id "ct-1n9gfnog5x7fl" --query "ChangeTypeVersion.ExecutionInputSchema" --output text > CreateIamResourceParams.jsonModify and save the CreateIamResourceParams file; example creates an IAM Role with policy documents pasted inline.
{
  "DocumentName": "AWSManagedServices-HandleAutomatedIAMProvisioningCreate-Admin",
  "Region": "us-east-1",
  "Parameters": {
    "ValidateOnly": "No"
  },
  "RoleDetails": {
    "Roles": [
      {
        "RoleName": "RoleTest01",
        "Description": "This is a test role",
        "AssumeRolePolicyDocument": {
          "Version": "2012-10-17",
          "Statement": [
            {
              "Effect": "Allow",
              "Principal": {
                "AWS": "arn:aws:iam::123456789012:root"
              },
              "Action": "sts:AssumeRole"
            }
          ]
        },
        "ManagedPolicyArns": [
          "arn:aws:iam::123456789012:policy/policy01",
          "arn:aws:iam::123456789012:policy/policy02"
        ],
        "Path": "/",
        "MaxSessionDuration": "7200",
        "PermissionsBoundary": "arn:aws:iam::123456789012:policy/permission_boundary01",
        "InstanceProfile": "No"
      }
    ]
  },
  "ManagedPolicyDetails": {
    "Policies": [
      {
        "ManagedPolicyName": "TestPolicy01",
        "Description": "This is customer policy",
        "Path": "/test/",
        "PolicyDocument": {
          "Version": "2012-10-17",
          "Statement": [
            {
              "Sid": "AllQueueActions",
              "Effect": "Allow",
              "Action": "sqs:ListQueues",
              "Resource": "*",
              "Condition": {
                "ForAllValues:StringEquals": {
                  "aws:tagKeys": [
                    "temporary"
                  ]
                }
              }
            }
          ]
        }
      }
    ]
  }
}
Output the RFC template JSON file to a file named CreateIamResourceRfc.json:
aws amscm create-rfc --generate-cli-skeleton > CreateIamResourceRfc.jsonModify and save the CreateIamResourceRfc.json file. For example, you can replace the contents with something like this:
{
  "ChangeTypeVersion": "1.0",
  "ChangeTypeId": "ct-1n9gfnog5x7fl",
  "Title": "Create entity or policy (read-write permissions)"
}
Create the RFC, specifying the CreateIamResourceRfc file and the CreateIamResourceParams file:
aws amscm create-rfc --cli-input-json file://CreateIamResourceRfc.json --execution-parameters file://CreateIamResourceParams.jsonYou receive the ID of the new RFC in the response and can use it to submit and monitor the RFC. Until you submit it, the RFC remains in the editing state and does not start.
-
After an IAM role is provisioned in your account, depending on the role and the policy document you attach to the role, you may need to onboard the role in your federation solution.
For information about AWS Identity and Access Management, see AWS Identity and Access Management (IAM)
and for policy information, see Managed policies and inline policies. For information about AMS permissions, see Deploying IAM resources.
Update IAM entity or policy

How it works:
Navigate to the Create RFC page: In the left navigation pane of the AMS console click RFCs to open the RFCs list page, and then click Create RFC.
Choose a popular change type (CT) in the default Browse change types view, or select a CT in the Choose by category view.
Browse by change type: You can click on a popular CT in the Quick create area to immediately open the Run RFC page. Note that you cannot choose an older CT version with quick create.
To sort CTs, use the All change types area in either the Card or Table view. In either view, select a CT and then click Create RFC to open the Run RFC page. If applicable, a Create with older version option appears next to the Create RFC button.
Choose by category: Select a category, subcategory, item, and operation and the CT details box opens with an option to Create with older version if applicable. Click Create RFC to open the Run RFC page.
On the Run RFC page, open the CT name area to see the CT details box. A Subject is required (this is filled in for you if you choose your CT in the Browse change types view). Open the Additional configuration area to add information about the RFC.
In the Execution configuration area, use available drop-down lists or enter values for the required parameters. To configure optional execution parameters, open the Additional configuration area.
When finished, click Run. If there are no errors, the RFC successfully created page displays with the submitted RFC details, and the initial Run output.
Open the Run parameters area to see the configurations you submitted. Refresh the page to update the RFC execution status. Optionally, cancel the RFC or create a copy of it with the options at the top of the page.
How it works:
Use either the Inline Create (you issue a
create-rfccommand with all RFC and execution parameters included), or Template Create (you create two JSON files, one for the RFC parameters and one for the execution parameters) and issue thecreate-rfccommand with the two files as input. Both methods are described here.Submit the RFC:
aws amscm submit-rfc --rfc-idcommand with the returned RFC ID.IDMonitor the RFC:
aws amscm get-rfc --rfc-idcommand.ID
To check the change type version, use this command:
aws amscm list-change-type-version-summaries --filter Attribute=ChangeTypeId,Value=CT_ID
Note
You can use any CreateRfc parameters with any RFC whether or not they are part of the schema for the
change type. For example, to get notifications when the RFC status changes, add this line, --notification "{\"Email\": {\"EmailRecipients\" : [\"email@example.com\"]}}" to the
RFC parameters part of the request (not the execution parameters). For a list of all CreateRfc parameters, see the
AMS Change Management API Reference.
INLINE CREATE:
Issue the create RFC command with execution parameters provided inline (escape quotes when providing execution parameters inline), and then submit the returned RFC ID. For example, you can replace the contents with something like this:
aws amscm create-rfc --change-type-id "ct-1e0xmuy1diafq" --change-type-version "1.0" --title "Update role or policy" --execution-parameters "{\"DocumentName\":\"AWSManagedServices-HandleAutomatedIAMProvisioningUpdate-Admin\",\"Region\":\"us-east-1\",\"Parameters\":{\"ValidateOnly\":\"No\"},\"RoleDetails\":{\"Roles\":[{\"RoleName\":\"RoleTest01\",\"Description\":\"This is a test role\",\"AssumeRolePolicyDocument\":\"{\\\"Version\\\":\\\"2012-10-17\\\",\\\"Statement\\\":[{\\\"Effect\\\":\\\"Allow\\\",\\\"Principal\\\":{\\\"AWS\\\":\\\"arn:aws:iam::123456789012:root\\\"},\\\"Action\\\":\\\"sts:AssumeRole\\\"}]}\",\"ManagedPolicyArns\":[\"arn:aws:iam::123456789012:policy/policy01\",\"arn:aws:iam::123456789012:policy/policy02\"],\"MaxSessionDuration\":\"7200\",\"PermissionsBoundary\":\"arn:aws:iam::123456789012:policy/permission_boundary01\"}]},\"ManagedPolicyDetails\":{\"Policies\":[{\"ManagedPolicyName\":\"TestPolicy01\",\"PolicyDocument\":\"{\\\"Version\\\":\\\"2012-10-17\\\",\\\"Statement\\\":[{\\\"Sid\\\":\\\"AllQueueActions\\\",\\\"Effect\\\":\\\"Allow\\\",\\\"Action\\\":\\\"sqs:ListQueues\\\",\\\"Resource\\\":\\\"*\\\",\\\"Condition\\\":{\\\"ForAllValues:StringEquals\\\":{\\\"aws:tagKeys\\\":[\\\"temporary\\\"]}}}]}\"}]}}"
TEMPLATE CREATE:
Output the execution parameters JSON schema for this change type to a file; example names it UpdateIamResourceParams.json:
aws amscm get-change-type-version --change-type-id "ct-1e0xmuy1diafq" --query "ChangeTypeVersion.ExecutionInputSchema" --output text > UpdateIamResourceParams.jsonModify and save the UpdateIamResourceParams file; example creates an IAM Role with policy documents pasted inline.
{
  "DocumentName": "AWSManagedServices-HandleAutomatedIAMProvisioningUpdate-Admin",
  "Region": "us-east-1",
  "Parameters": {
    "ValidateOnly": "No"
  },
  "RoleDetails": {
    "Roles": [
      {
        "RoleName": "RoleTest01",
        "Description": "This is a test role",
        "AssumeRolePolicyDocument": {"Version": "2012-10-17","Statement":[{"Effect":"Allow","Principal":{"AWS":"arn:aws:iam::123456789012:root"},"Action":"sts:AssumeRole"}]},
        "ManagedPolicyArns": [
          "arn:aws:iam::123456789012:policy/policy01",
          "arn:aws:iam::123456789012:policy/policy02"
        ],
        "MaxSessionDuration": "7200",
        "PermissionsBoundary": "arn:aws:iam::123456789012:policy/permission_boundary01"
      }
    ]
  },
  "ManagedPolicyDetails": {
    "Policies": [
      {
        "ManagedPolicyName": "TestPolicy01",
        "PolicyDocument": {"Version": "2012-10-17","Statement":[{"Sid":"AllQueueActions","Effect":"Allow","Action":"sqs:ListQueues","Resource":"*","Condition":{"ForAllValues:StringEquals":{"aws:tagKeys":["temporary"]}}}]}
      }
    ]
  }
}
Output the RFC template JSON file to a file named UpdateIamResourceRfc.json:
aws amscm create-rfc --generate-cli-skeleton > UpdateIamResourceRfc.jsonModify and save the UpdateIamResourceRfc.json file. For example, you can replace the contents with something like this:
{
    "ChangeTypeVersion": "1.0",
    "ChangeTypeId": "ct-1e0xmuy1diafq",
    "Title": "Update entity or policy (read-write permissions)"
}
Create the RFC, specifying the UpdateIamResourceRfc file and the UpdateIamResourceParams file:
aws amscm create-rfc --cli-input-json file://UpdateIamResourceRfc.json --execution-parameters file://UpdateIamResourceParams.jsonYou receive the ID of the new RFC in the response and can use it to submit and monitor the RFC. Until you submit it, the RFC remains in the editing state and does not start.
For information about AWS Identity and Access Management, see AWS Identity and Access Management (IAM)
and for policy information, see Managed policies and inline policies. For information about AMS permissions, see Deploying IAM resources.
Delete IAM entity or policy
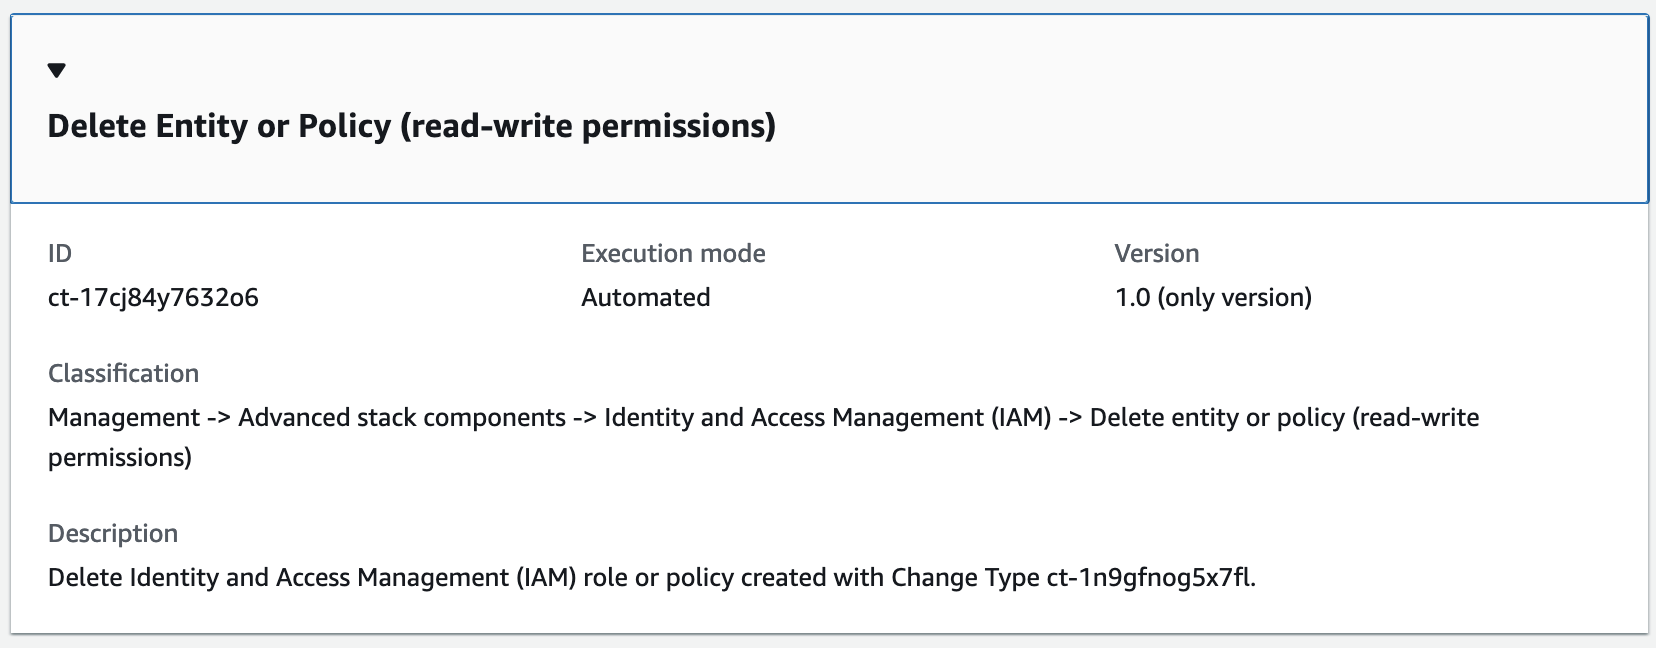
How it works:
Navigate to the Create RFC page: In the left navigation pane of the AMS console click RFCs to open the RFCs list page, and then click Create RFC.
Choose a popular change type (CT) in the default Browse change types view, or select a CT in the Choose by category view.
Browse by change type: You can click on a popular CT in the Quick create area to immediately open the Run RFC page. Note that you cannot choose an older CT version with quick create.
To sort CTs, use the All change types area in either the Card or Table view. In either view, select a CT and then click Create RFC to open the Run RFC page. If applicable, a Create with older version option appears next to the Create RFC button.
Choose by category: Select a category, subcategory, item, and operation and the CT details box opens with an option to Create with older version if applicable. Click Create RFC to open the Run RFC page.
On the Run RFC page, open the CT name area to see the CT details box. A Subject is required (this is filled in for you if you choose your CT in the Browse change types view). Open the Additional configuration area to add information about the RFC.
In the Execution configuration area, use available drop-down lists or enter values for the required parameters. To configure optional execution parameters, open the Additional configuration area.
When finished, click Run. If there are no errors, the RFC successfully created page displays with the submitted RFC details, and the initial Run output.
Open the Run parameters area to see the configurations you submitted. Refresh the page to update the RFC execution status. Optionally, cancel the RFC or create a copy of it with the options at the top of the page.
How it works:
Use either the Inline Create (you issue a
create-rfccommand with all RFC and execution parameters included), or Template Create (you create two JSON files, one for the RFC parameters and one for the execution parameters) and issue thecreate-rfccommand with the two files as input. Both methods are described here.Submit the RFC:
aws amscm submit-rfc --rfc-idcommand with the returned RFC ID.IDMonitor the RFC:
aws amscm get-rfc --rfc-idcommand.ID
To check the change type version, use this command:
aws amscm list-change-type-version-summaries --filter Attribute=ChangeTypeId,Value=CT_ID
Note
You can use any CreateRfc parameters with any RFC whether or not they are part of the schema for the
change type. For example, to get notifications when the RFC status changes, add this line, --notification "{\"Email\": {\"EmailRecipients\" : [\"email@example.com\"]}}" to the
RFC parameters part of the request (not the execution parameters). For a list of all CreateRfc parameters, see the
AMS Change Management API Reference.
INLINE CREATE:
Issue the create RFC command with execution parameters provided inline (escape quotes when providing execution parameters inline), and then submit the returned RFC ID. For example, you can replace the contents with something like this:
aws amscm create-rfc --change-type-id "ct-17cj84y7632o6" --change-type-version "1.0" --title "Delete role or policy" --execution-parameters "{\"DocumentName\":\"AWSManagedServices-HandleAutomatedIAMProvisioningDelete-Admin\",\"Region\":\"us-east-1\",\"Parameters\":{\"RoleName\":[\"TestRole01\",\"TestRole02\"],\"ManagedPolicyName\":[\"TestPolicy01\",\"TestPolicy02\"]}}"
TEMPLATE CREATE:
Output the execution parameters JSON schema for this change type to a file; example names it DeleteIamResourceParams.json:
aws amscm get-change-type-version --change-type-id "ct-17cj84y7632o6" --query "ChangeTypeVersion.ExecutionInputSchema" --output text > DeleteIamResourceParams.jsonModify and save the DeleteIamResourceParams file; example creates an IAM Role with policy documents pasted inline.
{
  "DocumentName" : "AWSManagedServices-HandleAutomatedIAMProvisioningDelete-Admin",
  "Region" : "us-east-1",
  "Parameters": {
    "RoleName": ["TestRole01", "TestRole02"],
    "ManagedPolicyName": ["TestPolicy01", "TestPolicy02"]
  }
}
Output the RFC template JSON file to a file named DeleteIamResourceRfc.json:
aws amscm create-rfc --generate-cli-skeleton > DeleteIamResourceRfc.jsonModify and save the DeleteIamResourceRfc.json file. For example, you can replace the contents with something like this:
{
    "ChangeTypeVersion": "1.0",
    "ChangeTypeId": "ct-17cj84y7632o6",
    "Title": "Delete entity or policy (read-write permissions)"
}
Create the RFC, specifying the DeleteIamResourceRfc file and the DeleteIamResourceParams file:
aws amscm create-rfc --cli-input-json file://DeleteIamResourceRfc.json --execution-parameters file://DeleteIamResourceParams.jsonYou receive the ID of the new RFC in the response and can use it to submit and monitor the RFC. Until you submit it, the RFC remains in the editing state and does not start.
For information about AWS Identity and Access Management, see AWS Identity and Access Management (IAM)
and for policy information, see Managed policies and inline policies.
Update detailed monitoring
Screenshot of this change type in the AMS console:

How it works:
Navigate to the Create RFC page: In the left navigation pane of the AMS console click RFCs to open the RFCs list page, and then click Create RFC.
Choose a popular change type (CT) in the default Browse change types view, or select a CT in the Choose by category view.
Browse by change type: You can click on a popular CT in the Quick create area to immediately open the Run RFC page. Note that you cannot choose an older CT version with quick create.
To sort CTs, use the All change types area in either the Card or Table view. In either view, select a CT and then click Create RFC to open the Run RFC page. If applicable, a Create with older version option appears next to the Create RFC button.
Choose by category: Select a category, subcategory, item, and operation and the CT details box opens with an option to Create with older version if applicable. Click Create RFC to open the Run RFC page.
On the Run RFC page, open the CT name area to see the CT details box. A Subject is required (this is filled in for you if you choose your CT in the Browse change types view). Open the Additional configuration area to add information about the RFC.
In the Execution configuration area, use available drop-down lists or enter values for the required parameters. To configure optional execution parameters, open the Additional configuration area.
When finished, click Run. If there are no errors, the RFC successfully created page displays with the submitted RFC details, and the initial Run output.
Open the Run parameters area to see the configurations you submitted. Refresh the page to update the RFC execution status. Optionally, cancel the RFC or create a copy of it with the options at the top of the page.
How it works:
Use either the Inline Create (you issue a
create-rfccommand with all RFC and execution parameters included), or Template Create (you create two JSON files, one for the RFC parameters and one for the execution parameters) and issue thecreate-rfccommand with the two files as input. Both methods are described here.Submit the RFC:
aws amscm submit-rfc --rfc-idcommand with the returned RFC ID.IDMonitor the RFC:
aws amscm get-rfc --rfc-idcommand.ID
To check the change type version, use this command:
aws amscm list-change-type-version-summaries --filter Attribute=ChangeTypeId,Value=CT_ID
Note
You can use any CreateRfc parameters with any RFC whether or not they are part of the schema for the
change type. For example, to get notifications when the RFC status changes, add this line, --notification "{\"Email\": {\"EmailRecipients\" : [\"email@example.com\"]}}" to the
RFC parameters part of the request (not the execution parameters). For a list of all CreateRfc parameters, see the
AMS Change Management API Reference.
INLINE CREATE:
Issue the create RFC command with execution parameters provided inline (escape quotation marks when providing execution parameters inline), and then submit the returned RFC ID. For example, you can replace the contents with something like this:
aws amscm create-rfc --title "Update EC2 detailed monitoring" -update --change-type-id ct-0tmpmp1wpgkr9 --change-type-version 1.0 --execution-parameters '{"DocumentName":"AWSManagedServices-UpdateInstanceEnhancedMonitoring","Region":"us-east-1","Parameters":{"InstanceIds":["i-09d65b13db992e8d4","i-0cdbd78ad80d2378c"]}}'
TEMPLATE CREATE:
Output the execution parameters for this change type to a JSON file; this example names it UpdateEc2MonitoringParams.json:
aws amscm get-change-type-version --change-type-id "ct-0tmpmp1wpgkr9" --query "ChangeTypeVersion.ExecutionInputSchema" --output text > UpdateEc2MonitoringParams.jsonModify and save the UpdateEc2MonitoringParams file, retaining only the parameters that you want to change. For example, you can replace the contents with something like this:
{
  "DocumentName": "AWSManagedServices-UpdateInstanceEnhancedMonitoring",
  "Region": "us-east-1",
  "Parameters": {
    "InstanceIds": [
      "i-09d65b13db992e8d4",
      "i-0cdbd78ad80d2378c"
    ],
    "MonitoringValue": "enabled"
  }
}
Output the RFC template to a file in your current folder; this example names it UpdateEc2MonitoringRfc.json:
aws amscm create-rfc --generate-cli-skeleton > UpdateEc2MonitoringRfc.jsonModify and save the UpdateEc2MonitoringRfc.json file. For example, you can replace the contents with something like this:
{
"ChangeTypeVersion":    "1.0",
"ChangeTypeId":         "ct-0tmpmp1wpgkr9",
"Title":                "EC2 Update Detailed Monitoring"
}
Create the RFC, specifying the UpdateEc2MonitoringRfc file and the UpdateEc2MonitoringParams file:
aws amscm create-rfc --cli-input-json file://UpdateEc2MonitoringRfc.json --execution-parameters file://UpdateEc2MonitoringParams.jsonYou receive the ID of the new RFC in the response and can use it to submit and monitor the RFC. Until you submit it, the RFC remains in the editing state and does not start.
To learn more about Amazon EC2, see
Amazon Elastic Compute Cloud Documentation
Share directory
The following shows this change type in the AMS console.

How it works:
Navigate to the Create RFC page: In the left navigation pane of the AMS console click RFCs to open the RFCs list page, and then click Create RFC.
Choose a popular change type (CT) in the default Browse change types view, or select a CT in the Choose by category view.
Browse by change type: You can click on a popular CT in the Quick create area to immediately open the Run RFC page. Note that you cannot choose an older CT version with quick create.
To sort CTs, use the All change types area in either the Card or Table view. In either view, select a CT and then click Create RFC to open the Run RFC page. If applicable, a Create with older version option appears next to the Create RFC button.
Choose by category: Select a category, subcategory, item, and operation and the CT details box opens with an option to Create with older version if applicable. Click Create RFC to open the Run RFC page.
On the Run RFC page, open the CT name area to see the CT details box. A Subject is required (this is filled in for you if you choose your CT in the Browse change types view). Open the Additional configuration area to add information about the RFC.
In the Execution configuration area, use available drop-down lists or enter values for the required parameters. To configure optional execution parameters, open the Additional configuration area.
When finished, click Run. If there are no errors, the RFC successfully created page displays with the submitted RFC details, and the initial Run output.
Open the Run parameters area to see the configurations you submitted. Refresh the page to update the RFC execution status. Optionally, cancel the RFC or create a copy of it with the options at the top of the page.
How it works:
Use either the Inline Create (you issue a
create-rfccommand with all RFC and execution parameters included), or Template Create (you create two JSON files, one for the RFC parameters and one for the execution parameters) and issue thecreate-rfccommand with the two files as input. Both methods are described here.Submit the RFC:
aws amscm submit-rfc --rfc-idcommand with the returned RFC ID.IDMonitor the RFC:
aws amscm get-rfc --rfc-idcommand.ID
To check the change type version, use this command:
aws amscm list-change-type-version-summaries --filter Attribute=ChangeTypeId,Value=CT_ID
Note
You can use any CreateRfc parameters with any RFC whether or not they are part of the schema for the
change type. For example, to get notifications when the RFC status changes, add this line, --notification "{\"Email\": {\"EmailRecipients\" : [\"email@example.com\"]}}" to the
RFC parameters part of the request (not the execution parameters). For a list of all CreateRfc parameters, see the
AMS Change Management API Reference.
INLINE CREATE:
Issue the create RFC command with execution parameters provided inline (escape quotation marks when providing execution parameters inline), and then submit the returned RFC ID. For example, you can replace the contents with something like this:
aws amscm create-rfc --change-type-id "ct-369odosk0pd9w" --change-type-version "1.0" --title "Share Directory" --execution-parameters "{\"DocumentName\":\"AWSManagedServices-ShareDirectory\",\"Region\":\"ap-southeast-2\",\"Parameters\":{\"DirectoryId\":[\"d-123456ab7c\"],\"TargetAccountId\":[\"012345678912\"]}}"
TEMPLATE CREATE:
Output the execution parameters JSON schema for this change type to a file; this example names it DirectorySharingParams.json:
aws amscm get-change-type-version --change-type-id "ct-369odosk0pd9w" --query "ChangeTypeVersion.ExecutionInputSchema" --output text > DirectorySharingParams.jsonModify and save the DirectorySharingParams.json file. For example, you can replace the contents with something like this:
{
  "DocumentName": "AWSManagedServices-ShareDirectory",
  "Region": "us-east-1",
  "Parameters": {
    "DirectoryId": [
      "d-123456ab7c"
    ],
    "TargetAccountId": [
      "012345678912"
    ]
  }
}
Output the RFC template to a file in your current folder; this example names it DirectorySharingRfc.json:
aws amscm create-rfc --generate-cli-skeleton > DirectorySharingRfc.jsonModify and save the DirectorySharingRfc.json file. For example, you can replace the contents with something like this:
{
  "ChangeTypeId": "ct-369odosk0pd9w",
  "ChangeTypeVersion": "1.0",
  "Title": "Share Directory"
}
Create the RFC, specifying the DirectorySharingRfc file and the DirectorySharingParams file:
aws amscm create-rfc --cli-input-json file://DirectorySharingRfc.json --execution-parameters file://DirectorySharingParams.jsonYou receive the ID of the new RFC in the response and can use it to submit and monitor the RFC. Until you submit it, the RFC remains in the editing state and does not start.
For related CTs, see Directory Service Subcategory.
Unshare directory
The following shows this change type in the AMS console.

How it works:
Navigate to the Create RFC page: In the left navigation pane of the AMS console click RFCs to open the RFCs list page, and then click Create RFC.
Choose a popular change type (CT) in the default Browse change types view, or select a CT in the Choose by category view.
Browse by change type: You can click on a popular CT in the Quick create area to immediately open the Run RFC page. Note that you cannot choose an older CT version with quick create.
To sort CTs, use the All change types area in either the Card or Table view. In either view, select a CT and then click Create RFC to open the Run RFC page. If applicable, a Create with older version option appears next to the Create RFC button.
Choose by category: Select a category, subcategory, item, and operation and the CT details box opens with an option to Create with older version if applicable. Click Create RFC to open the Run RFC page.
On the Run RFC page, open the CT name area to see the CT details box. A Subject is required (this is filled in for you if you choose your CT in the Browse change types view). Open the Additional configuration area to add information about the RFC.
In the Execution configuration area, use available drop-down lists or enter values for the required parameters. To configure optional execution parameters, open the Additional configuration area.
When finished, click Run. If there are no errors, the RFC successfully created page displays with the submitted RFC details, and the initial Run output.
Open the Run parameters area to see the configurations you submitted. Refresh the page to update the RFC execution status. Optionally, cancel the RFC or create a copy of it with the options at the top of the page.
How it works:
Use either the Inline Create (you issue a
create-rfccommand with all RFC and execution parameters included), or Template Create (you create two JSON files, one for the RFC parameters and one for the execution parameters) and issue thecreate-rfccommand with the two files as input. Both methods are described here.Submit the RFC:
aws amscm submit-rfc --rfc-idcommand with the returned RFC ID.IDMonitor the RFC:
aws amscm get-rfc --rfc-idcommand.ID
To check the change type version, use this command:
aws amscm list-change-type-version-summaries --filter Attribute=ChangeTypeId,Value=CT_ID
Note
You can use any CreateRfc parameters with any RFC whether or not they are part of the schema for the
change type. For example, to get notifications when the RFC status changes, add this line, --notification "{\"Email\": {\"EmailRecipients\" : [\"email@example.com\"]}}" to the
RFC parameters part of the request (not the execution parameters). For a list of all CreateRfc parameters, see the
AMS Change Management API Reference.
INLINE CREATE:
Issue the create RFC command with execution parameters provided inline (escape quotation marks when providing execution parameters inline), and then submit the returned RFC ID. For example, you can replace the contents with something like this:
aws amscm create-rfc --change-type-id "ct-2xd2anlb5hbzo" --change-type-version "1.0" --title "Unshare Directory" --execution-parameters "{\"DocumentName\":\"AWSManagedServices-ShareDirectory\",\"Region\":\"ap-southeast-2\",\"Parameters\":{\"DirectoryId\":[\"d-123456ab7c\"],\"UnshareTarget\":[\"012345678912\"]}}"
TEMPLATE CREATE:
Output the execution parameters JSON schema for this change type to a file; this example names it DirectoryUnsharingParams.json:
aws amscm get-change-type-version --change-type-id "ct-2xd2anlb5hbzo" --query "ChangeTypeVersion.ExecutionInputSchema" --output text > DirectoryUnsharingParams.jsonModify and save the DirectoryUnsharingParams.json file. For example, you can replace the contents with something like this:
{
  "DocumentName": "AWSManagedServices-UnshareDirectory",
  "Region": "us-east-1",
  "Parameters": {
    "DirectoryId": [
      "d-123456ab7c"
    ],
    "UnshareTarget": [
      "012345678912"
    ]
  }
}
Output the RFC template to a file in your current folder; this example names it DirectoryUnsharingRfc.json:
aws amscm create-rfc --generate-cli-skeleton > DirectoryUnsharingRfc.jsonModify and save the DirectoryUnsharingRfc.json file. For example, you can replace the contents with something like this:
{
  "ChangeTypeId": "ct-2xd2anlb5hbzo",
  "ChangeTypeVersion": "1.0",
  "Title": "Unshare Directory"
}
Create the RFC, specifying the DirectoryUnsharingRfc file and the DirectoryUnsharingParams file:
aws amscm create-rfc --cli-input-json file://DirectoryUnsharingRfc.json --execution-parameters file://DirectoryUnsharingParams.jsonYou receive the ID of the new RFC in the response and can use it to submit and monitor the RFC. Until you submit it, the RFC remains in the editing state and does not start.
For related CTs, see Directory Service Subcategory.
Create VPC endpoint
The following shows this change type in the AMS console.
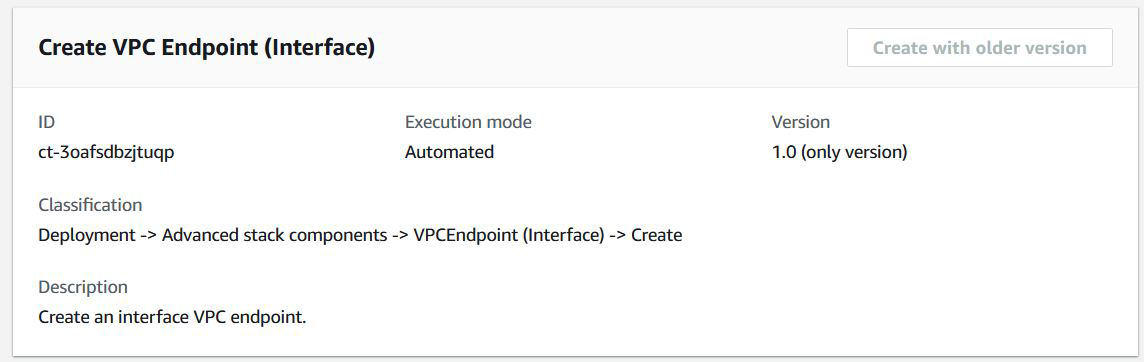
How it works:
Navigate to the Create RFC page: In the left navigation pane of the AMS console click RFCs to open the RFCs list page, and then click Create RFC.
Choose a popular change type (CT) in the default Browse change types view, or select a CT in the Choose by category view.
Browse by change type: You can click on a popular CT in the Quick create area to immediately open the Run RFC page. Note that you cannot choose an older CT version with quick create.
To sort CTs, use the All change types area in either the Card or Table view. In either view, select a CT and then click Create RFC to open the Run RFC page. If applicable, a Create with older version option appears next to the Create RFC button.
Choose by category: Select a category, subcategory, item, and operation and the CT details box opens with an option to Create with older version if applicable. Click Create RFC to open the Run RFC page.
On the Run RFC page, open the CT name area to see the CT details box. A Subject is required (this is filled in for you if you choose your CT in the Browse change types view). Open the Additional configuration area to add information about the RFC.
In the Execution configuration area, use available drop-down lists or enter values for the required parameters. To configure optional execution parameters, open the Additional configuration area.
When finished, click Run. If there are no errors, the RFC successfully created page displays with the submitted RFC details, and the initial Run output.
Open the Run parameters area to see the configurations you submitted. Refresh the page to update the RFC execution status. Optionally, cancel the RFC or create a copy of it with the options at the top of the page.
How it works:
Use either the Inline Create (you issue a
create-rfccommand with all RFC and execution parameters included), or Template Create (you create two JSON files, one for the RFC parameters and one for the execution parameters) and issue thecreate-rfccommand with the two files as input. Both methods are described here.Submit the RFC:
aws amscm submit-rfc --rfc-idcommand with the returned RFC ID.IDMonitor the RFC:
aws amscm get-rfc --rfc-idcommand.ID
To check the change type version, use this command:
aws amscm list-change-type-version-summaries --filter Attribute=ChangeTypeId,Value=CT_ID
Note
You can use any CreateRfc parameters with any RFC whether or not they are part of the schema for the
change type. For example, to get notifications when the RFC status changes, add this line, --notification "{\"Email\": {\"EmailRecipients\" : [\"email@example.com\"]}}" to the
RFC parameters part of the request (not the execution parameters). For a list of all CreateRfc parameters, see the
AMS Change Management API Reference.
INLINE CREATE:
Issue the create RFC command with execution parameters provided inline (escape quotation marks when providing execution parameters inline) and then submit the returned RFC ID. For example, you can replace the contents with something like this:
aws amscm create-rfc --change-type-id "ct-3oafsdbzjtuqp" --change-type-version "1.0" --title "Create VPC Endpoint" --execution-parameters "{\"Description\":\"VPC endpoint interface\",\"VpcId\":\"vpc-1234567890abcdef0\",\"Name\":\"VPC endpoint interface\",\"StackTemplateId\":\"stm-f0cumpt1rfc1p1739\",\"TimeoutInMinutes\":60,\"Parameters\":{\"VpcId\":\"vpc-1234567890abcdef0\",\"ServiceName\":\"com.amazonaws.us-east-1.codedeploy\",\"SecurityGroups\":[\"sg-1234567890abcdef0\",\"sg-1234567890abcdef1\"],\"SubnetIds\":[\"subnet-1234567890abcdef0\",\"subnet-1234567890abcdef1\"],\"EnablePrivateDns\":\"false\"}}"
TEMPLATE CREATE:
Output the execution parameters JSON schema for this change type; this example names it VPCEndpointCreateParams.json:
aws amscm get-change-type-version --change-type-id "ct-3oafsdbzjtuqp" --query "ChangeTypeVersion.ExecutionInputSchema" --output text > VPCEndpointCreateParams.jsonModify and save the execution parameters as VPCEndpointCreateParams.json. For example, you can replace the contents with something like this:
{ "Description": "VPC endpoint interface", "VpcId": "vpc-1234567890abcdef0", "Name": "VPC endpoint interface", "StackTemplateId": "stm-f0cumpt1rfc1p1739", "TimeoutInMinutes":60, "Parameters": { "VpcId": "vpc-1234567890abcdef0", "ServiceName": "com.amazonaws.us-east-1.codedeploy", "SecurityGroups": [ "sg-1234567890abcdef0", "sg-1234567890abcdef1" ], "SubnetIds": [ "subnet-1234567890abcdef0", "subnet-1234567890abcdef1" ], "EnablePrivateDns": "false" } }Output the RFC template JSON file; this example names it VPCEndpointCreateRfc.json:
aws amscm create-rfc --generate-cli-skeleton > VPCEndpointCreateRfc.jsonModify and save the VPNGatewayCreateRfc.json file. For example, you can replace the contents with something like this:
{ "ChangeTypeVersion" : "1.0", "ChangeTypeId" : "ct-3oafsdbzjtuqp", "Title" : "Create VPC Endpoint" }Create the RFC, specifying the VPCEndpointCreateRfc file and the VPCEndpointCreateParams file:
aws amscm create-rfc --cli-input-json file://VPCEndpointCreateRfc.json --execution-parameters file://VPCEndpointCreateParams.jsonYou receive the ID of the new RFC in the response and can use it to submit and monitor the RFC. Until you submit it, the RFC remains in the editing state and does not start.
Update RDS storage
Screenshot of this change type in the AMS console:

How it works:
Navigate to the Create RFC page: In the left navigation pane of the AMS console click RFCs to open the RFCs list page, and then click Create RFC.
Choose a popular change type (CT) in the default Browse change types view, or select a CT in the Choose by category view.
Browse by change type: You can click on a popular CT in the Quick create area to immediately open the Run RFC page. Note that you cannot choose an older CT version with quick create.
To sort CTs, use the All change types area in either the Card or Table view. In either view, select a CT and then click Create RFC to open the Run RFC page. If applicable, a Create with older version option appears next to the Create RFC button.
Choose by category: Select a category, subcategory, item, and operation and the CT details box opens with an option to Create with older version if applicable. Click Create RFC to open the Run RFC page.
On the Run RFC page, open the CT name area to see the CT details box. A Subject is required (this is filled in for you if you choose your CT in the Browse change types view). Open the Additional configuration area to add information about the RFC.
In the Execution configuration area, use available drop-down lists or enter values for the required parameters. To configure optional execution parameters, open the Additional configuration area.
When finished, click Run. If there are no errors, the RFC successfully created page displays with the submitted RFC details, and the initial Run output.
Open the Run parameters area to see the configurations you submitted. Refresh the page to update the RFC execution status. Optionally, cancel the RFC or create a copy of it with the options at the top of the page.
How it works:
Use either the Inline Create (you issue a
create-rfccommand with all RFC and execution parameters included), or Template Create (you create two JSON files, one for the RFC parameters and one for the execution parameters) and issue thecreate-rfccommand with the two files as input. Both methods are described here.Submit the RFC:
aws amscm submit-rfc --rfc-idcommand with the returned RFC ID.IDMonitor the RFC:
aws amscm get-rfc --rfc-idcommand.ID
To check the change type version, use this command:
aws amscm list-change-type-version-summaries --filter Attribute=ChangeTypeId,Value=CT_ID
Note
You can use any CreateRfc parameters with any RFC whether or not they are part of the schema for the
change type. For example, to get notifications when the RFC status changes, add this line, --notification "{\"Email\": {\"EmailRecipients\" : [\"email@example.com\"]}}" to the
RFC parameters part of the request (not the execution parameters). For a list of all CreateRfc parameters, see the
AMS Change Management API Reference.
INLINE CREATE:
Issue the create RFC command with execution parameters provided inline (escape quotation marks when providing execution parameters inline), and then submit the returned RFC ID. For example, you can replace the contents with something like this:
aws amscm create-rfc --change-type-id "ct-0loed9dzig1ze" --change-type-version "1.0" --title "Update RDS storage" --execution-parameters "{\"DocumentName\":\"AWSManagedServices-UpdateRDSStorage\",\"Region\":\"us-east-1\",\"Parameters\": {\"DBInstanceIdentifier\":[\"rt123456789\"], \"AllocatedStorage\": [\"100\"],,\"ApplyImmediately\": \"true\"}}"
TEMPLATE CREATE:
Output the execution parameters for this change type to a JSON file named UpdateStorageParams.json.
aws amscm get-change-type-version --change-type-id "ct-0loed9dzig1ze" --query "ChangeTypeVersion.ExecutionInputSchema" --output text > UpdateStorageParams.jsonModify and save the execution parameters JSON file. For example, you can replace the contents with something like this:
{
  "DocumentName": "AWSManagedServices-UpdateRDSStorage",
  "Region": "us-east-1",
  "Parameters": {
    "DBInstanceIdentifier": [
      "rt123456789"
    ],
    "AllocatedStorage": [
      "100"
    ],
    "ApplyImmediately": "false"
  }
}
Output the JSON template to a file in your current folder; this example names it UpdateStorageRfc.json:
aws amscm create-rfc --generate-cli-skeleton > UpdateStorageRfc.jsonModify and save the UpdateStorageRfc.json file. For example, you can replace the contents with something like this:
{
"ChangeTypeVersion":    "1.0",
"ChangeTypeId":         "ct-0loed9dzig1ze",
"Title":                "Update RDS storage"
}
Create the RFC, specifying the execution parameters file and the UpdateStorageRfc file:
aws amscm create-rfc --cli-input-json file://UpdateStorageRfc.json --execution-parameters file://UpdateStorageParams.jsonYou receive the ID of the new RFC in the response and can use it to submit and monitor the RFC. Until you submit it, the RFC remains in the editing state and does not start.
Note
AMS employs drift detection on certain stacks, including RDS stacks, to determine if configuration changes. The AMS disallows updates to an RDS stack that has been determined to have configuration drift. The RFC will fail with the following error message: "Update cannot be performed on this stack, please contact AMS for further assistance."
To learn more about Amazon RDS, including size recommendations, see
Amazon Relational Database Service Documentation
To update an RDS stack for Aurora, see RDS Database Stack | Update.
Update an RDS multi-AZ deployment
Screenshot of this change type in the AMS console:
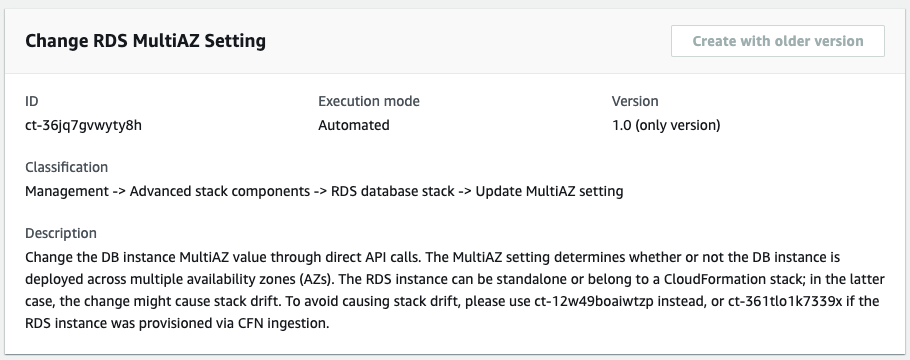
How it works:
Navigate to the Create RFC page: In the left navigation pane of the AMS console click RFCs to open the RFCs list page, and then click Create RFC.
Choose a popular change type (CT) in the default Browse change types view, or select a CT in the Choose by category view.
Browse by change type: You can click on a popular CT in the Quick create area to immediately open the Run RFC page. Note that you cannot choose an older CT version with quick create.
To sort CTs, use the All change types area in either the Card or Table view. In either view, select a CT and then click Create RFC to open the Run RFC page. If applicable, a Create with older version option appears next to the Create RFC button.
Choose by category: Select a category, subcategory, item, and operation and the CT details box opens with an option to Create with older version if applicable. Click Create RFC to open the Run RFC page.
On the Run RFC page, open the CT name area to see the CT details box. A Subject is required (this is filled in for you if you choose your CT in the Browse change types view). Open the Additional configuration area to add information about the RFC.
In the Execution configuration area, use available drop-down lists or enter values for the required parameters. To configure optional execution parameters, open the Additional configuration area.
When finished, click Run. If there are no errors, the RFC successfully created page displays with the submitted RFC details, and the initial Run output.
Open the Run parameters area to see the configurations you submitted. Refresh the page to update the RFC execution status. Optionally, cancel the RFC or create a copy of it with the options at the top of the page.
How it works:
Use either the Inline Create (you issue a
create-rfccommand with all RFC and execution parameters included), or Template Create (you create two JSON files, one for the RFC parameters and one for the execution parameters) and issue thecreate-rfccommand with the two files as input. Both methods are described here.Submit the RFC:
aws amscm submit-rfc --rfc-idcommand with the returned RFC ID.IDMonitor the RFC:
aws amscm get-rfc --rfc-idcommand.ID
To check the change type version, use this command:
aws amscm list-change-type-version-summaries --filter Attribute=ChangeTypeId,Value=CT_ID
Note
You can use any CreateRfc parameters with any RFC whether or not they are part of the schema for the
change type. For example, to get notifications when the RFC status changes, add this line, --notification "{\"Email\": {\"EmailRecipients\" : [\"email@example.com\"]}}" to the
RFC parameters part of the request (not the execution parameters). For a list of all CreateRfc parameters, see the
AMS Change Management API Reference.
INLINE CREATE:
Issue the create RFC command with execution parameters provided inline (escape quotation marks when providing execution parameters inline), and then submit the returned RFC ID. For example, you can replace the contents with something like this:
aws amscm create-rfc --change-type-id "ct-36jq7gvwyty8h" --change-type-version "1.0" --title "Update RDS Multiple AZ" --execution-parameters "{\"DocumentName\":\"AWSManagedServices-UpdateRDSMultiAZ\",\"Region\":\"us-east-1\",\"Parameters\": {\"DBInstanceIdentifier\":[\"rt123456789\"], \"MultiAZ\": \"true\",\"ApplyImmediately\": \"true\"}}"
TEMPLATE CREATE:
Output the execution parameters for this change type to a JSON file named UpdateMultipleAzParams.json.
aws amscm get-change-type-version --change-type-id "ct-36jq7gvwyty8h" --query "ChangeTypeVersion.ExecutionInputSchema" --output text > UpdateMultipleAzParams.jsonModify and save the execution parameters JSON file. For example, you can replace the contents with something like this:
{
  "DocumentName": "AWSManagedServices-UpdateRDSMultiAZ",
  "Region": "us-east-1",
  "Parameters": {
    "DBInstanceIdentifier": [
      "rt123456789"
    ],
    "MultiAZ": "true",
    "ApplyImmediately": "false"
  }
}
Output the JSON template to a file in your current folder; this example names it UpdateMultipleAzRfc.json:
aws amscm create-rfc --generate-cli-skeleton > UpdateMultipleAzRfc.jsonModify and save the UpdateMultipleAzRfc.json file. For example, you can replace the contents with something like this:
{
"ChangeTypeVersion":    "1.0",
"ChangeTypeId":         "ct-36jq7gvwyty8h",
"Title":                "Update RDS Multiple AZ"
}
Create the RFC, specifying the execution parameters file and the UpdateMultipleAzRfc file:
aws amscm create-rfc --cli-input-json file://UpdateMultipleAzRfc.json --execution-parameters file://UpdateMultipleAzParams.jsonYou receive the ID of the new RFC in the response and can use it to submit and monitor the RFC. Until you submit it, the RFC remains in the editing state and does not start.
Note
AMS employs drift detection on certain stacks, including RDS stacks, to determine if configuration changes. The AMS disallows updates to an RDS stack that has been determined to have configuration drift. The RFC will fail with the following error message: "Update cannot be performed on this stack, please contact AMS for further assistance."
To learn more about Amazon RDS, including size recommendations, see
Amazon Relational Database Service Documentation
To update an RDS stack for Aurora, see RDS Database Stack | Update.
Update an RDS instance type
Screenshot of this change type in the AMS console:
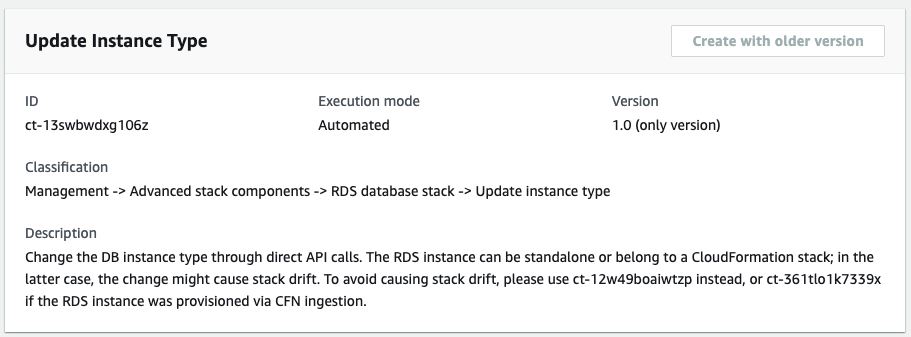
How it works:
Navigate to the Create RFC page: In the left navigation pane of the AMS console click RFCs to open the RFCs list page, and then click Create RFC.
Choose a popular change type (CT) in the default Browse change types view, or select a CT in the Choose by category view.
Browse by change type: You can click on a popular CT in the Quick create area to immediately open the Run RFC page. Note that you cannot choose an older CT version with quick create.
To sort CTs, use the All change types area in either the Card or Table view. In either view, select a CT and then click Create RFC to open the Run RFC page. If applicable, a Create with older version option appears next to the Create RFC button.
Choose by category: Select a category, subcategory, item, and operation and the CT details box opens with an option to Create with older version if applicable. Click Create RFC to open the Run RFC page.
On the Run RFC page, open the CT name area to see the CT details box. A Subject is required (this is filled in for you if you choose your CT in the Browse change types view). Open the Additional configuration area to add information about the RFC.
In the Execution configuration area, use available drop-down lists or enter values for the required parameters. To configure optional execution parameters, open the Additional configuration area.
When finished, click Run. If there are no errors, the RFC successfully created page displays with the submitted RFC details, and the initial Run output.
Open the Run parameters area to see the configurations you submitted. Refresh the page to update the RFC execution status. Optionally, cancel the RFC or create a copy of it with the options at the top of the page.
How it works:
Use either the Inline Create (you issue a
create-rfccommand with all RFC and execution parameters included), or Template Create (you create two JSON files, one for the RFC parameters and one for the execution parameters) and issue thecreate-rfccommand with the two files as input. Both methods are described here.Submit the RFC:
aws amscm submit-rfc --rfc-idcommand with the returned RFC ID.IDMonitor the RFC:
aws amscm get-rfc --rfc-idcommand.ID
To check the change type version, use this command:
aws amscm list-change-type-version-summaries --filter Attribute=ChangeTypeId,Value=CT_ID
Note
You can use any CreateRfc parameters with any RFC whether or not they are part of the schema for the
change type. For example, to get notifications when the RFC status changes, add this line, --notification "{\"Email\": {\"EmailRecipients\" : [\"email@example.com\"]}}" to the
RFC parameters part of the request (not the execution parameters). For a list of all CreateRfc parameters, see the
AMS Change Management API Reference.
INLINE CREATE:
Issue the create RFC command with execution parameters provided inline (escape quotation marks when providing execution parameters inline), and then submit the returned RFC ID. For example, you can replace the contents with something like this:
aws amscm create-rfc --change-type-id "ct-13swbwdxg106z" --change-type-version "1.0" --title "Update rds instance type" --execution-parameters "{\"DocumentName\":\"AWSManagedServices-UpdateRDSInstanceType\",\"Region\":\"us-east-1\",\"Parameters\": {\"DBInstanceIdentifier\":[\"rt123456789\"], \"DBInstanceClass\": [\"db.m4.large\"],\"ApplyImmediately\": \"true\"}}"
TEMPLATE CREATE:
Output the execution parameters for this change type to a JSON file named UpdateInstanceTypeParams.json.
aws amscm get-change-type-version --change-type-id "ct-13swbwdxg106z" --query "ChangeTypeVersion.ExecutionInputSchema" --output text > UpdateInstanceTypeParams.jsonModify and save the execution parameters JSON file. For example, you can replace the contents with something like this:
{
  "DocumentName": "AWSManagedServices-UpdateRDSInstanceType",
  "Region": "us-east-1",
  "Parameters": {
    "DBInstanceIdentifier": [
      "rt123456789"
    ],
    "DBInstanceClass": [
      "db.m4.large"
    ],
    "ApplyImmediately": "false"
  }
}
Output the JSON template to a file in your current folder; this example names it UpdateInstanceTypeRfc.json:
aws amscm create-rfc --generate-cli-skeleton > UpdateInstanceTypeRfc.jsonModify and save the UpdateInstanceTypeRfc.json file. For example, you can replace the contents with something like this:
{
"ChangeTypeVersion":    "1.0",
"ChangeTypeId":         "ct-13swbwdxg106z",
"Title":                "Update RDS instance type"
}
Create the RFC, specifying the execution parameters file and the UpdateInstanceTypeRfc file:
aws amscm create-rfc --cli-input-json file://UpdateInstanceTypeRfc.json --execution-parameters file://UpdateInstanceTypeParams.jsonYou receive the ID of the new RFC in the response and can use it to submit and monitor the RFC. Until you submit it, the RFC remains in the editing state and does not start.
Note
AMS employs drift detection on certain stacks, including RDS stacks, to determine if configuration changes. The AMS disallows updates to an RDS stack that has been determined to have configuration drift. The RFC will fail with the following error message: "Update cannot be performed on this stack, please contact AMS for further assistance."
To learn more about Amazon RDS, including size recommendations, see
Amazon Relational Database Service Documentation
To update an RDS stack for Aurora, see RDS Database Stack | Update.
Update S3 bucket versioning
Screenshot of this change type in the AMS console:

How it works:
Navigate to the Create RFC page: In the left navigation pane of the AMS console click RFCs to open the RFCs list page, and then click Create RFC.
Choose a popular change type (CT) in the default Browse change types view, or select a CT in the Choose by category view.
Browse by change type: You can click on a popular CT in the Quick create area to immediately open the Run RFC page. Note that you cannot choose an older CT version with quick create.
To sort CTs, use the All change types area in either the Card or Table view. In either view, select a CT and then click Create RFC to open the Run RFC page. If applicable, a Create with older version option appears next to the Create RFC button.
Choose by category: Select a category, subcategory, item, and operation and the CT details box opens with an option to Create with older version if applicable. Click Create RFC to open the Run RFC page.
On the Run RFC page, open the CT name area to see the CT details box. A Subject is required (this is filled in for you if you choose your CT in the Browse change types view). Open the Additional configuration area to add information about the RFC.
In the Execution configuration area, use available drop-down lists or enter values for the required parameters. To configure optional execution parameters, open the Additional configuration area.
When finished, click Run. If there are no errors, the RFC successfully created page displays with the submitted RFC details, and the initial Run output.
Open the Run parameters area to see the configurations you submitted. Refresh the page to update the RFC execution status. Optionally, cancel the RFC or create a copy of it with the options at the top of the page.
How it works:
Use either the Inline Create (you issue a
create-rfccommand with all RFC and execution parameters included), or Template Create (you create two JSON files, one for the RFC parameters and one for the execution parameters) and issue thecreate-rfccommand with the two files as input. Both methods are described here.Submit the RFC:
aws amscm submit-rfc --rfc-idcommand with the returned RFC ID.IDMonitor the RFC:
aws amscm get-rfc --rfc-idcommand.ID
To check the change type version, use this command:
aws amscm list-change-type-version-summaries --filter Attribute=ChangeTypeId,Value=CT_ID
Note
You can use any CreateRfc parameters with any RFC whether or not they are part of the schema for the
change type. For example, to get notifications when the RFC status changes, add this line, --notification "{\"Email\": {\"EmailRecipients\" : [\"email@example.com\"]}}" to the
RFC parameters part of the request (not the execution parameters). For a list of all CreateRfc parameters, see the
AMS Change Management API Reference.
INLINE CREATE:
Issue the create RFC command with execution parameters provided inline (escape quotation marks when providing execution parameters inline), and then submit the returned RFC ID. For example, you can replace the contents with something like this:
aws amscm create-rfc --change-type-id "ct-2hh93eyzmwbkd" --change-type-version "1.0" --title "Update bucket versioning" --execution-parameters "{\"DocumentName\":\"AWSManagedServices-UpdateBucketVersioning\",\"Region\":\"us-east-1\",\"Parameters\":{\"BucketName\":[\"BucketName\"],\"Versioning\": \"Enabled\"}}"
TEMPLATE CREATE:
Output the execution parameters for this change type to a JSON file named UpdateBucketVersioningParams.json.
aws amscm get-change-type-version --change-type-id "ct-2hh93eyzmwbkd" --query "ChangeTypeVersion.ExecutionInputSchema" --output text > UpdateBucketVersioningParams.jsonModify and save the execution parameters JSON file. For example, you can replace the contents with something like this:
{
  "DocumentName": "AWSManagedServices-UpdateBucketVersioning",
  "Region": "us-east-1",
  "Parameters": {
    "BucketName": [
      "BucketName"
    ],
    "Versioning": "Enabled"
  }
}
Output the JSON template to a file in your current folder; this example names it UpdateBucketVersioningRfc.json:
aws amscm create-rfc --generate-cli-skeleton > UpdateBucketVersioningRfc.jsonModify and save the UpdateBucketVersioningRfc.json file. For example, you can replace the contents with something like this:
{
"ChangeTypeVersion":    "1.0",
"ChangeTypeId":         "ct-2hh93eyzmwbkd",
"Title":                "Update bucket versioning"
}
Create the RFC, specifying the execution parameters file and the UpdateRdsRfc file:
aws amscm create-rfc --cli-input-json file://UpdateBucketVersioningRfc.json --execution-parameters file://UpdateBucketVersioningParams.jsonYou receive the ID of the new RFC in the response and can use it to submit and monitor the RFC. Until you submit it, the RFC remains in the editing state and does not start.
To learn more about Amazon S3, see Amazon Simple Storage Service Documentation
Update S3 bucket encryption
Screenshot of this change type in the AMS console:

How it works:
Navigate to the Create RFC page: In the left navigation pane of the AMS console click RFCs to open the RFCs list page, and then click Create RFC.
Choose a popular change type (CT) in the default Browse change types view, or select a CT in the Choose by category view.
Browse by change type: You can click on a popular CT in the Quick create area to immediately open the Run RFC page. Note that you cannot choose an older CT version with quick create.
To sort CTs, use the All change types area in either the Card or Table view. In either view, select a CT and then click Create RFC to open the Run RFC page. If applicable, a Create with older version option appears next to the Create RFC button.
Choose by category: Select a category, subcategory, item, and operation and the CT details box opens with an option to Create with older version if applicable. Click Create RFC to open the Run RFC page.
On the Run RFC page, open the CT name area to see the CT details box. A Subject is required (this is filled in for you if you choose your CT in the Browse change types view). Open the Additional configuration area to add information about the RFC.
In the Execution configuration area, use available drop-down lists or enter values for the required parameters. To configure optional execution parameters, open the Additional configuration area.
When finished, click Run. If there are no errors, the RFC successfully created page displays with the submitted RFC details, and the initial Run output.
Open the Run parameters area to see the configurations you submitted. Refresh the page to update the RFC execution status. Optionally, cancel the RFC or create a copy of it with the options at the top of the page.
How it works:
Use either the Inline Create (you issue a
create-rfccommand with all RFC and execution parameters included), or Template Create (you create two JSON files, one for the RFC parameters and one for the execution parameters) and issue thecreate-rfccommand with the two files as input. Both methods are described here.Submit the RFC:
aws amscm submit-rfc --rfc-idcommand with the returned RFC ID.IDMonitor the RFC:
aws amscm get-rfc --rfc-idcommand.ID
To check the change type version, use this command:
aws amscm list-change-type-version-summaries --filter Attribute=ChangeTypeId,Value=CT_ID
Note
You can use any CreateRfc parameters with any RFC whether or not they are part of the schema for the
change type. For example, to get notifications when the RFC status changes, add this line, --notification "{\"Email\": {\"EmailRecipients\" : [\"email@example.com\"]}}" to the
RFC parameters part of the request (not the execution parameters). For a list of all CreateRfc parameters, see the
AMS Change Management API Reference.
INLINE CREATE:
Issue the create RFC command with execution parameters provided inline (escape quotation marks when providing execution parameters inline), and then submit the returned RFC ID. For example, you can replace the contents with something like this:
aws amscm create-rfc --change-type-id "ct-128svy9nn2yj8" --change-type-version "1.0" --title "Update bucket encryption" --execution-parameters "{\"DocumentName\":\"AWSManagedServices-UpdateBucketEncryption\",\"Region\":\"us-east-1\",\"Parameters\":{\"BucketName\":[\"BucketName\"],\"ServerSideEncryption\": \"KmsManagedKeys\",\"KMSKeyId\":[\"01234567-abcd-abcd-abcd-0123456789ab\"]}}"
TEMPLATE CREATE:
Output the execution parameters for this change type to a JSON file named UpdateBucketEncryptionParams.json.
aws amscm get-change-type-version --change-type-id "ct-128svy9nn2yj8" --query "ChangeTypeVersion.ExecutionInputSchema" --output text > UpdateBucketEncryptionParams.jsonModify and save the execution parameters JSON file. For example, you can replace the contents with something like this:
{
  "DocumentName": "AWSManagedServices-UpdateBucketEncryption",
  "Region": "us-east-1",
  "Parameters": {
    "BucketName": [
      "BucketName"
    ],
    "ServerSideEncryption": "KmsManagedKeys",
    "KMSKeyId": [
      "01234567-abcd-abcd-abcd-0123456789ab"
    ]
  }
}
Output the JSON template to a file in your current folder; this example names it UpdateBucketEncryptionRfc.json:
aws amscm create-rfc --generate-cli-skeleton > UpdateBucketEncryptionRfc.jsonModify and save the UpdateBucketEncryptionRfc.json file. For example, you can replace the contents with something like this:
{
"ChangeTypeVersion":    "1.0",
"ChangeTypeId":         "ct-128svy9nn2yj8",
"Title":                "Update bucket encryption"
}
Create the RFC, specifying the execution parameters file and the UpdateBucketEncryptionRfc file:
aws amscm create-rfc --cli-input-json file://UpdateBucketEncryptionRfc.json --execution-parameters file://UpdateBucketEncryptionParams.jsonYou receive the ID of the new RFC in the response and can use it to submit and monitor the RFC. Until you submit it, the RFC remains in the editing state and does not start.
To learn more about Amazon S3, see Amazon Simple Storage Service Documentation
Updating an application account (Managed Automation)
Screenshot of this change type in the AMS console:

How it works:
Navigate to the Create RFC page: In the left navigation pane of the AMS console click RFCs to open the RFCs list page, and then click Create RFC.
Choose a popular change type (CT) in the default Browse change types view, or select a CT in the Choose by category view.
Browse by change type: You can click on a popular CT in the Quick create area to immediately open the Run RFC page. Note that you cannot choose an older CT version with quick create.
To sort CTs, use the All change types area in either the Card or Table view. In either view, select a CT and then click Create RFC to open the Run RFC page. If applicable, a Create with older version option appears next to the Create RFC button.
Choose by category: Select a category, subcategory, item, and operation and the CT details box opens with an option to Create with older version if applicable. Click Create RFC to open the Run RFC page.
On the Run RFC page, open the CT name area to see the CT details box. A Subject is required (this is filled in for you if you choose your CT in the Browse change types view). Open the Additional configuration area to add information about the RFC.
In the Execution configuration area, use available drop-down lists or enter values for the required parameters. To configure optional execution parameters, open the Additional configuration area.
When finished, click Run. If there are no errors, the RFC successfully created page displays with the submitted RFC details, and the initial Run output.
Open the Run parameters area to see the configurations you submitted. Refresh the page to update the RFC execution status. Optionally, cancel the RFC or create a copy of it with the options at the top of the page.
How it works:
Use either the Inline Create (you issue a
create-rfccommand with all RFC and execution parameters included), or Template Create (you create two JSON files, one for the RFC parameters and one for the execution parameters) and issue thecreate-rfccommand with the two files as input. Both methods are described here.Submit the RFC:
aws amscm submit-rfc --rfc-idcommand with the returned RFC ID.IDMonitor the RFC:
aws amscm get-rfc --rfc-idcommand.ID
To check the change type version, use this command:
aws amscm list-change-type-version-summaries --filter Attribute=ChangeTypeId,Value=CT_ID
Note
You can use any CreateRfc parameters with any RFC whether or not they are part of the schema for the
change type. For example, to get notifications when the RFC status changes, add this line, --notification "{\"Email\": {\"EmailRecipients\" : [\"email@example.com\"]}}" to the
RFC parameters part of the request (not the execution parameters). For a list of all CreateRfc parameters, see the
AMS Change Management API Reference.
INLINE CREATE:
Note
Run this change type from your Application account.
Issue the create RFC command with execution parameters provided inline (escape quotes when providing execution parameters inline), and then submit the returned RFC ID. For example, you can replace the contents with something like this:
aws amscm create-rfc --change-type-id "ct-0fuztxgwy37rf" --change-type-version "1.0" --title "Child Application Account RFC" --execution-parameters ""{\"RfcId\":\"7cc277c6-9b55-1f63-361b-5811fce9f830\",\"Comment\":\"test RFC\"}""
TEMPLATE CREATE:
-
Output the execution parameters JSON schema for this change type to a file; this example names it CreateAppAcctVpcParams.json:
aws amscm get-change-type-version --change-type-id "ct-0fuztxgwy37rf" --query "ChangeTypeVersion.ExecutionInputSchema" --output text > UpdateAppAcctParams.json Modify and save the UpdateAppAcctParams file. For example, you can replace the contents with something like this:
{ "RfcId": "7cc277c6-9b55-1f63-361b-5811fce9f830", "Comment": "test RFC" }-
Output the RFC template JSON file to a file; this example names it UpdateAppAcctRfc.json:
aws amscm create-rfc --generate-cli-skeleton > UpdateAppAcctRfc.json Modify and save the UpdateAppAcctRfc.json file. For example, you can replace the contents with something like this:
{
"ChangeTypeVersion":    "1.0",
"ChangeTypeId":         "ct-0fuztxgwy37rf",
"Title":                "Child Application Account RFC"
}
Create the RFC, specifying the UpdateAppAcctRfc file and the UpdateAppAcctParams file:
aws amscm create-rfc --cli-input-json file://UpdateAppAcctRfc.json --execution-parameters file://UpdateAppAcctParams.jsonYou receive the ID of the new RFC in the response and can use it to submit and monitor the RFC. Until you submit it, the RFC remains in the editing state and does not start.
Important
To create an additional public subnet in a new availability zone (AZ), a private subnet must already be present.
This change type is now at version 3.0 and it has been automated (it is no longer manually run by AMS). The 2.0 version of this change type was a "managed automation" (manual) change type.
To learn more about AMS multi-account landing zone, see VPC sharing: A new approach to multiple accounts and VPC management
.
Associate private IP addresses (Managed Automation) ct-1pvlhug439gl2
The following shows this change type in the AMS console.

How it works:
Navigate to the Create RFC page: In the left navigation pane of the AMS console click RFCs to open the RFCs list page, and then click Create RFC.
Choose a popular change type (CT) in the default Browse change types view, or select a CT in the Choose by category view.
Browse by change type: You can click on a popular CT in the Quick create area to immediately open the Run RFC page. Note that you cannot choose an older CT version with quick create.
To sort CTs, use the All change types area in either the Card or Table view. In either view, select a CT and then click Create RFC to open the Run RFC page. If applicable, a Create with older version option appears next to the Create RFC button.
Choose by category: Select a category, subcategory, item, and operation and the CT details box opens with an option to Create with older version if applicable. Click Create RFC to open the Run RFC page.
On the Run RFC page, open the CT name area to see the CT details box. A Subject is required (this is filled in for you if you choose your CT in the Browse change types view). Open the Additional configuration area to add information about the RFC.
In the Execution configuration area, use available drop-down lists or enter values for the required parameters. To configure optional execution parameters, open the Additional configuration area.
When finished, click Run. If there are no errors, the RFC successfully created page displays with the submitted RFC details, and the initial Run output.
Open the Run parameters area to see the configurations you submitted. Refresh the page to update the RFC execution status. Optionally, cancel the RFC or create a copy of it with the options at the top of the page.
How it works:
Use either the Inline Create (you issue a
create-rfccommand with all RFC and execution parameters included), or Template Create (you create two JSON files, one for the RFC parameters and one for the execution parameters) and issue thecreate-rfccommand with the two files as input. Both methods are described here.Submit the RFC:
aws amscm submit-rfc --rfc-idcommand with the returned RFC ID.IDMonitor the RFC:
aws amscm get-rfc --rfc-idcommand.ID
To check the change type version, use this command:
aws amscm list-change-type-version-summaries --filter Attribute=ChangeTypeId,Value=CT_ID
Note
You can use any CreateRfc parameters with any RFC whether or not they are part of the schema for the
change type. For example, to get notifications when the RFC status changes, add this line, --notification "{\"Email\": {\"EmailRecipients\" : [\"email@example.com\"]}}" to the
RFC parameters part of the request (not the execution parameters). For a list of all CreateRfc parameters, see the
AMS Change Management API Reference.
INLINE CREATE:
Issue the create RFC command with execution parameters provided inline (escape quotation marks when providing execution parameters inline), and then submit the returned RFC ID. For example, you can replace the contents with something like this:
aws amscm create-rfc --title="Associate Private IP Addresses" --description="Associate Private IP Addresses" --ct-id="ct-1pvlhug439gl2" --ct-version="1.0" --input-params="{\"NetworkInterfaceId\":\"eni-0123456789abcdef0\",\"PrivateIpAddresses\":[\"10.0.0.82\",\"10.0.0.83\"]}"
TEMPLATE CREATE:
Output the execution parameters for this change type to a JSON file; this example names it AssociatePrivateIPAddressesParams.json:
aws amscm get-change-type-version --change-type-id "ct-1pvlhug439gl2" --query "ChangeTypeVersion.ExecutionInputSchema" --output text > AssociatePrivateIPAddressesParams.jsonModify and save the AssociatePrivateIPAddressesParams file. For example, you can replace the contents with something like this:
{
    "NetworkInterfaceId": "eni-0123456789abcdef0",
    "PrivateIpAddresses": ["10.0.0.82", "10.0.0.83"]
  }
}
Output the RFC template to a file in your current folder; this example names it AssociatePrivateIPAddressesRfc.json:
aws amscm create-rfc --generate-cli-skeleton > AssociatePrivateIPAddressesRfc.jsonModify and save the AssociatePrivateIPAddressesRfc.json file. For example, you can replace the contents with something like this:.
{
  "ChangeTypeVersion": "1.0",
  "ChangeTypeId": "ct-1pvlhug439gl2",
  "Title": "Associate Private IP Addresses"
}
Create the RFC, specifying the AssociatePrivateIPAddressesRfc file and the AssociatePrivateIPAddressesParams file:
aws amscm create-rfc --cli-input-json file://AssociatePrivateIPAddressesRfc.json --execution-parameters file://AssociatePrivateIPAddressesParams.jsonYou receive the ID of the new RFC in the response and can use it to submit and monitor the RFC. Until you submit it, the RFC remains in the editing state and does not start.
For more information about Amazon EC2 IP addresses, see Amazon EC2 instance IP addressing.
If needed, see EC2 instance stack create fail.
Create Amazon RDS option group (Managed Automation)
Screenshot of this change type in the AMS console:

How it works:
Navigate to the Create RFC page: In the left navigation pane of the AMS console click RFCs to open the RFCs list page, and then click Create RFC.
Choose a popular change type (CT) in the default Browse change types view, or select a CT in the Choose by category view.
Browse by change type: You can click on a popular CT in the Quick create area to immediately open the Run RFC page. Note that you cannot choose an older CT version with quick create.
To sort CTs, use the All change types area in either the Card or Table view. In either view, select a CT and then click Create RFC to open the Run RFC page. If applicable, a Create with older version option appears next to the Create RFC button.
Choose by category: Select a category, subcategory, item, and operation and the CT details box opens with an option to Create with older version if applicable. Click Create RFC to open the Run RFC page.
On the Run RFC page, open the CT name area to see the CT details box. A Subject is required (this is filled in for you if you choose your CT in the Browse change types view). Open the Additional configuration area to add information about the RFC.
In the Execution configuration area, use available drop-down lists or enter values for the required parameters. To configure optional execution parameters, open the Additional configuration area.
When finished, click Run. If there are no errors, the RFC successfully created page displays with the submitted RFC details, and the initial Run output.
Open the Run parameters area to see the configurations you submitted. Refresh the page to update the RFC execution status. Optionally, cancel the RFC or create a copy of it with the options at the top of the page.
How it works:
Use either the Inline Create (you issue a
create-rfccommand with all RFC and execution parameters included), or Template Create (you create two JSON files, one for the RFC parameters and one for the execution parameters) and issue thecreate-rfccommand with the two files as input. Both methods are described here.Submit the RFC:
aws amscm submit-rfc --rfc-idcommand with the returned RFC ID.IDMonitor the RFC:
aws amscm get-rfc --rfc-idcommand.ID
To check the change type version, use this command:
aws amscm list-change-type-version-summaries --filter Attribute=ChangeTypeId,Value=CT_ID
Note
You can use any CreateRfc parameters with any RFC whether or not they are part of the schema for the
change type. For example, to get notifications when the RFC status changes, add this line, --notification "{\"Email\": {\"EmailRecipients\" : [\"email@example.com\"]}}" to the
RFC parameters part of the request (not the execution parameters). For a list of all CreateRfc parameters, see the
AMS Change Management API Reference.
INLINE CREATE:
Issue the create RFC command with execution parameters provided inline (escape quotation marks when providing execution parameters inline), and then submit the returned RFC ID. For example, you can replace the contents with something like this:
aws amscm create-rfc --change-type-id "ct-10yi1sd9nst1c" --change-type-version "1.0" --title "Create option group (managed automation)" --execution-parameters "{\"OptionGroupName\": \"CreatingTheOptionGroup\", \"Description\": \"RDS option group\", \"EngineName\": \"sqlserver-ee\", \"MajorEngineVersion\": \"10.01\", \"DBInstanceName\": \"database-1\", \"Priority\": \"Medium\"}"
TEMPLATE CREATE:
Output the execution parameters for this change type to a JSON file named CreateRdsOptionGroupParams.json.
aws amscm get-change-type-version --change-type-id "ct-10yi1sd9nst1c" --query "ChangeTypeVersion.ExecutionInputSchema" --output text > CreateRdsOptionGroupParams.jsonModify and save the execution parameters JSON file. For example, you can replace the contents with something like this:
{
  "OptionGroupName": "OptionGroup",
  "EngineName": "sqlserver-ee",
  "MajorEngineVersion": "10.01"
}
Output the JSON template to a file in your current folder; this example names it CreateRdsOptionGroupRfc.json:
aws amscm create-rfc --generate-cli-skeleton > CreateRdsOptionGroupRfc.jsonModify and save the CreateRdsOptionGroupRfc.json file. For example, you can replace the contents with something like this:
{
"ChangeTypeVersion":    "1.0",
"ChangeTypeId":         "ct-10yi1sd9nst1c",
"Title":                "RDS-Create-RFC"
}
Create the RFC, specifying the execution parameters file and the CreateRdsOptionGroupRfc file:
aws amscm create-rfc --cli-input-json file://CreateRdsOptionGroupRfc.json --execution-parameters file://CreateRdsOptionGroupParams.jsonYou receive the ID of the new RFC in the response and can use it to submit and monitor the RFC. Until you submit it, the RFC remains in the editing state and does not start.
To learn more about Amazon RDS DB option groups, see Working with option groups.
You can add up to 50 tags, but to do so you must enable the Advanced view.
Remove TGW static route
Screenshot of this change type in the AMS console:

How it works:
Navigate to the Create RFC page: In the left navigation pane of the AMS console click RFCs to open the RFCs list page, and then click Create RFC.
Choose a popular change type (CT) in the default Browse change types view, or select a CT in the Choose by category view.
Browse by change type: You can click on a popular CT in the Quick create area to immediately open the Run RFC page. Note that you cannot choose an older CT version with quick create.
To sort CTs, use the All change types area in either the Card or Table view. In either view, select a CT and then click Create RFC to open the Run RFC page. If applicable, a Create with older version option appears next to the Create RFC button.
Choose by category: Select a category, subcategory, item, and operation and the CT details box opens with an option to Create with older version if applicable. Click Create RFC to open the Run RFC page.
On the Run RFC page, open the CT name area to see the CT details box. A Subject is required (this is filled in for you if you choose your CT in the Browse change types view). Open the Additional configuration area to add information about the RFC.
In the Execution configuration area, use available drop-down lists or enter values for the required parameters. To configure optional execution parameters, open the Additional configuration area.
When finished, click Run. If there are no errors, the RFC successfully created page displays with the submitted RFC details, and the initial Run output.
Open the Run parameters area to see the configurations you submitted. Refresh the page to update the RFC execution status. Optionally, cancel the RFC or create a copy of it with the options at the top of the page.
How it works:
Use either the Inline Create (you issue a
create-rfccommand with all RFC and execution parameters included), or Template Create (you create two JSON files, one for the RFC parameters and one for the execution parameters) and issue thecreate-rfccommand with the two files as input. Both methods are described here.Submit the RFC:
aws amscm submit-rfc --rfc-idcommand with the returned RFC ID.IDMonitor the RFC:
aws amscm get-rfc --rfc-idcommand.ID
To check the change type version, use this command:
aws amscm list-change-type-version-summaries --filter Attribute=ChangeTypeId,Value=CT_ID
Note
You can use any CreateRfc parameters with any RFC whether or not they are part of the schema for the
change type. For example, to get notifications when the RFC status changes, add this line, --notification "{\"Email\": {\"EmailRecipients\" : [\"email@example.com\"]}}" to the
RFC parameters part of the request (not the execution parameters). For a list of all CreateRfc parameters, see the
AMS Change Management API Reference.
INLINE CREATE:
Issue the create RFC command with execution parameters provided inline (escape quotes when providing execution parameters inline), and then submit the returned RFC ID. For example, you can replace the contents with something like this:
aws amscm create-rfc --change-type-id "ct-0rmgrnr9w8mzh" --change-type-version "1.0" --title "Remove TGW Static Route" --execution-parameters "{\"DocumentName\": \"AWSManagedServices-RemoveRouteFromTGWRouteTable\",\"Region\": \"us-east-1\",\"Parameters\": {\"TransitGatewayRouteTableId\": \"tgw-rtb-06ddc751c0c0c881c\", \"DestinationCidrBlock\": \"10.16.1.0/24\"}}"
TEMPLATE CREATE:
Output the execution parameters JSON schema for this change type to a file; this example names it RemoveTgwStaticRouteParams.json:
aws amscm get-change-type-version --change-type-id "ct-0rmgrnr9w8mzh" --query "ChangeTypeVersion.ExecutionInputSchema" --output text > RemoveTgwStaticRouteParams.jsonModify and save the RemoveTgwStaticRouteParams file. For example, you can replace the contents with something like this:
{
  "DocumentName": "AWSManagedServices-RemoveRouteFromTGWRouteTable",
  "Region": "us-east-1",
  "Parameters": {
    "TransitGatewayRouteTableId": "tgw-rtb-06ddc751c0c0c881c",
    "DestinationCidrBlock": "10.16.1.0/24"
  }
}
Output the RFC template JSON file to a file; this example names it RemoveTgwStaticRouteRfc.json:
aws amscm create-rfc --generate-cli-skeleton > RemoveTgwStaticRouteRfc.jsonModify and save the RemoveTgwStaticRouteRfc.json file. For example, you can replace the contents with something like this:
{
  "ChangeTypeVersion": "1.0",
  "ChangeTypeId": "ct-0rmgrnr9w8mzh",
  "Title": "Remove TGW Static Route"
}
Create the RFC, specifying the RemoveTgwStaticRouteRfc file and the RemoveTgwStaticRouteParams file:
aws amscm create-rfc --cli-input-json file://RemoveTgwStaticRouteRfc.json --execution-parameters file://RemoveTgwStaticRouteParams.jsonYou receive the ID of the new RFC in the response and can use it to submit and monitor the RFC. Until you submit it, the RFC remains in the editing state and does not start.
Note
This Change Type is only valid in Multi-account Landing Zone (MALZ) Networking accounts.
To learn more about AMS multi-account landing zones, see
AWS Managed Services (AMS) Now Offers Managed Landing Zones
Create for WIGS (Managed Automation)
The following shows this change type in the AMS console.

How it works:
Navigate to the Create RFC page: In the left navigation pane of the AMS console click RFCs to open the RFCs list page, and then click Create RFC.
Choose a popular change type (CT) in the default Browse change types view, or select a CT in the Choose by category view.
Browse by change type: You can click on a popular CT in the Quick create area to immediately open the Run RFC page. Note that you cannot choose an older CT version with quick create.
To sort CTs, use the All change types area in either the Card or Table view. In either view, select a CT and then click Create RFC to open the Run RFC page. If applicable, a Create with older version option appears next to the Create RFC button.
Choose by category: Select a category, subcategory, item, and operation and the CT details box opens with an option to Create with older version if applicable. Click Create RFC to open the Run RFC page.
On the Run RFC page, open the CT name area to see the CT details box. A Subject is required (this is filled in for you if you choose your CT in the Browse change types view). Open the Additional configuration area to add information about the RFC.
In the Execution configuration area, use available drop-down lists or enter values for the required parameters. To configure optional execution parameters, open the Additional configuration area.
When finished, click Run. If there are no errors, the RFC successfully created page displays with the submitted RFC details, and the initial Run output.
Open the Run parameters area to see the configurations you submitted. Refresh the page to update the RFC execution status. Optionally, cancel the RFC or create a copy of it with the options at the top of the page.
How it works:
Use either the Inline Create (you issue a
create-rfccommand with all RFC and execution parameters included), or Template Create (you create two JSON files, one for the RFC parameters and one for the execution parameters) and issue thecreate-rfccommand with the two files as input. Both methods are described here.Submit the RFC:
aws amscm submit-rfc --rfc-idcommand with the returned RFC ID.IDMonitor the RFC:
aws amscm get-rfc --rfc-idcommand.ID
To check the change type version, use this command:
aws amscm list-change-type-version-summaries --filter Attribute=ChangeTypeId,Value=CT_ID
Note
You can use any CreateRfc parameters with any RFC whether or not they are part of the schema for the
change type. For example, to get notifications when the RFC status changes, add this line, --notification "{\"Email\": {\"EmailRecipients\" : [\"email@example.com\"]}}" to the
RFC parameters part of the request (not the execution parameters). For a list of all CreateRfc parameters, see the
AMS Change Management API Reference.
INLINE CREATE:
Issue the create RFC command with execution parameters provided inline (escape quotation marks when providing execution parameters inline), and then submit the returned RFC ID. For example, you can replace the contents with something like this:
aws amscm create-rfc --change-type-id "ct-36emj2uapfbu8" --change-type-version "2.0" --title "Create Pre-Ingestion Instance" --execution-parameters "{\"InstanceVpcId\": \"vpc-1234567890abcdef0\",\"InstanceAmiId\": \"ami-1234567890abcdef0\",\"InstanceEBSOptimized\":false,\"InstanceRootVolumeSize\":60,\"InstanceNameTagValue\": \"temp-wigs\",\"InstanceType\": \"t3.large\",\"InstanceSubnetId\": \"subnet-0bb1c79de3EXAMPLE\"}"
TEMPLATE CREATE:
Output the execution parameters for this change type to a JSON file; this example names it CreateEc2PreIngestParams.json:
aws amscm get-change-type-version --change-type-id "ct-36emj2uapfbu8" --query "ChangeTypeVersion.ExecutionInputSchema" --output text > CreateEc2PreIngestParams.jsonModify and save the CreateEc2PreIngestParams file. For example, you can replace the contents with something like this:
{ "InstanceVpcId": "vpc-1234567890abcdef0", "InstanceAmiId": "ami-1234567890abcdef0", "InstanceEBSOptimized":false, "InstanceRootVolumeSize":60, "InstanceSubnetId": "subnet-1234567890abcdef0", "InstanceType": "t3.large", "InstanceNameTagValue": "temp-wigs", } }Output the RFC template to a file in your current folder; this example names it CreateEc2PreIngestRfc.json:
aws amscm create-rfc --generate-cli-skeleton > CreateEc2PreIngestRfc.jsonModify and save the CreateEc2PreIngestRfc.json file. For example, you can replace the contents with something like this:.
{
    "ChangeTypeVersion": "2.0",
    "ChangeTypeId": "ct-36emj2uapfbu8",
    "Title": "Create Pre-Ingestion Instance"
}
Create the RFC, specifying the CreateEc2PreIngestRfc file and the CreateEc2PreIngestParams file:
aws amscm create-rfc --cli-input-json file://CreateEc2PreIngestRfc.json --execution-parameters file://CreateEc2PreIngestParams.jsonYou receive the ID of the new RFC in the response and can use it to submit and monitor the RFC. Until you submit it, the RFC remains in the editing state and does not start.
To use the AWS Marketplace AMI, you must subscribe to the AMI from your AWS Marketplace account and agree to the terms of the AMI. AMS can't perform these actions for you because, as a buyer, you perform these actions yourself. If you need additional IAM permissions for these actions, use the Identity and Access Management (IAM) | Create EC2 Instance Profile change type in a separate RFC to request them.
Modify EBS volume
Screenshot of this change type, in the AMS console:

How it works:
Navigate to the Create RFC page: In the left navigation pane of the AMS console click RFCs to open the RFCs list page, and then click Create RFC.
Choose a popular change type (CT) in the default Browse change types view, or select a CT in the Choose by category view.
Browse by change type: You can click on a popular CT in the Quick create area to immediately open the Run RFC page. Note that you cannot choose an older CT version with quick create.
To sort CTs, use the All change types area in either the Card or Table view. In either view, select a CT and then click Create RFC to open the Run RFC page. If applicable, a Create with older version option appears next to the Create RFC button.
Choose by category: Select a category, subcategory, item, and operation and the CT details box opens with an option to Create with older version if applicable. Click Create RFC to open the Run RFC page.
On the Run RFC page, open the CT name area to see the CT details box. A Subject is required (this is filled in for you if you choose your CT in the Browse change types view). Open the Additional configuration area to add information about the RFC.
In the Execution configuration area, use available drop-down lists or enter values for the required parameters. To configure optional execution parameters, open the Additional configuration area.
When finished, click Run. If there are no errors, the RFC successfully created page displays with the submitted RFC details, and the initial Run output.
Open the Run parameters area to see the configurations you submitted. Refresh the page to update the RFC execution status. Optionally, cancel the RFC or create a copy of it with the options at the top of the page.
How it works:
Use either the Inline Create (you issue a
create-rfccommand with all RFC and execution parameters included), or Template Create (you create two JSON files, one for the RFC parameters and one for the execution parameters) and issue thecreate-rfccommand with the two files as input. Both methods are described here.Submit the RFC:
aws amscm submit-rfc --rfc-idcommand with the returned RFC ID.IDMonitor the RFC:
aws amscm get-rfc --rfc-idcommand.ID
To check the change type version, use this command:
aws amscm list-change-type-version-summaries --filter Attribute=ChangeTypeId,Value=CT_ID
Note
You can use any CreateRfc parameters with any RFC whether or not they are part of the schema for the
change type. For example, to get notifications when the RFC status changes, add this line, --notification "{\"Email\": {\"EmailRecipients\" : [\"email@example.com\"]}}" to the
RFC parameters part of the request (not the execution parameters). For a list of all CreateRfc parameters, see the
AMS Change Management API Reference.
INLINE CREATE:
Issue the create RFC command with execution parameters provided inline (escape quotes when providing execution parameters inline), and then submit the returned RFC ID. For example, you can replace the contents with something like this:
aws amscm create-rfc --change-type-id "ct-1wle0ai4en6km" --change-type-version "2.0" --title "Modify EBS Volume" --execution-parameters "{\"DocumentName\":\"AWSManagedServices-ModifyEBSVolumes\",\"Region\":\"us-east-1\",\"Parameters\":{\"VolumeIds\":[\"vol-1234567890abcdef1\",\"vol-1234567890abcdef2\",\"vol-1234567890abcdef3\",\"vol-1234567890abcdef4\",\"vol-1234567890abcdef5\"],\"CreateSnapshot\":[\"False\"],\"VolumeType\":[\"gp3\"],\"VolumeSize\":[\"40\"],\"Iops\":[\"3000\"],\"Throughput\":[\"200\"],\"RemediateStackDrift\":[\"False\"]}}"
TEMPLATE CREATE:
Output the execution parameters JSON schema for this change type to a JSON file; this example names it ModifyEBSVolumeParams.json:
aws amscm get-change-type-version --change-type-id "ct-1wle0ai4en6km" --query "ChangeTypeVersion.ExecutionInputSchema" --output text > ModifyEBSVolumeParams.jsonModify and save the ModifyEBSVolumeParams file.
    {
  "DocumentName" : "AWSManagedServices-ModifyEBSVolumes",
  "Region" : "us-east-1",
  "Parameters" : {
    "VolumeIds" : [
            "vol-1234567890abcdef1",
            "vol-1234567890abcdef2",
            "vol-1234567890abcdef3",
            "vol-1234567890abcdef4",
            "vol-1234567890abcdef5"
        ],
    "CreateSnapshot" : [
      "False"
    ],
    "VolumeType" : [
      "gp3"
    ],
    "VolumeSize" : [
      "40"
    ],
    "Iops" : [
      "3000"
    ],
    "Throughput" : [
      "200"
    ],
    "RemediateStackDrift" : [
      "False"
    ]
  }
}
Output the RFC template to a file in your current folder; this example names it ModifyEBSVolumeRfc.json:
aws amscm create-rfc --generate-cli-skeleton > ModifyEBSVolumeRfc.jsonModify and save the ModifyEBSVolumeRfc.json file. For example, you can replace the contents with something like this:
{
  "ChangeTypeVersion": "2.0",
  "ChangeTypeId": "ct-1wle0ai4en6km",
  "Title": "Modify EBS Volume"
}
Create the RFC, specifying the ModifyEBSVolumeRfc file and the ModifyEBSVolumeParams file:
aws amscm create-rfc --cli-input-json file://ModifyEBSVolumeRfc.json --execution-parameters file://ModifyEBSVolumeParams.jsonYou receive the ID of the new RFC in the response and can use it to submit and monitor the RFC. Until you submit it, the RFC remains in the editing state and does not start.
To learn more about Amazon EBS, see Amazon
Elastic Block Store (EBS)
Update AWS Backup plan (Managed Automation)
The following shows this change type in the AMS console.

How it works:
Navigate to the Create RFC page: In the left navigation pane of the AMS console click RFCs to open the RFCs list page, and then click Create RFC.
Choose a popular change type (CT) in the default Browse change types view, or select a CT in the Choose by category view.
Browse by change type: You can click on a popular CT in the Quick create area to immediately open the Run RFC page. Note that you cannot choose an older CT version with quick create.
To sort CTs, use the All change types area in either the Card or Table view. In either view, select a CT and then click Create RFC to open the Run RFC page. If applicable, a Create with older version option appears next to the Create RFC button.
Choose by category: Select a category, subcategory, item, and operation and the CT details box opens with an option to Create with older version if applicable. Click Create RFC to open the Run RFC page.
On the Run RFC page, open the CT name area to see the CT details box. A Subject is required (this is filled in for you if you choose your CT in the Browse change types view). Open the Additional configuration area to add information about the RFC.
In the Execution configuration area, use available drop-down lists or enter values for the required parameters. To configure optional execution parameters, open the Additional configuration area.
When finished, click Run. If there are no errors, the RFC successfully created page displays with the submitted RFC details, and the initial Run output.
Open the Run parameters area to see the configurations you submitted. Refresh the page to update the RFC execution status. Optionally, cancel the RFC or create a copy of it with the options at the top of the page.
How it works:
Use either the Inline Create (you issue a
create-rfccommand with all RFC and execution parameters included), or Template Create (you create two JSON files, one for the RFC parameters and one for the execution parameters) and issue thecreate-rfccommand with the two files as input. Both methods are described here.Submit the RFC:
aws amscm submit-rfc --rfc-idcommand with the returned RFC ID.IDMonitor the RFC:
aws amscm get-rfc --rfc-idcommand.ID
To check the change type version, use this command:
aws amscm list-change-type-version-summaries --filter Attribute=ChangeTypeId,Value=CT_ID
Note
You can use any CreateRfc parameters with any RFC whether or not they are part of the schema for the
change type. For example, to get notifications when the RFC status changes, add this line, --notification "{\"Email\": {\"EmailRecipients\" : [\"email@example.com\"]}}" to the
RFC parameters part of the request (not the execution parameters). For a list of all CreateRfc parameters, see the
AMS Change Management API Reference.
INLINE CREATE:
Issue the create RFC command with execution parameters provided inline (escape quotation marks when providing execution parameters inline), and then submit the returned RFC ID. For example, you can replace the contents with something like this:
aws amscm create-rfc --change-type-id "ct-1ay83wy4vxa3k" --change-type-version "1.0" --title "Update AWSBackup Plan" --execution-parameters ""{\"BackupPlanName\":\"PLAN_NAME\",\"ResourceTagKey\":\"TAG_KEY\",\"ResourceTagValue\":\"TAG_VALUE\",\"BackupRuleName\":\"RULE_NAME\",\"BackupRuleVault\":\"VAULT\",\"BackupRuleCompletionWindowMinutes\":120,\"BackupRuleScheduleExpression\":\"cron(0 1 ? * * *)\",\"BackupRuleDeleteAfterDays\":90,\"BackupRuleMoveToColdStorageAfterDays\":365,\"BackupRuleStartWindowMinutes\":60,\"BackupRuleRecoveryPointTagKey\":\"TAG_KEY\",\"BackupRuleRecoveryPointTagValue\":\"TAG_VALUE\,\"BackupRuleEnableContinuousBackup\":\"false\",\"BackupRuleCopyActionsDestVaultArn\":\"VAULT\",\"BackupRuleCAMoveToColdStorageAfterDays\":0,\"BackupRuleCopyActionsDeleteAfterDays\":90}""
TEMPLATE CREATE:
Output the execution parameters JSON schema for this change type to a JSON file; this example names it UpdateBackupPlanParams.json:
aws amscm get-change-type-version --change-type-id "ct-1ay83wy4vxa3k" --query "ChangeTypeVersion.ExecutionInputSchema" --output text > UpdateBackupPlanParams.jsonModify and save the UpdateBackupPlanParams file.
{ "BackupPlanName": "MyCustomBackupPlan", "ResourceTagKey": "custom_backup_test", "ResourceTagValue": "true", "WindowsVSS": "disabled", "BackupRuleName": "BackupRule", "BackupRuleVault": "ams-custom-backups", "BackupRuleCompletionWindowMinutes":1440, "BackupRuleScheduleExpression": "cron(0 2 ? * * *)", "BackupRuleDeleteAfterDays":0, "BackupRuleMoveToColdStorageAfterDays":0, "BackupRuleStartWindowMinutes":180, "BackupRuleRecoveryPointTagKey": "test", "BackupRuleRecoveryPointTagValue": "test", "BackupRuleEnableContinuousBackup": "false", "BackupRuleCopyActionsDestVaultArn": "", "BackupRuleCAMoveToColdStorageAfterDays":0, "BackupRuleCopyActionsDeleteAfterDays":0}Output the RFC template to a file in your current folder; this example names it UpdateBackupPlanRfc.json:
aws amscm create-rfc --generate-cli-skeleton > UpdateBackupPlanRfc.jsonModify and save the UpdateBackupPlanRfc.json file. For example, you can replace the contents with something like this:
{
  "ChangeTypeVersion": "1.0",
  "ChangeTypeId": "ct-1ay83wy4vxa3k",
  "Title": "Update AWS Backup Plan"
}
Create the RFC, specifying the UpdateBackupPlanRfc file and the UpdateBackupPlanParams file:
aws amscm create-rfc --cli-input-json file://UpdateBackupPlanRfc.json --execution-parameters file://UpdateBackupPlanParams.jsonYou receive the ID of the new RFC in the response and can use it to submit and monitor the RFC. Until you submit it, the RFC remains in the editing state and does not start.
Note
Not all resource types supported by AWS Backup are enabled by default. Review the enabled resource types in your account using Getting Started 1: Service Opt-In.
To learn more about AWS Backup, see AWS Backup: How It Works.
Before creating backup plans, confirm supported resources at Feature availability by resource.
Confirm offboarding
Important
After confirming your intent to offboard the application account, you have 48 hours to run the Management account: Offboard Application account change type (ct-0vdiy51oyrhhm). After 48 hours, the offboarding request fails and the process of confirming and then offboarding must be restarted.
Screenshot of this change type in the AMS console:

How it works:
Navigate to the Create RFC page: In the left navigation pane of the AMS console click RFCs to open the RFCs list page, and then click Create RFC.
Choose a popular change type (CT) in the default Browse change types view, or select a CT in the Choose by category view.
Browse by change type: You can click on a popular CT in the Quick create area to immediately open the Run RFC page. Note that you cannot choose an older CT version with quick create.
To sort CTs, use the All change types area in either the Card or Table view. In either view, select a CT and then click Create RFC to open the Run RFC page. If applicable, a Create with older version option appears next to the Create RFC button.
Choose by category: Select a category, subcategory, item, and operation and the CT details box opens with an option to Create with older version if applicable. Click Create RFC to open the Run RFC page.
On the Run RFC page, open the CT name area to see the CT details box. A Subject is required (this is filled in for you if you choose your CT in the Browse change types view). Open the Additional configuration area to add information about the RFC.
In the Execution configuration area, use available drop-down lists or enter values for the required parameters. To configure optional execution parameters, open the Additional configuration area.
When finished, click Run. If there are no errors, the RFC successfully created page displays with the submitted RFC details, and the initial Run output.
Open the Run parameters area to see the configurations you submitted. Refresh the page to update the RFC execution status. Optionally, cancel the RFC or create a copy of it with the options at the top of the page.
How it works:
Use either the Inline Create (you issue a
create-rfccommand with all RFC and execution parameters included), or Template Create (you create two JSON files, one for the RFC parameters and one for the execution parameters) and issue thecreate-rfccommand with the two files as input. Both methods are described here.Submit the RFC:
aws amscm submit-rfc --rfc-idcommand with the returned RFC ID.IDMonitor the RFC:
aws amscm get-rfc --rfc-idcommand.ID
To check the change type version, use this command:
aws amscm list-change-type-version-summaries --filter Attribute=ChangeTypeId,Value=CT_ID
Note
You can use any CreateRfc parameters with any RFC whether or not they are part of the schema for the
change type. For example, to get notifications when the RFC status changes, add this line, --notification "{\"Email\": {\"EmailRecipients\" : [\"email@example.com\"]}}" to the
RFC parameters part of the request (not the execution parameters). For a list of all CreateRfc parameters, see the
AMS Change Management API Reference.
INLINE CREATE:
Note
Run this change type from your Application account.
Issue the create RFC command with execution parameters provided inline (escape quotes when providing execution parameters inline), and then submit the returned RFC ID. For example, you can replace the contents with something like this:
aws amscm create-rfc --change-type-id "ct-2wlfo2jxj2rkj" --change-type-version "1.0" --title "Confirm Offboarding" --execution-parameters "{\"AccountID\": \"000000000000\",\"AccountEmail\": \"email@amazon.com\"}"
TEMPLATE CREATE:
Output the execution parameters JSON schema for this change type to a file; this example names it ConfirmAppAcctOffBParams.json:
aws amscm get-change-type-version --change-type-id "ct-2wlfo2jxj2rkj" --query "ChangeTypeVersion.ExecutionInputSchema" --output text > ConfirmAppAcctOffBParams.jsonModify and save the ConfirmAppAcctOffBParams file. For example, you can replace the contents with something like this:
{
  "AccountID": "000000000000",
  "AccountEmail": "email@amazon.com",
}
Output the RFC template JSON file to a file; this example names it ConfirmAppAcctOffBRfc.json:
aws amscm create-rfc --generate-cli-skeleton > ConfirmAppAcctOffBRfc.jsonModify and save the ConfirmAppAcctOffBRfc.json file. For example, you can replace the contents with something like this:
{
  "ChangeTypeVersion": "1.0",
  "ChangeTypeId": "ct-2wlfo2jxj2rkj",
  "Title": "Confirm Offboarding"
}
Create the RFC, specifying the ConfirmAppAcctOffBRfc file and the ConfirmAppAcctOffBParams file:
aws amscm create-rfc --cli-input-json file://ConfirmAppAcctOffBRfc.json --execution-parameters file://ConfirmAppAcctOffBParams.jsonYou receive the ID of the new RFC in the response and can use it to submit and monitor the RFC. Until you submit it, the RFC remains in the editing state and does not start.
The second step to offboarding the AMS multi-account landing zone Application account is to submit the Management account: Offboard Application account change type (ct-0vdiy51oyrhhm) from the application account within 48 hours of successfully running this change type confirming the intent to offboard.
For application accounts (other than Customer Managed), run this from the Application account that you want offboarded. After successful confirmation, run the Offboard application account CT (ct-0vdiy51oyrhhm) from the associated management account. Offboarding is intended for account closure and cannot be undone.
Do not use this CT for Customer Managed application accounts. Go directly to Offboard application account CT (ct-0vdiy51oyrhhm).
Management account: Offboard Application account
Important
You have 48 hours to offboard the specified application account after successfully running the Confirm offboarding change type (ct-2wlfo2jxj2rkj). After 48 hours, the offboarding request fails and the process of confirming and then offboarding must be restarted.
Screenshot of this change type in the AMS console:

How it works:
Navigate to the Create RFC page: In the left navigation pane of the AMS console click RFCs to open the RFCs list page, and then click Create RFC.
Choose a popular change type (CT) in the default Browse change types view, or select a CT in the Choose by category view.
Browse by change type: You can click on a popular CT in the Quick create area to immediately open the Run RFC page. Note that you cannot choose an older CT version with quick create.
To sort CTs, use the All change types area in either the Card or Table view. In either view, select a CT and then click Create RFC to open the Run RFC page. If applicable, a Create with older version option appears next to the Create RFC button.
Choose by category: Select a category, subcategory, item, and operation and the CT details box opens with an option to Create with older version if applicable. Click Create RFC to open the Run RFC page.
On the Run RFC page, open the CT name area to see the CT details box. A Subject is required (this is filled in for you if you choose your CT in the Browse change types view). Open the Additional configuration area to add information about the RFC.
In the Execution configuration area, use available drop-down lists or enter values for the required parameters. To configure optional execution parameters, open the Additional configuration area.
When finished, click Run. If there are no errors, the RFC successfully created page displays with the submitted RFC details, and the initial Run output.
Open the Run parameters area to see the configurations you submitted. Refresh the page to update the RFC execution status. Optionally, cancel the RFC or create a copy of it with the options at the top of the page.
How it works:
Use either the Inline Create (you issue a
create-rfccommand with all RFC and execution parameters included), or Template Create (you create two JSON files, one for the RFC parameters and one for the execution parameters) and issue thecreate-rfccommand with the two files as input. Both methods are described here.Submit the RFC:
aws amscm submit-rfc --rfc-idcommand with the returned RFC ID.IDMonitor the RFC:
aws amscm get-rfc --rfc-idcommand.ID
To check the change type version, use this command:
aws amscm list-change-type-version-summaries --filter Attribute=ChangeTypeId,Value=CT_ID
Note
You can use any CreateRfc parameters with any RFC whether or not they are part of the schema for the
change type. For example, to get notifications when the RFC status changes, add this line, --notification "{\"Email\": {\"EmailRecipients\" : [\"email@example.com\"]}}" to the
RFC parameters part of the request (not the execution parameters). For a list of all CreateRfc parameters, see the
AMS Change Management API Reference.
INLINE CREATE:
Note
Run this change type from the Management account associated with the application account being offboarded.
Issue the create RFC command with execution parameters provided inline (escape quotes when providing execution parameters inline), and then submit the returned RFC ID. For example, you can replace the contents with something like this:
aws amscm create-rfc --change-type-id "ct-0vdiy51oyrhhm" --change-type-version "2.0" --title "Run Offboarding" --execution-parameters "{\"AccountID\": \"000000000000\",\"AccountEmail\": \"email@amazon.com\",\"Confirmation\": \"confirm\",\"DeleteTransitGatewayAttachment\":true}"
TEMPLATE CREATE:
Output the execution parameters JSON schema for this change type to a file; this example names it RunAppAcctOffBParams.json:
aws amscm get-change-type-version --change-type-id "ct-0vdiy51oyrhhm" --query "ChangeTypeVersion.ExecutionInputSchema" --output text > RunAppAcctOffBParams.jsonModify and save the RunAppAcctOffBParams file. For example, you can replace the contents with something like this:
{
  "AccountID": "000000000000",
  "AccountEmail": "email@amazon.com",
  "Confirmation": "confirm",
  "DeleteTransitGatewayAttachment" : true
}
Output the RFC template JSON file to a file; this example names it RunAppAcctOffBRfc.json:
aws amscm create-rfc --generate-cli-skeleton > RunAppAcctOffBRfc.jsonModify and save the RunAppAcctOffBRfc.json file. For example, you can replace the contents with something like this:
{
  "ChangeTypeVersion": "2.0",
  "ChangeTypeId": "ct-0vdiy51oyrhhm",
  "Title": "Execute Offboarding"
}
Create the RFC, specifying the RunAppAcctOffBRfc file and the RunAppAcctOffBParams file:
aws amscm create-rfc --cli-input-json file://RunAppAcctOffBRfc.json --execution-parameters file://RunAppAcctOffBParams.jsonYou receive the ID of the new RFC in the response and can use it to submit and monitor the RFC. Until you submit it, the RFC remains in the editing state and does not start.
The first step to offboarding the AMS multi-account landing zone Application account is to submit the Confirm offboarding CT (ct-2wlfo2jxj2rkj) from the application account.
Run this change type within 48 hours of successfully running the confirmation change type.
There is no prerequisite or confirmation CT for Customer Managed application accounts.
Note that offboarding is irreversible.
If you intend to self-operate the account after offboarding from AMS, then make sure to specify
DeleteTransitGatewayAttachmentparameter asfalseto retain connectivity.
Deploy AMS Resource Scheduler Solution
The following shows this change type in the AMS console.

How it works:
Navigate to the Create RFC page: In the left navigation pane of the AMS console click RFCs to open the RFCs list page, and then click Create RFC.
Choose a popular change type (CT) in the default Browse change types view, or select a CT in the Choose by category view.
Browse by change type: You can click on a popular CT in the Quick create area to immediately open the Run RFC page. Note that you cannot choose an older CT version with quick create.
To sort CTs, use the All change types area in either the Card or Table view. In either view, select a CT and then click Create RFC to open the Run RFC page. If applicable, a Create with older version option appears next to the Create RFC button.
Choose by category: Select a category, subcategory, item, and operation and the CT details box opens with an option to Create with older version if applicable. Click Create RFC to open the Run RFC page.
On the Run RFC page, open the CT name area to see the CT details box. A Subject is required (this is filled in for you if you choose your CT in the Browse change types view). Open the Additional configuration area to add information about the RFC.
In the Execution configuration area, use available drop-down lists or enter values for the required parameters. To configure optional execution parameters, open the Additional configuration area.
When finished, click Run. If there are no errors, the RFC successfully created page displays with the submitted RFC details, and the initial Run output.
Open the Run parameters area to see the configurations you submitted. Refresh the page to update the RFC execution status. Optionally, cancel the RFC or create a copy of it with the options at the top of the page.
How it works:
Use either the Inline Create (you issue a
create-rfccommand with all RFC and execution parameters included), or Template Create (you create two JSON files, one for the RFC parameters and one for the execution parameters) and issue thecreate-rfccommand with the two files as input. Both methods are described here.Submit the RFC:
aws amscm submit-rfc --rfc-idcommand with the returned RFC ID.IDMonitor the RFC:
aws amscm get-rfc --rfc-idcommand.ID
To check the change type version, use this command:
aws amscm list-change-type-version-summaries --filter Attribute=ChangeTypeId,Value=CT_ID
Note
You can use any CreateRfc parameters with any RFC whether or not they are part of the schema for the
change type. For example, to get notifications when the RFC status changes, add this line, --notification "{\"Email\": {\"EmailRecipients\" : [\"email@example.com\"]}}" to the
RFC parameters part of the request (not the execution parameters). For a list of all CreateRfc parameters, see the
AMS Change Management API Reference.
INLINE CREATE:
Issue the create RFC command with execution parameters provided inline (escape quotes when providing execution parameters inline), and then submit the returned RFC ID. For example, you can replace the contents with something like this:
aws amscm create-rfc --change-type-id ct-0ywnhc8e5k9z5 --change-type-version "2.0" --title "Deploy Resource Scheduler" --execution-parameters '{"DocumentName":"AWSManagedServices-HandleAMSResourceSchedulerStack-Admin","Region":"us-east-1","Parameters":{"SchedulingActive":["Yes"],"ScheduledServices":["ec2,rds,autoscaling"],"TagName":["Schedule"],"DefaultTimezone":["America/New_York"],"Action":["Deploy"]}}'
TEMPLATE CREATE:
Output the execution parameters JSON schema for this change type to a JSON file; this example names it DeployResSchedulerParams.json:
aws amscm get-change-type-version --change-type-id "ct-0ywnhc8e5k9z5" --query "ChangeTypeVersion.ExecutionInputSchema" --output text > DeployResSchedulerParams.jsonModify and save the DeployResSchedulerParams file.
{
  "DocumentName": "AWSManagedServices-HandleAMSResourceSchedulerStack-Admin",
  "Region": "us-east-1",
  "Parameters": {
    "SchedulingActive": [
      "Yes"
    ],
    "ScheduledServices": [
      "ec2,rds,autoscaling"
    ],
    "TagName": [
      "Schedule"
    ],
    "DefaultTimezone": [
      "America/New_York"
    ],
    "Action": [
      "Deploy"
    ]
  }
}
Output the RFC template to a file in your current folder; this example names it DeployResSchedulerRfc.json:
aws amscm create-rfc --generate-cli-skeleton > DeployResSchedulerRfc.jsonModify and save the DeployResSchedulerRfc.json file. For example, you can replace the contents with something like this:
{
"ChangeTypeVersion":    "2.0",
"ChangeTypeId":         "ct-0ywnhc8e5k9z5",
"Title":                "Deploy AMS Resource Scheduler"
}
Create the RFC, specifying the DeployResSchedulerRfc file and the DeployResSchedulerParams file:
aws amscm create-rfc --cli-input-json file://DeployResSchedulerRfc.json --execution-parameters file://DeployResSchedulerParams.jsonYou receive the ID of the new RFC in the response and can use it to submit and monitor the RFC. Until you submit it, the RFC remains in the editing state and does not start.
For background information, see How the AMS Resource Scheduler works. For a quick-start tutorial, see AMS Resource Scheduler quick start.
AMS Resource Scheduler is based on the AWS Instance Scheduler; to learn more, see AWS Instance Scheduler.
Update AMS Resource Scheduler Solution
The following shows this change type in the AMS console.

How it works:
Navigate to the Create RFC page: In the left navigation pane of the AMS console click RFCs to open the RFCs list page, and then click Create RFC.
Choose a popular change type (CT) in the default Browse change types view, or select a CT in the Choose by category view.
Browse by change type: You can click on a popular CT in the Quick create area to immediately open the Run RFC page. Note that you cannot choose an older CT version with quick create.
To sort CTs, use the All change types area in either the Card or Table view. In either view, select a CT and then click Create RFC to open the Run RFC page. If applicable, a Create with older version option appears next to the Create RFC button.
Choose by category: Select a category, subcategory, item, and operation and the CT details box opens with an option to Create with older version if applicable. Click Create RFC to open the Run RFC page.
On the Run RFC page, open the CT name area to see the CT details box. A Subject is required (this is filled in for you if you choose your CT in the Browse change types view). Open the Additional configuration area to add information about the RFC.
In the Execution configuration area, use available drop-down lists or enter values for the required parameters. To configure optional execution parameters, open the Additional configuration area.
When finished, click Run. If there are no errors, the RFC successfully created page displays with the submitted RFC details, and the initial Run output.
Open the Run parameters area to see the configurations you submitted. Refresh the page to update the RFC execution status. Optionally, cancel the RFC or create a copy of it with the options at the top of the page.
How it works:
Use either the Inline Create (you issue a
create-rfccommand with all RFC and execution parameters included), or Template Create (you create two JSON files, one for the RFC parameters and one for the execution parameters) and issue thecreate-rfccommand with the two files as input. Both methods are described here.Submit the RFC:
aws amscm submit-rfc --rfc-idcommand with the returned RFC ID.IDMonitor the RFC:
aws amscm get-rfc --rfc-idcommand.ID
To check the change type version, use this command:
aws amscm list-change-type-version-summaries --filter Attribute=ChangeTypeId,Value=CT_ID
Note
You can use any CreateRfc parameters with any RFC whether or not they are part of the schema for the
change type. For example, to get notifications when the RFC status changes, add this line, --notification "{\"Email\": {\"EmailRecipients\" : [\"email@example.com\"]}}" to the
RFC parameters part of the request (not the execution parameters). For a list of all CreateRfc parameters, see the
AMS Change Management API Reference.
INLINE CREATE:
Issue the create RFC command with execution parameters provided inline (escape quotes when providing execution parameters inline), and then submit the returned RFC ID. For example, you can replace the contents with something like this:
aws amscm create-rfc --change-type-id ct-2c7ve50jost1v --change-type-version "2.0" --title "Update Resource Scheduler Configurations" --execution-parameters '{"DocumentName":"AWSManagedServices-HandleAMSResourceSchedulerStack-Admin","Region":"us-east-1","Parameters":{"SchedulingActive":["Yes"],"ScheduledServices":["ec2,rds,autoscaling"],"TagName":["Schedule"],"DefaultTimezone":["America/New_York"],"Action":["Update"]}}'
TEMPLATE CREATE:
Output the execution parameters JSON schema for this change type to a JSON file; this example names it UpdateResSchedulerParams.json:
aws amscm get-change-type-version --change-type-id "ct-2c7ve50jost1v" --query "ChangeTypeVersion.ExecutionInputSchema" --output text > UpdateResSchedulerParams.jsonModify and save the UpdateResSchedulerParams file.
{
  "DocumentName": "AWSManagedServices-HandleAMSResourceSchedulerStack-Admin",
  "Region": "us-east-1",
  "Parameters": {
    "SchedulingActive": [
      "Yes"
    ],
    "ScheduledServices": [
      "ec2,rds,autoscaling"
    ],
    "TagName": [
      "Schedule"
    ],
    "DefaultTimezone": [
      "America/New_York"
    ],
    "Action": [
      "Update"
    ]
  }
}
Output the RFC template to a file in your current folder; this example names it UpdateResSchedulerRfc.json:
aws amscm create-rfc --generate-cli-skeleton > UpdateResSchedulerRfc.jsonModify and save the UpdateResSchedulerRfc.json file. For example, you can replace the contents with something like this:
{
"ChangeTypeVersion":    "2.0",
"ChangeTypeId":         "ct-2c7ve50jost1v",
"Title":                "Update Resource Scheduler Configurations"
}
Create the RFC, specifying the UpdateResSchedulerRfc file and the UpdateResSchedulerParams file:
aws amscm create-rfc --cli-input-json file://UpdateResSchedulerRfc.json --execution-parameters file://UpdateResSchedulerParams.jsonYou receive the ID of the new RFC in the response and can use it to submit and monitor the RFC. Until you submit it, the RFC remains in the editing state and does not start.
For background information, see How the AMS Resource Scheduler works. For a quick-start tutorial, see AMS Resource Scheduler quick start.
AMS Resource Scheduler is based on the AWS Instance Scheduler; to learn more, see AWS Instance Scheduler.
Delete or deactivate access key

How it works:
Navigate to the Create RFC page: In the left navigation pane of the AMS console click RFCs to open the RFCs list page, and then click Create RFC.
Choose a popular change type (CT) in the default Browse change types view, or select a CT in the Choose by category view.
Browse by change type: You can click on a popular CT in the Quick create area to immediately open the Run RFC page. Note that you cannot choose an older CT version with quick create.
To sort CTs, use the All change types area in either the Card or Table view. In either view, select a CT and then click Create RFC to open the Run RFC page. If applicable, a Create with older version option appears next to the Create RFC button.
Choose by category: Select a category, subcategory, item, and operation and the CT details box opens with an option to Create with older version if applicable. Click Create RFC to open the Run RFC page.
On the Run RFC page, open the CT name area to see the CT details box. A Subject is required (this is filled in for you if you choose your CT in the Browse change types view). Open the Additional configuration area to add information about the RFC.
In the Execution configuration area, use available drop-down lists or enter values for the required parameters. To configure optional execution parameters, open the Additional configuration area.
When finished, click Run. If there are no errors, the RFC successfully created page displays with the submitted RFC details, and the initial Run output.
Open the Run parameters area to see the configurations you submitted. Refresh the page to update the RFC execution status. Optionally, cancel the RFC or create a copy of it with the options at the top of the page.
How it works:
Use either the Inline Create (you issue a
create-rfccommand with all RFC and execution parameters included), or Template Create (you create two JSON files, one for the RFC parameters and one for the execution parameters) and issue thecreate-rfccommand with the two files as input. Both methods are described here.Submit the RFC:
aws amscm submit-rfc --rfc-idcommand with the returned RFC ID.IDMonitor the RFC:
aws amscm get-rfc --rfc-idcommand.ID
To check the change type version, use this command:
aws amscm list-change-type-version-summaries --filter Attribute=ChangeTypeId,Value=CT_ID
Note
You can use any CreateRfc parameters with any RFC whether or not they are part of the schema for the
change type. For example, to get notifications when the RFC status changes, add this line, --notification "{\"Email\": {\"EmailRecipients\" : [\"email@example.com\"]}}" to the
RFC parameters part of the request (not the execution parameters). For a list of all CreateRfc parameters, see the
AMS Change Management API Reference.
Note
When pasting in a policy document, note that the RFC only accepts policy pastes up to 5,000 characters. If your file has more than 5,000 characters, create a service request to upload the policy and then refer to that service request in the RFC that you open for IAM.
INLINE CREATE:
Issue the create RFC command with execution parameters provided inline (escape quotes when providing execution parameters inline), and then submit the returned RFC ID. For example, you can replace the contents with something like this:
aws amscm create-rfc --change-type-id "ct-37qquo9wbpa8x" --change-type-version "2.0" --title "Delete or deactivate access key" --execution-parameters "{\"DocumentName\": \"AWSManagedServices-DeactivateIAMAccessKeyV2\",\"Region\": \"\",\"Parameters\": {\"UserName\": \"test-user\", \"AccessKeyId\": \"AKIAIOSFODNN7EXAMPLE\", \"Delete\":false}}"
TEMPLATE CREATE:
Output the execution parameters JSON schema for this change type to a file; example names it DeactivateIamAccessKeyParams.json:
aws amscm get-change-type-version --change-type-id "ct-37qquo9wbpa8x" --query "ChangeTypeVersion.ExecutionInputSchema" --output text > DeactivateIamAccessKeyParams.jsonModify and save the DeactivateIamAccessKey file; example creates an IAM Role with policy documents pasted inline.
{ "DocumentName": "AWSManagedServices-DeactivateIAMAccessKeyV2", "Region": "us-east-1", "Parameters": { "UserName": "test-user", "AccessKeyId": "AKIAIOSFODNN7EXAMPLE", "Delete":false} } }Output the RFC template JSON file to a file named DeactivateIamAccessKeyRfc.json:
aws amscm create-rfc --generate-cli-skeleton > DeactivateIamAccessKeyRfc.jsonModify and save the DeactivateIamAccessKeyRfc.json file. For example, you can replace the contents with something like this:
{
    "ChangeTypeVersion": "2.0",
    "ChangeTypeId": "ct-37qquo9wbpa8x",
    "Title": "Delete or Deactivate Access Key"
}
Create the RFC, specifying the DeactivateIamAccessKeyRfc.json file and the CreateIamResourceNrrParams file:
aws amscm create-rfc --cli-input-json file://DeactivateIamAccessKeyRfc.json --execution-parameters file://DeactivateIamAccessKeyParams.jsonYou receive the ID of the new RFC in the response and can use it to submit and monitor the RFC. Until you submit it, the RFC remains in the editing state and does not start.
For information about AWS Identity and Access Management, see AWS Identity and Access Management (IAM)
and for policy information, see Managed policies and inline policies. For information about AMS permissions, see Deploying IAM resources.
Create access key

How it works:
Navigate to the Create RFC page: In the left navigation pane of the AMS console click RFCs to open the RFCs list page, and then click Create RFC.
Choose a popular change type (CT) in the default Browse change types view, or select a CT in the Choose by category view.
Browse by change type: You can click on a popular CT in the Quick create area to immediately open the Run RFC page. Note that you cannot choose an older CT version with quick create.
To sort CTs, use the All change types area in either the Card or Table view. In either view, select a CT and then click Create RFC to open the Run RFC page. If applicable, a Create with older version option appears next to the Create RFC button.
Choose by category: Select a category, subcategory, item, and operation and the CT details box opens with an option to Create with older version if applicable. Click Create RFC to open the Run RFC page.
On the Run RFC page, open the CT name area to see the CT details box. A Subject is required (this is filled in for you if you choose your CT in the Browse change types view). Open the Additional configuration area to add information about the RFC.
In the Execution configuration area, use available drop-down lists or enter values for the required parameters. To configure optional execution parameters, open the Additional configuration area.
When finished, click Run. If there are no errors, the RFC successfully created page displays with the submitted RFC details, and the initial Run output.
Open the Run parameters area to see the configurations you submitted. Refresh the page to update the RFC execution status. Optionally, cancel the RFC or create a copy of it with the options at the top of the page.
How it works:
Use either the Inline Create (you issue a
create-rfccommand with all RFC and execution parameters included), or Template Create (you create two JSON files, one for the RFC parameters and one for the execution parameters) and issue thecreate-rfccommand with the two files as input. Both methods are described here.Submit the RFC:
aws amscm submit-rfc --rfc-idcommand with the returned RFC ID.IDMonitor the RFC:
aws amscm get-rfc --rfc-idcommand.ID
To check the change type version, use this command:
aws amscm list-change-type-version-summaries --filter Attribute=ChangeTypeId,Value=CT_ID
Note
You can use any CreateRfc parameters with any RFC whether or not they are part of the schema for the
change type. For example, to get notifications when the RFC status changes, add this line, --notification "{\"Email\": {\"EmailRecipients\" : [\"email@example.com\"]}}" to the
RFC parameters part of the request (not the execution parameters). For a list of all CreateRfc parameters, see the
AMS Change Management API Reference.
Note
When pasting in a policy document, note that the RFC only accepts policy pastes up to 5,000 characters. If your file has more than 5,000 characters, create a service request to upload the policy and then refer to that service request in the RFC that you open for IAM.
INLINE CREATE:
Issue the create RFC command with execution parameters provided inline (escape quotes when providing execution parameters inline), and then submit the returned RFC ID. For example, you can replace the contents with something like this:
aws amscm create-rfc --change-type-id "ct-2hhqzgxvkcig8" --change-type-version "2.0" --title "Create access key" --execution-parameters "{\"DocumentName\": \"AWSManagedServices-CreateIAMAccessKey\",\"Region\": \"us-east-1\",\"Parameters\": {\"UserARN\": \"arn:aws:iam::012345678910:user/myusername\"}}"
TEMPLATE CREATE:
Output the execution parameters JSON schema for this change type to a file; example names it CreateIamAccessKeyParameters.json:
aws amscm get-change-type-version --change-type-id "ct-2hhqzgxvkcig8" --query "ChangeTypeVersion.ExecutionInputSchema" --output text > CreateIamAccessKeyParameters.jsonModify and save the CreateIamAccessKeyParameters.json file; example creates an IAM Role with policy documents pasted inline.
{
    "DocumentName": "AWSManagedServices-CreateIAMAccessKey",
    "Region": "ap-southeast-2",
    "Parameters": {
        "UserARN": "arn:aws:iam::012345678910:user/myusername"
    }
  }
}
Output the RFC template JSON file to a file named CreateIamAccessKeyRfc.json:
aws amscm create-rfc --generate-cli-skeleton > CreateIamAccessKeyRfc.jsonModify and save the CreateIamAccessKeyRfc.json file. For example, you can replace the contents with something like this:
{
  "ChangeTypeVersion": "2.0",
  "ChangeTypeId": "ct-2hhqzgxvkcig8",
  "Title": "Create IAM access key"
}
Create the RFC, specifying the CreateIamAccessKeyRfc.json file and the CreateIamAccessKeyParameters.json file:
aws amscm create-rfc --cli-input-json file://CreateIamAccessKeyRFC.json --execution-parameters file://CreateIamAccessKeyParameters.jsonYou receive the ID of the new RFC in the response and can use it to submit and monitor the RFC. Until you submit it, the RFC remains in the editing state and does not start.
For information about AWS Identity and Access Management, see AWS Identity and Access Management (IAM)
and for policy information, see Managed policies and inline policies. For information about AMS permissions, see Deploying IAM resources.
Enable Detailed Monitoring
The following shows this change type in the AMS console.
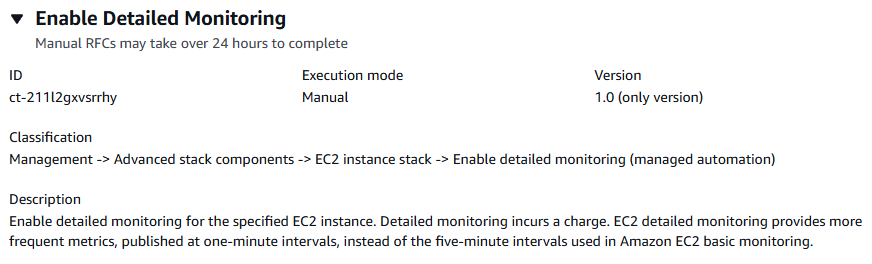
How it works:
Navigate to the Create RFC page: In the left navigation pane of the AMS console click RFCs to open the RFCs list page, and then click Create RFC.
Choose a popular change type (CT) in the default Browse change types view, or select a CT in the Choose by category view.
Browse by change type: You can click on a popular CT in the Quick create area to immediately open the Run RFC page. Note that you cannot choose an older CT version with quick create.
To sort CTs, use the All change types area in either the Card or Table view. In either view, select a CT and then click Create RFC to open the Run RFC page. If applicable, a Create with older version option appears next to the Create RFC button.
Choose by category: Select a category, subcategory, item, and operation and the CT details box opens with an option to Create with older version if applicable. Click Create RFC to open the Run RFC page.
On the Run RFC page, open the CT name area to see the CT details box. A Subject is required (this is filled in for you if you choose your CT in the Browse change types view). Open the Additional configuration area to add information about the RFC.
In the Execution configuration area, use available drop-down lists or enter values for the required parameters. To configure optional execution parameters, open the Additional configuration area.
When finished, click Run. If there are no errors, the RFC successfully created page displays with the submitted RFC details, and the initial Run output.
Open the Run parameters area to see the configurations you submitted. Refresh the page to update the RFC execution status. Optionally, cancel the RFC or create a copy of it with the options at the top of the page.
How it works:
Use either the Inline Create (you issue a
create-rfccommand with all RFC and execution parameters included), or Template Create (you create two JSON files, one for the RFC parameters and one for the execution parameters) and issue thecreate-rfccommand with the two files as input. Both methods are described here.Submit the RFC:
aws amscm submit-rfc --rfc-idcommand with the returned RFC ID.IDMonitor the RFC:
aws amscm get-rfc --rfc-idcommand.ID
To check the change type version, use this command:
aws amscm list-change-type-version-summaries --filter Attribute=ChangeTypeId,Value=CT_ID
Note
You can use any CreateRfc parameters with any RFC whether or not they are part of the schema for the
change type. For example, to get notifications when the RFC status changes, add this line, --notification "{\"Email\": {\"EmailRecipients\" : [\"email@example.com\"]}}" to the
RFC parameters part of the request (not the execution parameters). For a list of all CreateRfc parameters, see the
AMS Change Management API Reference.
INLINE CREATE:
Issue the create RFC command with execution parameters provided inline (escape quotation marks when providing execution parameters inline), and then submit the returned RFC ID. For example, you can replace the contents with something like this:
aws amscm create-rfc --change-type-id "ct-211l2gxvsrrhy" --change-type-version "1.0" --title "Enable Detailed Monitoring" --execution-parameters "{\"InstanceIds\": [\"i-1234567890abcdef0\",\"i-1234567890abcdef1\"]}"
TEMPLATE CREATE:
Output the execution parameters for this change type to a JSON file; this example names it EnableDetailedMonitoringParams.json:
aws amscm get-change-type-version --change-type-id "ct-211l2gxvsrrhy" --query "ChangeTypeVersion.ExecutionInputSchema" --output text > EnableDetailedMonitoringParams.jsonModify and save the EnableDetailedMonitoringParams file, retaining only the parameters that you want to change. For example, you can replace the contents with something like this:
{
    "InstanceIds": ["i-0cc489fa851c31a21","i-0cc489fa851c31a22"]
}
Output the RFC template to a file in your current folder; this example names it EnableDetailedMonitoringRfc.json:
aws amscm create-rfc --generate-cli-skeleton > EnableDetailedMonitoringRfc.jsonModify and save the EnableDetailedMonitoringRfc file. For example, you can replace the contents with something like this:
{
  "ChangeTypeVersion": "1.0",
  "ChangeTypeId": "ct-211l2gxvsrrhy",
  "Title": "Enable Detailed Monitoring"
}
Create the RFC, specifying the EnableDetailedMonitoringRfc file and the EnableDetailedMonitoringParams file:
aws amscm create-rfc --cli-input-json file://EnableDetailedMonitoringRfc.json --execution-parameters file://EnableDetailedMonitoringParams.jsonYou receive the ID of the new RFC in the response and can use it to submit and monitor the RFC. Until you submit it, the RFC remains in the editing state and does not start.
For more information about Amazon EC2, including size recommendations, see
Amazon Elastic Compute Cloud Documentation
Update the DeleteOnTermination option (Managed Automation)
Screenshot of this change type in the AMS console:
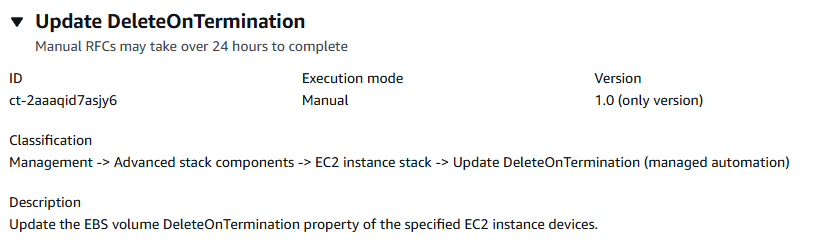
How it works:
Navigate to the Create RFC page: In the left navigation pane of the AMS console click RFCs to open the RFCs list page, and then click Create RFC.
Choose a popular change type (CT) in the default Browse change types view, or select a CT in the Choose by category view.
Browse by change type: You can click on a popular CT in the Quick create area to immediately open the Run RFC page. Note that you cannot choose an older CT version with quick create.
To sort CTs, use the All change types area in either the Card or Table view. In either view, select a CT and then click Create RFC to open the Run RFC page. If applicable, a Create with older version option appears next to the Create RFC button.
Choose by category: Select a category, subcategory, item, and operation and the CT details box opens with an option to Create with older version if applicable. Click Create RFC to open the Run RFC page.
On the Run RFC page, open the CT name area to see the CT details box. A Subject is required (this is filled in for you if you choose your CT in the Browse change types view). Open the Additional configuration area to add information about the RFC.
In the Execution configuration area, use available drop-down lists or enter values for the required parameters. To configure optional execution parameters, open the Additional configuration area.
When finished, click Run. If there are no errors, the RFC successfully created page displays with the submitted RFC details, and the initial Run output.
Open the Run parameters area to see the configurations you submitted. Refresh the page to update the RFC execution status. Optionally, cancel the RFC or create a copy of it with the options at the top of the page.
How it works:
Use either the Inline Create (you issue a
create-rfccommand with all RFC and execution parameters included), or Template Create (you create two JSON files, one for the RFC parameters and one for the execution parameters) and issue thecreate-rfccommand with the two files as input. Both methods are described here.Submit the RFC:
aws amscm submit-rfc --rfc-idcommand with the returned RFC ID.IDMonitor the RFC:
aws amscm get-rfc --rfc-idcommand.ID
To check the change type version, use this command:
aws amscm list-change-type-version-summaries --filter Attribute=ChangeTypeId,Value=CT_ID
Note
You can use any CreateRfc parameters with any RFC whether or not they are part of the schema for the
change type. For example, to get notifications when the RFC status changes, add this line, --notification "{\"Email\": {\"EmailRecipients\" : [\"email@example.com\"]}}" to the
RFC parameters part of the request (not the execution parameters). For a list of all CreateRfc parameters, see the
AMS Change Management API Reference.
INLINE CREATE:
Issue the create RFC command with execution parameters provided inline (escape quotation marks when providing execution parameters inline), and then submit the returned RFC ID. For example, you can replace the contents with something like this:
aws amscm create-rfc --change-type-id "ct-2aaaqid7asjy6" --change-type-version "1.0" --title "Update DeleteOnTermination" --execution-parameters "{\"InstanceId\": \"i-1234567890abcdef0\", \"DeviceNames\": [\"/dev/sda1\", \"/dev/xvda\"], \"DeleteOnTermination\": \"False\"}"
TEMPLATE CREATE:
Output the execution parameters for this change type to a JSON file; this example names it UpdateDeleteOnTerminationParams.json:
aws amscm get-change-type-version --change-type-id "ct-2aaaqid7asjy6" --query "ChangeTypeVersion.ExecutionInputSchema" --output text > UpdateDeleteOnTerminationParames.jsonModify and save the UpdateDeleteOnTerminationParams.json file, retaining only the parameters that you want to change. For example, you can replace the contents with something like this:
{
  "InstanceId": "i-0cc489fa851c31a21",
  "DeviceNames": [
    "/dev/sda1",
    "/dev/xvda"
  ],
  "DeleteOnTermination": "False"
}
Output the RFC template to a file in your current folder; this example names it UpdateDeleteOnTerminationRfc.json:
aws amscm create-rfc --generate-cli-skeleton > UpdateDeleteOnTerminationRfc.jsonModify and save the UpdateDeleteOnTerminationRfc.json file. For example, you can replace the contents with something like this:
{
"ChangeTypeVersion":    "1.0",
"ChangeTypeId":         "ct-2aaaqid7asjy6",
"Title":                "Update DeleteOnTermination"
}
Create the RFC, specifying the UpdateDeleteOnTerminationRfc.json file and the UpdateDeleteOnTerminationParams.json file:
aws amscm create-rfc --cli-input-json file://UpdateDeleteOnTerminationRfc.json --execution-parameters file://UpdateDeleteOnTerminationParams.jsonYou receive the ID of the new RFC in the response and can use it to submit and monitor the RFC. Until you submit it, the RFC remains in the editing state and does not start.
You receive the ID of the new RFC in the response and can use it to submit and monitor the RFC. Until you submit it, the RFC remains in the editing state and does not start.
To learn more about Amazon EC2, including size recommendations, see
Amazon Elastic Compute Cloud Documentation
Update RDS maintainance window (Managed Automation)
Screenshot of this change type in the AMS console:

How it works:
Navigate to the Create RFC page: In the left navigation pane of the AMS console click RFCs to open the RFCs list page, and then click Create RFC.
Choose a popular change type (CT) in the default Browse change types view, or select a CT in the Choose by category view.
Browse by change type: You can click on a popular CT in the Quick create area to immediately open the Run RFC page. Note that you cannot choose an older CT version with quick create.
To sort CTs, use the All change types area in either the Card or Table view. In either view, select a CT and then click Create RFC to open the Run RFC page. If applicable, a Create with older version option appears next to the Create RFC button.
Choose by category: Select a category, subcategory, item, and operation and the CT details box opens with an option to Create with older version if applicable. Click Create RFC to open the Run RFC page.
On the Run RFC page, open the CT name area to see the CT details box. A Subject is required (this is filled in for you if you choose your CT in the Browse change types view). Open the Additional configuration area to add information about the RFC.
In the Execution configuration area, use available drop-down lists or enter values for the required parameters. To configure optional execution parameters, open the Additional configuration area.
When finished, click Run. If there are no errors, the RFC successfully created page displays with the submitted RFC details, and the initial Run output.
Open the Run parameters area to see the configurations you submitted. Refresh the page to update the RFC execution status. Optionally, cancel the RFC or create a copy of it with the options at the top of the page.
How it works:
Use either the Inline Create (you issue a
create-rfccommand with all RFC and execution parameters included), or Template Create (you create two JSON files, one for the RFC parameters and one for the execution parameters) and issue thecreate-rfccommand with the two files as input. Both methods are described here.Submit the RFC:
aws amscm submit-rfc --rfc-idcommand with the returned RFC ID.IDMonitor the RFC:
aws amscm get-rfc --rfc-idcommand.ID
To check the change type version, use this command:
aws amscm list-change-type-version-summaries --filter Attribute=ChangeTypeId,Value=CT_ID
Note
You can use any CreateRfc parameters with any RFC whether or not they are part of the schema for the
change type. For example, to get notifications when the RFC status changes, add this line, --notification "{\"Email\": {\"EmailRecipients\" : [\"email@example.com\"]}}" to the
RFC parameters part of the request (not the execution parameters). For a list of all CreateRfc parameters, see the
AMS Change Management API Reference.
INLINE CREATE:
Issue the create RFC command with execution parameters provided inline (escape quotation marks when providing execution parameters inline), and then submit the returned RFC ID. For example, you can replace the contents with something like this:
aws amscm create-rfc --change-type-id "ct-27jjy5wnrfef2" --change-type-version "1.0" --title "Update RDS Maintenance Window" --execution-parameters "{\"DBIdentifierArn\": \"arn:aws:rds:us-east-1:123456789101:db:database-1\", \"PreferredMaintenanceWindow\": \"Sun:04:00-Sun:04:30\"}"
TEMPLATE CREATE:
Output the execution parameters for this change type to a JSON file named UpdateRDSMaintenanceWindowParams.json.
aws amscm get-change-type-version --change-type-id "ct-27jjy5wnrfef2" --query "ChangeTypeVersion.ExecutionInputSchema" --output text > UpdateRDSMaintenanceWindowParams.jsonModify and save the execution parameters JSON file. For example, you can replace the contents with something like this:
{
  "DBIdentifierArn": "arn:aws:rds:us-east-1:123456789101:db:database-1",
  "PreferredMaintenanceWindow": "Sun:04:00-Sun:04:30"
}
Output the JSON template to a file in your current folder; this example names it UpdateRDSMaintenanceWindowRfc.json:
aws amscm create-rfc --generate-cli-skeleton > UpdateRDSMaintenanceWindowRfc.jsonModify and save the UpdateRDSMaintenanceWindowRfc.json file. For example, you can replace the contents with something like this:
{
  "ChangeTypeVersion": "1.0",
  "ChangeTypeId": "ct-27jjy5wnrfef2",
  "Title": "Update RDS Maintenance Window"
}
Create the RFC, specifying the execution parameters file and the UpdateRDSMaintenanceWindowRfc.json file:
aws amscm create-rfc --cli-input-json file://UpdateRDSMaintenanceWindowRfc.json --execution-parameters file://UpdateRDSMaintenanceWindowParams.jsonYou receive the ID of the new RFC in the response and can use it to submit and monitor the RFC. Until you submit it, the RFC remains in the editing state and does not start.
You receive the ID of the new RFC in the response and can use it to submit and monitor the RFC. Until you submit it, the RFC remains in the editing state and does not start.
Note
AMS employs drift detection on certain stacks, including RDS stacks, to determine if configuration changes. The AMS disallows updates to an RDS stack that has been determined to have configuration drift. The RFC will fail with the following error message: "Update cannot be performed on this stack, please contact AMS for further assistance."
To learn more about Amazon RDS, including size recommendations, see
Amazon Relational Database Service Documentation
Update RDS performance insights (Managed Automation)
Screenshot of this change type in the AMS console:

How it works:
Navigate to the Create RFC page: In the left navigation pane of the AMS console click RFCs to open the RFCs list page, and then click Create RFC.
Choose a popular change type (CT) in the default Browse change types view, or select a CT in the Choose by category view.
Browse by change type: You can click on a popular CT in the Quick create area to immediately open the Run RFC page. Note that you cannot choose an older CT version with quick create.
To sort CTs, use the All change types area in either the Card or Table view. In either view, select a CT and then click Create RFC to open the Run RFC page. If applicable, a Create with older version option appears next to the Create RFC button.
Choose by category: Select a category, subcategory, item, and operation and the CT details box opens with an option to Create with older version if applicable. Click Create RFC to open the Run RFC page.
On the Run RFC page, open the CT name area to see the CT details box. A Subject is required (this is filled in for you if you choose your CT in the Browse change types view). Open the Additional configuration area to add information about the RFC.
In the Execution configuration area, use available drop-down lists or enter values for the required parameters. To configure optional execution parameters, open the Additional configuration area.
When finished, click Run. If there are no errors, the RFC successfully created page displays with the submitted RFC details, and the initial Run output.
Open the Run parameters area to see the configurations you submitted. Refresh the page to update the RFC execution status. Optionally, cancel the RFC or create a copy of it with the options at the top of the page.
How it works:
Use either the Inline Create (you issue a
create-rfccommand with all RFC and execution parameters included), or Template Create (you create two JSON files, one for the RFC parameters and one for the execution parameters) and issue thecreate-rfccommand with the two files as input. Both methods are described here.Submit the RFC:
aws amscm submit-rfc --rfc-idcommand with the returned RFC ID.IDMonitor the RFC:
aws amscm get-rfc --rfc-idcommand.ID
To check the change type version, use this command:
aws amscm list-change-type-version-summaries --filter Attribute=ChangeTypeId,Value=CT_ID
Note
You can use any CreateRfc parameters with any RFC whether or not they are part of the schema for the
change type. For example, to get notifications when the RFC status changes, add this line, --notification "{\"Email\": {\"EmailRecipients\" : [\"email@example.com\"]}}" to the
RFC parameters part of the request (not the execution parameters). For a list of all CreateRfc parameters, see the
AMS Change Management API Reference.
INLINE CREATE:
Issue the create RFC command with execution parameters provided inline (escape quotation marks when providing execution parameters inline), and then submit the returned RFC ID. For example, you can replace the contents with something like this:
aws amscm create-rfc --change-type-id "ct-31eyj2hlvqjwu" --change-type-version "1.0" --title "Update Performance Insights." --execution-parameters "{\"DBIdentifierArn\": \"arn:aws:rds:us-east-1:123456789012:cluster:database-1\",\"PerformanceInsights\": \"true\", \"PerformanceInsightsKMSKeyId\": \"default\", \"PerformanceInsightsRetentionPeriod\": \"7 days\"}"
TEMPLATE CREATE:
Output the execution parameters for this change type to a JSON file named UpdatePerformanceInsightsParams.json.
aws amscm get-change-type-version --change-type-id "ct-31eyj2hlvqjwu" --query "ChangeTypeVersion.ExecutionInputSchema" --output text > UpdatePerformanceInsightsParams.jsonModify and save the execution parameters JSON file. For example, you can replace the contents with something like this:
{
  "DBIdentifierArn": "arn:aws:rds:us-east-1:123456789101:cluster:database-1",
  "PerformanceInsights": "true",
  "PerformanceInsightsKMSKeyId": "default",
  "PerformanceInsightsRetentionPeriod": "7 days"
}
Output the JSON template to a file in your current folder; this example names it UpdatePerformanceInsightsRfc.json:
aws amscm create-rfc --generate-cli-skeleton > UpdatePerformanceInsightsRfc.jsonModify and save the UpdatePerformanceInsightsRfc.json file. For example, you can replace the contents with something like this:
{
"ChangeTypeVersion":    "1.0",
"ChangeTypeId":         "ct-31eyj2hlvqjwu",
"Title":                "Update Performance Insights"
}
Create the RFC, specifying the execution parameters file and the UpdateRdsRfc file:
aws amscm create-rfc --cli-input-json file://UpdatePerformanceInsightsRfc.json --execution-parameters file://UpdatePerformanceInsightsParams.jsonYou receive the ID of the new RFC in the response and can use it to submit and monitor the RFC. Until you submit it, the RFC remains in the editing state and does not start.
You receive the ID of the new RFC in the response and can use it to submit and monitor the RFC. Until you submit it, the RFC remains in the editing state and does not start.
Note
AMS employs drift detection on certain stacks, including RDS stacks, to determine if configuration changes. The AMS disallows updates to an RDS stack that has been determined to have configuration drift. The RFC will fail with the following error message: "Update cannot be performed on this stack, please contact AMS for further assistance."
To learn more about Amazon RDS, including size recommendations, see
Amazon Relational Database Service Documentation
To update an RDS stack for Aurora, see RDS Database Stack | Update.
Create security group (Managed Automation)
Screenshot of this change type in the AMS console:

How it works:
Navigate to the Create RFC page: In the left navigation pane of the AMS console click RFCs to open the RFCs list page, and then click Create RFC.
Choose a popular change type (CT) in the default Browse change types view, or select a CT in the Choose by category view.
Browse by change type: You can click on a popular CT in the Quick create area to immediately open the Run RFC page. Note that you cannot choose an older CT version with quick create.
To sort CTs, use the All change types area in either the Card or Table view. In either view, select a CT and then click Create RFC to open the Run RFC page. If applicable, a Create with older version option appears next to the Create RFC button.
Choose by category: Select a category, subcategory, item, and operation and the CT details box opens with an option to Create with older version if applicable. Click Create RFC to open the Run RFC page.
On the Run RFC page, open the CT name area to see the CT details box. A Subject is required (this is filled in for you if you choose your CT in the Browse change types view). Open the Additional configuration area to add information about the RFC.
In the Execution configuration area, use available drop-down lists or enter values for the required parameters. To configure optional execution parameters, open the Additional configuration area.
When finished, click Run. If there are no errors, the RFC successfully created page displays with the submitted RFC details, and the initial Run output.
Open the Run parameters area to see the configurations you submitted. Refresh the page to update the RFC execution status. Optionally, cancel the RFC or create a copy of it with the options at the top of the page.
How it works:
Use either the Inline Create (you issue a
create-rfccommand with all RFC and execution parameters included), or Template Create (you create two JSON files, one for the RFC parameters and one for the execution parameters) and issue thecreate-rfccommand with the two files as input. Both methods are described here.Submit the RFC:
aws amscm submit-rfc --rfc-idcommand with the returned RFC ID.IDMonitor the RFC:
aws amscm get-rfc --rfc-idcommand.ID
To check the change type version, use this command:
aws amscm list-change-type-version-summaries --filter Attribute=ChangeTypeId,Value=CT_ID
Note
You can use any CreateRfc parameters with any RFC whether or not they are part of the schema for the
change type. For example, to get notifications when the RFC status changes, add this line, --notification "{\"Email\": {\"EmailRecipients\" : [\"email@example.com\"]}}" to the
RFC parameters part of the request (not the execution parameters). For a list of all CreateRfc parameters, see the
AMS Change Management API Reference.
INLINE CREATE:
Issue the create RFC command with execution parameters provided inline (escape quotes when providing execution parameters inline), and then submit the returned RFC ID. For example, you can replace the contents with something like this:
aws --profile saml amscm create-rfc --change-type-id "ct-1oxx2g2d7hc90" --change-type-version "2.0" --title "Test-SG-RR" --execution-parameters "{\"Description\":\"Test-SG-RR\", \"Name\":\"Test-SG-IC\", \"InboundRules\":{\"Protocol\":\"TCP\", \"PortRange\":\"49152-65535\, \"Source\":\"203.0.113.5/32\"}, \"OutboundRules\":{\"Protocol\":\"TCP\", \"PortRange\":\"49152-65535\, \"Destination\":\"203.0.113.5/32\"}}"
TEMPLATE CREATE:
Output the execution parameters JSON schema for this change type to a file; this example names it CreateSgRrParams.json.
aws amscm get-change-type-version --change-type-id "ct-1oxx2g2d7hc90" --query "ChangeTypeVersion.ExecutionInputSchema" --output text > CreateSgRrParams.jsonModify and save the CreateSgRrParams file. For example, you can replace the contents with something like this:
{
"Description":      "SG-Create-With-Review",
"Name":             "My-SG",
"VpcId":            "vpc-12345abc",
"InboundRules":   {
    "Protocol":     "TRAFFIC_PROTOCOL",
    "PortRange":    "PORT_RANGE",
    "Source":       "TRAFFIC_SOURCE"
    },
"OutboundRules":   {
    "Protocol":     "TRAFFIC_PROTOCOL",
    "PortRange":    "PORT_RANGE",
    "Destination":  "TRAFFIC_DESTINATION"
    }
}
Output the RFC template JSON file to a file named CreateSgRrRfc.json:
aws amscm create-rfc --generate-cli-skeleton > CreateSgRrRfc.jsonModify and save the CreateSgRrRfc.json file. For example, you can replace the contents with something like this:
{
"ChangeTypeVersion":    "2.0",
"ChangeTypeId":         "ct-1oxx2g2d7hc90",
"Title":                "SG-Create-RR-RFC"
}
Create the RFC, specifying the CreateSgRrRfc file and the CreateSgRrParams file:
aws amscm create-rfc --cli-input-json file://CreateSgRrRfc.json --execution-parameters file://CreateSgRrParams.jsonYou receive the ID of the new RFC in the response and can use it to submit and monitor the RFC. Until you submit it, the RFC remains in the editing state and does not start.
Note
There is an automated change type for creating a security group, Deployment | Advanced stack components | Security group | Create (no managed automation) (ct-3pc215bnwb6p7) that provides options for TCP and ICMP ingress and egress rules. If those rules are adequate, the Create (auto) change type will execute more quickly than this change type. For details, see Security Group | Create.
Note
Once the security group is created, use Security Group | Associate to associate the security group with your AMS resources. In order to delete a security group, it must have associated resources.
Note
Outbound rules are not required; however, if they are not specified, then a "127.0.0.1/32 Blackhole Rule" is used, meaning that the resource will only be able to communicate to itself and not with other resources. You can see this default outbound rule when using the AMS console, but not when using the AMS API/CLI.
This is a manual change type (an AMS operator must review and run the CT), which means that the RFC can take longer to run and you might have to communicate with AMS through the RFC details page correspondance option. Additionally, if you schedule a manual change type RFC, be sure to allow at least 24 hours, if approval does not happen before the scheduled start time, the RFC is rejected automatically.
To learn more about AWS security groups and creating security groups, see Security Group Rules Reference; this page can help you determine the rules you want and, importantly, how to name your security group so choosing it when creating other resources is intuitive. Also see Amazon EC2 Security Groups for Linux Instances and/or Security Groups for Your VPC.
To better understand general AWS security, see
Best Practices for Security, Identity, & Compliance
Once the security group is created, use Security Group | Associate to associate the security group with your AMS resources. In order to delete a security group, it must have associated resources.
