Create the HTML for your Amazon Location application
In this tutorial, you will create a static HTML page that embeds a map, and allows the user to find what's at a location on the map. The app will consist of three files: an HTML file and CSS file for the webpage, and a JavaScript (.js) file for the code that creates the map and responds to the user's interactions and map events.
First, let's create the HTML and CSS framework that will be used for the application.
This will be a simple page with a <div> element to hold the map
container and a <pre> element to show the JSON responses to your queries.
To create the HTML for your quick start application
-
Create a new file called
quickstart.html. -
Edit the file in the text editor or environment of your choice. Add the following HTML to the file.
<!DOCTYPE html>
<html>
  <head>
    <meta charset="utf-8">
    <title>Quick start tutorial</title>

    <!-- Styles -->
    <link href="main.css" rel="stylesheet" />
  </head>

  <body>
    <header>
      <h1>Quick start tutorial</h1>
    </header>
    <main>
      <div id="map"></div>
      <aside>
        <h2>JSON Response</h2>
        <pre id="response"></pre>
      </aside>
    </main>
    <footer>This is a simple Amazon Location Service app. Pan and zoom. Click to see details about entities close to a point.</footer>

  </body>
</html>
This HTML has a pointer to the CSS file that you will create in the next step, some placeholder elements for the application, and some explanatory text.
There are two placeholder elements that you will use later in this tutorial. The first is the
<div id="map>element, which will hold the map control. The second is the<pre id="response">element, which will show the results of searching on the map. -
Save your file.
Now add the CSS for the webpage. This will set the style of the text and placeholder elements for the application.
To create the CSS for your quick start application
-
Create a new file called
main.css, in the same folder as the quickstart.html file created in the previous procedure. -
Edit the file in whatever editor that you want to use. Add the following text to the file.
* {
  box-sizing: border-box;
  font-family: Arial, Helvetica, sans-serif;
}

body {
  margin: 0;
}

header {
  background: #000000;
  padding: 0.5rem;
}

h1 {
  margin: 0;
  text-align: center;
  font-size: 1.5rem;
  color: #ffffff;
}

main {
  display: flex;
  min-height: calc(100vh - 94px);
}

#map {
  flex: 1;
}

aside {
  overflow-y: auto;
  flex: 0 0 30%;
  max-height: calc(100vh - 94px);
  box-shadow: 0 1px 1px 0 #001c244d, 1px 1px 1px 0 #001c2426, -1px 1px 1px 0 #001c2426;
  background: #f9f9f9;
  padding: 1rem;
}

h2 {
  margin: 0;
}

pre {
  white-space: pre-wrap;
  font-family: monospace;
  color: #16191f;
}

footer {
  background: #000000;
  padding: 1rem;
  color: #ffffff;
}
This sets the map to fill the space not used by anything else, sets the area for our responses to take up 30% of the width of the app, and sets color and styles for the title and explanatory text.
-
Save the file.
-
You can now view the
quickstart.htmlfile in a browser to see the layout of the application.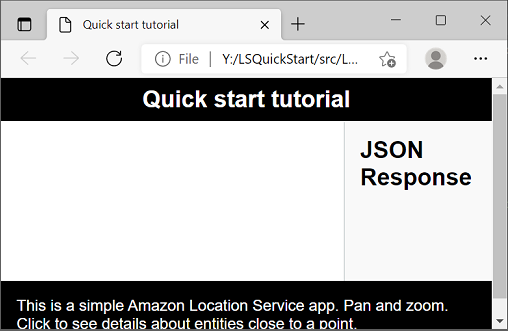
Next, you will add the map control to the application.
