Add an Amazon Location interactive map to your application
Now that you have a framework and a div placeholder, you can add the map control to
your application. This tutorial uses MapLibre GL JS
To add an interactive map to your application
-
Open the
quickstart.htmlfile that you created in the previous section. -
Add references to the needed libraries, and the script file that you will create. The changes you need to make are shown in
green.<!DOCTYPE html> <html> <head> <meta charset="utf-8"> <title>Quick start tutorial</title> <!-- Styles --><link href="https://unpkg.com/maplibre-gl@3.x/dist/maplibre-gl.css" rel="stylesheet" /><link href="main.css" rel="stylesheet" /> </head> <body> ... <footer>This is a simple Amazon Location Service app. Pan and zoom. Click to see details about entities close to a point.</footer><!-- JavaScript dependencies --> <script src="https://unpkg.com/maplibre-gl@3.x/dist/maplibre-gl.js"></script> <script src="https://unpkg.com/@aws/amazon-location-client@1.x/dist/amazonLocationClient.js"></script> <script src="https://unpkg.com/@aws/amazon-location-utilities-auth-helper@1.x/dist/amazonLocationAuthHelper.js"></script> <!-- JavaScript for the app --> <script src="main.js"></script></body> </html>This adds the following dependencies to your app:
-
MapLibre GL JS. This library and stylesheet include a map control that displays map tiles and includes interactivity, such as pan and zoom. The control also allows extensions, such as drawing your own features on the map.
-
Amazon Location client. This provides interfaces for the Amazon Location functionality needed to get map data, and to search for places on the map. The Amazon Location client is based on the AWS SDK for JavaScript v3.
-
Amazon Location Authentication Helper. This provides helpful functions for authenticating Amazon Location Service with API keys or Amazon Cognito.
This step also adds a reference to
main.js, which you will create next. -
-
Save the
quickstart.htmlfile. -
Create a new file called
main.jsin the same folder as your HTML and CSS files, and open it for editing. -
Add the following script to your file. The text in
redshould be replaced with the API key value, map resource name, and place resource name that you created earlier, as well as the region identifier for your region (such asus-east-1).// Amazon Location Service resource names: const mapName = "explore.map"; const placesName = "explore.place"; const region = "your_region"; const apiKey = "v1.public.a1b2c3d4...// Initialize a map async function initializeMap() { const mlglMap = new maplibregl.Map({ container: "map", // HTML element ID of map element center: [-77.03674, 38.891602], // Initial map centerpoint zoom: 16, // Initial map zoom style: `https://maps.geo.${region}.amazonaws.com/maps/v0/maps/${mapName}/style-descriptor?key=${apiKey}`, // Defines the appearance of the map and authenticates using an API key }); // Add navigation control to the top left of the map mlglMap.addControl(new maplibregl.NavigationControl(), "top-left"); return mlglMap; } async function main() { // Initialize map and Amazon Location SDK client: const map = await initializeMap(); } main();This code sets up Amazon Location resources, then configures and initializes a MapLibre GL JS map control and places it in your
<div>element with the idmap.The
initializeMap()function is important to understand. It creates a new MapLibre map control (calledmlglMaplocally, but calledmapin the rest of the code) that is used to render the map in your application.// Initialize the map const mlglMap = new maplibregl.Map({ container: "map", // HTML element ID of map element center: [-77.03674, 38.891602], // Initial map centerpoint zoom: 16, // Initial map zoom style: `https://maps.geo.${region}.amazonaws.com/maps/v0/maps/${mapName}/style-descriptor?key=${apiKey}`, // Defines the appearance of the map and authenticates using an API key });When you create a new MapLibre map control, the parameters that you pass indicate the initial state of the map control. Here, we set the following parameters.
-
HTML container, which uses the map div element in our HTML.
-
The initial center of the map to a point in Washington, DC.
-
The zoom level to 16 (zoomed into a neighborhood or block level).
-
The style to use for the map, which gives MapLibre a URL to use to get the map tiles and other information to render the map. Notice that this URL includes your API key for authentication.
-
-
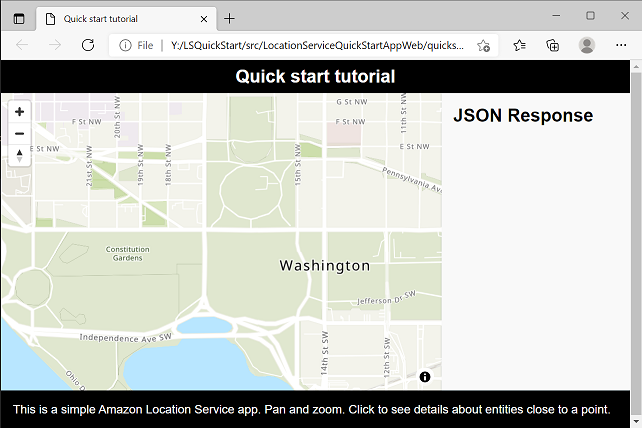
Save your JavaScript file, and open it with a browser. You now have a map on your page, where you can use pan and zoom actions.
Note
You can use this app to see how the MapLibre map control behaves. You can try using Ctrl or Shift while using a dragging operation, to see other ways to interact with the map. All of this functionality is customizable.
Your app is nearly complete. In the next section, you will handle choosing a location on the map, and show the address of the location chosen. You will also show the resulting JSON on the page, to see the full results.
