Launch and configure a WordPress instance
Amazon Lightsail is the easiest way to get started with Amazon Web Services (AWS). Lightsail
includes everything you need to launch your project quickly — instances (virtual private
servers), managed databases, SSD-based storage, backups (snapshots), data transfer, domain DNS
management, static IPs, and load balancers — for a low, predictable price
With this tutorial, you will learn how to launch and configure a WordPress instance on Lightsail. It includes steps to configure a custom domain name, secure internet traffic with HTTPS, connect to your instance by using SSH, and sign in to your WordPress website. When you're done with this tutorial, you have the fundamentals to get your instance up and running on Lightsail.
Note
As part of the AWS Free Tier, you can get started with Amazon Lightsail for free on
select instance bundles. For more information, see AWS Free Tier
on the Amazon Lightsail Pricing page
Step 1: Sign up for AWS
Amazon Lightsail requires an AWS account. Sign up for AWS
Step 2: Create a WordPress instance
Complete the following steps to get your WordPress instance up and running. For more information, see Create a Lightsail instance.
To create a Lightsail instance for WordPress
-
Sign in to the Lightsail console
. -
On the Instances section of the Lightsail home page, choose Create instance.

-
Choose the AWS Region and Availability Zone for your instance.

-
Choose the image for your instance as follows:
-
For Select a platform, choose Linux/Unix.
-
Select a WordPress blueprint.
-
Select your Blueprint provider. We recommend using Lightsail.
-
-
Choose an instance plan.
A plan includes a machine configuration (RAM, SSD, vCPU) at a low, predictable cost, plus a data transfer allowance.
-
Enter a name for your instance. Resource names:
-
Must be unique within each AWS Region in your Lightsail account.
-
Must contain 2 to 255 characters.
-
Must start and end with an alphanumeric character or number.
-
Can include alphanumeric characters, numbers, periods, dashes, and underscores.
-
-
Choose Create instance.
-
To view the test blog post, go to the instance management page and copy the public IPv4 address shown in the upper-right corner of the page. Paste the address into the address field of an internet-connected web browser. The browser displays the test blog post.
Step 3: Configure your WordPress instance
You can configure your WordPress instance by using a guided, step-by-step workflow that will configure the following:
-
A registered domain name – Your WordPress site needs a domain name that is easy to remember. Users will specify this domain name to access your WordPress site. For more information, see Register and manage domains for your website in Lightsail.
-
DNS management – You must decide how to manage the DNS records for your domain. A DNS record tells the DNS server which IP address or hostname a domain or subdomain is associated with. A DNS zone contains the DNS records for your domain. For more information, see Understanding DNS in Lightsail.
-
A Static IP address – The default public IP address for your WordPress instance changes if you stop and start your instance. When you attach a static IP address to your instance, it stays the same even if you stop and start your instance. For more information, see View and manage IP addresses for Lightsail resources.
-
An SSL/TLS certificate – After you create a validated certificate and install it on your instance, you can enable HTTPS for your WordPress website so that traffic that is routed to the instance through your registered domain is encrypted using HTTPS. For more information, see Secure your WordPress site with HTTPS on Lightsail.
Tip
Review the following tips before you begin. For troubleshooting information, see Troubleshooting WordPress setup.
-
Your instance must be in a Running state. Allow a few minutes for the SSH connection to become ready if the instance was just started.
-
Ports 22, 80, and 443 on your instance firewall must allow TCP connections from any IP address while setup is running. For more information, see Instance firewalls.
-
When you add or update DNS records that point traffic from your apex domain (
example.com) and itswwwsubdomains (www.example.com), they will need to propagate throughout the Internet. You can verify that your DNS changes have taken effect by using tools such as nslookup, or DNS Lookup from MxToolbox. -
Let's Encrypt certificates will automatically renew every 60 to 90 days.
-
While setup is in progress, do not stop or make changes to your instance. It can take up to 15 minutes to configure your instance. You can view the progress for each step in the instance connect tab.
To configure your instance using the website setup wizard
-
On the instance management page, on the Connect tab, choose Set up your website.

-
For Specify a domain name, use an existing Lightsail managed domain, register a new domain with Lightsail, or use a domain that you registered by using another domain registrar. Choose Use this domain to go to the next step.
-
For Configure DNS, do one of the following:
-
Choose Lightsail managed domain to use a Lightsail DNS zone. Choose Use this DNS zone to go to the next step.
-
Choose Third-party domain to use the hosting service that manages the DNS records for your domain. Note that we create a matching DNS zone in your Lightsail account in case you decide to use it later on. Choose Use third-party DNS to go to the next step.
-
-
For Create a static IP address, enter a name for your static IP address and then choose Create static IP.
-
For Manage domain assignments, choose Add assignment, choose a domain type, and then choose Add. Choose Continue to go to the next step.
-
For Create an SSL/TLS certificate, choose your domains and subdomains, enter an email address, select I authorize Lightsail to configure a Let's Encrypt certificate on my instance, and choose Create certificate. We start to configure the Lightsail resources.
While setup is in progress, do not stop or make changes to your instance. It can take up to 15 minutes to configure your instance. You can view the progress for each step in the instance connect tab.
-
After the website setup is complete, verify that the URLs that you specified in the domain assignments step open your WordPress site.
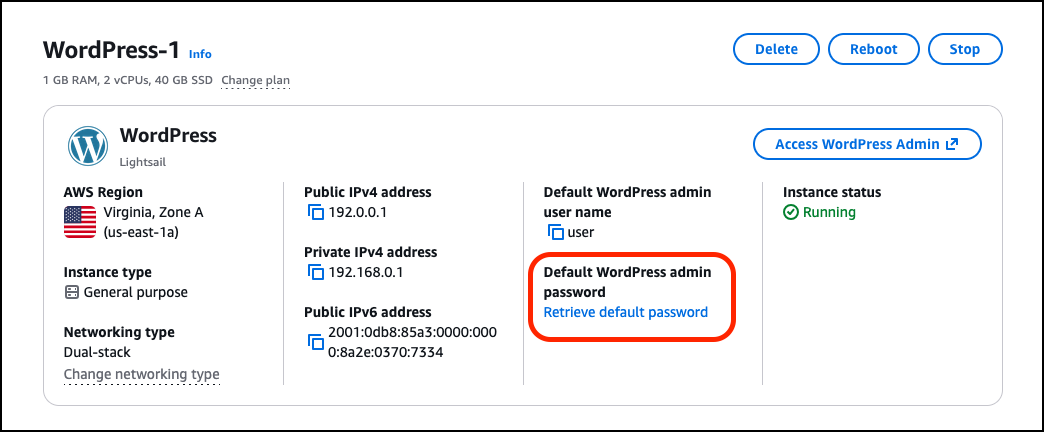
Step 4: Get the admin password for your WordPress website
The default password to sign in to the administration dashboard of your WordPress website is stored on the instance. Complete the following steps to get the password.
To get the default password for the WordPress administrator
-
Open the instance management page for your WordPress instance.
-
On the WordPress panel, choose Retrieve default password. This expands Access default password at the bottom of the page.
-
Choose Launch CloudShell. This opens a panel at the bottom of the page.
-
Choose Copy and then paste the contents into the CloudShell window. You can either put your cursor at the CloudShell prompt and press Ctrl+V, or you can right-click to open the menu and then choose Paste.
-
Make a note of the password displayed in the CloudShell window. You need this to sign in to the administration dashboard of your WordPress website.

Step 5: Sign in to the administration dashboard of your WordPress website
Now that you have the password for the administration dashboard of your WordPress website, you can sign in. In the administration dashboard, you can change your user password, install plugins, change the theme of your website, and more.
Complete the following steps to sign in to the administration dashboard of your WordPress website.
To sign in to the administration dashboard
-
Open the instance management page for your WordPress instance.
-
On the WordPress panel, choose Access WordPress Admin.
-
On the Access your WordPress Admin Dashboard panel, under Use public IP address, choose the link with this format:
http://
public-ipv4-address./wp-admin -
For Username or Email Address, enter
user. -
For Password, enter the password obtained in the previous step.
-
Choose Log in.

You are now signed in to the administration dashboard of your WordPress website where you can perform administrative actions. For more information about administering your WordPress website, see the WordPress Codex
in the WordPress documentation. 
Additional information
Here are some additional steps that you can perform after launching a WordPress instance in Amazon Lightsail:
