Amazon Redshift Managed Storage for the lakehouse architecture of Amazon SageMaker
You can manage Amazon Redshift tables in the lakehouse architecture of Amazon SageMaker by creating a Amazon Redshift managed catalog in the AWS Glue Data Catalog (Data Catalog). With lakehouse architecture integration, you can access Amazon Redshift tables stored in the Amazon Redshift managed storage (RMS) through Apache Iceberg REST APIs. The lakehouse architecture uses Data Catalog as the technical catalog. The Data Catalog functions as the centralized metadata repository, storing table schemas, partitioning information, and other metadata required for query planning and execution. AWS Lake Formation provides fine-grained access to Redshift tables stored in RMS. You can query and analyze Amazon Redshift data alongside your data lake assets.
Amazon Redshift managed storage overview
Amazon Redshift Managed Storage provides the following benefits for your lakehouse architecture:
-
Unified data access - Query Amazon Redshift tables directly from your lakehouse environment using familiar SQL interfaces
-
No data movement - Access Amazon Redshift data in place without ETL processes or data duplication
-
Consistent governance - Apply unified access controls and data governance policies across data warehouse and data lake
-
Performance optimization - Leverage Amazon Redshift's columnar storage and query optimization for analytical workloads
Creating Amazon Redshift managed catalog in the AWS Glue Data Catalog
You can create a Amazon Redshift managed catalog in the AWS Glue Data Catalog with RMS storage. This catalog will contain the Amazon Redshift tables and databases that are accessible from open source engines to serve to business intelligence (BI) applications.
You can get started by creating an AWS Glue
managed catalog using the glue:CreateCatalog API or the AWS Lake Formation console by setting
the catalog type as Managed and Catalog source as Redshift. This step does the following:
Creates a catalog in the Data Catalog
Registers the catalog as a Lake Formation data location
creates an Amazon Redshift managed serverless-workgroup
Links Amazon Redshift serverless workgroup and Data Catalog using a datashare object
To create a managed catalog and set up permissions (console)
-
Open the Lake Formation console at https://console.aws.amazon.com/lakeformation/
. In the navigation pane, choose Catalogs under Data Catalog.
Select the option Create catalog.
Next, choose Redshift managed storage as the data source.
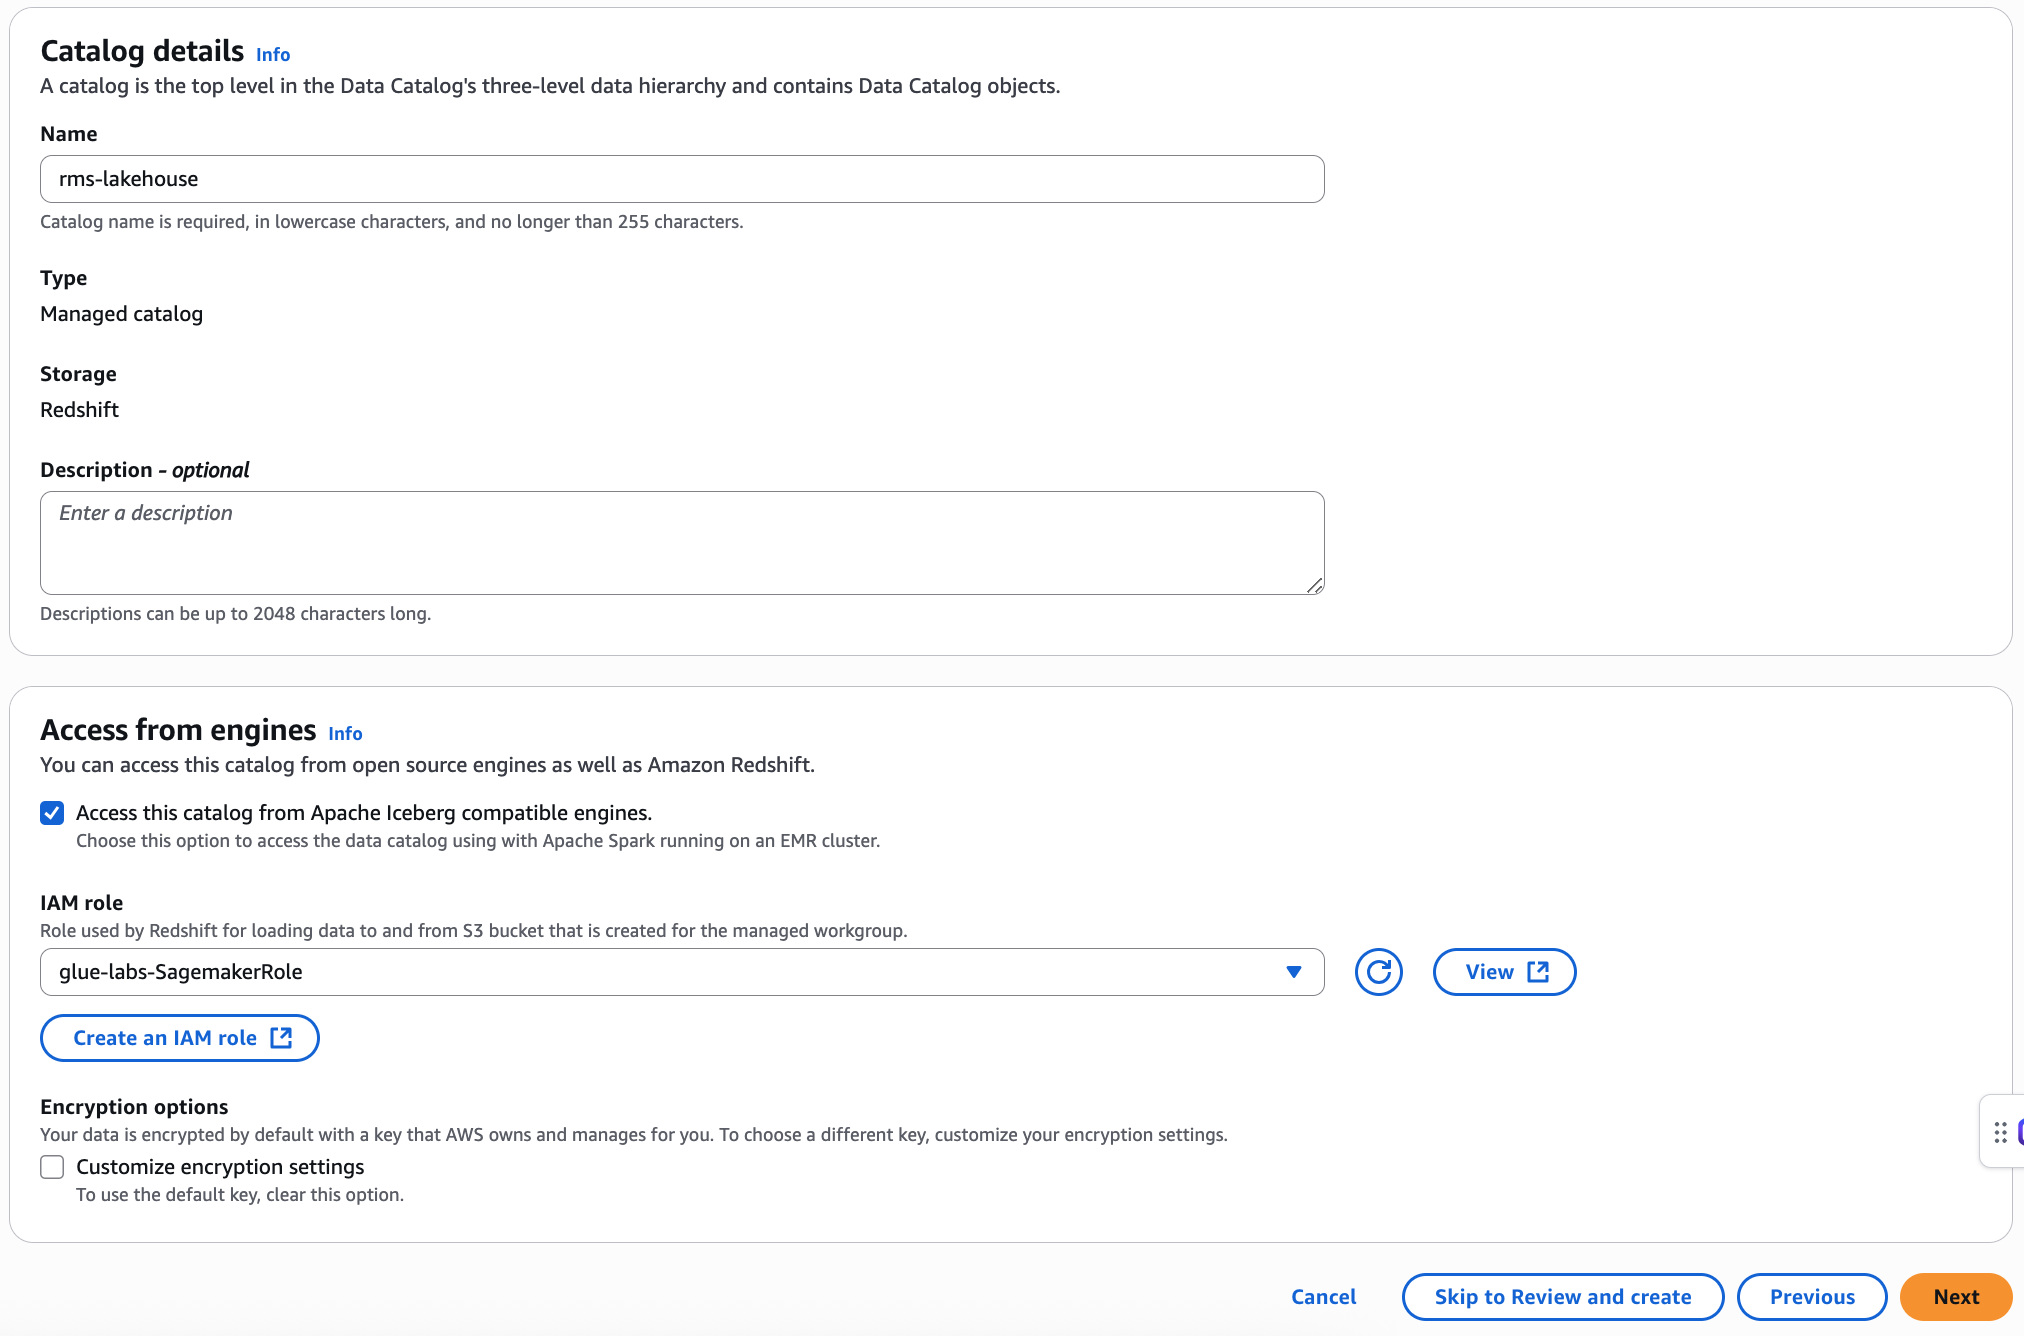
On the Set catalog details page, enter the following information:
-
Name – A unique name for your managed catalog. The name can't be changed, and must be in lower case. The name can consist of a maximum of 255 characters maximum. account.
-
Description – Enter a description for the catalog created from the data source.
-
Under Access from engines make sure that Access this catalog from Iceberg compatible engines is selected.
You can use Apache Spark applications running on Amazon EMR on Amazon EC2 to access the Amazon Redshift databases in the AWS Glue Data Catalog.
To enable Apache Spark to read and write to Amazon Redshift managed storage, AWS Glue creates a managed Amazon Redshift cluster with the compute and storage resources required to perform read and write operations without impacting Amazon Redshift data warehouse workloads.
-
You also need to provide an IAM role with the permissions required to transfer data to and from the Amazon S3 bucket. For the permissions required for the data transfer role, see step 5 in the Prerequisites for managing Amazon Redshift managed catalog in the AWS Glue Data Catalog section.
-
Encryption options – Choose Customize encryption settings option if you want to use a custom key to encrypt the catalog. To use a custom key, you must add additional custom managed key policy to your KMS key.
By default, the data in the Amazon Redshift cluster is encrypted using an AWS managed key. Lake Formation provides an option to create your custom KMS key for encryption. If you're using a customer managed key, you must add specific key policies to the key.
-
Choose Next to grant permissions to other principals.
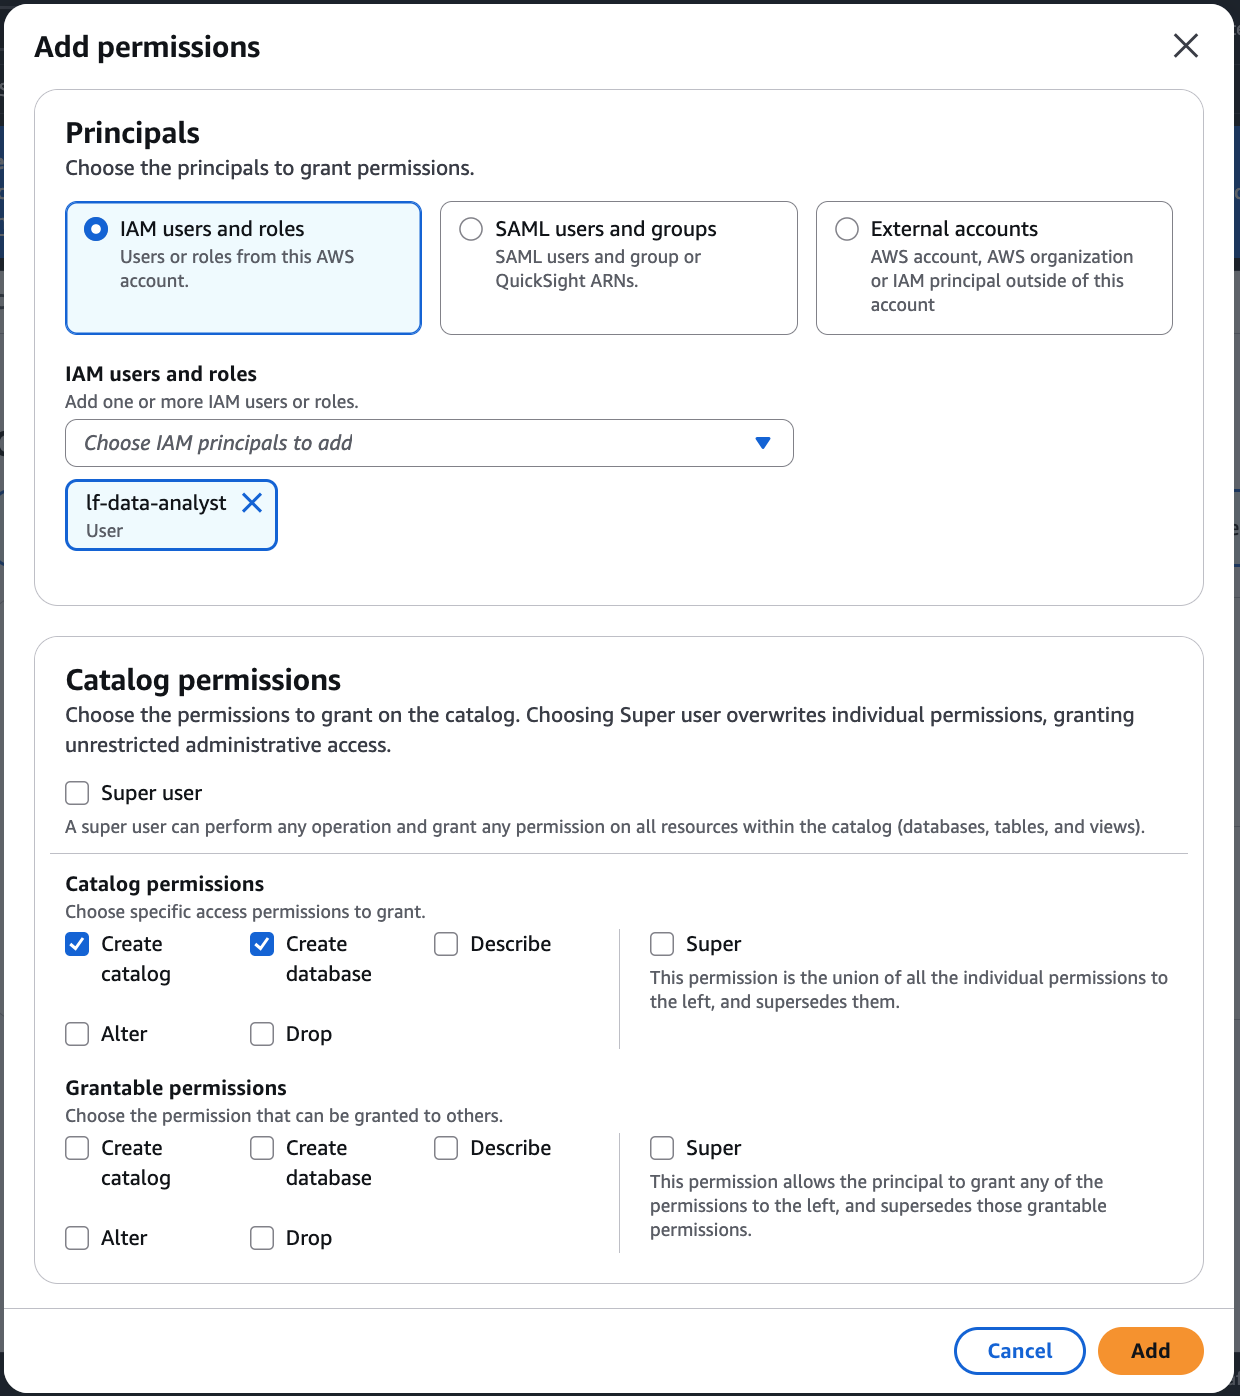
On the Grant permissions page, choose Add permissions.
-
On the Add permissions screen, choose the principals and the types of permissions to grant.
-
In the Principals section, choose a principal type and then specify principals to grant permissions.
-
IAM users and roles – Choose one or more users or roles from the IAM users and roles list.
-
SAML users and groups – For SAML and Amazon Quick users and groups, enter one or more Amazon Resource Names (ARNs) for users or groups federated through SAML, or ARNs for Amazon Quick users or groups. Press Enter after each ARN.
-
External accounts – Select this option if you want to share the catalog with external accounts, organizations or IAM roles.
For information about how to construct the ARNs, see AWS CLI grant and revoke AWS CLI commands.
-
-
In the Permissions section, select permissions and grantable permissions.
Under Catalog permissions, select one or more permissions to grant.
Choose Super user to grant unrestricted administrative permissions on all resources within the catalog.
Under Grantable permissions, select the permissions that the grant recipient can grant to other principals in their AWS account. This option is not supported when you are granting permissions to an IAM principal from an external account.
-
-
Choose Next to review the information and create the catalog. The Catalogs list shows the new managed catalog.
To create a federated catalog (CLI)
-
The following example shows how to create a federated catalog.
aws glue create-catalog --cli-input-json file://input.json { "Name":"CatalogName", "CatalogInput": { "Description":"Redshift published Catalog", "CreateDatabaseDefaultPermissions" : [], "CreateTableDefaultPermissions": [], "CatalogProperties": { "DataLakeAccessProperties" : { "DataLakeAccess" : "true", "DataTransferRole" :"DTR arn", "KMSKey":"kms key arn", // Optional "CatalogType": "aws:redshift" } } } }Glue get-catalog response
aws glue get-catalog \ --catalog-idaccount-id:catalog-name\ --regionus-east-1Response: { "Catalog": { "Name": "CatalogName", "Description": "Glue Catalog for Redshift z-etl use case", "CreateDatabaseDefaultPermissions" : [], "CreateTableDefaultPermissions": [], "CatalogProperties": { "DataLakeAccessProperties" : { "DataLakeAccess": "true", "DataTransferRole": "DTR arn", "KMSKey": "kms key arn", "ManagedWorkgroupName": "MWG name", "ManagedWorkgroupStatus": "MWG status", "RedshiftDatabaseName": "RS db name", "NamespaceArn": "namespace key arn", "CatalogType": "aws:redshift" } } }
Accessing Amazon Redshift data
Once RMS integration is established, you can access Amazon Redshift data through multiple interfaces:
-
SQL queries - Use Amazon Athena or other SQL engines to query Amazon Redshift tables alongside Amazon S3 data
-
Data discovery - Browse Amazon Redshift schemas and tables through the lakehouse data catalog
-
Cross-source joins - Perform federated queries that join Amazon Redshift data with data lake sources
-
ML workflows - Access Amazon Redshift data directly in Amazon SageMaker Unified Studio for machine learning model training and inference
Best practices
Follow these best practices when working with Amazon Redshift Managed Storage:
-
Security - Use IAM roles for authentication and implement least-privilege access principles
-
Performance - Optimize queries by using appropriate filters and leveraging the distribution of Amazon Redshift and sort keys
-
Cost management - Monitor query patterns and optimize Amazon Redshift cluster sizing based on usage
-
Data governance - Apply consistent data classification and access policies across warehouse and lake
