기계 번역으로 제공되는 번역입니다. 제공된 번역과 원본 영어의 내용이 상충하는 경우에는 영어 버전이 우선합니다.
Azure DevOps 파이프라인에서 프라이빗 Amazon EKS 클러스터로 워크로드 배포
Mahendra Revanasiddappa, Amazon Web Services
요약
이 패턴은 Azure DevOps 파이프라인에서 프라이빗 Amazon Elastic Kubernetes Service(Amazon EKS) 클러스터로 지속적 통합 및 지속적 전달(CI/CD)을 구현하는 방법을 보여줍니다. Amazon EKS 클러스터의 프라이빗 API 서버 엔드포인트로 전환하여 보안 태세를 강화하고 있는 조직이 직면한 중요한 문제를 해결합니다.
퍼블릭 엔드포인트는 Kubernetes API 서버를 인터넷에 직접 노출하여 악의적인 공격자가 잠재적으로 대상으로 삼을 수 있는 더 큰 공격 표면을 생성합니다. 프라이빗 엔드포인트로 전환하면 클러스터의 컨트롤 플레인에 대한 액세스가 고객의 Virtual Private Cloud(VPC) 내에서 로 제한됩니다.
Amazon EKS 클러스터를 프라이빗 API 엔드포인트로 전환하면 보안이 크게 향상되지만 Azure DevOps와 같은 외부 CI/CD 플랫폼에 연결 문제가 발생합니다. 프라이빗 엔드포인트는 클러스터의 VPC 또는 피어링된 네트워크 내에서만 액세스할 수 있습니다. 따라서 AWS 프라이빗 네트워크 외부에서 작동하는 표준 Microsoft 호스팅 Azure DevOps 에이전트는 Kubernetes API 서버에 직접 연결할 수 없습니다. 이렇게 하면 클러스터에 대한 연결을 설정하지 못하기 때문에 이러한 에이전트에서 실행되는 kubectl 또는 Helm과 같은 도구에 의존하는 일반적인 배포 워크플로가 중단됩니다.
이 문제를 해결하기 위해이 패턴은 프라이빗 Amazon EKS 클러스터 내에서 자체 호스팅된 Azure DevOps 에이전트를 사용하여 효율적인 접근 방식을 보여줍니다. 이 솔루션은 보안 요구 사항을 유지하면서 우수한 비용 최적화, 운영 효율성 및 확장성을 제공합니다. 이 접근 방식은 성능이나 보안을 손상시키지 않고 멀티 클라우드 DevOps 프로세스를 간소화하려는 기업에 특히 유용합니다.
사전 조건 및 제한 사항
사전 조건
활성. AWS 계정
AWS Command Line Interface (AWS CLI) 버전 2.13.17 이상, 설치됨.
kubectl 버전 1.25.1 이상 설치
네임스페이스, 보안 암호 및 배포를 생성할 수 있는 권한이 있는 프라이빗 Amazon EKS 클러스터 버전 1.24 이상이 생성되었습니다.
Amazon EKS 클러스터의 작업자 노드를 인터넷에 아웃바운드로 연결하여 해당 노드에서 실행되는 Azure DevOps 에이전트가 Azure DevOps 에이전트 풀에 연결할 수 있도록 합니다.
GitHub 계정이 생성되었습니다
. Azure Pipelines과 외부 또는 원격 서비스 간의 인증된 연결인 서비스 연결을 구성할 수 있는 액세스 권한이 있는 Azure DevOps 프로젝트가 생성됩니다
. 이전 포인트에서 설명한 Azure DevOps 프로젝트를 위해 설치된 AWS Toolkit for Azure DevOps 버전 1.15 이상입니다. 설치 지침은 Visual Studio MarketplaceAWS Toolkit for Azure DevOps
의 섹션을 참조하세요.
제한 사항
일부 AWS 서비스 는 전혀 사용할 수 없습니다 AWS 리전. 리전별 가용성은 리전별AWS 서비스
를 참조하세요. 구체적인 엔드포인트는 서비스 엔드포인트 및 할당량을 참조하고 서비스 링크를 선택합니다.
아키텍처
이 패턴은 다음을 생성합니다.
Amazon ECR 리포지토리 - Amazon Elastic Container Registry(Amazon ECR) 리포지토리는 Azure DevOps 에이전트 및 배포된 샘플 앱과 함께 Docker 이미지를 저장합니다.
Azure DevOps 에이전트 풀 - Azure DevOps 자체 호스팅 에이전트 풀은 프라이빗 Amazon EKS 클러스터에서 실행되는 에이전트를 등록합니다.
IAM 역할 - 프라이빗 Amazon EKS 클러스터에서 실행 중인 에이전트에 필요한 액세스를 제공하는 Azure 서비스 연결을 위한 AWS Identity and Access Management (IAM) 역할입니다.
Azure DevOps 서비스 연결 - 파이프라인 작업이에 액세스하는 데 필요한 액세스를 제공하는 IAM 역할을 사용하기 위한 Azure DevOps 계정의 서비스 연결입니다 AWS 서비스.
다음 다이어그램은 프라이빗 Amazon EKS 클러스터에 자체 호스팅된 Azure DevOps 에이전트를 배포하고 동일한 클러스터에 샘플 애플리케이션을 배포하는 아키텍처를 보여줍니다.
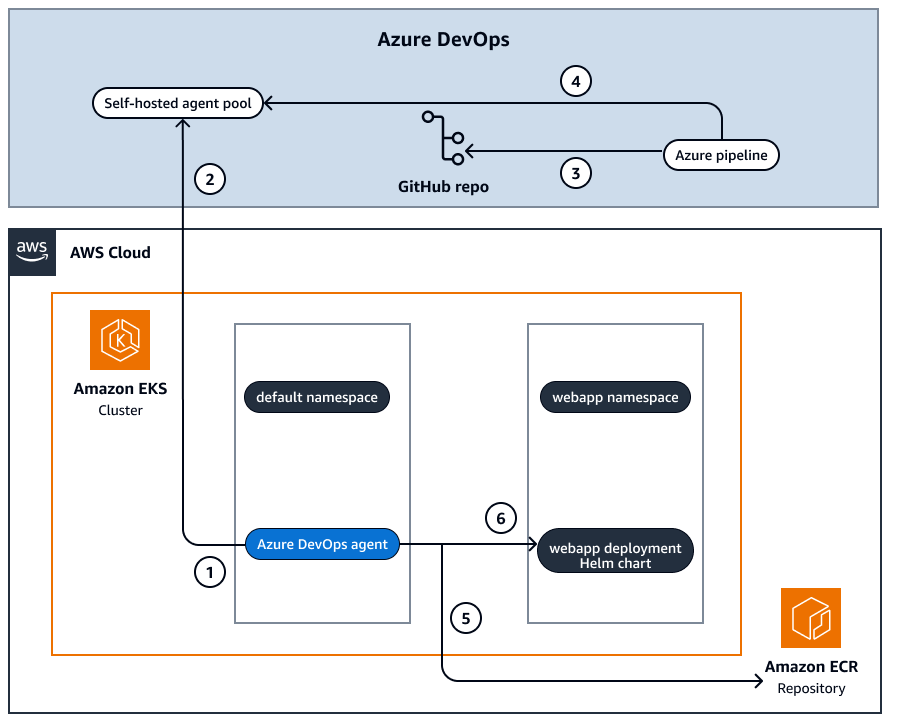
이 다이어그램은 다음 워크플로를 보여줍니다.
자체 호스팅 Azure DevOps 에이전트를 Amazon EKS 클러스터 내에 배포로 배포합니다.
Azure DevOps 에이전트는 인증을 위해 개인 액세스 토큰(PAT)을 사용하여 Azure DevOps 계정의 에이전트 풀에 연결합니다.
Azure Pipelines은 GitHub 리포지토리의 코드를 사용하여 배포하도록 파이프라인을 구성합니다.
파이프라인은 파이프라인 구성에 구성된 에이전트 풀의 에이전트에서 실행됩니다. Azure DevOps 에이전트는 Azure DevOps 계정으로 지속적으로 폴링하여 파이프라인의 작업 정보를 가져옵니다.
Azure DevOps 에이전트는 파이프라인 작업의 일부로 Docker 이미지를 빌드하고 이미지를 Amazon ECR 리포지토리로 푸시합니다.
Azure DevOps 에이전트는 라는 네임스페이스의 프라이빗 Amazon EKS 클러스터에 샘플 애플리케이션을 배포합니다
webapp.
도구
도구
Amazon Elastic Container Registry(Amazon ECR)는 안전하고 확장 가능하고 신뢰할 수 있는 관리형 컨테이너 이미지 레지스트리 서비스입니다.
Amazon Elastic Kubernetes Service(Amazon EKS)를 사용하면 자체 Kubernetes 컨트롤 플레인 또는 노드를 설치하거나 유지 관리할 필요 AWS 없이에서 Kubernetes를 실행할 수 있습니다.
AWS Identity and Access Management (IAM)는 AWS 리소스에 대한 액세스를 인증하고 사용할 수 있는 권한을 부여받은 사용자를 제어하여 리소스에 대한 액세스를 안전하게 관리하는 데 도움이 됩니다.
기타 도구
코드 리포지토리
이 패턴의 코드는 GitHub deploy-kubernetes-resources-to-amazon-eks-using-azure-devops
리포지토리에서 사용할 수 있습니다.
모범 사례
Amazon EKS의 경우 Amazon EKS 모범 사례 가이드를 참조하세요.
최소 권한 원칙을 따르고 작업을 수행하는 데 필요한 최소 권한을 부여하세요. 자세한 내용은 IAM 설명서의 최소 권한 부여 및 보안 모범 사례를 참조하세요.
에픽
| 작업 | 설명 | 필요한 기술 |
|---|---|---|
Azure DevOps 조직 GUID를 찾습니다. | Azure DevOps 계정에 로그인한 다음 다음 URL을 사용하여 조직 GUID를 찾습니다. URL | DevOps |
에서 IdP를 구성합니다 AWS 계정. | Azure 서비스 연결을 AWS 계정 위해에서 ID 제공업체(IdP)를 구성하려면 다음 단계를 사용합니다.
자세한 내용은 OpenID Connect를 사용하여 Azure DevOps AWS 에서 로 페더레이션하는 방법을 | DevOps |
AWS 계정을 사용하여 IAM 정책을 생성합니다. | Azure DevOps 파이프라인에서 사용하는 IAM 역할에 필요한 권한을 제공하는 IAM 정책을 생성하려면 다음 단계를 사용합니다.
| DevOps |
에서 IAM 역할 생성하기 | Azure 서비스 연결을 AWS 계정 위해에서 IAM 역할을 구성하려면 다음 단계를 사용합니다.
정책에서 다음 자리 표시자에 대한 정보를 제공합니다.
| DevOps |
Azure DevOps 계정에서 서비스 연결을 생성합니다. | Azure 서비스 연결을 구성하려면 다음 단계를 사용합니다.
자세한 내용은 Microsoft 설명서의 서비스 연결 생성을 | DevOps |
Amazon EKS 구성 파일에 IAM 역할을 추가합니다. | IAM 역할에는 Amazon EKS 클러스터에서 필요한 작업을 수행하는 데 필요한 권한이 있어야 합니다. 파이프라인 역할이므로 IAM 역할은 클러스터에서 거의 모든 유형의 리소스를 관리할 수 있어야 합니다. 따라서 Kubernetes
를 AWS 계정 ID 자세한 내용은 Amazon EKS 설명서의 Amazon EKS에서 IAM을 사용하는 방법을 참조하세요. | DevOps |
| 작업 | 설명 | 필요한 기술 |
|---|---|---|
자체 호스팅 에이전트 풀을 생성합니다. | Azure DevOps 계정에서 자체 호스팅된 에이전트 풀을 구성하려면 다음 단계를 사용합니다.
자세한 내용은 Microsoft 설명서의 에이전트 풀 생성 및 관리를 참조하세요 |
| 작업 | 설명 | 필요한 기술 |
|---|---|---|
Amazon ECR 리포지토리를 생성합니다. | 프라이빗 Amazon EKS 클러스터에 Azure DevOps 에이전트 및 샘플 애플리케이션(
자세한 내용은 Amazon ECR 설명서의 이미지를 저장할 Amazon ECR 프라이빗 리포지토리 생성을 참조하세요. | DevOps |
Dockerfile을 생성하여 Azure DevOps 에이전트를 빌드합니다. | Dockerfile을 생성하여 Azure DevOps 에이전트가 설치된 Docker 이미지를 빌드합니다. 다음 콘텐츠를
| DevOps |
Azure DevOps 에이전트용 스크립트를 생성합니다. | 다음 SQL 스크립트를 사용하여 테이블을 생성합니다.
| DevOps |
Azure DevOps 에이전트를 사용하여 Docker 이미지를 빌드합니다. | Azure DevOps 에이전트를 설치할 Docker 이미지를 생성하려면 이전에 생성한 Dockerfile을 사용하여 이미지를 빌드합니다. 파일을 저장한 디렉터리에서 다음 명령을 실행합니다.
| DevOps |
| 작업 | 설명 | 필요한 기술 |
|---|---|---|
개인 액세스 토큰 생성: | 프라이빗 Amazon EKS 클러스터에서 실행되는 에이전트는 Azure DevOps 계정으로 인증할 수 있도록 개인 액세스 토큰(PAT)이 필요합니다. PAT를 생성하려면 다음 단계를 사용합니다.
자세한 내용은 Microsoft 설명서의 개인 액세스 토큰(PAT)을 사용하여 에이전트 등록 | DevOps |
Kubernetes 배포 매니페스트 파일을 생성합니다. | 프라이빗 Amazon EKS 클러스터에 Azure DevOps 에이전트를 배포하려면 다음 매니페스트 파일을 복사하고 파일을 로 저장합니다.
| DevOps |
프라이빗 Amazon EKS 클러스터에 에이전트를 배포합니다. | 프라이빗 Amazon EKS 클러스터에 Azure Devops 에이전트를 배포하려면 다음 명령을 사용합니다.
| DevOps |
에이전트가 실행 중인지 확인 | 에이전트가 실행 중인지 확인하려면 다음 명령을 사용합니다.
출력은 다음 예시와 비슷해야 합니다.
| DevOps |
에이전트가 Azure DevOps 에이전트 풀에 등록되어 있는지 확인합니다. | 에이전트가 프라이빗 Amazon EKS 클러스터에 배포되고 에이전트 풀에 등록되었는지 확인하려면 다음 단계를
온라인 상태인 에이전트가 하나 나열되고 에이전트 이름이 azure-pipelines-agent-eks-*로 시작해야 합니다. | DevOps |
| 작업 | 설명 | 필요한 기술 |
|---|---|---|
샘플 애플리케이션 리포지토리를 GitHub 계정으로 포크합니다. | GitHub 계정에 다음 AWS 샘플 리포지토리를 포크합니다. https://github.com/aws-samples/deploy-kubernetes-resources-to-amazon-eks-using-azure-devops | DevOps |
파이프라인 생성. | Azure DevOps 계정에서 파이프라인을 생성하려면 다음 단계를 사용합니다.
| DevOps |
샘플 애플리케이션이 실행 중인지 확인합니다. | 파이프라인이 완료되면 Amazon ECR 리포지토리와 Amazon EKS 클러스터를 모두 확인하여 샘플 애플리케이션의 성공적인 배포를 확인합니다. Amazon ECR 리포지토리에서 아티팩트를 확인하려면 다음 단계를 사용합니다.
예: 네임스페이스의 프라이빗 Amazon EKS 클러스터에서 배포를 확인하려면 다음 명령을
예상 출력은 다음과 같습니다.
참고: 첫 번째 파이프라인 실행인 경우 서비스 연결 및 에이전트 풀을 승인해야 할 수 있습니다. Azure DevOps 파이프라인 인터페이스에서 권한 요청을 찾아 계속 진행하도록 승인합니다. | DevOps |
문제 해결
| 문제 | Solution |
|---|---|
Amazon ECR 리포지토리 이름이 일치하지 않으면 파이프라인이 실패합니다. | 샘플 애플리케이션은 Amazon ECR 리포지토리 이름이의 이 문제를 해결하려면 Amazon ECR 리포지토리의 이름을 로 바꾸
|
오류: Kubernetes 클러스터에 연결할 수 없음: 서버에서 클라이언트에 자격 증명을 제공하도록 요청했습니다. | Azure 파이프라인의 "Helm 차트 풀 및 배포" 단계에서이 오류가 발생하는 경우 근본 원인은 일반적으로 Amazon EKS 클러스터의에서 잘못된 IAM 역할 구성으로 인해 발생합니다 이 문제를 해결하려면 다음과 같이 실행합니다.
|
관련 리소스
AWS 블로그
AWS 서비스 설명서
Microsoft 설명서
