기계 번역으로 제공되는 번역입니다. 제공된 번역과 원본 영어의 내용이 상충하는 경우에는 영어 버전이 우선합니다.
에서 클러스터 초기화 AWS CloudHSM
클러스터를 생성하고에 하드웨어 보안 모듈(HSM)을 추가한 후 클러스터를 초기화 AWS CloudHSM할 수 있습니다. 다음 주제의 단계를 완료하여 클러스터를 초기화합니다.
클러스터를 초기화하기 전에 HSM의 자격 증명 및 신뢰성을 확인할 수 있는 프로세스를 검토합니다. 이 프로세스는 선택 사항이며, 클러스터가 초기화될 때까지만 유효합니다. 클러스터가 초기화된 후에는 이 프로세스를 사용하여 인증서를 가져오거나 HSM을 확인할 수 없습니다.
개요
클러스터 초기화 프로세스는 인증서 기반 인증 시스템을 통해 클러스터와 HSMs에 대한 소유권과 제어를 설정합니다. 이 프로세스는 사용자가 클러스터에 있는 HSMs의 유일한 소유자임을 암호화 방식으로 증명하고 HSMs에 대한 향후 모든 연결에 필요한 신뢰 기반을 만듭니다.
이 페이지에서는 다음을 수행하는 방법을 보여줍니다.
-
클러스터의 인증서 서명 요청(CSR)을 검색합니다.
-
프라이빗 키(들)를 생성하고 사용하여 자체 서명된 루트 인증서 또는 인증서 체인을 생성합니다.
-
클러스터의 CSR에 서명하여 서명된 HSM 인증서를 생성합니다.
-
서명된 HSM 인증서와 자체 서명된 인증서 또는 인증서 체인을 사용하여 클러스터를 초기화합니다.
시작할 준비가 되면 1단계. 클러스터 CSR 가져오기로 이동합니다.
1단계. 클러스터 CSR 가져오기
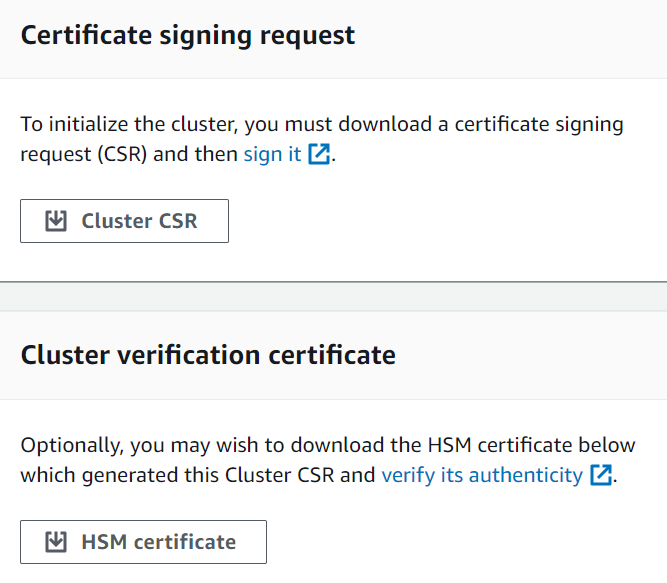
클러스터를 초기화하려면 먼저, 클러스터의 첫 번째 HSM에서 생성된 인증서를 다운로드하여 서명 요청(CSR)에 서명해야 합니다. 단계에 따라 클러스터의 HSM 자격 증명을 확인했다면 이미 CSR이 있는 것이므로 CSR에 서명할 수 있습니다. 그렇지 않으면 AWS CloudHSM 콘솔, AWS Command Line Interface (AWS CLI) 또는 AWS CloudHSM API를 사용하여 CSR을 가져옵니다.
- Console
- AWS CLI
-
명령 프롬프트에서 다음 describe-clusters 명령을 실행하여 CSR을 추출하고 파일에 저장합니다. <cluster ID>를 이전에 생성한 클러스터의 ID로 바꿉니다.
$ aws cloudhsmv2 describe-clusters --filters clusterIds=<cluster ID> \
                                   --output text \
                                   --query 'Clusters[].Certificates.ClusterCsr' \
                                   > <cluster ID>_ClusterCsr.csr
- AWS CloudHSM API
2단계. 루트 CA에 대한 프라이빗 키 생성
프로덕션 클러스터의 경우 신뢰할 수 있는 임의 소스를 사용하여 안전한 방식으로 키를 생성해야 합니다. 안전한 오프사이트 및 오프라인 HSM이나 이에 상응하는 디바이스를 사용하는 것이 좋습니다. 키를 안전하게 저장하십시오. 키는 클러스터의 ID와 클러스터에 포함된 HSM에 대한 사용자의 단독 제어권을 설정합니다.
개발 및 테스트 중에 원하는 편리한 도구(예: OpenSSL)를 사용하여 클러스터 인증서를 만들고 서명할 수 있습니다. 다음 예에서는 키를 생성하는 방법을 보여줍니다. 키를 사용하여 자체 서명된 인증서를 생성한 후(아래 참조), 안전한 방식으로 저장해야 합니다. AWS CloudHSM 인스턴스에 로그인하려면 인증서가 있어야 하지만 프라이빗 키는 존재하지 않습니다.
아래 표에는 인증서 생성에 지원되는 알고리즘, 키 크기 및 곡선이 요약되어 있습니다.
| 알고리즘 |
크기/곡선 |
RSA PKCSv1.5 |
2048, 3072, 4096
|
RSA-PSS |
2048, 3072, 4096
|
ECDSA |
prime256v1, secp384r1, secp521r1 |
다이제스트 |
SHA-224, SHA-256, SHA-384 및 SHA-512
|
다음 예제 명령을 사용하여 자체 서명된 루트 CA에 대한 프라이빗 키를 생성합니다.
$ openssl genrsa -aes256 -out customerRootCA.key 2048
Generating RSA private key, 2048 bit long modulus
........+++
............+++
e is 65537 (0x10001)
Enter pass phrase for customerRootCA.key:
Verifying - Enter pass phrase for customerRootCA.key:
3단계. CSR에 서명
이전 단계에서 클러스터의 CSR을 검색하고 루트 CA에 대한 프라이빗 키를 생성했습니다. 이 단계에서는 클러스터의 CSR에 서명하기 위해 프라이빗 키를 사용하여 서명 인증서를 생성합니다. 아래 주제에서는 OpenSSL을 사용하여 자체 서명된 단일 인증서 또는 인증서 체인을 생성하는 프로세스를 안내합니다. AWS CLI 이 단계에서는이 필요하지 않으며 쉘을 AWS 계정과 연결할 필요가 없습니다.
클러스터를 초기화하려면 트러스트 앵커가 RFC 5280을 준수하고 다음 요구 사항을 충족해야 합니다.
다음 방법 중 하나를 선택하여 클러스터의 CSR에 서명합니다.
인증서 접근 방식 선택
다음 두 가지 방법 중 하나를 선택해야 합니다. 두 접근 방식을 모두 완료하지 마십시오.
- 옵션 A: 자체 서명된 단일 인증서
-
자체 서명된 루트 인증서 하나를 생성하여 클러스터의 CSR에 서명합니다. 이는 신뢰를 구축하는 가장 간단하고 직접적인 방법입니다.
권장 대상:
외부 PKI가 필요하지 않은 환경
단순성이 선호되는 테스트 및 개발 환경
다음으로 이동합니다. 자체 서명된 인증서 하나 생성
- 옵션 B: 중간 CA가 있는 인증서 체인
-
중간 인증 기관을 사용하여 인증서 체인을 생성합니다. 중간 인증서 체인은 루트 인증 기관(CAs 오프라인 상태를 유지하면서 인증서 발급을 중간 CAs에 위임하여 루트 CA를 손상시킬 위험을 줄임으로써 향상된 보안, 확장성 및 유연성을 제공합니다.
권장 대상:
AWS PCA 통합 예제: AWS Private Certificate Authority를 사용하여 중간 CA 인증서를 생성하고 관리할 수 있습니다. 이를 통해 갱신 및 해지를 포함한 자동화된 인증서 수명 주기 관리를 제공하는 동시에 루트 CA를 오프라인으로 유지하는 보안 이점을 유지할 수 있습니다. AWS PCA에 대한 자세한 내용은 AWS Private Certificate Authority 사용 설명서를 참조하세요.
다음으로 이동합니다. 중간 인증 기관(ICA) 체인 생성
자체 서명된 인증서 하나 생성
프로덕션 클러스터의 프라이빗 키를 생성하는 데 사용하는 신뢰할 수 있는 하드웨어는 해당 키를 통해 자체 서명된 인증서를 생성하기 위한 소프트웨어 도구도 제공해야 합니다. 다음 예제에서는 이전 단계에서 생성한 OpenSSL 및 프라이빗 키를 사용하여 자체 서명된 루트 CA 서명 인증서를 생성합니다. 인증서는 10년(3,652일) 동안 유효합니다. 화면의 지침을 읽고 프롬프트의 메시지를 따릅니다.
$ openssl req -new -x509 -days 3652 -key customerRootCA.key -out customerRootCA.crt
Enter pass phrase for customerRootCA.key:
You are about to be asked to enter information that will be incorporated
into your certificate request.
What you are about to enter is what is called a Distinguished Name or a DN.
There are quite a few fields but you can leave some blank
For some fields there will be a default value,
If you enter '.', the field will be left blank.
-----
Country Name (2 letter code) [AU]:
State or Province Name (full name) [Some-State]:
Locality Name (eg, city) []:
Organization Name (eg, company) [Internet Widgits Pty Ltd]:
Organizational Unit Name (eg, section) []:
Common Name (e.g. server FQDN or YOUR name) []:
Email Address []:
이 명령은 customerRootCA.crt 인증서 파일을 생성합니다. AWS CloudHSM 클러스터에 연결할 모든 호스트에이 인증서를 배치합니다. 파일에 다른 이름을 지정하거나 호스트의 루트가 아닌 다른 경로에 파일을 저장하는 경우, 그에 따라 클라이언트 구성 파일을 편집해야 합니다. 방금 생성한 인증서와 프라이빗 키를 사용하여 다음 단계에서 클러스터 CSR(인증서 서명 요청)에 서명합니다.
자체 서명된 루트 CA를 사용하여 클러스터 CSR에 서명
프로덕션 클러스터의 프라이빗 키를 생성하는 데 사용하는 신뢰할 수 있는 하드웨어는 해당 키를 통해 CSR에 서명하기 위한 도구도 제공해야 합니다. 다음 예에서는 OpenSSL을 사용하여 클러스터의 CSR에 서명합니다. 아래 예제 명령은 자체 서명된를 사용하여 CSR에 서명합니다. customerRootCA.crt
$ openssl x509 -req -days 3652 -in <cluster ID>_ClusterCsr.csr \
		-CA <customerRootCA>.crt \
		-CAkey <customerRootCA>.key \
		-CAcreateserial \
		-out <cluster ID>_CustomerHsmCertificate.crt
Signature ok
subject=/C=US/ST=CA/O=Cavium/OU=N3FIPS/L=SanJose/CN=HSM:<HSM identifier>:PARTN:<partition number>, for FIPS mode
Getting CA Private Key
Enter pass phrase for <customerRootCA>.key:
이 명령은 <cluster ID>_CustomerHsmCertificate.crt
루트 CA에 대해 서명된 인증서를 확인합니다(선택 사항).
$ openssl verify -purpose sslserver -CAfile customerRootCA.crt <cluster ID>_CustomerHsmCertificate.crt
<cluster ID>_CustomerHsmCertificate.crt: OK
자체 서명된 루트 CA를 사용하여 서명된 HSM 인증서를 생성한 후 로 이동합니다4단계. 클러스터 초기화.
중간 인증 기관(ICA) 체인 생성
다음 예제에서는 루트 인증 기관(CA)과 중간 CA로 구성된 길이 2의 인증서 체인을 생성하는 방법을 안내합니다. 먼저 자체 서명된 루트 CA 인증서를 생성한 다음 루트 CA에서 서명한 중간 CA를 생성합니다. 마지막으로 중간 CA를 사용하여 클러스터의 CSR에 서명하여 HSM 인증서에서 루트 CA로 완전한 신뢰 체인을 생성합니다. 이 접근 방식은 day-to-day 인증서 작업에 중간 CA를 사용하는 동안 루트 CA를 오프라인으로 유지하여 보안을 강화합니다.
인증서 체인으로 클러스터를 초기화하려면 체인이 다음 요구 사항을 충족해야 합니다.
체인은 클러스터 CSR에 서명하는 중간 CA부터 주문해야 합니다. 이 순서로 첫 번째 ICA에는 체인의 다음 ICA 주제와 일치하는 발급자가 있어야 합니다.
루트 CA만 자체 서명되어야 합니다. 즉, 발급자와 주체가 동일해야 합니다.
체인은 4개 이하의 인증서(끝의 루트 CA 포함)로 구성되어야 하며, 체인의 총 크기는 16KB(킬로바이트)를 초과해서는 안 됩니다.
모든 인증 기관(CAs)은 RFC 5280 지침을 준수해야 합니다.
이 섹션에서는 로컬 인증서 생성을 위한 OpenSSL과 관리형 인증서 서비스를 위한 AWS Private Certificate Authority(PCA)라는 두 가지 접근 방식을 사용하여 중간 인증 기관 체인을 생성하는 예제를 제공합니다. 환경 및 보안 요구 사항에 가장 적합한 접근 방식을 선택합니다.
다음 예제는 일반적인 사용 사례이며 가장 기본적인 구성을 사용하여 간소화됩니다. 프로덕션 환경의 경우 사용 사례에 맞는 추가 구성 옵션 및 보안 요구 사항을 검토하세요.
- OpenSSL
-
CA용 공통 v3 확장명으로 OpenSSL 구성 파일을 생성합니다.
$ cat > ca-extensions.conf <<EOF
[req]
distinguished_name = req_distinguished_name
[req_distinguished_name]
C = Country Name (2 letter code)
ST = State or Province Name (full name)
L = Locality Name (eg, city)
O = Organization Name (eg, company)
OU = Organizational Unit Name (eg, section)
CN = Common Name (e.g. server FQDN or YOUR name)
[v3_ca]
subjectKeyIdentifier = hash
authorityKeyIdentifier = keyid:always,issuer
basicConstraints = critical,CA:true
keyUsage = critical, keyCertSign, cRLSign, digitalSignature
EOF
OpenSSL을 사용하여 자체 서명된 루트 CA를 생성합니다.
$ openssl req -new -x509 -days 3652 -key customerRootCA.key -out customerRootCA.crt -extensions v3_ca -config ca-extensions.conf
Enter pass phrase for customerRootCA.key:
You are about to be asked to enter information that will be incorporated
into your certificate request.
What you are about to enter is what is called a Distinguished Name or a DN.
There are quite a few fields but you can leave some blank
For some fields there will be a default value,
If you enter '.', the field will be left blank.
-----
Country Name (2 letter code) [AU]:
State or Province Name (full name) [Some-State]:
Locality Name (eg, city) []:
Organization Name (eg, company) [Internet Widgits Pty Ltd]:
Organizational Unit Name (eg, section) []:
Common Name (e.g. server FQDN or YOUR name) []:
Email Address []:
중간 CA 키를 생성합니다.
$ openssl genrsa -aes256 -out intermediateCA.key 2048
Generating RSA private key, 2048 bit long modulus
........+++
............+++
e is 65537 (0x10001)
Enter pass phrase for intermediateCA.key:
Verifying - Enter pass phrase for intermediateCA.key:
중간 CA 인증서 서명 요청(CSR)을 생성합니다.
$ openssl req -new -key intermediateCA.key -out intermediateCA.csr
Enter pass phrase for intermediateCA.key:
You are about to be asked to enter information that will be incorporated
into your certificate request.
What you are about to enter is what is called a Distinguished Name or a DN.
There are quite a few fields but you can leave some blank
For some fields there will be a default value,
If you enter '.', the field will be left blank.
-----
Country Name (2 letter code) [AU]:
State or Province Name (full name) [Some-State]:
Locality Name (eg, city) []:
Organization Name (eg, company) [Internet Widgits Pty Ltd]:
Organizational Unit Name (eg, section) []:
Common Name (e.g. server FQDN or YOUR name) []:
Email Address []:
자체 서명된 루트 CA를 사용하여 중간 CA 인증서를 생성합니다.
$ openssl x509 -req -in intermediateCA.csr \
		-CA customerRootCA.crt \
		-CAkey customerRootCA.key \
		-CAcreateserial \
		-days 3652 \
		-extensions v3_ca \
		-extfile ca-extensions.conf \
		-out intermediateCA.crt

Certificate request self-signature ok
subject=C= , ST= , L= , O= , OU=
인증서를 체인 파일로 결합합니다.
$ cat intermediateCA.crt customerRootCA.crt > chainCA.crt

-----BEGIN CERTIFICATE-----
[Intermediate CA]
-----END CERTIFICATE-----
...
...
-----BEGIN CERTIFICATE-----
[Root CA]
-----END CERTIFICATE-----
중간 CA를 사용하여 클러스터 CSR에 서명합니다.
$ openssl x509 -req -days 3652 -in <cluster ID>_ClusterCsr.csr \
			-CA intermediateCA.crt \
			-CAkey intermediateCA.key \
			-CAcreateserial \
			-out <cluster ID>_CustomerHsmCertificate.crt
Signature ok
subject=/C=US/ST=CA/O=Cavium/OU=N3FIPS/L=SanJose/CN=HSM:<HSM identifier>:PARTN:<partition number>, for FIPS mode
Getting CA Private Key
Enter pass phrase for intermediateCA.key:
- AWS PCA
-
AWS Private Certificate Authority를 사용하여 루트 CA를 생성하고 활성화합니다.
$ # 1. Create Root CA
aws acm-pca create-certificate-authority \
    --certificate-authority-configuration \
        "KeyAlgorithm=RSA_4096,
        SigningAlgorithm=SHA256WITHRSA,
        Subject={Country=US,Organization=MyOrg,OrganizationalUnit=IT,CommonName=RootCA}" \
    --certificate-authority-type ROOT

# Store the Root CA Authority ARN from the previous output
ROOT_CA_AUTHORITY_ARN="arn:aws:acm-pca:<region>:<account-id>:certificate-authority/<ca-authority-id>"

# 2. Generate Root CA CSR
aws acm-pca get-certificate-authority-csr \
    --certificate-authority-arn $ROOT_CA_AUTHORITY_ARN \
    --output text > customerRootCA.csr

# 3. Self-sign Root CA Certificate
aws acm-pca issue-certificate \
    --certificate-authority-arn $ROOT_CA_AUTHORITY_ARN \
    --csr fileb://customerRootCA.csr \
    --signing-algorithm SHA256WITHRSA \
	--template-arn arn:aws:acm-pca:::template/RootCACertificate/V1 \
    --validity Value=3652,Type=DAYS

# Store the Root CA certificate ARN from the previous output
ROOT_CA_ARN="arn:aws:acm-pca:<region>:<account-id>:certificate-authority/<ca-authority-id>/certificate/<cert-id>"

# 4. Retrieve the Root CA certificate
aws acm-pca get-certificate \
    --certificate-authority-arn $ROOT_CA_AUTHORITY_ARN \
    --certificate-arn $ROOT_CA_ARN \
    --output text > customerRootCA.crt

# 5. Import the Root CA Certificate
aws acm-pca import-certificate-authority-certificate \
    --certificate-authority-arn $ROOT_CA_AUTHORITY_ARN \
    --certificate fileb://customerRootCA.crt
하위 CA(중간 CA라고도 함)를 생성하고 활성화합니다.
$ # 6. Create Subordinate CA
aws acm-pca create-certificate-authority \
    --certificate-authority-configuration \
        "KeyAlgorithm=RSA_4096,
        SigningAlgorithm=SHA256WITHRSA,
        Subject={Country=US,Organization=MyOrg,OrganizationalUnit=IT,CommonName=SubordinateCA}" \
    --certificate-authority-type SUBORDINATE

# Store the Subordinate CA Authority ARN from the previous output
SUB_CA_AUTHORITY_ARN="arn:aws:acm-pca:<region>:<account-id>:certificate-authority/<sub-ca-authority-id>"

# 7. Generate Subordinate CA CSR
aws acm-pca get-certificate-authority-csr \
    --certificate-authority-arn $SUB_CA_AUTHORITY_ARN \
    --output text > intermediateCA.csr

# 8. Issue Subordinate CA Certificate using Root CA
aws acm-pca issue-certificate \
    --certificate-authority-arn $ROOT_CA_AUTHORITY_ARN \
    --csr fileb://intermediateCA.csr \
    --signing-algorithm SHA256WITHRSA \
    --template-arn arn:aws:acm-pca:::template/SubordinateCACertificate_PathLen0/V1 \
    --validity Value=3651,Type=DAYS

# Store the Subordinate CA certificate ARN from the previous output
SUB_CA_ARN="arn:aws:acm-pca:<region>:<account-id>:certificate-authority/<sub-ca-authority-id>"

# 9. Retrieve Subordinate CA Certificate
aws acm-pca get-certificate \
    --certificate-authority-arn $ROOT_CA_AUTHORITY_ARN \
    --certificate-arn $SUB_CA_ARN \
    --query 'Certificate' \
    --output text > intermediateCA.crt

# 10. Import the Subordinate CA Certificate
aws acm-pca import-certificate-authority-certificate \
    --certificate-authority-arn $SUB_CA_AUTHORITY_ARN \
    --certificate fileb://intermediateCA.crt \
    --certificate-chain fileb://customerRootCA.crt
인증서를 체인 파일로 결합합니다.
$ cat intermediateCA.crt customerRootCA.crt > chainCA.crt

-----BEGIN CERTIFICATE-----
[Intermediate CA]
-----END CERTIFICATE-----
...
...
-----BEGIN CERTIFICATE-----
[Root CA]
-----END CERTIFICATE-----
AWS PCA를 사용하여 클러스터 CSR에 서명합니다.
$ aws acm-pca issue-certificate \
    --certificate-authority-arn $SUB_CA_AUTHORITY_ARN \
    --csr fileb://<cluster ID>_ClusterCsr.csr \
    --signing-algorithm SHA256WITHRSA \
    --template-arn arn:aws:acm-pca:::template/EndEntityCertificate/V1 \
    --validity Value=3650,Type=DAYS

# Store your cluster's cert ARN from the previous output
CLUSTER_CERT_ARN="arn:aws:acm-pca:<region>:<account-id>:certificate-authority/<cluster-cert-arn>"
서명된 클러스터 인증서를 다운로드합니다.
$ aws acm-pca get-certificate \
    --certificate-authority-arn $SUB_CA_AUTHORITY_ARN \
    --certificate-arn $CLUSTER_CERT_ARN \
    --output text --query Certificate > <cluster ID>_CustomerHsmCertificate.crt
이 명령은 <cluster ID>_CustomerHsmCertificate.crt
인증서 체인에 대해 서명된 인증서를 확인합니다(선택 사항).
$ openssl verify -purpose sslserver -CAfile chainCA.crt <cluster ID>_CustomerHsmCertificate.crt
<cluster ID>_CustomerHsmCertificate.crt: OK
중간 CA로 서명된 HSM 인증서를 생성한 후 로 이동합니다4단계. 클러스터 초기화.
4단계. 클러스터 초기화
서명한 HSM 인증서와 서명 인증서를 사용하여 클러스터를 초기화하십시오. AWS CloudHSM 콘솔, AWS CLI또는 AWS CloudHSM API를 사용할 수 있습니다.
- Console
클러스터를 초기화하려면(콘솔)
https://console.aws.amazon.com/cloudhsm/home AWS CloudHSM 콘솔을 엽니다.
-
확인할 HSM의 클러스터 자격 증명 옆의 라디오 버튼을 선택합니다.
-
작업을 선택합니다. 드롭다운 메뉴에서 초기화를 선택합니다.
-
HSM을 생성하기 위한 이전 단계를 완료하지 않은 경우, 생성 중인 HSM의 가용 영역을 선택합니다. 그런 다음 생성을 선택합니다.
-
[Download certificate signing request] 페이지에서 [Next]를 선택합니다. [Next]가 비활성화 되어 있는 경우에는 먼저 CSR 또는 인증서 링크 중 하나를 선택합니다. 그리고 다음을 선택합니다.
-
[Sign certificate signing request (CSR)] 페이지에서 [Next]를 선택합니다.
-
[Upload the certificates] 페이지에서 다음 작업을 수행하십시오.
-
클러스터 인증서 옆의 파일 업로드를 선택합니다. 그러면 이전에 서명한 HSM 인증서 위치를 확인하고 선택합니다. 이전 섹션에 나온 단계들을 완료했다면 <cluster
ID>_CustomerHsmCertificate.crt
-
Issuing certificate(인증서 발급하기) 옆의 파일 업로드를 선택합니다. 그런 다음 선택한 접근 방식에 따라 서명 인증서를 선택합니다.
-
[Upload and initialize]를 선택합니다.
- AWS CLI
-
명령 프롬프트에서 initialize-cluster 명령을 실행합니다. 다음을 제공합니다.
$ aws cloudhsmv2 initialize-cluster --cluster-id <cluster ID> \
                                    --signed-cert file://<cluster ID>_CustomerHsmCertificate.crt \
                                    --trust-anchor file://<customerRootCA.crt OR chainCA.crt>
{
    "State": "INITIALIZE_IN_PROGRESS",
    "StateMessage": "Cluster is initializing. State will change to INITIALIZED upon completion."
}
- AWS CloudHSM API
클러스터를 초기화하려면(AWS CloudHSM API)