기계 번역으로 제공되는 번역입니다. 제공된 번역과 원본 영어의 내용이 상충하는 경우에는 영어 버전이 우선합니다.
Amazon Braket의 양자 작업 예제
이 섹션에서는 디바이스 선택부터 결과 보기에 이르기까지 예제 양자 작업을 실행하는 단계를 안내합니다. Amazon Braket의 모범 사례로, SV1과 같은 시뮬레이터에서 회로를 실행하여 시작하는 것이 좋습니다.
디바이스 지정
먼저, 양자 작업에 사용할 디바이스를 선택하고 지정합니다. 이 예제에서는 시뮬레이터 SV1을 선택하는 방법을 보여줍니다.
from braket.aws import AwsDevice

# Choose the on-demand simulator to run the circuit
device = AwsDevice("arn:aws:braket:::device/quantum-simulator/amazon/sv1")
이 디바이스의 몇 가지 속성은 다음과 같이 확인할 수 있습니다.
print(device.name)
for iter in device.properties.action['braket.ir.openqasm.program']:
    print(iter)
SV1
('version', ['1.0'])
('actionType', 'braket.ir.openqasm.program')
('supportedOperations', ['ccnot', 'cnot', 'cphaseshift', 'cphaseshift00', 'cphaseshift01', 'cphaseshift10', 'cswap', 'cy', 'cz', 'ecr', 'h', 'i', 'iswap', 'pswap', 'phaseshift', 'rx', 'ry', 'rz', 's', 'si', 'swap', 't', 'ti', 'v', 'vi', 'x', 'xx', 'xy', 'y', 'yy', 'z', 'zz', 'gpi', 'gpi2', 'ms'])
('supportedModifiers', [])
('supportedPragmas', ['braket_unitary_matrix', 'braket_basis_rotation', 'braket_result_type_sample', 'braket_result_type_expectation', 'braket_result_type_variance', 'braket_result_type_probability', 'braket_result_type_amplitude', 'braket_result_type_adjoint_gradient'])
('forbiddenPragmas', ['braket_result_type_state_vector', 'braket_result_type_density_matrix', 'braket_noise_amplitude_damping', 'braket_noise_bit_flip', 'braket_noise_depolarizing', 'braket_noise_kraus', 'braket_noise_pauli_channel', 'braket_noise_generalized_amplitude_damping', 'braket_noise_phase_flip', 'braket_noise_phase_damping', 'braket_noise_two_qubit_dephasing', 'braket_noise_two_qubit_depolarizing'])
('maximumQubitArrays', 1)
('maximumClassicalArrays', 1)
('forbiddenArrayOperations', ['concatenation', 'negativeIndex', 'range', 'rangeWithStep', 'slicing', 'selection'])
('requiresAllQubitsMeasurement', True)
('supportPhysicalQubits', False)
('requiresContiguousQubitIndices', True)
('supportsPartialVerbatimBox', True)
('supportsUnassignedMeasurements', True)
('disabledQubitRewiringSupported', False)
('supportedResultTypes', [ResultType(name='Sample', observables=['x', 'y', 'z', 'h', 'i', 'hermitian'], minShots=1, maxShots=100000), ResultType(name='Expectation', observables=['x', 'y', 'z', 'h', 'i', 'hermitian'], minShots=0, maxShots=100000), ResultType(name='Variance', observables=['x', 'y', 'z', 'h', 'i', 'hermitian'], minShots=0, maxShots=100000), ResultType(name='Probability', observables=None, minShots=1, maxShots=100000), ResultType(name='Amplitude', observables=None, minShots=0, maxShots=0), ResultType(name='AdjointGradient', observables=['x', 'y', 'z', 'h', 'i'], minShots=0, maxShots=0)])
예제 양자 작업 제출
온디맨드 시뮬레이터에서 실행할 예제 양자 작업을 제출합니다.
from braket.circuits import Circuit, Observable

# Create a circuit with a result type
circ = Circuit().rx(0, 1).ry(1, 0.2).cnot(0, 2).variance(observable=Observable.Z(), target=0)
# Add another result type
circ.probability(target=[0, 2])

# Set up S3 bucket (where results are stored)
my_bucket = "amazon-braket-s3-demo-bucket"  # The name of the bucket
my_prefix = "your-folder-name"  # The name of the folder in the bucket
s3_location = (my_bucket, my_prefix)

# Submit the quantum task to run
my_task = device.run(circ, s3_location, shots=1000, poll_timeout_seconds=100, poll_interval_seconds=10)
# The positional argument for the S3 bucket is optional if you want to specify a bucket other than the default

# Get results of the quantum task
result = my_task.result()
device.run() 명령은 CreateQuantumTask API를 통해 양자 작업을 생성합니다. 짧은 초기화 시간 후, 양자 작업은 디바이스에서 양자 작업을 실행할 수 있는 용량이 생길 때까지 대기열에 추가됩니다. 이 경우 디바이스는 SV1입니다. 디바이스가 계산을 완료한 후 Amazon Braket은 직접 호출 시 지정된 Amazon S3 위치에 결과를 기록합니다. 위치 인수 s3_location은 로컬 시뮬레이터를 제외한 모든 디바이스에 필요합니다.
참고
Braket 양자 작업 작업은 크기가 5MB로 제한됩니다.
파라미터화된 작업 제출
Amazon Braket 온디맨드 및 로컬 시뮬레이터와 QPU는 작업 제출 시 자유 파라미터 값을 지정하는 것도 지원합니다. 다음 예제와 같이 device.run()에 inputs 인수를 사용하여 이 작업을 수행할 수 있습니다. inputs는 키가 파라미터 이름인 문자열-부동 소수점 쌍의 딕셔너리여야 합니다.
파라메트릭 컴파일은 특정 QPU에서 파라메트릭 회로 실행 성능을 향상할 수 있습니다. 파라메트릭 회로를 지원되는 QPU에 양자 작업으로 제출할 때 Braket은 회로를 한 번 컴파일하고 결과를 캐싱합니다. 동일한 회로에 대한 후속 파라미터 업데이트는 재컴파일되지 않으므로 동일한 회로를 사용하는 작업의 런타임이 단축됩니다. Braket은 회로를 컴파일할 때 하드웨어 공급자의 업데이트된 보정 데이터를 자동으로 사용하여 최고 품질의 결과를 보장합니다.
참고
파라메트릭 컴파일은 펄스 레벨 프로그램을 제외한 Rigetti Computing의 모든 초전도 게이트 기반 QPU에서 지원됩니다.
from braket.circuits import Circuit, FreeParameter, Observable

# Create the free parameters
alpha = FreeParameter('alpha')
beta = FreeParameter('beta')

# Create a circuit with a result type
circ = Circuit().rx(0, alpha).ry(1, alpha).cnot(0, 2).xx(0, 2, beta)
circ.variance(observable=Observable.Z(), target=0)

# Add another result type
circ.probability(target=[0, 2])

# Submit the quantum task to run
my_task = device.run(circ, inputs={'alpha': 0.1, 'beta': 0.2}, shots=100)
shots을 지정합니다.
shots 인수는 원하는 측정 shots 수를 나타냅니다. SV1과 같은 시뮬레이터는 두 가지 시뮬레이션 모드를 지원합니다.
-
shots = 0의 경우 시뮬레이터는 정확한 시뮬레이션을 수행하여 모든 결과 유형에 대한 참 값을 반환합니다.
-
shots 값이 0이 아닌 경우, 시뮬레이터는 출력 분포에서 샘플링하여 실제 QPU의 shot 노이즈를 에뮬레이션합니다. QPU 디바이스는 shots > 0만 허용합니다.
양자 작업당 최대 샷 수에 대한 자세한 내용은 Braket 할당량을 참조하세요.
결과에 대한 폴링
my_task.result()를 실행하면 SDK는 양자 작업 생성 시 정의한 파라미터로 결과에 대한 폴링을 시작합니다.
-
poll_timeout_seconds는 온디맨드 시뮬레이터 및/또는 QPU 디바이스에서 양자 작업을 실행할 때 시간이 초과되기 전에 양자 작업을 폴링하는 초의 수입니다. 기본값은 432,000초(5일)입니다. -
참고: Rigetti 및 IonQ와 같은 QPU 디바이스의 경우 며칠 정도 허용하는 것이 좋습니다. 폴링 시간 초과가 너무 짧으면 폴링 시간 내에 결과가 반환되지 않을 수 있습니다. 예를 들어 QPU를 사용할 수 없는 경우 로컬 시간 초과 오류가 반환됩니다.
-
poll_interval_seconds는 양자 작업이 폴링되는 빈도입니다. 온디맨드 시뮬레이터 및 QPU 디바이스에서 양자 작업이 실행될 때 상태를 가져오기 위해 Braket API를 직접적으로 호출하는 빈도를 지정합니다. 기본값은 1초입니다.
이 비동기 실행은 항상 사용할 수 있는 것은 아닌 QPU 디바이스와의 상호 작용을 용이하게 합니다. 예를 들어 정기 유지 관리 기간 동안에는 디바이스를 사용하지 못할 수 있습니다.
반환된 결과에는 양자 작업과 관련된 다양한 메타데이터가 포함됩니다. 다음 명령을 사용하여 측정 결과를 확인할 수 있습니다.
print('Measurement results:\n', result.measurements)
print('Counts for collapsed states:\n', result.measurement_counts)
print('Probabilities for collapsed states:\n', result.measurement_probabilities)
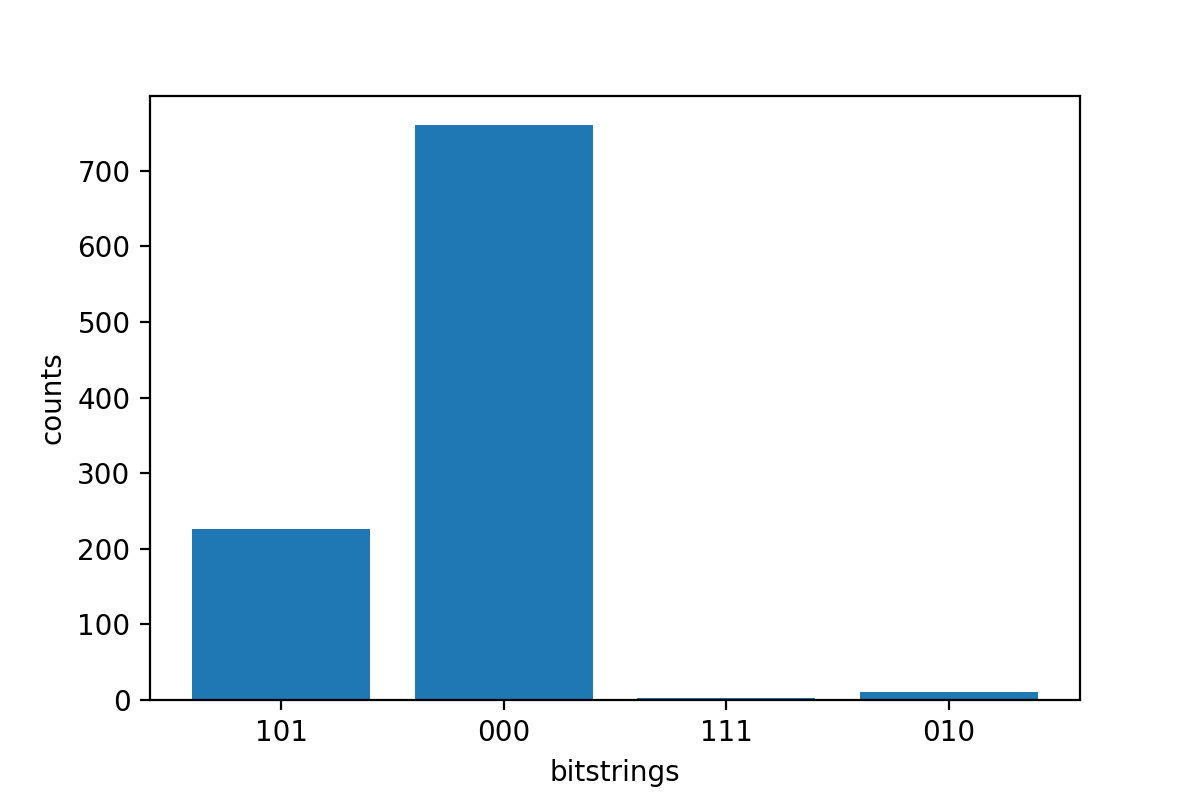
Measurement results:
 [[1 0 1]
 [0 0 0]
 [0 0 0]
 ...
 [0 0 0]
 [0 0 0]
 [1 0 1]]
Counts for collapsed states:
 Counter({'000': 766, '101': 220, '010': 11, '111': 3})
Probabilities for collapsed states:
 {'101': 0.22, '000': 0.766, '010': 0.011, '111': 0.003}
예제 결과 확인
ResultType도 지정했으므로 반환된 결과를 볼 수 있습니다. 결과 유형은 회로에 추가된 순서대로 표시됩니다.
print('Result types include:\n', result.result_types)
print('Variance=', result.values[0])
print('Probability=', result.values[1])

# Plot the result and do some analysis
import matplotlib.pyplot as plt
plt.bar(result.measurement_counts.keys(), result.measurement_counts.values())
plt.xlabel('bitstrings')
plt.ylabel('counts')
Result types include:
 [ResultTypeValue(type=Variance(observable=['z'], targets=[0], type=<Type.variance: 'variance'>), value=0.693084), ResultTypeValue(type=Probability(targets=[0, 2], type=<Type.probability: 'probability'>), value=array([0.777, 0.   , 0.   , 0.223]))]
Variance= 0.693084
Probability= [0.777 0.    0.    0.223]
Text(0, 0.5, 'counts')