OAuth2를 사용하여 Google Drive와 통합
이 시작하기 자습서에서는 AI 에이전트에 Amazon Bedrock AgentCore 자격 증명을 사용하기 위한 필수 단계를 안내합니다. 개발 환경을 설정하고, 필요한 SDKs를 설치하고, 첫 번째 에이전트 자격 증명을 생성하고, 에이전트가 외부 리소스에 안전하게 액세스하도록 허용하는 방법을 알아봅니다.
이 자습서를 마치면 AgentCore Identity OAuth2 자격 증명 공급자를 사용하여 Google에서 액세스 토큰을 검색하고 액세스 토큰을 사용하여 Google Drive에서 파일을 읽을 수 있는 작업 에이전트가 생깁니다. OAuth2 흐름에 대한 자세한 내용은 AgentCore 자격 증명을 사용하여 자격 증명 공급자 관리를 참조하세요.
주제
사전 조건
시작하기 전에 다음이 필요합니다.
-
적절한 권한이 있는 AWS 계정(예:
BedrockAgentCoreFullAccess) -
Python 3.10 이상
-
최신 AWS CLI 및
jq설치됨 -
AWS 구성된 자격 증명 및 리전(
aws configure) -
Python 프로그래밍에 대한 기본 이해
중요
BedrockAgentCoreFullAccess 관리형 정책은 호출자가 IdP 토큰 확인 없이 모든 사용자 식별자 문자열을 사용하여 워크로드 액세스 토큰을 발급할 수 GetWorkloadAccessTokenForUserId있는를 포함한 광범위한 권한을 부여합니다. 이는 개발 및 테스트에 적합합니다. 프로덕션 배포의 경우 최소 권한 원칙을 따르고 필요한 특정 작업으로만 권한을 제한하는 사용자 지정 IAM 정책을 생성합니다. 애플리케이션이 JWT 기반 인증(프로덕션에 권장)을 사용하는 경우 모든 사용자 식별이 확인된 JWT 경로를 통과GetWorkloadAccessTokenForUserId하도록 명시적으로 거부할 수 있습니다. 자세한 내용은 워크로드 액세스 토큰 가져오기를 참조하세요.
SDK 설치
시작하려면 bedrock-agentcore 패키지를 설치합니다.
pip install bedrock-agentcore
Google 클라이언트 ID 및 클라이언트 보안 암호 가져오기
에이전트가 Google Drive에 액세스하도록 허용하려면 에이전트의 Google 클라이언트 ID와 클라이언트 암호를 얻어야 합니다. Google 개발자 콘솔
-
Google 개발자 콘솔에서 프로젝트 생성
-
Google Drive API 활성화
-
OAuth 동의 구성 화면
-
에이전트를 위한 새 웹 애플리케이션 생성. 예: "내 에이전트 1"
-
에이전트 애플리케이션에 다음 OAuth 2.0 범위를 추가합니다.
https://www.googleapis.com/auth/drive.metadata.readonly -
새 웹 애플리케이션에 대한 OAuth 2.0 자격 증명을 생성하고 생성된 Google 클라이언트 ID 및 클라이언트 보안 암호를 저장합니다.
1단계: OAuth 2.0 자격 증명 공급자 설정
다음 AWS CLI 명령을 사용하여 이전에 얻은 Google 클라이언트 ID 및 클라이언트 보안 암호를 사용하여 새 OAuth 2.0 자격 증명 공급자를 생성합니다.
OAUTH2_CREDENTIAL_PROVIDER_RESPONSE=$(aws bedrock-agentcore-control create-oauth2-credential-provider \
  --region us-east-1 \
  --name "google-provider" \
  --credential-provider-vendor "GoogleOauth2" \
  --oauth2-provider-config-input '{
      "googleOauth2ProviderConfig": {
        "clientId": "<your-google-client-id>",
        "clientSecret": "<your-google-client-secret>"
      }
    }' \
--output json)

OAUTH2_CALLBACK_URL=$(echo $OAUTH2_CREDENTIAL_PROVIDER_RESPONSE | jq -r '.callbackUrl')

echo "OAuth2 Callback URL: $OAUTH2_CALLBACK_URL"
참고
위의 CreateOauth2CredentialProvider 응답callbackUrl에서를 가져오고 Google 애플리케이션의 리디렉션 URI 목록에 URI를 추가합니다. 콜백 URL은 https://bedrock-agentcore.us-east-1.amazonaws.com/identities/oauth2/callback/********-****-****-****-****-********와 같아야 합니다.
2단계: 자격 증명 및 인증 모듈 가져오기
Python 파일에이 가져오기 문을 추가합니다.
from bedrock_agentcore.services.identity import IdentityClient
from bedrock_agentcore.identity.auth import requires_access_token, requires_api_key
3단계: OAuth 2.0 액세스 토큰 획득
이전 단계에서 Google 자격 증명 공급자를 생성한 후에는 Google 액세스 토큰이 필요한 에이전트 코드에 @requires_access_token 데코레이터를 추가합니다. 콘솔 출력에서 권한 부여 URL을 복사한 다음 브라우저에 붙여넣고 Google Drive로 동의 흐름을 완료합니다.
다음 코드 샘플은 에이전트 코드에 통합되어 권한 부여 워크플로를 호출하기 위한 것입니다. 이는 독립적으로 복사하고 실행할 수 있는 독립 실행형 코드가 아닙니다.
import asyncio

# Injects Google Access Token
@requires_access_token(
    # Uses the same credential provider name created above
    provider_name="google-provider",
    # Requires Google OAuth2 scope to access Google Drive
    scopes=["https://www.googleapis.com/auth/drive.metadata.readonly"],
    # Sets to OAuth 2.0 Authorization Code flow
    auth_flow="USER_FEDERATION",
    # Prints authorization URL to console
    on_auth_url=lambda x: print("\nPlease copy and paste this URL in your browser:\n" + x),
    # If false, caches obtained access token
    force_authentication=False,
    # The callback URL to redirect to after the OAuth 2.0 token retrieval is complete
    callback_url='oauth2_callback_url_for_session_binding',
)
async def write_to_google_drive(*, access_token: str):
    # Prints the access token obtained from Google
    print(access_token)

asyncio.run(write_to_google_drive(access_token=""))
백그라운드에서 @requires_access_token 데코레이터는 다음 시퀀스를 거칩니다.
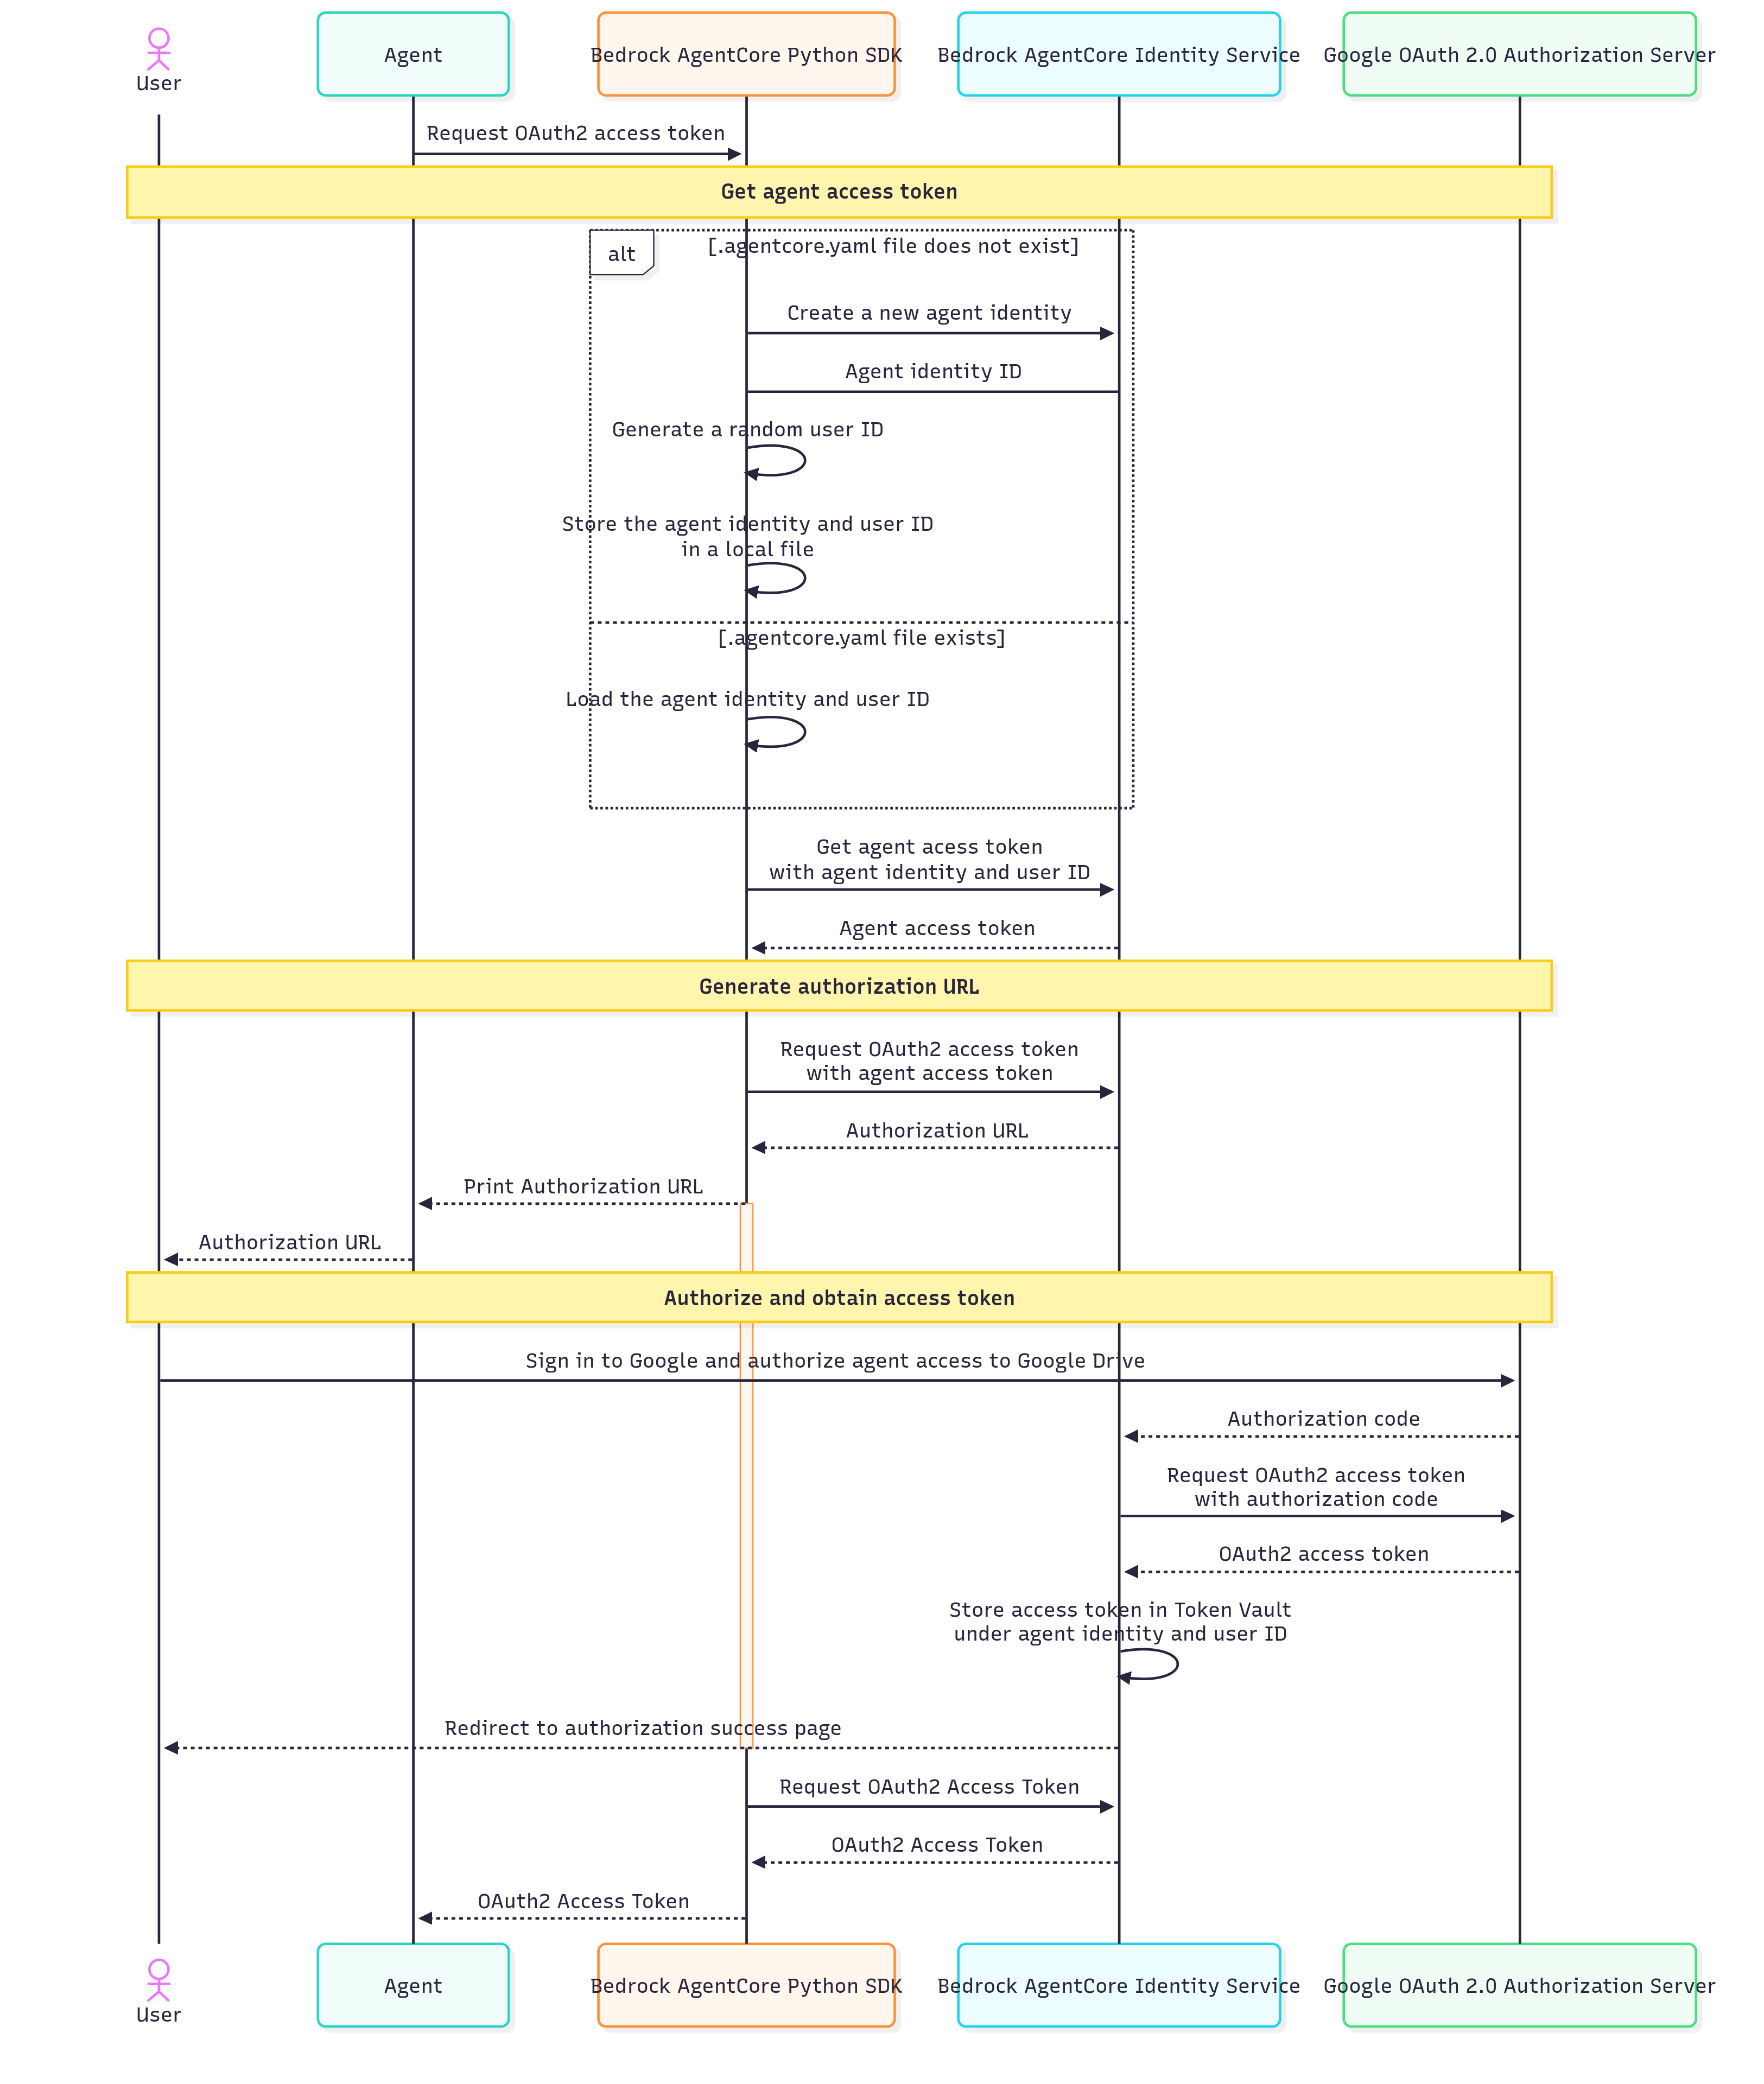
-
SDK는
CreateWorkloadIdentity, 및GetWorkloadAccessToken에 대한 API 호출을 수행합니다GetResourceOauth2Token. -
에이전트 코드를 로컬에서 실행할 때 SDK는 로컬 테스트를 위해 에이전트 자격 증명 ID와 무작위 사용자 ID를 자동으로 생성하고 라는 로컬 파일에 저장합니다
.bedrock_agentcore.yaml. -
AgentCore 런타임을 사용하여 에이전트 코드를 실행할 때 SDK는 에이전트 자격 증명 ID 또는 임의 사용자 ID를 생성하지 않습니다. 대신 할당된 에이전트 자격 증명 ID와 에이전트 호출자가 전달한 사용자 ID 또는 JWT 토큰을 사용합니다.
-
에이전트 액세스 토큰은 에이전트 자격 증명 ID와 사용자 ID가 포함된 암호화된(불투명한) 토큰입니다.
-
AgentCore Identity 서비스는 Google 액세스 토큰을 토큰 볼트의 에이전트 ID 및 사용자 ID 아래에 저장합니다. 그러면 에이전트 자격 증명, 사용자 자격 증명 및 Google 액세스 토큰 간에 바인딩이 생성됩니다.
-
AgentCore Identity에서 호출자에게 Google 액세스 토큰을 반환하기 전에 세션 바인딩 흐름을 완료해야 합니다.
4단계: OAuth2 액세스 토큰을 사용하여 외부 리소스 간접 호출
에이전트가 위 단계에 따라 Google 액세스 토큰을 받으면 액세스 토큰을 사용하여 Google Drive에 액세스할 수 있습니다. 다음은 사용자가 액세스할 수 있는 처음 10개 파일의 이름과 IDs를 나열하는 전체 예제입니다.
먼저 Python용 Google 클라이언트 라이브러리를 설치합니다.
pip install --upgrade google-api-python-client google-auth-httplib2 google-auth-oauthlib
그런 다음 다음 코드를 복사합니다.
import asyncio
from bedrock_agentcore.identity.auth import requires_access_token, requires_api_key
from google.auth.transport.requests import Request
from google.oauth2.credentials import Credentials
from google_auth_oauthlib.flow import InstalledAppFlow
from googleapiclient.discovery import build
from googleapiclient.errors import HttpError

SCOPES = ["https://www.googleapis.com/auth/drive.metadata.readonly"]

def main(access_token):
    """Shows basic usage of the Drive v3 API.

    Prints the names and ids of the first 10 files the user has access to.
    """
    creds = Credentials(token=access_token, scopes=SCOPES)

    try:
        service = build("drive", "v3", credentials=creds)

        # Call the Drive v3 API
        results = (
            service.files()
            .list(pageSize=10, fields="nextPageToken, files(id, name)")
            .execute()
        )
        items = results.get("files", [])

        if not items:
            print("No files found.")
            return

        print("Files:")
        for item in items:
            print(f"{item['name']} ({item['id']})")

    except HttpError as error:
        # TODO(developer) - Handle errors from drive API.
        print(f"An error occurred: {error}")

if __name__ == "__main__":
    # This annotation helps agent developer to obtain access tokens from external applications
    @requires_access_token(
        provider_name="google-provider",
        # Google OAuth2 scopes
        scopes=["https://www.googleapis.com/auth/drive.metadata.readonly"],
        # 3LO flow
        auth_flow="USER_FEDERATION",
        # prints authorization URL to console
        on_auth_url=lambda x: print("Copy and paste this authorization url to your browser", x),
        force_authentication=True,
        callback_url='oauth2_callback_url_for_session_binding',
    )
    async def read_from_google_drive(*, access_token: str):
        print(access_token)  # You can see the access_token
        # Make API calls...
        main(access_token)

    asyncio.run(read_from_google_drive(access_token=""))
참고
세션 바인딩을 처리하기 위한 샘플 로컬 콜백 서버 구현은 섹션을 참조하세요. https://github.com/awslabs/amazon-bedrock-agentcore-samples/blob/main/01-tutorials/03-AgentCore-identity/05-Outbound_Auth_3lo/oauth2_callback_server.py
다음 단계
이 섹션의 예제에서는 특정 사용 사례에 맞게 조정할 수 있는 실제 구현 패턴에 중점을 둡니다. 에이전트 또는 모델 컨텍스트 프로토콜(MCP) 도구의 일부로 코드를 포함할 수 있습니다. AgentCore 런타임으로 에이전트 코드 또는 MCP 도구를 호스팅하려면 Amazon Bedrock AgentCore 런타임으로 호스트 에이전트 또는 도구를 따라 위의 코드를 AgentCore 런타임으로 복사합니다.
