AWS Action에 대한 애플리케이션 관찰성
AWS GitHub Action에 대한 애플리케이션 관찰성은 소스 코드 및 라이브 프로덕션 원격 분석 데이터를 AI 에이전트에 연결하는 엔드 투 엔드 애플리케이션 관찰성 조사 워크플로를 제공합니다. 이 작업에서는 CloudWatch MCP를 활용하고 사용자 지정 프롬프트를 생성하여 AI 에이전트가 문제를 해결하고 코드 수정을 적용하는 데 필요한 컨텍스트를 제공합니다.
이 작업은 CloudWatch Application Signals MCP 서버
시작하려면 GitHub 문제에 @awsapm을 언급하여 AI 에이전트를 트리거합니다. 에이전트는 프로덕션 문제를 해결하고, 수정 사항을 구현하며, 라이브 애플리케이션 데이터를 기반으로 관찰성 적용 범위를 개선합니다.
이 작업 자체에는 직접적인 비용이 발생하지 않습니다. 그러나 이 작업을 사용하면 AWS 서비스 및 AI 모델 사용에 대한 요금이 발생할 수 있습니다. 잠재적 비용에 대한 자세한 내용은 비용 고려 사항 설명서
시작하기
이 작업은 AWS 전용 MCP 구성 및 사용자 지정 관찰성 프롬프트를 생성하여 GitHub 워크플로 내에서 AI 에이전트를 구성합니다. 부여할 IAM 역할 및 사용할 Bedrock 모델 ID 또는 기존 LLM 구독의 API 토큰만 제공하면 됩니다. 아래 예제에서는 이 작업을 Anthropic의 claude-code-base-action
사전 조건
시작하기 전에 다음 요건을 갖추고 있는지 확인하세요.
-
GitHub 리포지토리 권한: 리포지토리에 대한 쓰기 액세스 권한 또는 그 이상의 권한(작업을 트리거하는 데 필요함)
-
AWS IAM 역할: 다음에 대한 권한이 있는 GitHub Actions용 OpenID Connect(OIDC)로 구성된 IAM 역할:
-
CloudWatch Application Signals 및 CloudWatch 액세스
-
Amazon Bedrock 모델 액세스(Bedrock 모델을 사용할 경우)
-
-
GitHub 토큰: 워크플로에서는 필요한 권한을 통해 GITHUB_TOKEN을 자동으로 사용합니다.
설정 단계
1단계: AWS 자격 증명 설정
이 작업은 aws-actions/configure-aws-credentials
-
IAM ID 제공업체 생성
우선 AWS Management Console에서 GitHub의 OIDC 엔드포인트를 신뢰하는 IAM ID 제공업체를 생성합니다.
-
IAM 콘솔 열기
-
액세스 관리에서 ID 제공업체를 선택합니다.
-
아직 생성하지 않은 경우 공급자 추가 버튼을 클릭하여 GitHub ID 제공업체를 추가합니다.
-
ID 제공업체 유형에서 OpenID Connect를 선택합니다.
-
공급자 URL 입력 상자에
https://token.actions.githubusercontent.com을 입력합니다. -
대상 입력 상자에
sts.amazonaws.com을 입력합니다. -
공급자 추가 버튼을 클릭합니다.
-
-
IAM 정책 생성
이 작업에 필요한 권한이 있는 IAM 정책을 생성합니다. 자세한 내용은 아래의 필수 권한 섹션을 참조하세요.
-
IAM 역할 생성
아래의 신뢰 정책 템플릿을 사용하여 AWS Management Console에서 IAM 역할(예:
AWS_IAM_ROLE_ARN)을 생성합니다. 이렇게 하면 승인된 GitHub 리포지토리가 해당 역할을 수임할 수 있습니다.{ "Version": "2012-10-17", "Statement": [ { "Effect": "Allow", "Principal": { "Federated": "arn:aws:iam::<AWS_ACCOUNT_ID>:oidc-provider/token.actions.githubusercontent.com" }, "Action": "sts:AssumeRoleWithWebIdentity", "Condition": { "StringEquals": { "token.actions.githubusercontent.com:aud": "sts.amazonaws.com" }, "StringLike": { "token.actions.githubusercontent.com:sub": "repo:<GITHUB_ORG>/<GITHUB_REPOSITORY>:ref:refs/heads/<GITHUB_BRANCH>" } } } ] }템플릿에서 아래의 자리 표시자를 교체합니다.
-
<AWS_ACCOUNT_ID>- 사용자의 AWS 계정 ID -
<GITHUB_ORG>- 사용자의 GitHub 조직 이름 -
<GITHUB_REPOSITORY>- 사용자의 리포지토리 이름 -
<GITHUB_BRANCH>- 사용자의 브랜치 이름(예: main)
-
-
IAM 정책 연결
역할의 권한 탭으로 이동하여 2단계에서 생성한 IAM 정책을 연결합니다.
AWS에서 OIDC를 구성하는 방법에 대한 자세한 내용은 configure-aws-credentials OIDC 빠른 시작 설명서
2단계: 보안 암호 구성 및 워크플로 추가
-
리포지토리 보안 암호 구성
내 리포지토리 → Settings → Secrets and variables → Actions로 이동합니다.
-
AWS_IAM_ROLE_ARN이라는 새 리포지토리 보안 암호를 생성한 후 이 값을 1단계에서 생성한 IAM 역할의 ARN으로 설정합니다. -
(선택 사항)
AWS_REGION이라는 리포지토리 변수를 생성하여 AWS 리전을 지정합니다(설정하지 않은 경우 기본값은us-east-1).
-
-
워크플로 파일 추가
다음은 Amazon Bedrock 모델에서 이 작업을 사용하는 방법을 보여주는 워크플로 예제입니다. GitHub 리포지토리 디렉터리
.github/workflows에 있는 이 템플릿에서 애플리케이션 관찰성 조사 워크플로를 생성합니다.name: Application observability for AWS on: issue_comment: types: [created, edited] issues: types: [opened, assigned, edited] jobs: awsapm-investigation: if: | (github.event_name == 'issue_comment' && contains(github.event.comment.body, '@awsapm')) || (github.event_name == 'issues' && (contains(github.event.issue.body, '@awsapm') || contains(github.event.issue.title, '@awsapm'))) runs-on: ubuntu-latest permissions: contents: write # To create branches for PRs pull-requests: write # To post comments on PRs issues: write # To post comments on issues id-token: write # Required for AWS OIDC authentication steps: - name: Checkout repository uses: actions/checkout@v4 - name: Configure AWS credentials uses: aws-actions/configure-aws-credentials@v4 with: role-to-assume: ${{ secrets.AWS_IAM_ROLE_ARN }} aws-region: ${{ vars.AWS_REGION || 'us-east-1' }} # Step 1: Prepare AWS MCP configuration and investigation prompt - name: Prepare Investigation Context id: prepare uses: aws-actions/application-observability-for-aws@v1 with: bot_name: "@awsapm" cli_tool: "claude_code" # Step 2: Execute investigation with Claude Code - name: Run Claude Investigation id: claude uses: anthropics/claude-code-base-action@beta with: use_bedrock: "true" # Set to any Bedrock Model ID model: "us.anthropic.claude-sonnet-4-5-20250929-v1:0" prompt_file: ${{ steps.prepare.outputs.prompt_file }} mcp_config: ${{ steps.prepare.outputs.mcp_config_file }} allowed_tools: ${{ steps.prepare.outputs.allowed_tools }} # Step 3: Post results back to GitHub issue/PR (reuse the same action) - name: Post Investigation Results if: always() uses: aws-actions/application-observability-for-aws@v1 with: cli_tool: "claude_code" comment_id: ${{ steps.prepare.outputs.awsapm_comment_id }} output_file: ${{ steps.claude.outputs.execution_file }} output_status: ${{ steps.claude.outputs.conclusion }}구성 참고 사항:
-
문제 또는 댓글에서
@awsapm을 언급하면 이 워크플로가 자동으로 트리거됩니다. -
워크플로는 이전 단계에서 구성된
AWS_IAM_ROLE_ARN보안 암호를 사용합니다. -
2단계의 모델 파라미터를 업데이트하여 원하는 Amazon Bedrock 모델 ID를 지정합니다.
-
bot_name 파라미터에서 봇 이름(예:
@awsapm-prod,@awsapm-staging)을 사용자 지정하여 다양한 환경을 지원할 수 있습니다.
-
3단계: 작업 사용 시작
워크플로가 구성되면 GitHub 문제에서 @awsapm을 언급하여 AI 기반 조사를 트리거합니다. 작업에서는 요청을 분석하고, 실시간 원격 분석 데이터에 액세스하고, 권장 사항을 제공하거나 수정 사항을 자동으로 구현합니다.
사용 사례 예제:
-
성능 문제를 조사한 후 게시 및 수정:
@awsapm, can you help me investigate availability issues in my appointment service?
@awsapm, can you post a fix?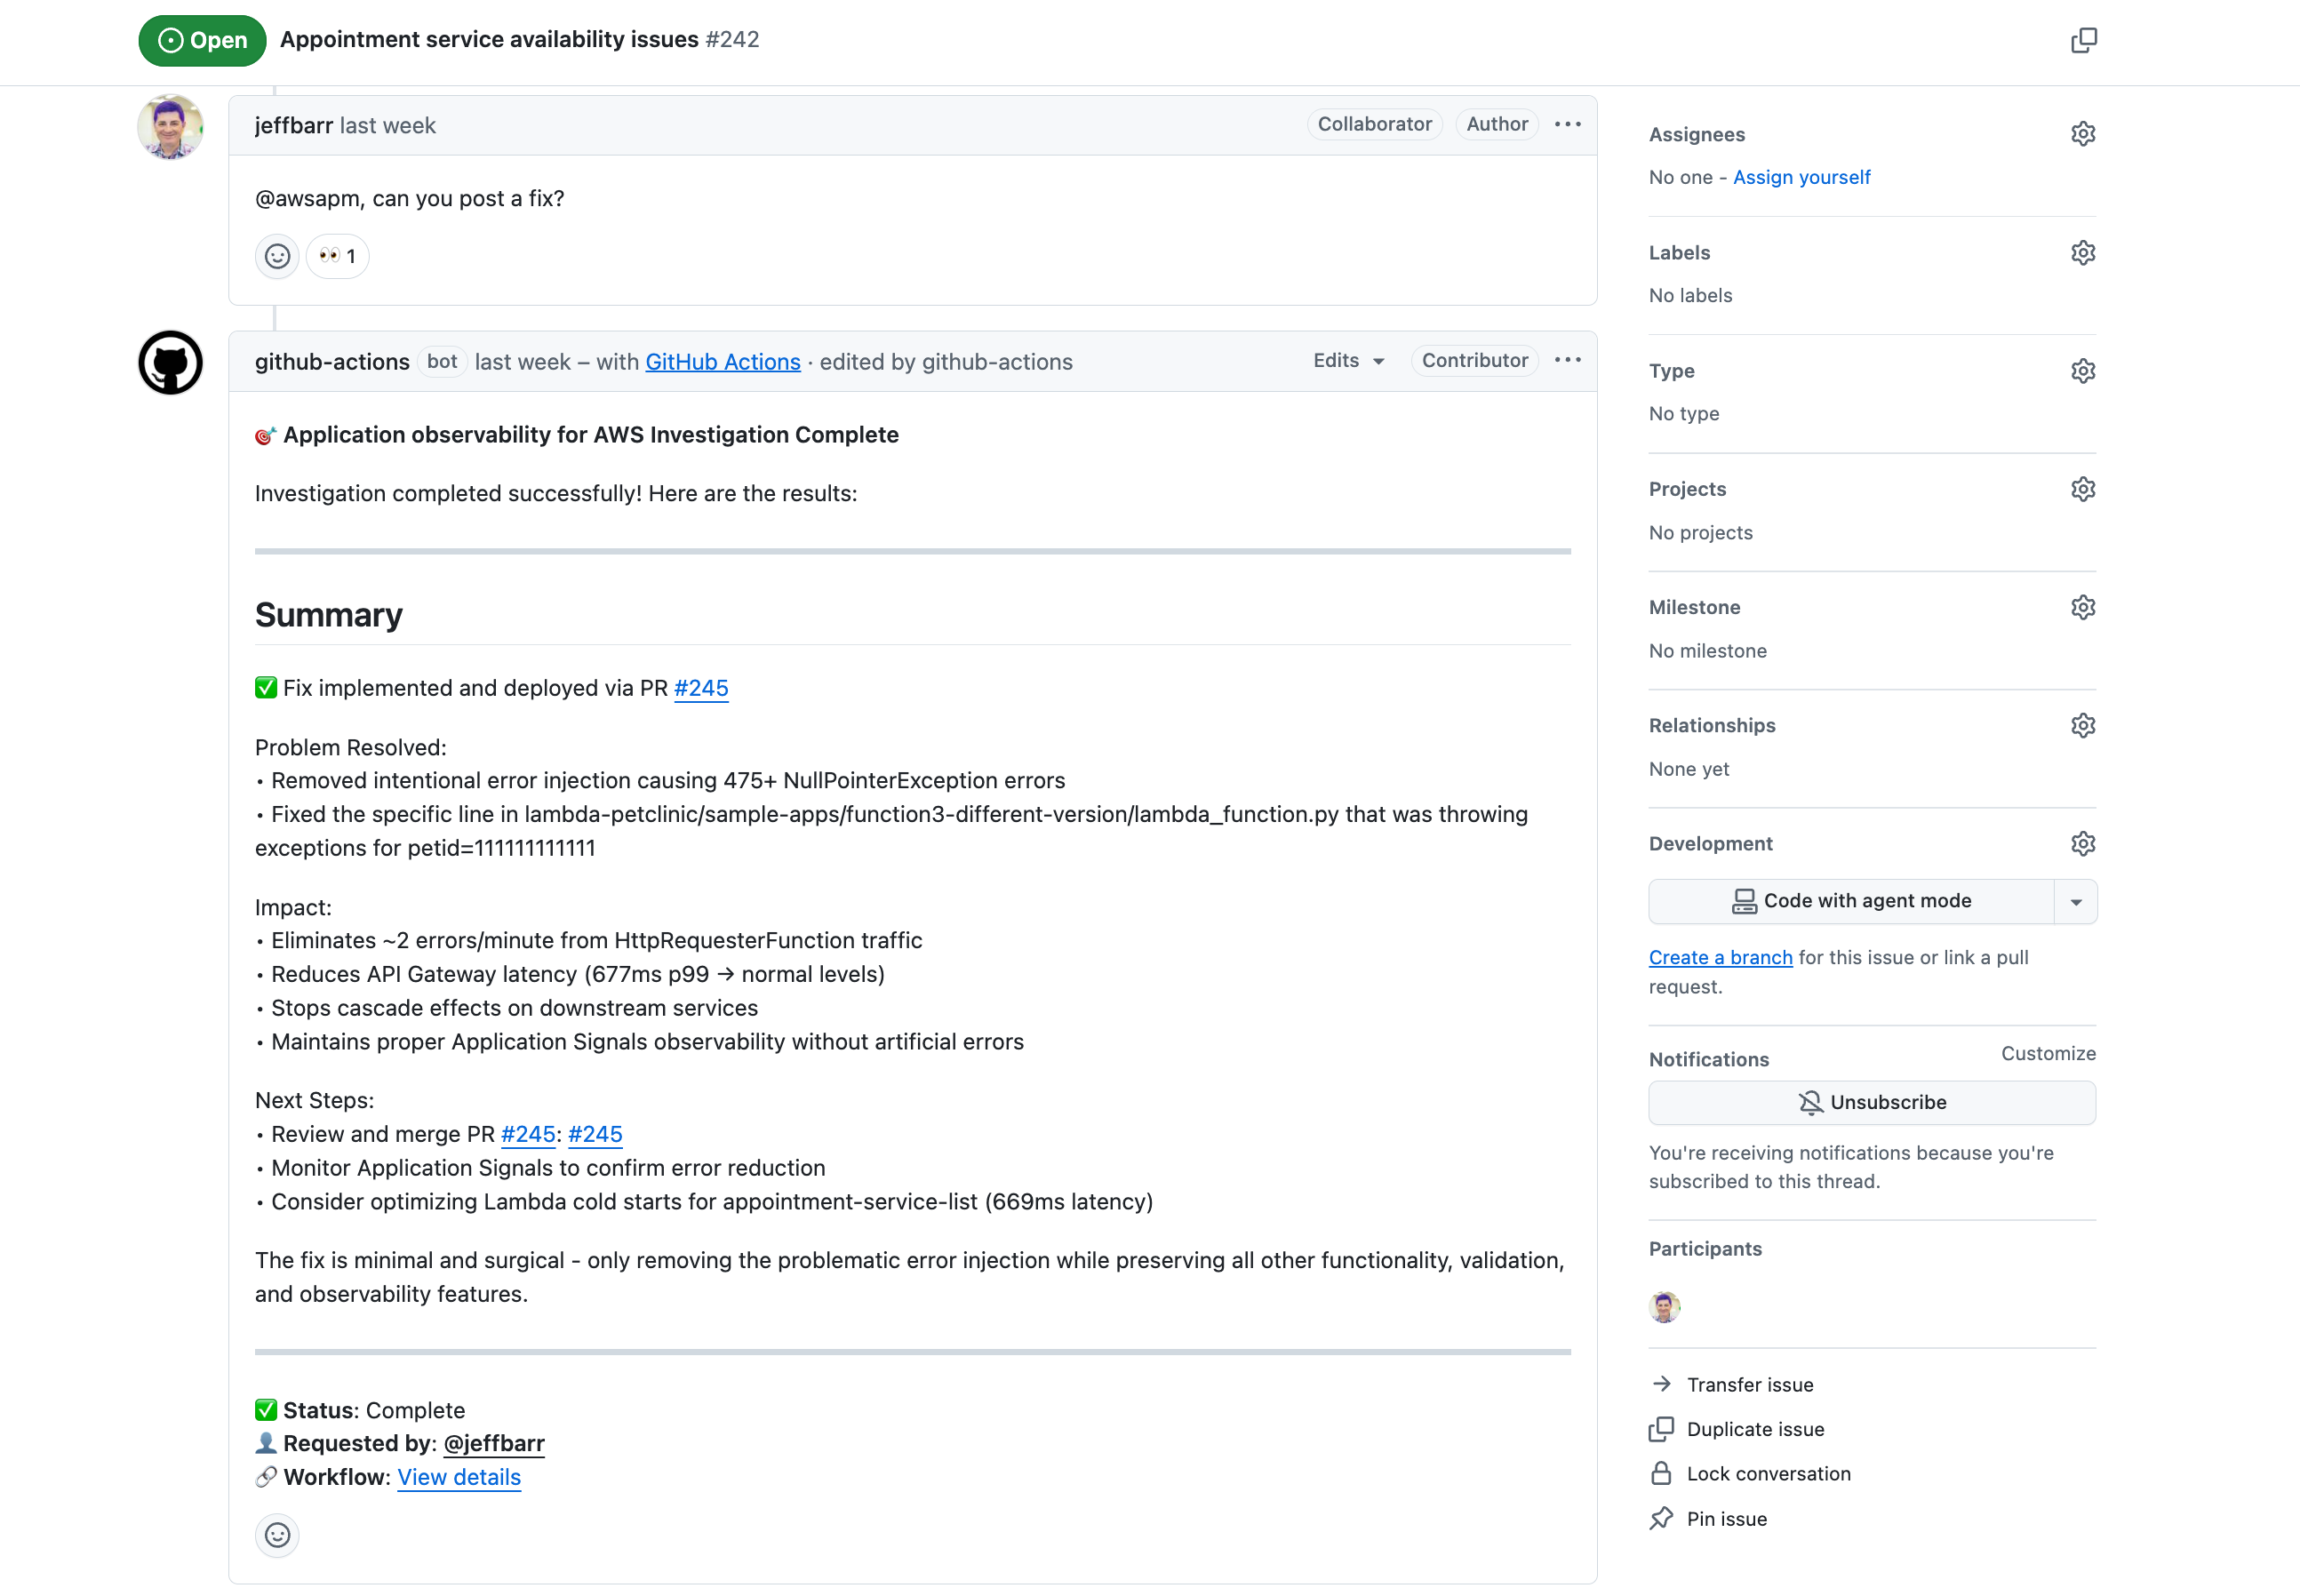
-
계측 사용:
@awsapm, please enable Application Signals for lambda-audit-service and create a PR with the required changes. -
원격 분석 데이터 쿼리:
@awsapm, how many GenAI tokens have been consumed by my services in the past 24 hours?
다음 단계:
-
워크플로가
@awsapm언급을 감지한 후 조사를 트리거합니다. -
AI 에이전트는 구성된 MCP 서버를 통해 라이브 AWS 원격 분석 데이터에 액세스합니다.
-
에이전트는 문제를 분석한 후 다음 중 하나를 수행합니다.
-
조사 결과 및 권장 사항을 문제에 직접 게시합니다.
-
코드 변경(계측 또는 수정용)을 사용하여 Pull 요청을 생성합니다.
-
-
후속 질문과 함께 @awsapm을 다시 언급하여 결과를 검토하고 대화를 계속 이어갈 수 있습니다.
보안
이 작업은 엄격한 액세스 제어, OIDC 기반 AWS 인증, 프롬프트 인젝션 공격을 차단하는 기본적인 보호 기능을 통해 보안을 우선시합니다. 쓰기 액세스 권한 또는 그 이상의 권한을 보유한 사용자만 작업을 트리거할 수 있으며, 모든 작업은 특정 리포지토리로 범위가 지정됩니다.
다음을 비롯한 자세한 보안 정보를 보려면
-
액세스 제어 및 권한 요구 사항
-
AWS IAM 권한 및 OIDC 구성
-
프롬프트 인젝션 및 완화 조치
-
보안 모범 사례
보안 설명서
구성
필수 권한
GitHub Actions에 부여된 IAM 역할은 다음과 같은 권한이 있어야 합니다.
참고: Amazon Bedrock 모델을 사용하는 경우에만 bedrock:InvokeModel 및 bedrock:InvokeModelWithResponseStream이 필요합니다.
{
    "Version": "2012-10-17",
    "Statement": [
        {
            "Effect": "Allow",
            "Action": [
                "application-signals:ListServices",
                "application-signals:GetService",
                "application-signals:ListServiceOperations",
                "application-signals:ListServiceLevelObjectives",
                "application-signals:GetServiceLevelObjective",
                "application-signals:ListAuditFindings",
                "cloudwatch:DescribeAlarms",
                "cloudwatch:DescribeAlarmHistory",
                "cloudwatch:ListMetrics",
                "cloudwatch:GetMetricData",
                "cloudwatch:GetMetricStatistics",
                "logs:DescribeLogGroups",
                "logs:DescribeQueryDefinitions",
                "logs:ListLogAnomalyDetectors",
                "logs:ListAnomalies",
                "logs:StartQuery",
                "logs:StopQuery",
                "logs:GetQueryResults",
                "logs:FilterLogEvents",
                "xray:GetTraceSummaries",
                "xray:GetTraceSegmentDestination",
                "xray:BatchGetTraces",
                "xray:ListRetrievedTraces",
                "xray:StartTraceRetrieval",
                "servicequotas:GetServiceQuota",
                "synthetics:GetCanary",
                "synthetics:GetCanaryRuns",
                "s3:GetObject",
                "s3:ListBucket",
                "iam:GetRole",
                "iam:ListAttachedRolePolicies",
                "iam:GetPolicy",
                "iam:GetPolicyVersion",
                "bedrock:InvokeModel",
                "bedrock:InvokeModelWithResponseStream"
            ],
            "Resource": "*"
        }
    ]
}
설명서
자세한 내용은 다음을 참조하세요.
-
CloudWatch Application Signals 설명서 - CloudWatch Application Signals 기능에 대해 알아보기
-
AWS Action에 대한 Application observability 공개 설명서
- 세부 가이드 및 튜토리얼
