翻訳は機械翻訳により提供されています。提供された翻訳内容と英語版の間で齟齬、不一致または矛盾がある場合、英語版が優先します。
# スピーカーをパーティション化する (ダイアライゼーション)
スピーカーダイアライゼーションを使用すると、文字起こし出力で異なるスピーカーを区別できます。 Amazon Transcribeは最大 30 人の一意のスピーカーを区別し、各一意のスピーカーのテキストに一意の値 (`spk_0` から ) をラベル付けできます`spk_9`。
スピーカーパーティショニングが有効になっているリクエストには、[標準の文字起こしセクション](how-input.md#how-it-works-output) (`transcripts`と`items`) に加えて、`speaker_labels` セクションが含まれます。このセクションはスピーカーごとにグループ化されており、話者ラベルやタイムスタンプなど、各発話に関する情報が含まれています。
```
"speaker_labels": {
"channel_label": "ch_0",
"speakers": 2,
"segments": [
{
"start_time": "4.87",
"speaker_label": "spk_0",
"end_time": "6.88",
"items": [
{
"start_time": "4.87",
"speaker_label": "spk_0",
"end_time": "5.02"
},
{{...}}
{
"start_time": "8.49",
"speaker_label": "spk_1",
"end_time": "9.24",
"items": [
{
"start_time": "8.49",
"speaker_label": "spk_1",
"end_time": "8.88"
},
```
スピーカーパーティショニングを使用した完全な文字起こしの例 (2 人の話者の場合) を見るには、「[ダイアライゼーション出力の例 (バッチ)](diarization-output-batch.md)」を参照してください。
## バッチ文字起こしで、スピーカーをパーティション化する
バッヂ文字起こしでスピーカーをパーティション化する方法については、以下の例を参照してください。
### AWS マネジメントコンソール
1. [AWS マネジメントコンソール](https://console.aws.amazon.com/transcribe/) にサインインします。
1. ナビゲーションペインで、[**文字起こしジョブ**] を選択後、[**ジョブの作成**] (右上) を選択します。これにより、「**ジョブの詳細を指定**」ページが開きます。
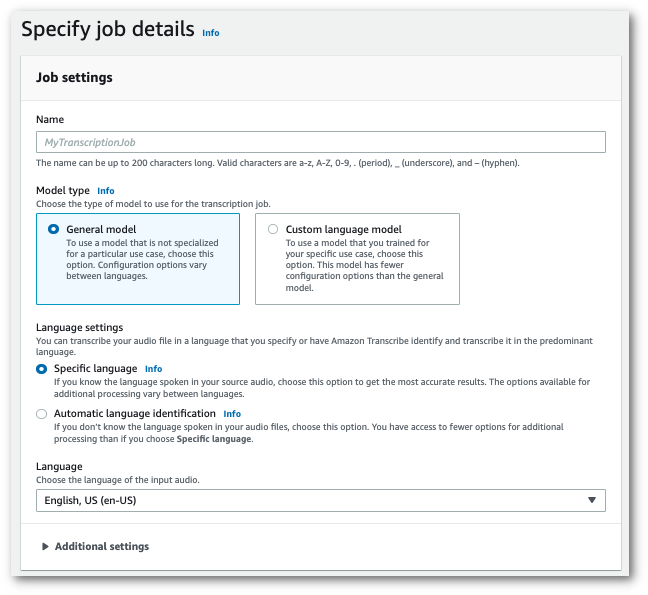
1. **ジョブの詳細を指定**ページで追加したいフィールドに入力後、「**次へ**」を選択します。これにより、**ジョブの設定 - *オプション***ページへ移動します。
話者のパーティショニングを有効にするには、**[オーディオ設定]** で **[音声識別]** を選択します。次に、**[話者のパーティショニング]** を選択し、話者の数を指定します。

1. [**ジョブの作成**] を選択して、文字起こしジョブを実行します。
### AWS CLI
この例では、[start-transcription-job](https://awscli.amazonaws.com/v2/documentation/api/latest/reference/transcribe/start-transcription-job.html) を使用します。詳細については、「[https://docs.aws.amazon.com/transcribe/latest/APIReference/API_StartTranscriptionJob.html](https://docs.aws.amazon.com/transcribe/latest/APIReference/API_StartTranscriptionJob.html)」を参照してください。
```
aws transcribe start-transcription-job \
--region {{us-west-2}} \
--transcription-job-name {{my-first-transcription-job}} \
--media MediaFileUri=s3://{{amzn-s3-demo-bucket}}/{{my-input-files}}/{{my-media-file}}.{{flac}} \
--output-bucket-name {{amzn-s3-demo-bucket}} \
--output-key {{my-output-files}}/ \
--language-code {{en-US}} \
--settings ShowSpeakerLabels={{true}},MaxSpeakerLabels={{3}}
```
別の例として、[start-transcription-job](https://awscli.amazonaws.com/v2/documentation/api/latest/reference/transcribe/start-transcription-job.html) コマンド、およびそのジョブでスピーカーパーティショニングを有効にするリクエストボディを使用します。
```
aws transcribe start-transcription-job \
--region {{us-west-2}} \
--cli-input-json file://{{my-first-transcription-job}}.json
```
ファイル *my-first-transcription-job.json* には、次のリクエストボディが含まれています。
```
{
"TranscriptionJobName": "{{my-first-transcription-job}}",
"Media": {
"MediaFileUri": "s3://{{amzn-s3-demo-bucket}}/{{my-input-files}}/{{my-media-file}}.{{flac}}"
},
"OutputBucketName": "{{amzn-s3-demo-bucket}}",
"OutputKey": "{{my-output-files}}/",
"LanguageCode": "{{en-US}}",
"ShowSpeakerLabels": 'TRUE',
"MaxSpeakerLabels": {{3}}
}
```
### AWS SDK for Python (Boto3)
この例ではAWS SDK for Python (Boto3)、 を使用して [start\_transcription\_job](https://boto3.amazonaws.com/v1/documentation/api/latest/reference/services/transcribe.html#TranscribeService.Client.start_transcription_job) メソッドを使用してチャネルを識別します。詳細については、「[StartTranscriptionJob](https://docs.aws.amazon.com/transcribe/latest/APIReference/API_StartTranscriptionJob.html)」を参照してください。
```
from __future__ import print_function
import time
import boto3
transcribe = boto3.client('transcribe', '{{us-west-2}}')
job_name = "{{my-first-transcription-job}}"
job_uri = "s3://{{amzn-s3-demo-bucket}}/{{my-input-files}}/{{my-media-file}}.{{flac}}"
transcribe.start_transcription_job(
TranscriptionJobName = job_name,
Media = {
'MediaFileUri': job_uri
},
OutputBucketName = '{{amzn-s3-demo-bucket}}',
OutputKey = '{{my-output-files}}/',
LanguageCode = '{{en-US}}',
Settings = {
'ShowSpeakerLabels': True,
'MaxSpeakerLabels': {{3}}
}
)
while True:
status = transcribe.get_transcription_job(TranscriptionJobName = job_name)
if status['TranscriptionJob']['TranscriptionJobStatus'] in ['COMPLETED', 'FAILED']:
break
print("Not ready yet...")
time.sleep(5)
print(status)
```
## ストリーミング文字起こしでスピーカーをパーティション化する
ストリーミング文字起こしでスピーカーをパーティション化するには、次の例を参照してください。
### ストリーミング文字起こし
1. [AWS マネジメントコンソール](https://console.aws.amazon.com/transcribe/) にサインインします。
1. ナビゲーションペインで、[**リアルタイム文字起こし**] を選択します。**音声設定**にスクロールして、最小化されている場合はこのフィールドを展開します。

1. **スピーカーパーティショニング**をオンに切り替えます。

1. これで、ストリームを書き起こす準備ができました。[**ストリーミングを開始する**] を選択し、話し始めます。ディクテーションを終了するには、[**ストリーミングを停止する**] を選択します。
### HTTP/2 ストリーム
この例では、文字起こし出力でスピーカーをパーティショニングする HTTP/2 リクエストを作成します。での HTTP/2 ストリーミングの使用の詳細についてはAmazon Transcribe、「」を参照してください[HTTP/2 ストリームの設定](streaming-setting-up.md#streaming-http2)。Amazon Transcribe に固有のパラメータとヘッダーの詳細については、「[StartStreamTranscription](https://docs.aws.amazon.com/transcribe/latest/APIReference/API_streaming_StartStreamTranscription.html)」を参照してください。
```
POST /stream-transcription HTTP/2
host: transcribestreaming.{{us-west-2}}.amazonaws.com
X-Amz-Target: com.amazonaws.transcribe.Transcribe.{{StartStreamTranscription}}
Content-Type: application/vnd.amazon.eventstream
X-Amz-Content-Sha256: {{string}}
X-Amz-Date: {{20220208}}T{{235959}}Z
Authorization: AWS4-HMAC-SHA256 Credential={{access-key}}/{{20220208}}/{{us-west-2}}/transcribe/aws4_request, SignedHeaders=content-type;host;x-amz-content-sha256;x-amz-date;x-amz-target;x-amz-security-token, Signature={{string}}
x-amzn-transcribe-language-code: {{en-US}}
x-amzn-transcribe-media-encoding: {{flac}}
x-amzn-transcribe-sample-rate: {{16000}}
x-amzn-transcribe-show-speaker-label: true
transfer-encoding: chunked
```
パラメータ定義は [API リファレンス](https://docs.aws.amazon.com/transcribe/latest/APIReference/API_Reference.html)にあります。すべての AWSAPI オペレーションに共通のパラメータは、[「共通パラメータ](https://docs.aws.amazon.com/transcribe/latest/APIReference/CommonParameters.html)」セクションに記載されています。
### WebSocket ストリーム
この例では、文字起こし出力でスピーカーを区切る署名付き URL を作成します。読みやすくするために、改行が追加されています。で WebSocket ストリームを使用する方法の詳細についてはAmazon Transcribe、「」を参照してください[WebSocket ストリームの設定](streaming-setting-up.md#streaming-websocket)。パラメータの詳細については、「[https://docs.aws.amazon.com/transcribe/latest/APIReference/API_streaming_StartStreamTranscription.html](https://docs.aws.amazon.com/transcribe/latest/APIReference/API_streaming_StartStreamTranscription.html)」を参照してください。
```
GET wss://transcribestreaming.{{us-west-2}}.amazonaws.com:8443/stream-transcription-websocket?
&X-Amz-Algorithm=AWS4-HMAC-SHA256
&X-Amz-Credential={{AKIAIOSFODNN7EXAMPLE}}%2F{{20220208}}%2F{{us-west-2}}%2F{{transcribe}}%2Faws4_request
&X-Amz-Date={{20220208}}T{{235959}}Z
&X-Amz-Expires={{300}}
&X-Amz-Security-Token={{security-token}}
&X-Amz-Signature={{string}}
&X-Amz-SignedHeaders=content-type%3Bhost%3Bx-amz-date
&language-code=en-US
&specialty={{PRIMARYCARE}}
&type={{DICTATION}}
&media-encoding={{flac}}
&sample-rate={{16000}}
&show-speaker-label=true
```
パラメータ定義は [API リファレンス](https://docs.aws.amazon.com/transcribe/latest/APIReference/API_Reference.html)にあります。すべての AWSAPI オペレーションに共通のパラメータは、[「共通パラメータ](https://docs.aws.amazon.com/transcribe/latest/APIReference/CommonParameters.html)」セクションに記載されています。