翻訳は機械翻訳により提供されています。提供された翻訳内容と英語版の間で齟齬、不一致または矛盾がある場合、英語版が優先します。
# カスタム語彙の使用
カスタム語彙を作成したら、それを文字起こしのリクエストに含めることができます。例については、以下のセクションを参照してください。
リクエストに含めるカスタム語彙の言語は、メディアに指定した言語コードと一致する必要があります。言語が一致しない場合、カスタム語彙は文字起こしに適用されず、警告やエラーも発生しません。
## バッチ文字起こしでカスタム語彙を使用する
バッチ文字起こしでカスタム語彙を使用するには、以下の例を参照してください。
### AWS マネジメントコンソール
1. [AWS マネジメントコンソール](https://console.aws.amazon.com/transcribe/) にサインインします。
1. ナビゲーションペインで、[**文字起こしジョブ**] を選択後、[**ジョブの作成**] (右上) を選択します。これにより、「**ジョブの詳細を指定**」ページが開きます。
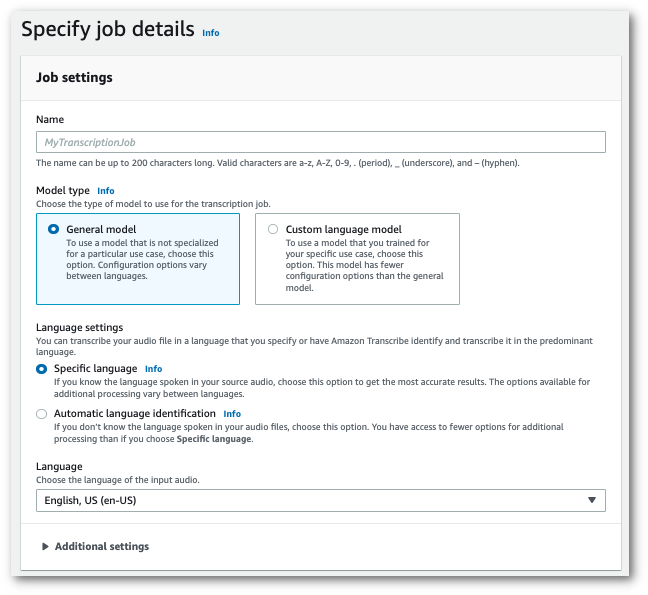
ジョブに名前を付け、入力メディアを指定します。オプションで、他のフィールドも追加し、[**次へ**] を選択します。
1. **ジョブの設定**ページの下部にある**カスタマイズ**パネルで、**カスタム語彙**をオンに切り替えます。
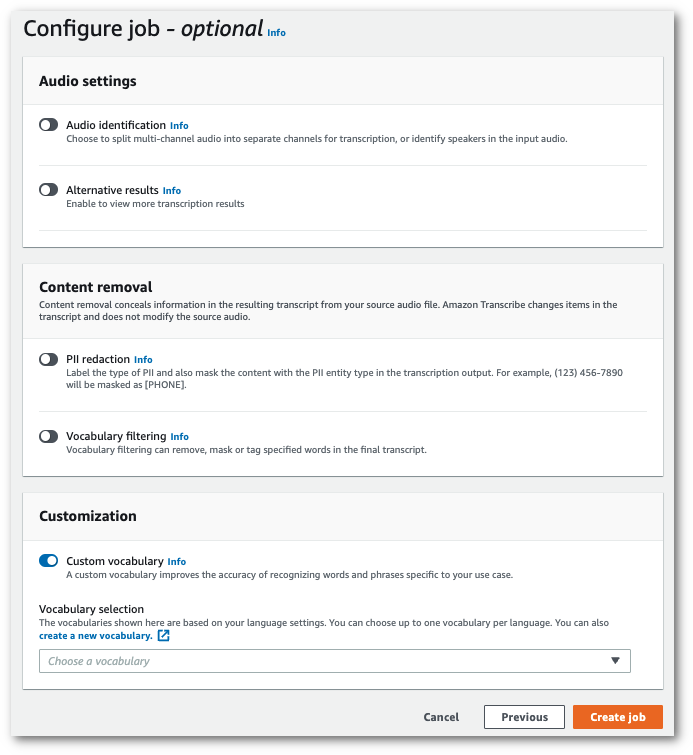
1. ドロップダウンメニューから [カスタム語彙] を選択します。
[**ジョブの作成**] を選択して、文字起こしジョブを実行します。
### AWS CLI
この例では、[start-transcription-job](https://awscli.amazonaws.com/v2/documentation/api/latest/reference/transcribe/start-transcription-job.html) コマンドと `Settings` パラメータ、`VocabularyName` サブパラメータを使用します。詳細については、「[https://docs.aws.amazon.com/transcribe/latest/APIReference/API_StartTranscriptionJob.html](https://docs.aws.amazon.com/transcribe/latest/APIReference/API_StartTranscriptionJob.html)」および「[https://docs.aws.amazon.com/transcribe/latest/APIReference/API_Settings.html](https://docs.aws.amazon.com/transcribe/latest/APIReference/API_Settings.html)」を参照してください。
```
aws transcribe start-transcription-job \
--region {{us-west-2}} \
--transcription-job-name {{my-first-transcription-job}} \
--media MediaFileUri=s3://{{amzn-s3-demo-bucket}}/{{my-input-files}}/{{my-media-file}}.{{flac}} \
--output-bucket-name {{amzn-s3-demo-bucket}} \
--output-key {{my-output-files}}/ \
--language-code {{en-US}} \
--settings VocabularyName={{my-first-vocabulary}}
```
以下は、[start-transcription-job](https://awscli.amazonaws.com/v2/documentation/api/latest/reference/transcribe/start-transcription-job.html) コマンド、およびそのジョブでカスタム語彙を含むリクエストボディを使用した別の例です。
```
aws transcribe start-transcription-job \
--region {{us-west-2}} \
--cli-input-json file://{{my-first-vocabulary-job}}.json
```
ファイル *my-first-vocabulary-job.json* には、次のリクエストボディが含まれています。
```
{
"TranscriptionJobName": "{{my-first-transcription-job}}",
"Media": {
"MediaFileUri": "s3://{{amzn-s3-demo-bucket}}/{{my-input-files}}/{{my-media-file}}.{{flac}}"
},
"OutputBucketName": "{{amzn-s3-demo-bucket}}",
"OutputKey": "{{my-output-files}}/",
"LanguageCode": "{{en-US}}",
"Settings": {
"VocabularyName": "{{my-first-vocabulary}}"
}
}
```
### AWS SDK for Python (Boto3)
この例では AWS SDK for Python (Boto3) 、 を使用して、[start\_transcription\_job](https://boto3.amazonaws.com/v1/documentation/api/latest/reference/services/transcribe.html#TranscribeService.Client.start_transcription_job) メソッドの `Settings`引数を使用してカスタム語彙を含めます。詳細については、「[https://docs.aws.amazon.com/transcribe/latest/APIReference/API_StartTranscriptionJob.html](https://docs.aws.amazon.com/transcribe/latest/APIReference/API_StartTranscriptionJob.html)」および「[https://docs.aws.amazon.com/transcribe/latest/APIReference/API_Settings.html](https://docs.aws.amazon.com/transcribe/latest/APIReference/API_Settings.html)」を参照してください。
機能固有の例、シナリオ例、クロスサービス例など、 AWS SDKs[SDK を使用した Amazon Transcribe のコード例 AWS SDKs](service_code_examples.md)「」の章を参照してください。
```
from __future__ import print_function
import time
import boto3
transcribe = boto3.client('transcribe', '{{us-west-2}}')
job_name = "{{my-first-transcription-job}}"
job_uri = "s3://{{amzn-s3-demo-bucket}}/{{my-input-files}}/{{my-media-file}}.{{flac}}"
transcribe.start_transcription_job(
TranscriptionJobName = job_name,
Media = {
'MediaFileUri': job_uri
},
OutputBucketName = '{{amzn-s3-demo-bucket}}',
OutputKey = '{{my-output-files}}/',
LanguageCode = '{{en-US}}',
Settings = {
'VocabularyName': '{{my-first-vocabulary}}'
}
)
while True:
status = transcribe.get_transcription_job(TranscriptionJobName = job_name)
if status['TranscriptionJob']['TranscriptionJobStatus'] in ['COMPLETED', 'FAILED']:
break
print("Not ready yet...")
time.sleep(5)
print(status)
```
## ストリーミング文字起こしでのカスタム語彙の使用
ストリーミング文字起こしでカスタム語彙を使用するには、以下の例を参照してください。
### AWS マネジメントコンソール
1. [AWS マネジメントコンソール](https://console.aws.amazon.com/transcribe/) にサインインします。
1. ナビゲーションペインで、[**リアルタイム文字起こし**] を選択します。**カスタマイズ**までスクロールして、最小化されている場合はこのフィールドを展開します。
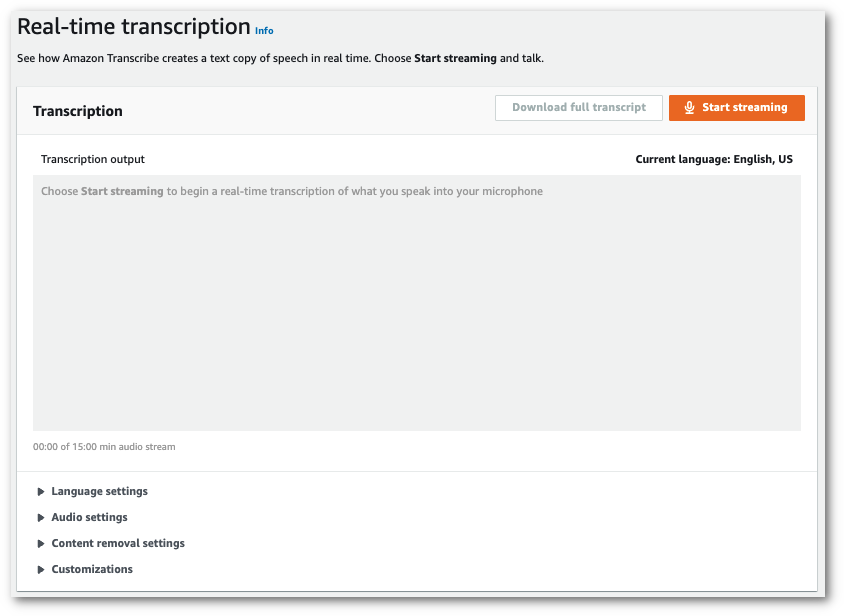
1. **カスタム語彙**をオンにして、ドロップダウンメニューから [カスタム語彙] を選択します。
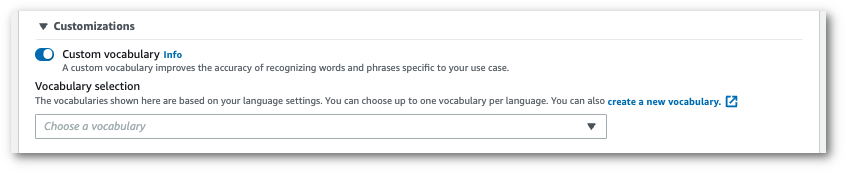
ストリームに適用するその他の設定を含めます。
1. これで、ストリームを書き起こす準備ができました。[**ストリーミングを開始する**] を選択し、話し始めます。ディクテーションを終了するには、[**ストリーミングを停止する**] を選択します。
### HTTP/2 ストリーム
この例では、カスタム語彙を含む HTTP/2 リクエストを作成します。での HTTP/2 ストリーミングの使用の詳細については Amazon Transcribe、「」を参照してください[HTTP/2 ストリームの設定](streaming-setting-up.md#streaming-http2)。 Amazon Transcribeに固有のパラメータとヘッダーの詳細については、「[https://docs.aws.amazon.com/transcribe/latest/APIReference/API_streaming_StartStreamTranscription.html](https://docs.aws.amazon.com/transcribe/latest/APIReference/API_streaming_StartStreamTranscription.html)」を参照してください。
```
POST /stream-transcription HTTP/2
host: transcribestreaming.{{us-west-2}}.amazonaws.com
X-Amz-Target: com.amazonaws.transcribe.Transcribe.{{StartStreamTranscription}}
Content-Type: application/vnd.amazon.eventstream
X-Amz-Content-Sha256: {{string}}
X-Amz-Date: {{20220208}}T{{235959}}Z
Authorization: AWS4-HMAC-SHA256 Credential={{access-key}}/{{20220208}}/{{us-west-2}}/transcribe/aws4_request, SignedHeaders=content-type;host;x-amz-content-sha256;x-amz-date;x-amz-target;x-amz-security-token, Signature={{string}}
x-amzn-transcribe-language-code: {{en-US}}
x-amzn-transcribe-media-encoding: {{flac}}
x-amzn-transcribe-sample-rate: {{16000}}
x-amzn-transcribe-vocabulary-name: {{my-first-vocabulary}}
transfer-encoding: chunked
```
パラメータ定義は [API リファレンス](https://docs.aws.amazon.com/transcribe/latest/APIReference/API_Reference.html)にあります。すべての AWS API オペレーションに共通のパラメータは、[「共通パラメータ](https://docs.aws.amazon.com/transcribe/latest/APIReference/CommonParameters.html)」セクションに記載されています。
### WebSocket ストリーム
この例では、カスタム語彙を WebSocket ストリームに適用する署名付き URL を作成します。読みやすくするために、改行が追加されています。で WebSocket ストリームを使用する方法の詳細については Amazon Transcribe、「」を参照してください[WebSocket ストリームの設定](streaming-setting-up.md#streaming-websocket)。パラメータの詳細については、「[https://docs.aws.amazon.com/transcribe/latest/APIReference/API_streaming_StartStreamTranscription.html](https://docs.aws.amazon.com/transcribe/latest/APIReference/API_streaming_StartStreamTranscription.html)」を参照してください。
```
GET wss://transcribestreaming.{{us-west-2}}.amazonaws.com:8443/stream-transcription-websocket?
&X-Amz-Algorithm=AWS4-HMAC-SHA256
&X-Amz-Credential={{AKIAIOSFODNN7EXAMPLE}}%2F{{20220208}}%2F{{us-west-2}}%2F{{transcribe}}%2Faws4_request
&X-Amz-Date={{20220208}}T{{235959}}Z
&X-Amz-Expires={{300}}
&X-Amz-Security-Token={{security-token}}
&X-Amz-Signature={{string}}
&X-Amz-SignedHeaders=content-type%3Bhost%3Bx-amz-date
&language-code={{en-US}}
&media-encoding={{flac}}
&sample-rate={{16000}}
&vocabulary-name={{my-first-vocabulary}}
```
パラメータ定義は [API リファレンス](https://docs.aws.amazon.com/transcribe/latest/APIReference/API_Reference.html)にあります。すべての AWS API オペレーションに共通のパラメータは、[「共通パラメータ](https://docs.aws.amazon.com/transcribe/latest/APIReference/CommonParameters.html)」セクションに記載されています。