Use a C2C (Cloud-to-Cloud) connector
A C2C connector manages the translation of request and response messages, and enables communication between managed integrations and a third-party vendor cloud. It facilitates unified control across different device types, platforms and protocols enabling third-party devices to be onboarded and managed.
The following procedure lists the steps to use the C2C connector.
Steps to use the C2C connector:
-
CreateCloudConnector
Configure a connector to enable bidirectional communication between your managed integrations and third-party vendor clouds.
When setting up the connector, provide the following details:
-
Name: Choose a descriptive name for the connector.
-
Description: Provide a brief summary of the connector's purpose and capabilities.
-
AWS Lambda ARN: Specify the Amazon Resource Name (ARN) of the AWS Lambda function that will power the connector.
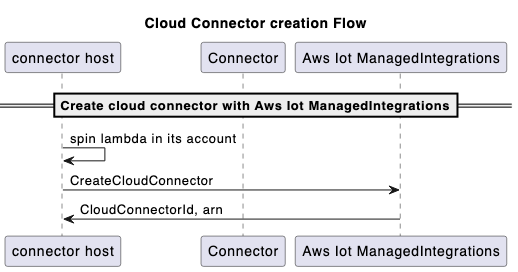
Build and deploy an AWS Lambda function that communicates with third-party vendor APIs to create a connector. Next, call the CreateCloudConnector API within managed integrations, and provide the AWS Lambda function ARN for registration. Ensure that the AWS Lambda function is deployed in the same AWS account where you crete the connector in managed integrations. You will be assigned a unique Connector ID to identify the integration.
Sample CreateCloudConnector API Request and Response:
Request:

{
    "Name": "CreateCloudConnector",
    "Description": "Testing for C2C",
    "EndpointType": "LAMBDA",
    "EndpointConfig": {
        "lambda": {
            "arn": "arn:aws:lambda:us-east-1:xxxxxx:function:TestingConnector"
        }
    },
    "ClientToken": "abc"
}

Response:

{
    "Id": "string"
}
Creation flow:
Note
Use the GetCloudConnector, UpdateCloudConnector, DeleteCloudConnector, and ListCloudConnectors APIs as needed for this procedure.
-
-
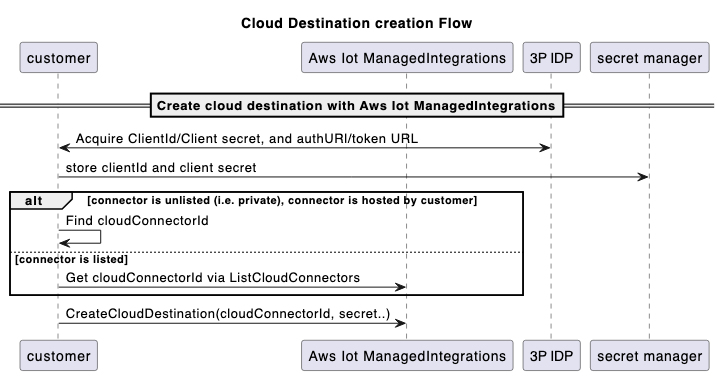
CreateConnectorDestination
Configure Destinations to provide the settings and authorization credentials that connectors need to establish secure connections with third-party vendor clouds. Use Destinations to register your third-party authorization credentials with managed integrations.
Two authorization types are now supported:
-
OAuth 2.0 - For platforms using OAuth authorization (authorization URL, token URL, client credentials)
-
GeneralAuthorization - For platforms using API keys, bearer tokens, or any non-OAuth authorization mechanism
Prerequisites
Before creating a ConnectorDestination, you must:
Call the CreateCloudConnector API to create a connector. The ID that the function returns is used in the CreateConnectorDestination API API call.
-
For OAuth authorization:
Retrieve the
tokenUrlfor the third-party platform (to exchange an authCode for an accessToken)Retrieve the
authUrlfor the third-party platform (for end-user authorization)Store the
clientIdandclientSecretin AWS Secrets Manager
-
For GeneralAuthorization:
Store your authorization materials (API keys, bearer tokens, etc.) in AWS Secrets Manager
Each authorization material needs a name and Secrets Manager reference
Sample CreateConnectorDestination API Request (OAuth):
Request:

{
    "Name": "CreateConnectorDestination",
    "Description": "CreateConnectorDestination",
    "AuthType": "OAUTH",
    "AuthConfig": {
        "oAuth": {
            "authUrl": "https://xxxx.com/oauth2/authorize",
            "tokenUrl": "https://xxxx/oauth2/token",
            "scope": "testScope",
            "tokenEndpointAuthenticationScheme": "HTTP_BASIC",
            "oAuthCompleteRedirectUrl": "about:blank",
            "proactiveRefreshTokenRenewal": {
                "enabled": false,
                "DaysBeforeRenewal": 30
            }
        }
    },
    "CloudConnectorId": "<connectorId>",
    "SecretsManager": {
        "arn": "arn:aws:secretsmanager:*****:secret:*******",
        "versionId": "********"
    },
    "ClientToken": "***"
}

Response:

{
    "Id":"string"
}
Sample CreateConnectorDestination API Request (GeneralAuthorization):
Request:

{
    "Name": "CreateConnectorDestination",
    "Description": "GeneralAuthorization test destination",
    "AuthConfig": {
        "GeneralAuthorization": {
            "AuthMaterials": [
                {
                    "AuthMaterialName": "AuthKey1",
                    "SecretsManager": {
                        "arn": "arn:aws:secretsmanager:*****:secret:*******",
                        "versionId": "********"
                    }
                }
            ]
        }
    },
    "CloudConnectorId": "<connectorId>",
    "ClientToken": "***"
}

Response:

{
    "Id": "string"
}
Key differences for GeneralAuthorization:
No
AuthTypefield requiredNo top-level
SecretsManagerfield requiredUses
AuthConfig.GeneralAuthorization.AuthMaterialsarrayEach auth material has a name and its own Secrets Manager reference
Supports multiple authentication materials for future use cases
Currently, ConnectorDestination also supports OAuth and GeneralAuthorization together in our ConnectorDestination.
Cloud destination creation flow:
Note
Use the GetConnectorDestination, UpdateConnectorDestination, DeleteConnectorDestination, and ListConnectorDestinations APIs as needed for this procedure.
-
-
CreateAccountAssociation
Associations represent the relationships between end users' third-party cloud accounts and a connector destination. After creating an Association and linking end users to managed integrations, their devices are accessible through a unique Association ID. This integration enables three key functions: discovering devices, sending commands, and receiving events.
Prerequisites
Before creating an AccountAssociation you must complete the following:
Call the CreateConnectorDestination API to create a destination. The ID that the function returns is used in the CreateAccountAssociation API call.
Invoke the CreateAccountAssociation API.
Sample CreateAccountAssociation API Request (OAuth):
Request:

{
    "Name": "CreateAccountAssociation",
    "Description": "CreateAccountAssociation",
    "ConnectorDestinationId": "<destinationId>",
    "ClientToken": "***"
}

Response:

{
    "Id":"string"
}
Sample CreateAccountAssociation API Request (GeneralAuthorization):
Request:

{
    "Name": "CreateAccountAssociation",
    "Description": "GeneralAuthorization test account association",
    "GeneralAuthorization": {
        "AuthMaterialName": "AuthKey1"
    },
    "ConnectorDestinationId": "<destinationId>",
    "ClientToken": "***"
}

Response:

{
    "AccountAssociationId": "string",
    "Arn": "string",
    "AssociationState": "ASSOCIATION_SUCCEEDED"
}
Key differences for GeneralAuthorization:
Includes
GeneralAuthorization.AuthMaterialNamefieldReferences one of the auth materials defined in the ConnectorDestination
No OAuth authorization URL in the response
Note
Use the GetAccountAssociation, UpdateAccountAssociation, DeleteAccountAssociation, and ListAccountAssociations APIs as needed for this procedure.
An AccountAssociation has a state that is queried from GetAccountAssociation and ListAccountAssociations APIs. These APIs show the state of the Association. The StartAccountAssociationRefresh API allows the refresh of an AccountAssociation state when its refresh token expires.
-
Device discovery
Each managed thing is linked to device-specific details, such as its serial number and a data model. The data model describes the device's functionality, indicating whether it's a lightbulb, switch, thermostat, or another type of device. There are two workflows for discovering third-party devices and creating managedThings: the traditional discovery flow and the pre-onboarded discovery flow.
-
Option 1: Traditional Device Discovery Flow
Use this workflow when you don't know the connector device IDs in advance. This flow discovers all devices associated with an account and allows you to select which devices to onboard.
-
Call StartDeviceDiscovery API to start the device discovery process.
Sample StartDeviceDiscovery API Request and Response:
Request: { "DiscoveryType": "CLOUD", "AccountAssociationId": "*****", "ClientToken": "abc" } Response: { "Id": "string", "StartedAt": number } -
Invoke GetDeviceDiscovery API to check the status of the discovery process.
-
Invoke ListDiscoveredDevices API to list the devices discovered.
Sample ListDiscoveredDevices API Request and Response:
Request: //Empty body Response: { "Items": [ { "Brand": "string", "ConnectorDeviceId": "string", "ConnectorDeviceName": "string", "DeviceTypes": [ "string" ], "DiscoveredAt": number, "ManagedThingId": "string", "Model": "string", "Modification": "string" } ], "NextToken": "string" } -
Invoke CreateManagedThing API to select the devices from the discovery list to be imported into managed integrations.
Sample CreateManagedThing API Request and Response:
Request: { "Role": "DEVICE", "AuthenticationMaterial": "CLOUD:<deviceDiscoveryId>:<connectorDeviceId>", "AuthenticationMaterialType": "DISCOVERED_DEVICE", "Name": "sample-device-name", "ClientToken": "xxx" } Response: { "Arn": "string", // This is the ARN of the managedThing "CreatedAt": number, "Id": "string" } -
Invoke GetManagedThing API to view this newly created
managedThing. The status will beUNASSOCIATED. -
Invoke RegisterAccountAssociation API to associate this
managedThingto a specificaccountAssociation. At the end of a successful RegisterAccountAssociation API, themanagedThingchanges toACTIVATEDstate.Sample RegisterAccountAssociation API Request and Response:
Request:

{
    "AccountAssociationId": "string",
    "DeviceDiscoveryId": "string",
    "ManagedThingId": "string"
}

Response:

{
    "AccountAssociationId": "string",
    "DeviceDiscoveryId": "string",
    "ManagedThingId": "string"
}
-
-
Option 2: Pre-onboarded Device Discovery Flow
Use this workflow when you already know the connector device IDs before onboarding. This flow is useful for pre-provisioned devices or when you want to selectively onboard specific devices from a larger set. This approach reduces the number of API calls required to fully register and activate devices.
Important
To use the pre-onboarded cloud discovery flow, you must know the
connectorDeviceId(connector device identifier) before initiating the device onboarding process. This identifier is obtained from the third-party vendor's platform or during device provisioning.-
Invoke CreateManagedThing API with
PRE_ONBOARDED_CLOUDauthentication material type. This creates a managedThing inPRE_ASSOCIATEDstate with multiple account associations.Sample CreateManagedThing API Request and Response (Pre-onboarded):
Request:

{
    "Role": "DEVICE",
    "AuthenticationMaterial": "CLOUD:<connectorDeviceId>:<accountAssociationId1>:<accountAssociationId2>",
    "AuthenticationMaterialType": "PRE_ONBOARDED_CLOUD",
    "Name": "pre-onboarded-device-name",
    "ClientToken": "xxx"
}

Response:

{
   "Arn": "string", // This is the ARN of the managedThing
   "CreatedAt": number,
   "Id": "string"
}
Note
The
AuthenticationMaterialformat for pre-onboarded devices isCLOUD:<connectorDeviceId>:<accountAssociationId1>:<accountAssociationId2>:...where you can specify one or more account association IDs. -
(Optional) Invoke GetManagedThing API to verify the managedThing is in
PRE_ASSOCIATEDstate. -
Call StartDeviceDiscovery API with the
connectorDeviceIdListparameter to discover only the pre-onboarded devices.Sample StartDeviceDiscovery API Request with connectorDeviceIdList:
Request:

{
    "DiscoveryType": "CLOUD",
    "AccountAssociationId": "*****",
    "ConnectorDeviceIdList": [
        "connector-device-id-1",
        "connector-device-id-2",
        "connector-device-id-3"
    ],
    "ClientToken": "abc"
}

Response:

{
    "Id": "string",
    "StartedAt": number
}
When using
connectorDeviceIdList, the discovery process returns only devices matching the specified connector device IDs. The connector will send aDEVICE_DISCOVERYevent via SendConnectorEvent with the discovered device information. -
After the discovery completes successfully, managed integrations automatically registers the pre-onboarded managedThings to their associated account associations. The managedThing transitions from
PRE_ASSOCIATEDtoACTIVATEDstate.Note
If auto-registration fails and the managedThing remains in
DISCOVEREDstate, you can manually invoke the RegisterAccountAssociation API as a fallback to complete the registration process. -
(Optional) Invoke GetManagedThing API to verify the managedThing is now in
ACTIVATEDstate.
-
-
-
Send a command to the third-party device
To control a newly onboarded device, use the SendManagedThingCommand API, with the previously created Association ID and a control action based on the capability supported by the device. The connector uses stored credentials from the account linking process to authenticate with the third-party cloud and invoke the relevant API call for the operation.
Note
For GeneralAuthorization, the connector retrieves the authorization material (API key, bearer token, etc.) from Secrets Manager using the authorization material name specified in the AccountAssociation.
Sample SendManagedThingCommand API Request and Response:
Request:

{
    "AccountAssociationId": "string",
    "ConnectorAssociationId": "string",
    "Endpoints": [
       {
          "capabilities": [
             {
                "actions": [
                   {
                      "actionTraceId": "string",
                      "name": "string",
                      "parameters": JSON value,
                      "ref": "string"
                   }
                ],
                "id": "string",
                "name": "string",
                "version": "string"
             }
          ],
          "endpointId": "string"
       }
    ]
}

Response:

{
   "TraceId": "string"
}
Send command to the third-party device flow:

-
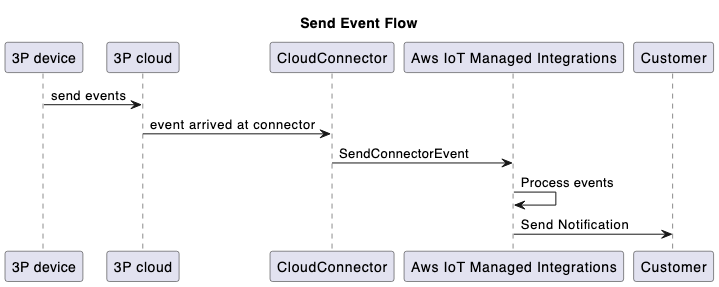
Connector sends events to managed integrations
The SendConnectorEvent API captures four types of events from the connector to managed integrations, represented by the following enum values for the Operation Type parameter:
-
DEVICE_COMMAND_RESPONSE: The asynchronous response that the connector sends in response to a command.
-
DEVICE_DISCOVERY: In response to a device discovery process, connector sends the list of discovered devices to managed integrations, it uses the SendConnectorEvent API.
-
DEVICE_EVENT: Sends the received device events.
-
DEVICE_COMMAND_REQUEST: Command requests initiated from the device. For example, WebRTC workflows.
The connector can also forward device events using the SendConnectorEvent API, with an optional
userIdparameter.Note
For GeneralAuthorization: When using GeneralAuthorization, for each Secrets ARN and version, the userId needs to be unique.
-
For device events with a
userId:Sample SendConnectorEvent API Request and Response:
Request: { "UserId": "*****", "Operation": "DEVICE_EVENT", "OperationVersion": "1.0", "StatusCode": 200, "ConnectorId": "****", "ConnectorDeviceId": "***", "TraceId": "***", "MatterEndpoint": { "id": "**", "clusters": [{ ..... } }] } } Response: { "ConnectorId": "string" } -
For device events without a
userId:Sample SendConnectorEvent API Request and Response:
Request:

{
    "Operation": "DEVICE_EVENT",
    "OperationVersion": "1.0",
    "StatusCode": 200,
    "ConnectorId": "*****",
    "ConnectorDeviceId": "****",
    "TraceId": "****",
    "MatterEndpoint": {
        "id": "**",
        "clusters": [{
            ....
        }]
    }
}

Response:

{
    "ConnectorId": "string"
}
To remove the link between a particular
managedThingand an account association, use the deregister mechanism:Sample DeregisterAccountAssociation API Request and Response:
Request:

{
    "AccountAssociationId": "****",
    "ManagedThingId": "****"
}

Response:

HTTP/1.1 200 // Empty body
Send event flow:
-
-
Update connector status to "Listed" to make it visible to other managed integrations customers
By default, connectors are private and only visible to the AWS account that created them. You can choose to make a connector visible to other managed integrations customers.
To share your connector with other users, use the Make visible option in the AWS Management Console on the connector details page to submit your connector ID to AWS for review. Once approved, the connector is available to all managed integrations users in the same AWS Region. Additionally, you can restrict access to specific AWS account IDs by modifying the access policy on the connector's associated AWS Lambda function. To ensure your connector is usable by other customers, manage the IAM access permissions on your Lambda function from other AWS accounts to your visible connector.
Review the AWS service terms and your organization's policies that govern connector sharing and access permissions before making connectors visible to other managed integrations customers.
