Terjemahan disediakan oleh mesin penerjemah. Jika konten terjemahan yang diberikan bertentangan dengan versi bahasa Inggris aslinya, utamakan versi bahasa Inggris.
Impor
Anda dapat menggunakan Amazon SageMaker Data Wrangler untuk mengimpor data dari sumber data berikut: Amazon Simple Storage Service (Amazon S3), Amazon Athena, Amazon Redshift, dan Snowflake. Dataset yang Anda impor dapat menyertakan hingga 1000 kolom.
Topik
Beberapa sumber data memungkinkan Anda menambahkan beberapa koneksi data:
-
Anda dapat terhubung ke beberapa cluster Amazon Redshift. Setiap cluster menjadi sumber data.
-
Anda dapat menanyakan database Athena apa pun di akun Anda untuk mengimpor data dari database tersebut.
Ketika Anda mengimpor dataset dari sumber data, itu akan muncul dalam aliran data Anda. Data Wrangler secara otomatis menyimpulkan tipe data setiap kolom dalam kumpulan data Anda. Untuk mengubah jenis ini, pilih langkah Jenis data dan pilih Edit tipe data.
Saat Anda mengimpor data dari Athena atau Amazon Redshift, data yang diimpor secara otomatis disimpan di bucket AI S3 SageMaker default untuk Wilayah tempat Anda AWS menggunakan Studio Classic. Selain itu, Athena menyimpan data yang Anda pratinjau di Data Wrangler di bucket ini. Untuk mempelajari selengkapnya, lihat Penyimpanan Data yang Diimpor.
penting
Bucket Amazon S3 default mungkin tidak memiliki setelan keamanan yang paling tidak permisif, seperti kebijakan bucket dan enkripsi sisi server (SSE). Kami sangat menyarankan Anda Menambahkan Kebijakan Bucket Untuk Membatasi Akses ke Kumpulan Data yang Diimpor ke Data Wrangler.
penting
Selain itu, jika Anda menggunakan kebijakan terkelola untuk SageMaker AI, kami sangat menyarankan agar Anda memasukkannya ke kebijakan paling ketat yang memungkinkan Anda melakukan kasus penggunaan. Untuk informasi selengkapnya, lihat Berikan Izin Peran IAM untuk Menggunakan Data Wrangler.
Semua sumber data kecuali Amazon Simple Storage Service (Amazon S3) Simple Storage Service mengharuskan Anda menentukan kueri SQL untuk mengimpor data Anda. Untuk setiap kueri, Anda harus menentukan yang berikut:
-
Katalog data
-
Basis Data
-
Tabel
Anda dapat menentukan nama database atau katalog data di menu drop-down atau dalam kueri. Berikut ini adalah contoh query:
-
select * from— Kueri tidak menggunakan apa pun yang ditentukan dalam menu tarik-turun antarmuka pengguna (UI) untuk dijalankan. Ini pertanyaan diexample-data-catalog-name.example-database-name.example-table-nameexample-table-nameexample-database-namedalamexample-data-catalog-name. -
select * from— Kueri menggunakan katalog data yang telah Anda tentukan di menu tarik-turun katalog Data untuk dijalankan. Ini queryexample-database-name.example-table-nameexample-table-namedalamexample-database-namedalam katalog data yang telah Anda tentukan. -
select * from— Kueri mengharuskan Anda untuk memilih bidang untuk katalog Data dan menu tarik-turun nama Database. Ini queryexample-table-nameexample-table-namedalam katalog data dalam database dan katalog data yang telah Anda tentukan.
Hubungan antara Data Wrangler dan sumber data adalah koneksi. Anda menggunakan koneksi untuk mengimpor data dari sumber data Anda.
Ada beberapa jenis koneksi berikut:
-
Langsung
-
Dikatalogkan
Data Wrangler selalu memiliki akses ke data terbaru dalam koneksi langsung. Jika data dalam sumber data telah diperbarui, Anda dapat menggunakan koneksi untuk mengimpor data. Misalnya, jika seseorang menambahkan file ke salah satu bucket Amazon S3 Anda, Anda dapat mengimpor file tersebut.
Koneksi yang dikatalogkan adalah hasil dari transfer data. Data dalam koneksi yang dikatalogkan tidak selalu memiliki data terbaru. Misalnya, Anda dapat mengatur transfer data antara Salesforce dan Amazon S3. Jika ada pembaruan pada data Salesforce, Anda harus mentransfer data lagi. Anda dapat mengotomatiskan proses transfer data. Untuk informasi selengkapnya tentang transfer data, lihatImpor Data Dari Perangkat Lunak sebagai Platform Layanan (SaaS).
Impor data dari Amazon S3
Anda dapat menggunakan Amazon Simple Storage Service (Amazon S3) untuk menyimpan dan mengambil sejumlah data, kapan saja, dari mana saja di web. Anda dapat menyelesaikan tugas-tugas ini menggunakan Konsol Manajemen AWS, yang merupakan antarmuka web yang sederhana dan intuitif, dan Amazon S3 API. Jika Anda telah menyimpan kumpulan data secara lokal, kami sarankan Anda menambahkannya ke bucket S3 untuk diimpor ke Data Wrangler. Untuk mempelajari caranya, lihat Mengunggah objek ke bucket di Panduan Pengguna Layanan Penyimpanan Sederhana Amazon.
Data Wrangler menggunakan S3 Select
penting
Jika Anda berencana untuk mengekspor aliran data dan meluncurkan pekerjaan Data Wrangler, memasukkan data ke feature SageMaker store AI, atau membuat pipeline SageMaker AI, ketahuilah bahwa integrasi ini memerlukan data input Amazon S3 untuk ditempatkan di wilayah yang sama. AWS
penting
Jika Anda mengimpor file CSV, pastikan file tersebut memenuhi persyaratan berikut:
-
Catatan dalam kumpulan data Anda tidak boleh lebih dari satu baris.
-
Sebuah backslash,
\, adalah satu-satunya karakter melarikan diri yang valid. -
Dataset Anda harus menggunakan salah satu pembatas berikut:
-
Koma —
, -
Usus besar —
: -
Titik koma —
; -
Pipa —
| -
Tab —
[TAB]
-
Untuk menghemat ruang, Anda dapat mengimpor file CSV terkompresi.
Data Wrangler memberi Anda kemampuan untuk mengimpor seluruh kumpulan data atau mengambil sampel sebagian darinya. Untuk Amazon S3, ini menyediakan opsi pengambilan sampel berikut:
-
Tidak ada - Impor seluruh dataset.
-
K Pertama - Contoh baris K pertama dari kumpulan data, di mana K adalah bilangan bulat yang Anda tentukan.
-
Acak - Mengambil sampel acak dari ukuran yang Anda tentukan.
-
Bertingkat — Mengambil sampel acak bertingkat. Sampel bertingkat mempertahankan rasio nilai dalam kolom.
Setelah mengimpor data, Anda juga dapat menggunakan transformator sampling untuk mengambil satu atau lebih sampel dari seluruh kumpulan data Anda. Untuk informasi lebih lanjut tentang transformator sampling, lihatPengambilan sampel.
Anda dapat menggunakan salah satu pengidentifikasi sumber daya berikut untuk mengimpor data Anda:
-
URI Amazon S3 yang menggunakan bucket Amazon S3 atau jalur akses Amazon S3
-
Alias jalur akses Amazon S3
-
Nama Sumber Daya Amazon (ARN) yang menggunakan jalur akses Amazon S3 atau bucket Amazon S3
Titik akses Amazon S3 diberi nama titik akhir jaringan yang dilampirkan ke bucket. Setiap titik akses memiliki izin dan kontrol jaringan yang berbeda yang dapat Anda konfigurasi. Untuk informasi selengkapnya tentang titik akses, lihat Mengelola akses data dengan jalur akses Amazon S3.
penting
Jika Anda menggunakan Nama Sumber Daya Amazon (ARN) untuk mengimpor data Anda, itu harus untuk sumber daya yang terletak sama dengan Wilayah AWS yang Anda gunakan untuk mengakses Amazon SageMaker Studio Classic.
Anda dapat mengimpor satu file atau beberapa file sebagai kumpulan data. Anda dapat menggunakan operasi impor multifile ketika Anda memiliki kumpulan data yang dipartisi menjadi file terpisah. Dibutuhkan semua file dari direktori Amazon S3 dan mengimpornya sebagai kumpulan data tunggal. Untuk informasi tentang jenis file yang dapat Anda impor dan cara mengimpornya, lihat bagian berikut.
Anda juga dapat menggunakan parameter untuk mengimpor subset file yang cocok dengan pola. Parameter membantu Anda memilih file yang Anda impor secara lebih selektif. Untuk mulai menggunakan parameter, edit sumber data dan terapkan ke jalur yang Anda gunakan untuk mengimpor data. Untuk informasi selengkapnya, lihat Menggunakan Kembali Alur Data untuk Kumpulan Data yang Berbeda.
Impor data dari Athena
Gunakan Amazon Athena untuk mengimpor data Anda dari Amazon Simple Storage Service (Amazon S3) ke Data Wrangler. Di Athena, Anda menulis kueri SQL standar untuk memilih data yang Anda impor dari Amazon S3. Untuk informasi lebih lanjut, lihat Apa itu Amazon Athena?
Anda dapat menggunakan Konsol Manajemen AWS untuk mengatur Amazon Athena. Anda harus membuat setidaknya satu database di Athena sebelum Anda mulai menjalankan kueri. Untuk informasi lebih lanjut tentang memulai dengan Athena, lihat Memulai.
Athena terintegrasi langsung dengan Data Wrangler. Anda dapat menulis kueri Athena tanpa harus meninggalkan UI Data Wrangler.
Selain menulis kueri Athena sederhana di Data Wrangler, Anda juga dapat menggunakan:
-
Kelompok kerja Athena untuk manajemen hasil kueri. Untuk informasi selengkapnya tentang kelompok kerja, lihatMengelola hasil kueri.
-
Konfigurasi siklus hidup untuk menyetel periode retensi data. Untuk informasi selengkapnya tentang retensi data, lihatMengatur periode retensi data.
Pertanyaan Athena dalam Data Wrangler
catatan
Data Wrangler tidak mendukung kueri federasi.
Jika Anda menggunakan AWS Lake Formation Athena, pastikan izin IAM Lake Formation Anda tidak mengganti izin IAM untuk database. sagemaker_data_wrangler
Data Wrangler memberi Anda kemampuan untuk mengimpor seluruh kumpulan data atau mengambil sampel sebagian darinya. Untuk Athena, ini menyediakan opsi pengambilan sampel berikut:
-
Tidak ada - Impor seluruh dataset.
-
K Pertama - Contoh baris K pertama dari kumpulan data, di mana K adalah bilangan bulat yang Anda tentukan.
-
Acak - Mengambil sampel acak dari ukuran yang Anda tentukan.
-
Bertingkat — Mengambil sampel acak bertingkat. Sampel bertingkat mempertahankan rasio nilai dalam kolom.
Prosedur berikut menunjukkan cara mengimpor dataset dari Athena ke Data Wrangler.
Untuk mengimpor dataset ke Data Wrangler dari Athena
-
Masuk ke Amazon SageMaker AI Console
. -
Pilih Studio.
-
Pilih Luncurkan aplikasi.
-
Dari daftar dropdown, pilih Studio.
-
Pilih ikon Beranda.
-
Pilih Data.
-
Pilih Data Wrangler.
-
Pilih Impor data.
-
Di bawah Tersedia, pilih Amazon Athena.
-
Untuk Katalog Data, pilih katalog data.
-
Gunakan daftar dropdown Database untuk memilih database yang ingin Anda kueri. Saat memilih database, Anda dapat melihat pratinjau semua tabel dalam database menggunakan Tabel yang tercantum di bawah Detail.
-
(Opsional) Pilih Konfigurasi lanjutan.
-
Pilih Workgroup.
-
Jika grup kerja Anda belum menerapkan lokasi keluaran Amazon S3 atau jika Anda tidak menggunakan grup kerja, tentukan nilai untuk lokasi hasil kueri Amazon S3.
-
(Opsional) Untuk periode penyimpanan data, pilih kotak centang untuk mengatur periode penyimpanan data dan tentukan jumlah hari untuk menyimpan data sebelum dihapus.
-
(Opsional) Secara default, Data Wrangler menyimpan koneksi. Anda dapat memilih untuk membatalkan pilihan kotak centang dan tidak menyimpan koneksi.
-
-
Untuk Sampling, pilih metode pengambilan sampel. Pilih Tidak Ada untuk mematikan pengambilan sampel.
-
Masukkan kueri Anda di editor kueri dan gunakan tombol Jalankan untuk menjalankan kueri. Setelah kueri berhasil, Anda dapat melihat pratinjau hasil Anda di bawah editor.
catatan
Data Salesforce menggunakan tipe.
timestamptzJika Anda menanyakan kolom stempel waktu yang telah Anda impor ke Athena dari Salesforce, transmisikan data di kolom ke jenisnya.timestampKueri berikut melemparkan kolom stempel waktu ke jenis yang benar.# cast column timestamptz_col as timestamp type, and name it as timestamp_col select cast(timestamptz_col as timestamp) as timestamp_col from table -
Untuk mengimpor hasil kueri, pilih Impor.
Setelah Anda menyelesaikan prosedur sebelumnya, kumpulan data yang Anda kueri dan impor akan muncul di alur Data Wrangler.
Secara default, Data Wrangler menyimpan pengaturan koneksi sebagai koneksi baru. Saat Anda mengimpor data, kueri yang telah Anda tentukan akan muncul sebagai koneksi baru. Koneksi tersimpan menyimpan informasi tentang workgroup Athena dan bucket Amazon S3 yang Anda gunakan. Saat Anda menghubungkan ke sumber data lagi, Anda dapat memilih koneksi yang disimpan.
Mengelola hasil kueri
Data Wrangler mendukung penggunaan workgroup Athena untuk mengelola hasil kueri dalam akun. AWS Anda dapat menentukan lokasi keluaran Amazon S3 untuk setiap workgroup. Anda juga dapat menentukan apakah output kueri dapat masuk ke lokasi Amazon S3 yang berbeda. Untuk informasi selengkapnya, lihat Menggunakan Grup Kerja untuk Mengontrol Akses dan Biaya Kueri.
Workgroup Anda mungkin dikonfigurasi untuk menerapkan lokasi keluaran kueri Amazon S3. Anda tidak dapat mengubah lokasi keluaran hasil kueri untuk kelompok kerja tersebut.
Jika Anda tidak menggunakan grup kerja atau menentukan lokasi keluaran untuk kueri, Data Wrangler menggunakan bucket Amazon S3 default di AWS Wilayah yang sama tempat instans Studio Classic Anda berada untuk menyimpan hasil kueri Athena. Ini membuat tabel sementara dalam database ini untuk memindahkan output kueri ke bucket Amazon S3 ini. Ini menghapus tabel ini setelah data telah diimpor; Namun database,sagemaker_data_wrangler, tetap ada. Untuk mempelajari selengkapnya, lihat Penyimpanan Data yang Diimpor.
Untuk menggunakan workgroup Athena, siapkan kebijakan IAM yang memberikan akses ke workgroup. Jika Anda menggunakan aSageMaker AI-Execution-Role, sebaiknya tambahkan kebijakan ke peran tersebut. Untuk informasi selengkapnya tentang kebijakan IAM untuk grup kerja, lihat kebijakan IAM untuk mengakses grup kerja. Misalnya kebijakan grup kerja, lihat Kebijakan contoh Workgroup.
Mengatur periode retensi data
Data Wrangler secara otomatis menetapkan periode retensi data untuk hasil kueri. Hasilnya dihapus setelah lamanya periode retensi. Misalnya, periode retensi default adalah lima hari. Hasil kueri dihapus setelah lima hari. Konfigurasi ini dirancang untuk membantu Anda membersihkan data yang tidak lagi Anda gunakan. Membersihkan data Anda mencegah pengguna yang tidak sah mendapatkan akses. Ini juga membantu mengontrol biaya penyimpanan data Anda di Amazon S3.
Jika Anda tidak menyetel periode retensi, konfigurasi siklus hidup Amazon S3 menentukan durasi penyimpanan objek. Kebijakan penyimpanan data yang Anda tentukan untuk konfigurasi siklus hidup menghapus hasil kueri yang lebih lama dari konfigurasi siklus hidup yang telah Anda tentukan. Untuk informasi selengkapnya, lihat Menyetel konfigurasi siklus hidup pada bucket.
Data Wrangler menggunakan konfigurasi siklus hidup Amazon S3 untuk mengelola retensi dan kedaluwarsa data. Anda harus memberikan izin peran eksekusi Amazon SageMaker Studio Classic IAM untuk mengelola konfigurasi siklus hidup bucket. Gunakan prosedur berikut untuk memberikan izin.
Untuk memberikan izin untuk mengelola konfigurasi siklus hidup lakukan hal berikut.
-
Masuk ke Konsol Manajemen AWS dan buka konsol IAM di https://console.aws.amazon.com/iam/
. -
Pilih Peran.
-
Di bilah pencarian, tentukan peran eksekusi Amazon SageMaker AI yang digunakan Amazon SageMaker Studio Classic.
-
Pilih perannya.
-
Pilih Tambahkan izin.
-
Pilih Buat kebijakan sebaris.
-
Untuk Layanan, tentukan S3 dan pilih.
-
Di bawah bagian Baca, pilih GetLifecycleConfiguration.
-
Di bawah bagian Tulis, pilih PutLifecycleConfiguration.
-
Untuk Sumber daya, pilih Spesifik.
-
Untuk Tindakan, pilih ikon panah di sebelah Manajemen izin.
-
Pilih PutResourcePolicy.
-
Untuk Sumber daya, pilih Spesifik.
-
Pilih kotak centang di sebelah Apa saja di akun ini.
-
Pilih Tinjau kebijakan.
-
Untuk Nama, tentukan nama.
-
Pilih Buat kebijakan.
Impor data dari Amazon Redshift
Amazon Redshift adalah layanan gudang data dengan skala petabyte yang terkelola penuh di cloud. Langkah pertama untuk membuat gudang data adalah meluncurkan satu set node, yang disebut cluster Amazon Redshift. Setelah menyediakan klaster, Anda dapat mengunggah kumpulan data dan kemudian melakukan kueri analisis data.
Anda dapat terhubung ke dan menanyakan satu atau beberapa klaster Amazon Redshift di Data Wrangler. Untuk menggunakan opsi impor ini, Anda harus membuat setidaknya satu cluster di Amazon Redshift. Untuk mempelajari caranya, lihat Memulai Amazon Redshift.
Anda dapat menampilkan hasil kueri Amazon Redshift Anda di salah satu lokasi berikut:
-
Bucket Amazon S3 default
-
Lokasi keluaran Amazon S3 yang Anda tentukan
Anda dapat mengimpor seluruh kumpulan data atau mengambil sampel sebagian darinya. Untuk Amazon Redshift, ini menyediakan opsi pengambilan sampel berikut:
-
Tidak ada - Impor seluruh dataset.
-
K Pertama - Contoh baris K pertama dari kumpulan data, di mana K adalah bilangan bulat yang Anda tentukan.
-
Acak - Mengambil sampel acak dari ukuran yang Anda tentukan.
-
Bertingkat — Mengambil sampel acak bertingkat. Sampel bertingkat mempertahankan rasio nilai dalam kolom.
Bucket Amazon S3 default berada di AWS Wilayah yang sama tempat instans Studio Classic Anda berada untuk menyimpan hasil kueri Amazon Redshift. Untuk informasi selengkapnya, lihat Penyimpanan Data yang Diimpor.
Untuk bucket Amazon S3 default atau bucket yang Anda tentukan, Anda memiliki opsi enkripsi berikut:
-
Enkripsi AWS sisi layanan default dengan kunci terkelola Amazon S3 () SSE-S3
-
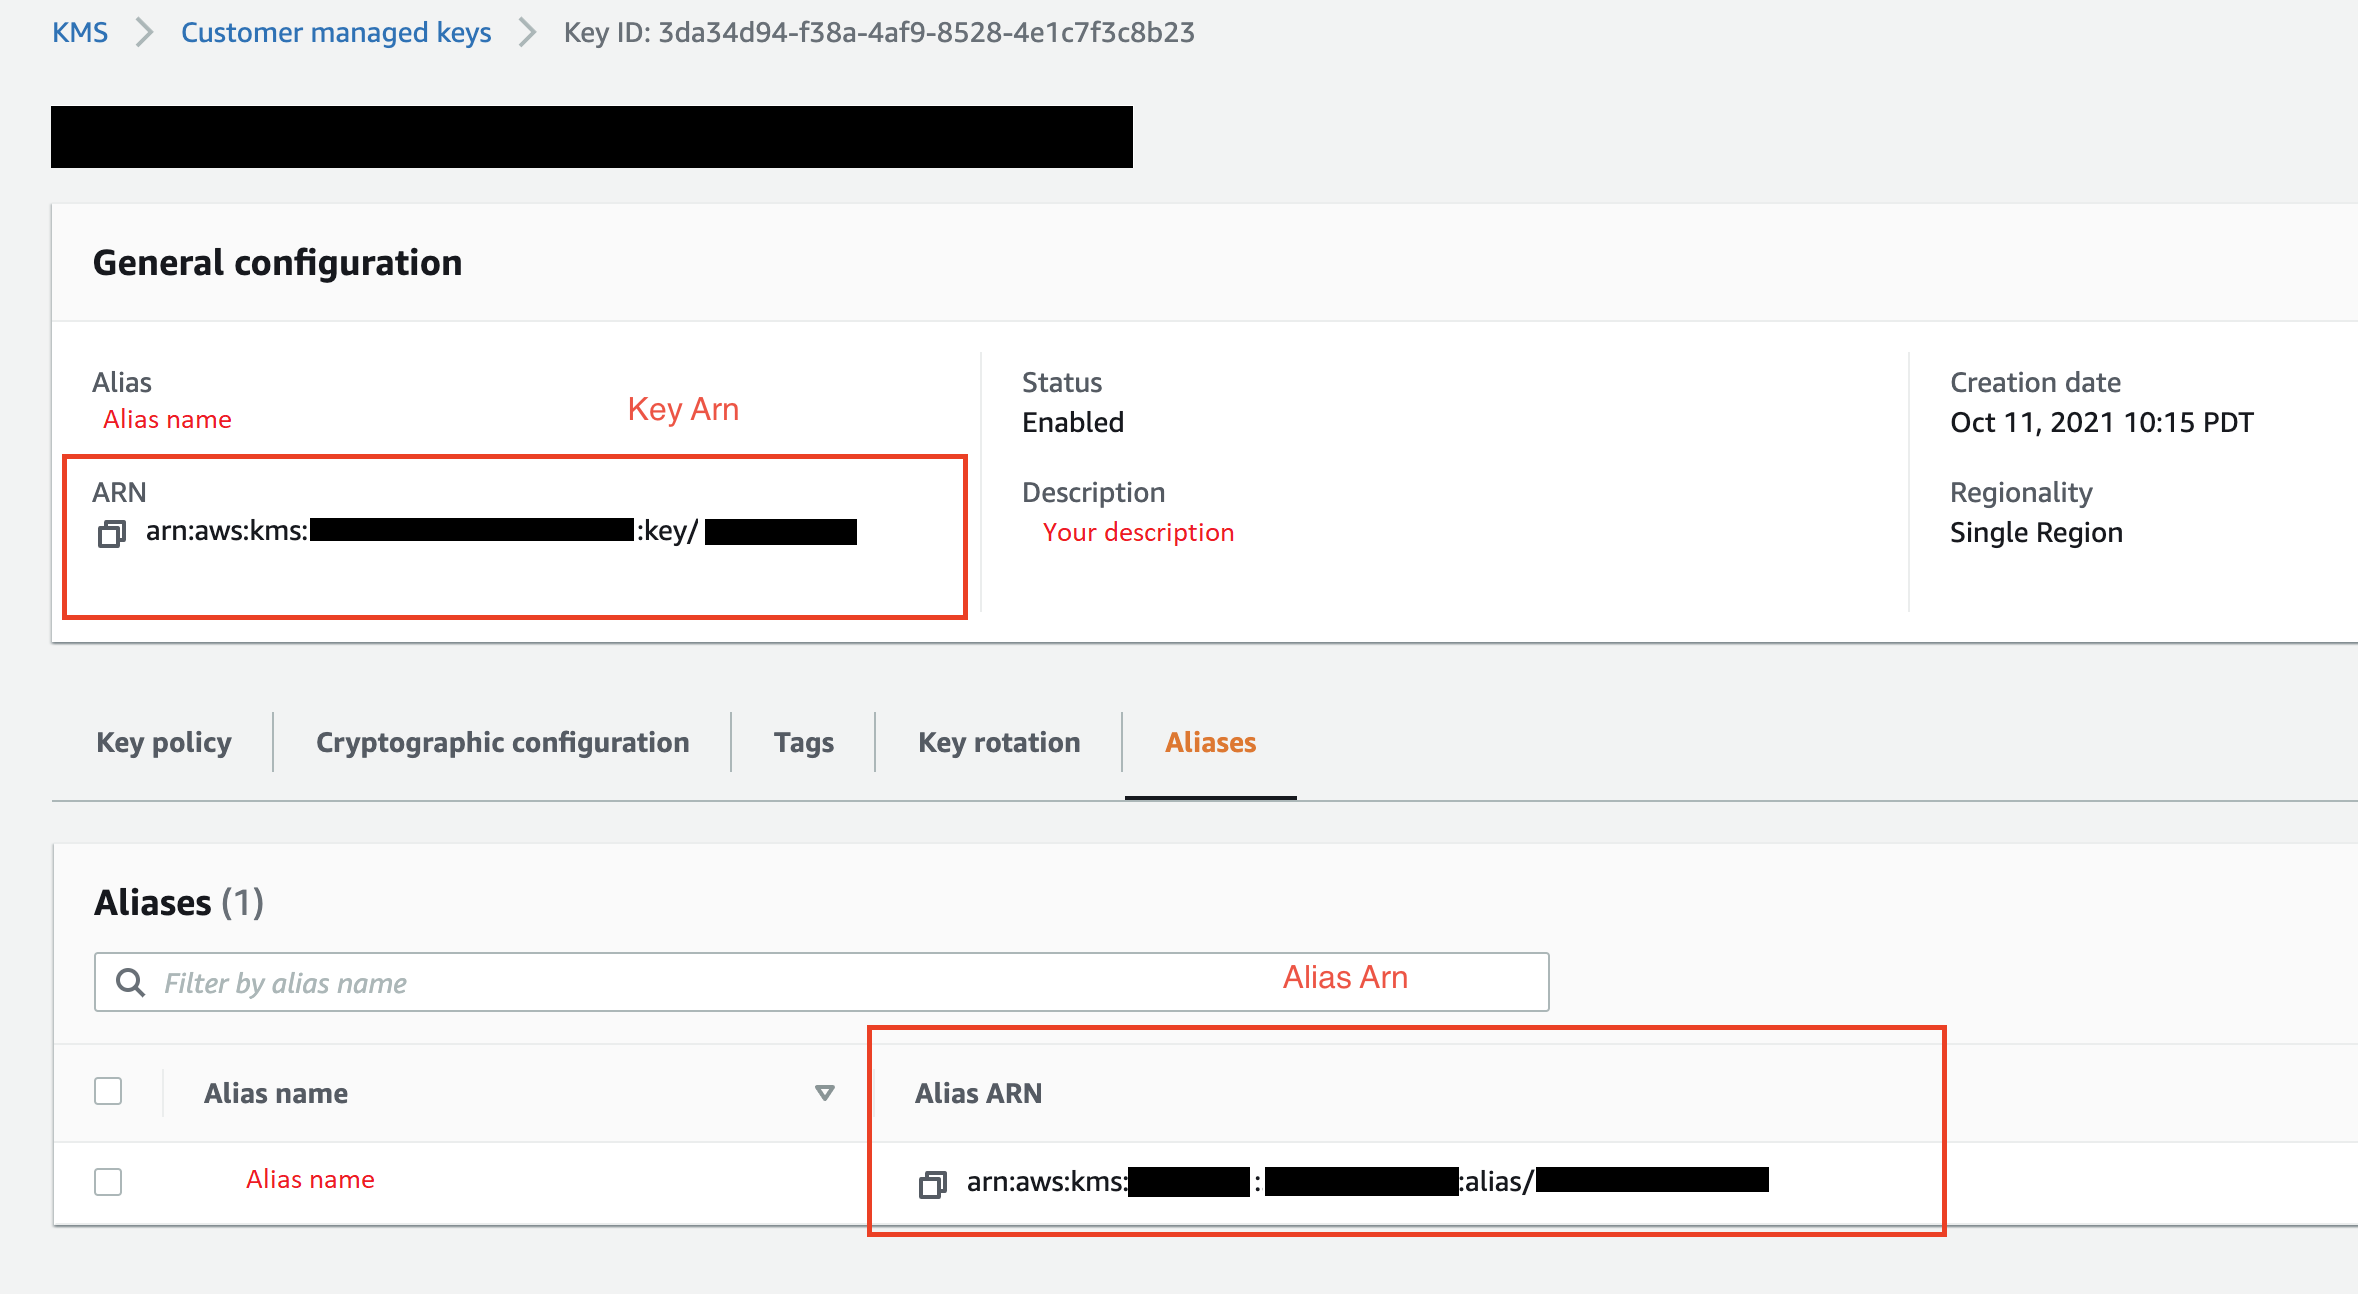
Kunci AWS Key Management Service (AWS KMS) yang Anda tentukan
AWS KMS Kunci adalah kunci enkripsi yang Anda buat dan kelola. Untuk informasi lebih lanjut tentang kunci KMS, lihat AWS Key Management Service.
Anda dapat menentukan AWS KMS kunci menggunakan kunci ARN atau ARN akun Anda. AWS
Jika Anda menggunakan kebijakan terkelola IAMAmazonSageMakerFullAccess, untuk memberikan izin peran untuk menggunakan Data Wrangler di Studio Classic, nama Pengguna Database Anda harus memiliki awalan. sagemaker_access
Gunakan prosedur berikut untuk mempelajari cara menambahkan cluster baru.
catatan
Data Wrangler menggunakan Amazon Redshift Data API dengan kredensi sementara. Untuk mempelajari lebih lanjut tentang API ini, lihat Menggunakan API Data Amazon Redshift di Panduan Manajemen Pergeseran Merah Amazon.
Untuk terhubung ke cluster Amazon Redshift
-
Masuk ke Amazon SageMaker AI Console
. -
Pilih Studio.
-
Pilih Luncurkan aplikasi.
-
Dari daftar dropdown, pilih Studio.
-
Pilih ikon Beranda.
-
Pilih Data.
-
Pilih Data Wrangler.
-
Pilih Impor data.
-
Di bawah Tersedia, pilih Amazon Athena.
-
Pilih Amazon Redshift.
-
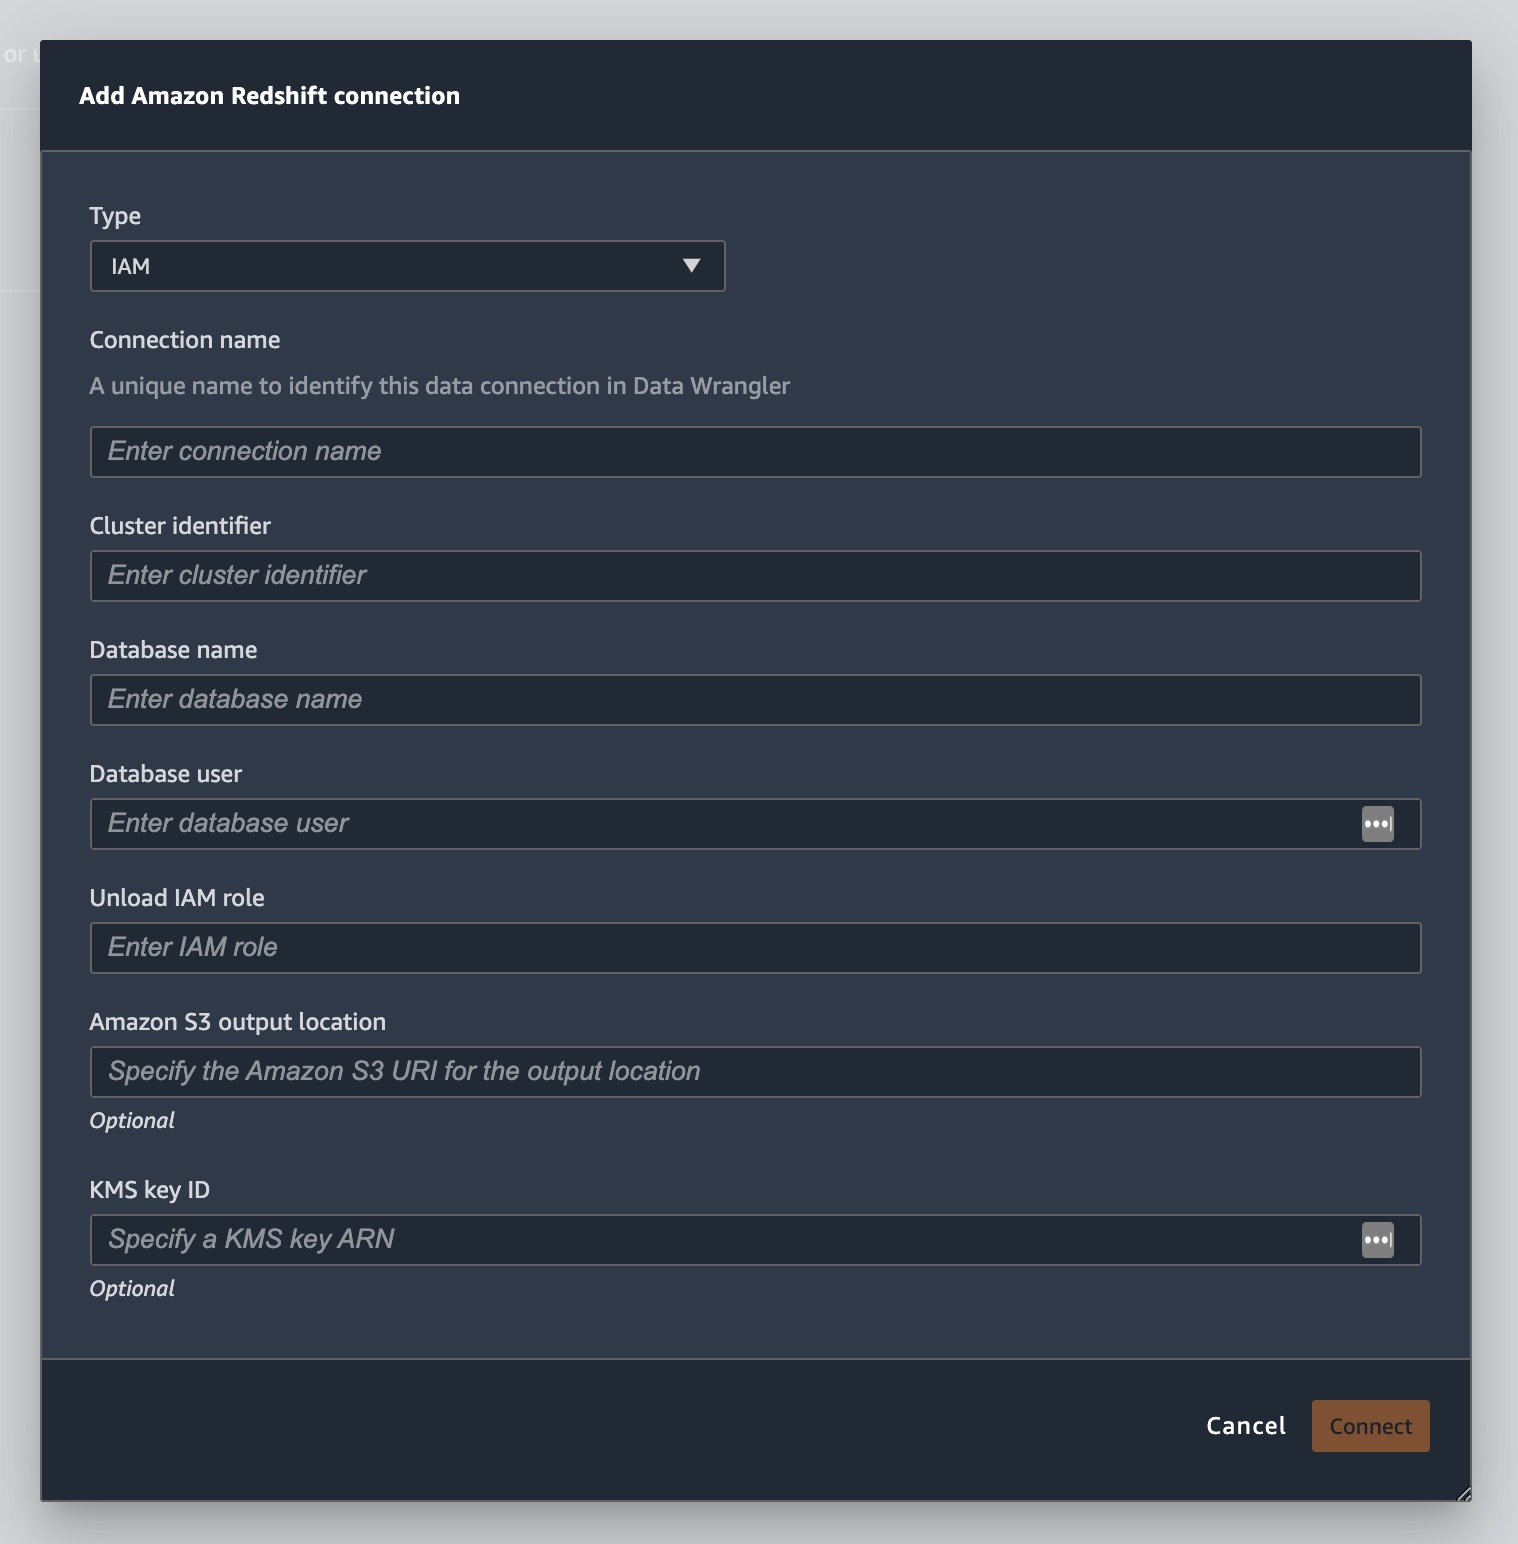
Pilih Temporary credentials (IAM) untuk Type.
-
Masukkan Nama Koneksi. Ini adalah nama yang digunakan oleh Data Wrangler untuk mengidentifikasi koneksi ini.
-
Masukkan Cluster Identifier untuk menentukan cluster mana yang ingin Anda sambungkan. Catatan: Masukkan hanya pengidentifikasi klaster dan bukan titik akhir penuh klaster Amazon Redshift.
-
Masukkan Nama Database dari database yang ingin Anda sambungkan.
-
Masukkan Pengguna Database untuk mengidentifikasi pengguna yang ingin Anda gunakan untuk terhubung ke database.
-
Untuk UNLOAD IAM Role, masukkan ARN peran IAM dari peran yang harus diasumsikan oleh cluster Amazon Redshift untuk memindahkan dan menulis data ke Amazon S3. Untuk informasi selengkapnya tentang peran ini, lihat Mengotorisasi Amazon Redshift untuk mengakses layanan AWS lain atas nama Anda di Panduan Manajemen Amazon Redshift.
-
Pilih Hubungkan.
-
(Opsional) Untuk lokasi keluaran Amazon S3, tentukan URI S3 untuk menyimpan hasil kueri.
-
(Opsional) Untuk ID kunci KMS, tentukan ARN kunci atau AWS KMS alias. Gambar berikut menunjukkan di mana Anda dapat menemukan salah satu kunci di Konsol Manajemen AWS.
Gambar berikut menunjukkan semua bidang dari prosedur sebelumnya.
Setelah koneksi Anda berhasil dibuat, itu muncul sebagai sumber data di bawah Impor Data. Pilih sumber data ini untuk menanyakan database Anda dan mengimpor data.
Untuk kueri dan impor data dari Amazon Redshift
-
Pilih koneksi yang ingin Anda kueri dari Sumber Data.
-
Pilih Skema. Untuk mempelajari selengkapnya tentang Skema Amazon Redshift, lihat Skema di Panduan Pengembang Database Amazon Redshift.
-
(Opsional) Di bawah Konfigurasi lanjutan, tentukan metode Sampling yang ingin Anda gunakan.
-
Masukkan kueri Anda di editor kueri dan pilih Jalankan untuk menjalankan kueri. Setelah kueri berhasil, Anda dapat melihat pratinjau hasil Anda di bawah editor.
-
Pilih Impor dataset untuk mengimpor dataset yang telah ditanyakan.
-
Masukkan nama Dataset. Jika Anda menambahkan nama Dataset yang berisi spasi, spasi ini akan diganti dengan garis bawah saat dataset Anda diimpor.
-
Pilih Tambahkan.
Untuk mengedit kumpulan data, lakukan hal berikut.
-
Arahkan ke alur Data Wrangler Anda.
-
Pilih + di sebelah Sumber - Sampel.
-
Ubah data yang Anda impor.
-
Pilih Terapkan
Impor data dari Amazon EMR
Anda dapat menggunakan Amazon EMR sebagai sumber data untuk aliran Amazon SageMaker Data Wrangler Anda. Amazon EMR adalah platform cluster terkelola yang dapat Anda gunakan untuk memproses dan menganalisis data dalam jumlah besar. Untuk informasi selengkapnya tentang Amazon EMR, lihat Apa itu Amazon EMR? . Untuk mengimpor dataset dari EMR, Anda menghubungkannya dan menanyakannya.
penting
Anda harus memenuhi prasyarat berikut untuk terhubung ke cluster EMR Amazon:
Prasyarat
-
Konfigurasi jaringan
-
Anda memiliki VPC Amazon di Wilayah yang Anda gunakan untuk meluncurkan Amazon SageMaker Studio Classic dan Amazon EMR.
-
Baik Amazon EMR dan Amazon SageMaker Studio Classic harus diluncurkan dalam subnet pribadi. Mereka bisa berada di subnet yang sama atau di subnet yang berbeda.
-
Amazon SageMaker Studio Classic harus dalam VPC-only mode.
Untuk informasi selengkapnya tentang membuat VPC, lihat Membuat VPC.
Untuk informasi selengkapnya tentang membuat VPC, lihat Connect SageMaker Studio Classic Notebook di VPC ke Sumber Daya Eksternal.
-
Cluster EMR Amazon yang Anda jalankan harus berada di VPC Amazon yang sama.
-
Cluster EMR Amazon dan VPC Amazon harus berada di akun yang sama. AWS
-
Cluster EMR Amazon Anda menjalankan Hive atau Presto.
-
Kluster sarang harus mengizinkan lalu lintas masuk dari grup keamanan Studio Classic di port 10000.
-
Cluster Presto harus mengizinkan lalu lintas masuk dari grup keamanan Studio Classic di port 8889.
catatan
Nomor port berbeda untuk cluster EMR Amazon yang menggunakan peran IAM. Arahkan ke akhir bagian prasyarat untuk informasi lebih lanjut.
-
-
-
SageMaker Studio Klasik
-
Amazon SageMaker Studio Classic harus menjalankan Jupyter Lab Versi 3. Untuk informasi tentang memperbarui Versi Lab Jupyter, lihat. Lihat dan perbarui JupyterLab versi aplikasi dari konsol
-
Amazon SageMaker Studio Classic memiliki peran IAM yang mengontrol akses pengguna. Peran IAM default yang Anda gunakan untuk menjalankan Amazon SageMaker Studio Classic tidak memiliki kebijakan yang dapat memberi Anda akses ke kluster EMR Amazon. Anda harus melampirkan izin pemberian kebijakan ke peran IAM. Untuk informasi selengkapnya, lihat Konfigurasikan daftar kluster EMR Amazon.
-
Peran IAM juga harus memiliki kebijakan berikut terlampir
secretsmanager:PutResourcePolicy. -
Jika Anda menggunakan domain Studio Classic yang telah Anda buat, pastikan domain
AppNetworkAccessTypetersebut dalam VPC-only mode. Untuk informasi tentang memperbarui domain ke VPC-only mode penggunaan, lihatMatikan dan Perbarui Amazon SageMaker Studio Classic.
-
-
Kluster Amazon EMR
-
Anda harus menginstal Hive atau Presto di cluster Anda.
-
Rilis Amazon EMR harus versi 5.5.0 atau yang lebih baru.
catatan
Amazon EMR mendukung penghentian otomatis. Penghentian otomatis menghentikan cluster idle agar tidak berjalan dan mencegah Anda mengeluarkan biaya. Berikut ini adalah rilis yang mendukung penghentian otomatis:
-
Untuk rilis 6.x, versi 6.1.0 atau yang lebih baru.
-
Untuk rilis 5.x, versi 5.30.0 atau yang lebih baru.
-
-
-
Cluster EMR Amazon menggunakan peran runtime IAM
-
Gunakan halaman berikut untuk menyiapkan peran runtime IAM untuk klaster EMR Amazon. Anda harus mengaktifkan enkripsi dalam transit saat menggunakan peran runtime:
-
Anda harus Lake Formation sebagai alat tata kelola untuk data dalam database Anda. Anda juga harus menggunakan pemfilteran data eksternal untuk kontrol akses.
-
Untuk informasi lebih lanjut tentang Lake Formation, lihat Apa itu AWS Lake Formation?
-
Untuk informasi selengkapnya tentang mengintegrasikan Lake Formation ke Amazon EMR, lihat Mengintegrasikan layanan pihak ketiga dengan Lake Formation.
-
-
Versi cluster Anda harus 6.9.0 atau yang lebih baru.
-
Akses ke AWS Secrets Manager. Untuk informasi selengkapnya tentang Secrets Manager lihat Apa itu AWS Secrets Manager?
-
Kluster sarang harus mengizinkan lalu lintas masuk dari grup keamanan Studio Classic di port 10000.
-
VPC Amazon adalah jaringan virtual yang secara logis terisolasi dari jaringan lain di cloud. AWS Amazon SageMaker Studio Classic dan kluster EMR Amazon Anda hanya ada di dalam VPC Amazon.
Gunakan prosedur berikut untuk meluncurkan Amazon SageMaker Studio Classic di Amazon VPC.
Untuk meluncurkan Studio Classic dalam VPC, lakukan hal berikut.
-
Arahkan ke konsol SageMaker AI di https://console.aws.amazon.com/sagemaker/
. -
Pilih Launch SageMaker Studio Classic.
-
Pilih Pengaturan standar.
-
Untuk peran eksekusi default, pilih peran IAM untuk menyiapkan Studio Classic.
-
Pilih VPC tempat Anda meluncurkan kluster EMR Amazon.
-
Untuk Subnet, pilih subnet pribadi.
-
Untuk grup Keamanan, tentukan grup keamanan yang Anda gunakan untuk mengontrol antara VPC Anda.
-
Pilih VPC Saja.
-
(Opsional) AWS menggunakan kunci enkripsi default. Anda dapat menentukan AWS Key Management Service kunci untuk mengenkripsi data Anda.
-
Pilih Berikutnya.
-
Di bawah Pengaturan Studio, pilih konfigurasi yang paling cocok untuk Anda.
-
Pilih Berikutnya untuk melewati pengaturan SageMaker Canvas.
-
Pilih Berikutnya untuk melewati pengaturan RStudio.
Jika Anda tidak memiliki kluster EMR Amazon yang siap, Anda dapat menggunakan prosedur berikut untuk membuatnya. Untuk informasi selengkapnya tentang Amazon EMR, lihat Apa itu Amazon EMR?
Untuk membuat cluster, lakukan hal berikut.
-
Arahkan ke Konsol Manajemen AWS.
-
Di bilah pencarian, tentukan
Amazon EMR. -
Pilih Buat klaster.
-
Untuk nama Cluster, tentukan nama cluster Anda.
-
Untuk Rilis, pilih versi rilis cluster.
catatan
Amazon EMR mendukung penghentian otomatis untuk rilis berikut:
-
Untuk rilis 6.x, rilis 6.1.0 atau yang lebih baru
-
Untuk rilis 5.x, rilis 5.30.0 atau yang lebih baru
Penghentian otomatis menghentikan cluster idle agar tidak berjalan dan mencegah Anda mengeluarkan biaya.
-
-
(Opsional) Untuk Aplikasi, pilih Presto.
-
Pilih aplikasi yang Anda jalankan di cluster.
-
Di bawah Jaringan, untuk konfigurasi Perangkat Keras, tentukan pengaturan konfigurasi perangkat keras.
penting
Untuk Networking, pilih VPC yang menjalankan Amazon SageMaker Studio Classic dan pilih subnet pribadi.
-
Di bawah Keamanan dan akses, tentukan pengaturan keamanan.
-
Pilih Buat.
Untuk tutorial tentang membuat klaster EMR Amazon, lihat Memulai Amazon EMR. Untuk informasi tentang praktik terbaik untuk mengonfigurasi klaster, lihat Pertimbangan dan praktik terbaik.
catatan
Untuk praktik terbaik keamanan, Data Wrangler hanya dapat terhubung ke VPC pada subnet pribadi. Anda tidak dapat terhubung ke node master kecuali Anda menggunakan AWS Systems Manager untuk instans EMR Amazon Anda. Untuk informasi selengkapnya, lihat Mengamankan akses ke kluster EMR menggunakan
Saat ini Anda dapat menggunakan metode berikut untuk mengakses kluster EMR Amazon:
-
Tidak ada otentikasi
-
Protokol Akses Direktori Ringan (LDAP)
-
IAM (Peran runtime)
Tidak menggunakan autentikasi atau menggunakan LDAP dapat mengharuskan Anda membuat beberapa cluster dan profil instans Amazon EC2. Jika Anda seorang administrator, Anda mungkin perlu menyediakan grup pengguna dengan tingkat akses yang berbeda ke data. Metode ini dapat menghasilkan overhead administratif yang membuatnya lebih sulit untuk mengelola pengguna Anda.
Sebaiknya gunakan peran runtime IAM yang memberi banyak pengguna kemampuan untuk terhubung ke kluster EMR Amazon yang sama. Peran runtime adalah peran IAM yang dapat Anda tetapkan ke pengguna yang terhubung ke kluster EMR Amazon. Anda dapat mengonfigurasi peran IAM runtime agar memiliki izin yang spesifik untuk setiap grup pengguna.
Gunakan bagian berikut untuk membuat cluster EMR Presto atau Hive Amazon dengan LDAP diaktifkan.
Gunakan bagian berikut untuk menggunakan otentikasi LDAP untuk klaster EMR Amazon yang telah Anda buat.
Gunakan prosedur berikut untuk mengimpor data dari cluster.
Untuk mengimpor data dari cluster, lakukan hal berikut.
-
Buka alur Data Wrangler.
-
Pilih Buat Koneksi.
-
Pilih Amazon EMR.
-
Lakukan salah satu dari berikut ini.
-
(Opsional) Untuk Rahasia ARN, tentukan Nomor Sumber Daya Amazon (ARN) database dalam cluster. Rahasia memberikan keamanan tambahan. Untuk informasi lebih lanjut tentang rahasia, lihat Apa itu AWS Secrets Manager? Untuk informasi tentang membuat rahasia untuk klaster Anda, lihatMembuat AWS Secrets Manager rahasia untuk cluster Anda.
penting
Anda harus menentukan rahasia jika Anda menggunakan peran runtime IAM untuk otentikasi.
-
Dari tabel dropdown, pilih cluster.
-
-
Pilih Berikutnya.
-
Untuk Pilih titik akhir untuk
example-cluster-namecluster, pilih mesin kueri. -
(Opsional) Pilih Simpan koneksi.
-
Pilih Berikutnya, pilih login dan pilih salah satu dari berikut ini:
-
Tidak ada otentikasi
-
LDAP
-
IAM
-
-
Untuk Login ke
example-cluster-namecluster, tentukan Username dan Password untuk cluster. -
Pilih Hubungkan.
-
Di editor kueri tentukan kueri SQL.
-
Pilih Jalankan.
-
Pilih Impor.
Membuat AWS Secrets Manager rahasia untuk cluster Anda
Jika Anda menggunakan peran runtime IAM untuk mengakses klaster EMR Amazon Anda, Anda harus menyimpan kredensyal yang Anda gunakan untuk mengakses Amazon EMR sebagai rahasia Secrets Manager. Anda menyimpan semua kredensil yang Anda gunakan untuk mengakses cluster dalam rahasia.
Anda harus menyimpan informasi berikut secara rahasia:
-
Titik akhir JDBC —
jdbc:hive2:// -
Nama DNS — Nama DNS cluster EMR Amazon Anda. Ini adalah titik akhir untuk node utama atau nama host.
-
Pelabuhan —
8446
Anda juga dapat menyimpan informasi tambahan berikut dalam rahasia:
-
Peran IAM — Peran IAM yang Anda gunakan untuk mengakses cluster. Data Wrangler menggunakan peran eksekusi SageMaker AI Anda secara default.
-
Jalur Truststore - Secara default, Data Wrangler membuat jalur truststore untuk Anda. Anda juga dapat menggunakan jalur truststore Anda sendiri. Untuk informasi selengkapnya tentang jalur truststore, lihat In-transit enkripsi di HiveServer 2.
-
Kata sandi Truststore - Secara default, Data Wrangler membuat kata sandi truststore untuk Anda. Anda juga dapat menggunakan jalur truststore Anda sendiri. Untuk informasi selengkapnya tentang jalur truststore, lihat In-transit enkripsi di HiveServer 2.
Gunakan prosedur berikut untuk menyimpan kredensyal dalam rahasia Secrets Manager.
Untuk menyimpan kredensi Anda sebagai rahasia, lakukan hal berikut.
-
Arahkan ke Konsol Manajemen AWS.
-
Di bilah pencarian, tentukan Secrets Manager.
-
Pilih AWS Secrets Manager.
-
Pilih Simpan rahasia baru.
-
Untuk Tipe rahasia, pilih Tipe rahasia lainnya.
-
Di bawah Key/valuepasangan, pilih Plaintext.
-
Untuk cluster yang menjalankan Hive, Anda dapat menggunakan template berikut untuk otentikasi IAM.
{"jdbcURL": ""
 "iam_auth": {"endpoint": "jdbc:hive2://", #required
                "dns": "ip-xx-x-xxx-xxx.ec2.internal", #required
                "port": "10000", #required
              "cluster_id": "j-xxxxxxxxx", #required
              "iam_role": "arn:aws:iam::xxxxxxxx:role/xxxxxxxxxxxx", #optional
              "truststore_path": "/etc/alternatives/jre/lib/security/cacerts", #optional
              "truststore_password": "changeit" #optional

              }}
catatan
Setelah mengimpor data, Anda menerapkan transformasi ke data tersebut. Anda kemudian mengekspor data yang telah Anda ubah ke lokasi tertentu. Jika Anda menggunakan notebook Jupyter untuk mengekspor data yang diubah ke Amazon S3, Anda harus menggunakan jalur truststore yang ditentukan dalam contoh sebelumnya.
Rahasia Secrets Manager menyimpan URL JDBC dari cluster Amazon EMR sebagai rahasia. Menggunakan rahasia lebih aman daripada langsung memasukkan kredensialmu.
Gunakan prosedur berikut untuk menyimpan URL JDBC sebagai rahasia.
Untuk menyimpan URL JDBC sebagai rahasia, lakukan hal berikut.
-
Arahkan ke Konsol Manajemen AWS.
-
Di bilah pencarian, tentukan Secrets Manager.
-
Pilih AWS Secrets Manager.
-
Pilih Simpan rahasia baru.
-
Untuk Tipe rahasia, pilih Tipe rahasia lainnya.
-
Untuk Key/value pasangan, tentukan
jdbcURLsebagai kunci dan URL JDBC yang valid sebagai nilainya.Format URL JDBC yang valid tergantung pada apakah Anda menggunakan otentikasi dan apakah Anda menggunakan Hive atau Presto sebagai mesin kueri. Daftar berikut menunjukkan format URL JBDC yang valid untuk berbagai kemungkinan konfigurasi.
-
Sarang, tidak ada otentikasi -
jdbc:hive2://emr-cluster-master-public-dns:10000/; -
Hive, otentikasi LDAP -
jdbc:hive2://emr-cluster-master-public-dns-name:10000/;AuthMech=3;UID=david;PWD=welcome123; -
Untuk Hive dengan SSL diaktifkan, format URL JDBC tergantung pada apakah Anda menggunakan File Keystore Java untuk konfigurasi TLS. File Keystore Java membantu memverifikasi identitas simpul master cluster EMR Amazon. Untuk menggunakan File Keystore Java, buat di cluster EMR dan unggah ke Data Wrangler. Untuk menghasilkan file, gunakan perintah berikut di cluster EMR Amazon,.
keytool -genkey -alias hive -keyalg RSA -keysize 1024 -keystore hive.jksUntuk informasi tentang menjalankan perintah di klaster EMR Amazon, lihat Mengamankan akses ke kluster EMRmenggunakan. AWS Systems Manager Untuk mengunggah file, pilih panah ke atas pada navigasi sebelah kiri UI Data Wrangler. Berikut ini adalah format URL JDBC yang valid untuk Hive dengan SSL diaktifkan:
-
Tanpa File Keystore Java -
jdbc:hive2://emr-cluster-master-public-dns:10000/;AuthMech=3;UID=user-name;PWD=password;SSL=1;AllowSelfSignedCerts=1; -
Dengan File Keystore Java -
jdbc:hive2://emr-cluster-master-public-dns:10000/;AuthMech=3;UID=user-name;PWD=password;SSL=1;SSLKeyStore=/home/sagemaker-user/data/Java-keystore-file-name;SSLKeyStorePwd=Java-keystore-file-passsword;
-
-
Presto, tidak ada otentikasi — jdbc:presto: //:8889/;
emr-cluster-master-public-dns -
Untuk Presto dengan otentikasi LDAP dan SSL diaktifkan, format URL JDBC tergantung pada apakah Anda menggunakan File Keystore Java untuk konfigurasi TLS. File Keystore Java membantu memverifikasi identitas simpul master cluster EMR Amazon. Untuk menggunakan File Keystore Java, buat di cluster EMR dan unggah ke Data Wrangler. Untuk mengunggah file, pilih panah ke atas pada navigasi sebelah kiri UI Data Wrangler. Untuk informasi tentang membuat File Keystore Java untuk Presto, lihat File Keystore Java
untuk TLS. Untuk informasi tentang menjalankan perintah di klaster EMR Amazon, lihat Mengamankan akses ke kluster EMR menggunakan. AWS Systems Manager -
Tanpa File Keystore Java -
jdbc:presto://emr-cluster-master-public-dns:8889/;SSL=1;AuthenticationType=LDAP Authentication;UID=user-name;PWD=password;AllowSelfSignedServerCert=1;AllowHostNameCNMismatch=1; -
Dengan File Keystore Java -
jdbc:presto://emr-cluster-master-public-dns:8889/;SSL=1;AuthenticationType=LDAP Authentication;SSLTrustStorePath=/home/sagemaker-user/data/Java-keystore-file-name;SSLTrustStorePwd=Java-keystore-file-passsword;UID=user-name;PWD=password;
-
-
Selama proses mengimpor data dari kluster EMR Amazon, Anda mungkin mengalami masalah. Untuk informasi tentang pemecahan masalah, lihat. Memecahkan masalah dengan Amazon EMR
Impor data dari Databricks (JDBC)
Anda dapat menggunakan Databricks sebagai sumber data untuk aliran Amazon SageMaker Data Wrangler Anda. Untuk mengimpor dataset dari Databricks, gunakan fungsi impor JDBC (Java Database Connectivity) untuk mengakses database Databricks Anda. Setelah Anda mengakses database, tentukan kueri SQL untuk mendapatkan data dan mengimpornya.
Kami berasumsi bahwa Anda memiliki cluster Databricks yang sedang berjalan dan Anda telah mengonfigurasi driver JDBC Anda untuk itu. Untuk informasi selengkapnya, lihat halaman dokumentasi Databricks berikut:
Data Wrangler menyimpan URL JDBC Anda di. AWS Secrets Manager Anda harus memberikan izin peran eksekusi Amazon SageMaker Studio Classic IAM untuk menggunakan Secrets Manager. Gunakan prosedur berikut untuk memberikan izin.
Untuk memberikan izin kepada Secrets Manager, lakukan hal berikut.
-
Masuk ke Konsol Manajemen AWS dan buka konsol IAM di https://console.aws.amazon.com/iam/
. -
Pilih Peran.
-
Di bilah pencarian, tentukan peran eksekusi Amazon SageMaker AI yang digunakan Amazon SageMaker Studio Classic.
-
Pilih perannya.
-
Pilih Tambahkan izin.
-
Pilih Buat kebijakan sebaris.
-
Untuk Layanan, tentukan Secrets Manager dan pilih.
-
Untuk Tindakan, pilih ikon panah di sebelah Manajemen izin.
-
Pilih PutResourcePolicy.
-
Untuk Sumber daya, pilih Spesifik.
-
Pilih kotak centang di sebelah Apa saja di akun ini.
-
Pilih Tinjau kebijakan.
-
Untuk Nama, tentukan nama.
-
Pilih Buat kebijakan.
Anda dapat menggunakan partisi untuk mengimpor data Anda lebih cepat. Partisi memberikan Data Wrangler kemampuan untuk memproses data secara paralel. Secara default, Data Wrangler menggunakan 2 partisi. Untuk sebagian besar kasus penggunaan, 2 partisi memberi Anda kecepatan pemrosesan data yang hampir optimal.
Jika Anda memilih untuk menentukan lebih dari 2 partisi, Anda juga dapat menentukan kolom untuk mempartisi data. Jenis nilai di kolom harus numerik atau tanggal.
Sebaiknya gunakan partisi hanya jika Anda memahami struktur data dan cara pengolahannya.
Anda dapat mengimpor seluruh kumpulan data atau mengambil sampel sebagian darinya. Untuk database Databricks, ini menyediakan opsi pengambilan sampel berikut:
-
Tidak ada - Impor seluruh dataset.
-
K Pertama - Contoh baris K pertama dari kumpulan data, di mana K adalah bilangan bulat yang Anda tentukan.
-
Acak - Mengambil sampel acak dari ukuran yang Anda tentukan.
-
Bertingkat — Mengambil sampel acak bertingkat. Sampel bertingkat mempertahankan rasio nilai dalam kolom.
Gunakan prosedur berikut untuk mengimpor data Anda dari database Databricks.
Untuk mengimpor data dari Databricks, lakukan hal berikut.
-
Masuk ke Amazon SageMaker AI Console
. -
Pilih Studio.
-
Pilih Luncurkan aplikasi.
-
Dari daftar dropdown, pilih Studio.
-
Dari tab Impor data alur Data Wrangler Anda, pilih Databricks.
-
Tentukan bidang berikut:
-
Nama Dataset — Nama yang ingin Anda gunakan untuk kumpulan data dalam alur Data Wrangler Anda.
-
Pengemudi — com.simba.spark.jdbc.driver.
-
URL JDBC — URL dari database Databricks. Pemformatan URL dapat bervariasi antara instance Databricks. Untuk informasi tentang menemukan URL dan menentukan parameter di dalamnya, lihat konfigurasi JDBC dan
parameter koneksi. Berikut ini adalah contoh bagaimana URL dapat diformat: jdbc:spark: //aws-sagemaker-datawrangler.cloud.databricks.com:; transportMode=http; ssl=1; httpPath=//0909-200301-cut318; =3; UID =; PWD =. 443/default sql/protocolv1 o/3122619508517275 AuthMech tokenpersonal-access-tokencatatan
Anda dapat menentukan ARN rahasia yang berisi URL JDBC alih-alih menentukan URL JDBC itu sendiri. Rahasianya harus berisi pasangan kunci-nilai dengan format berikut:.
jdbcURL:Untuk informasi selengkapnya, lihat Apa itu Secrets Manager? .JDBC-URL
-
-
Tentukan pernyataan SQL SELECT.
catatan
Data Wrangler tidak mendukung Common Table Expressions (CTE) atau tabel sementara dalam kueri.
-
Untuk Sampling, pilih metode pengambilan sampel.
-
Pilih Jalankan.
-
(Opsional) Untuk PREVIEW, pilih roda gigi untuk membuka pengaturan Partisi.
-
Tentukan jumlah partisi. Anda dapat mempartisi berdasarkan kolom jika Anda menentukan jumlah partisi:
-
Masukkan jumlah partisi - Tentukan nilai yang lebih besar dari 2.
-
(Opsional) Partisi demi kolom - Tentukan bidang berikut. Anda hanya dapat partisi dengan kolom jika Anda telah menentukan nilai untuk Masukkan jumlah partisi.
-
Pilih kolom - Pilih kolom yang Anda gunakan untuk partisi data. Tipe data kolom harus numerik atau tanggal.
-
Batas atas - Dari nilai di kolom yang telah Anda tentukan, batas atas adalah nilai yang Anda gunakan di partisi. Nilai yang Anda tentukan tidak mengubah data yang Anda impor. Itu hanya mempengaruhi kecepatan impor. Untuk kinerja terbaik, tentukan batas atas yang mendekati maksimum kolom.
-
Batas bawah - Dari nilai di kolom yang telah Anda tentukan, batas bawah adalah nilai yang Anda gunakan di partisi. Nilai yang Anda tentukan tidak mengubah data yang Anda impor. Itu hanya mempengaruhi kecepatan impor. Untuk kinerja terbaik, tentukan batas bawah yang mendekati minimum kolom.
-
-
-
-
Pilih Impor.
Impor data dari Salesforce Data Cloud
Anda dapat menggunakan Salesforce Data Cloud sebagai sumber data di Amazon Data Wrangler untuk menyiapkan SageMaker data di Salesforce Data Cloud Anda untuk pembelajaran mesin.
Dengan Salesforce Data Cloud sebagai sumber data di Data Wrangler, Anda dapat dengan cepat terhubung ke data Salesforce Anda tanpa menulis satu baris kode pun. Anda dapat menggabungkan data Salesforce Anda dengan data dari sumber data lain di Data Wrangler.
Setelah Anda terhubung ke cloud data, Anda dapat melakukan hal berikut:
-
Visualisasikan data Anda dengan visualisasi bawaan
-
Memahami data dan mengidentifikasi potensi kesalahan dan nilai ekstrim
-
Transformasi data dengan lebih dari 300 transformasi bawaan
-
Ekspor data yang telah Anda ubah
Pengaturan administrator
penting
Sebelum memulai, pastikan pengguna Anda menjalankan Amazon SageMaker Studio Classic versi 1.3.0 atau yang lebih baru. Untuk informasi tentang memeriksa versi Studio Classic dan memperbaruinya, lihatSiapkan Data ML dengan Amazon SageMaker Data Wrangler.
Saat menyiapkan akses ke Salesforce Data Cloud, Anda harus menyelesaikan tugas-tugas berikut:
-
Mendapatkan URL Domain Salesforce Anda. Salesforce juga mengacu pada URL Domain sebagai URL organisasi Anda.
-
Mendapatkan kredensi OAuth dari Salesforce.
-
Mendapatkan URL otorisasi dan URL token untuk Domain Salesforce Anda.
-
Membuat AWS Secrets Manager rahasia dengan konfigurasi OAuth.
-
Membuat konfigurasi siklus hidup yang digunakan Data Wrangler untuk membaca kredensil dari rahasia.
-
Memberikan izin Data Wrangler untuk membaca rahasianya.
Setelah Anda melakukan tugas sebelumnya, pengguna Anda dapat masuk ke Salesforce Data Cloud menggunakan OAuth.
catatan
Pengguna Anda mungkin mengalami masalah setelah Anda mengatur semuanya. Untuk informasi tentang pemecahan masalah, lihat. Pemecahan masalah dengan Salesforce
Gunakan prosedur berikut untuk mendapatkan URL Domain.
-
Arahkan ke halaman login Salesforce.
-
Untuk Pencarian cepat, tentukan Domain Saya.
-
Salin nilai URL Domain Saya Saat Ini ke file teks.
-
Tambahkan
https://ke awal URL.
Setelah Anda mendapatkan URL Domain Salesforce, Anda dapat menggunakan prosedur berikut untuk mendapatkan kredensyal login dari Salesforce dan memungkinkan Data Wrangler untuk mengakses data Salesforce Anda.
Untuk mendapatkan kredensi log in dari Salesforce dan memberikan akses ke Data Wrangler, lakukan hal berikut.
-
Arahkan ke URL Domain Salesforce Anda dan masuk ke akun Anda.
-
Pilih ikon roda gigi.
-
Di bilah pencarian yang muncul, tentukan Manajer Aplikasi.
-
Pilih Aplikasi Terhubung Baru.
-
Tentukan bidang berikut:
-
Nama Aplikasi Terhubung — Anda dapat menentukan nama apa pun, tetapi sebaiknya pilih nama yang menyertakan Data Wrangler. Misalnya, Anda dapat menentukan Integrasi Wrangler Data Cloud Data Salesforce.
-
Nama API - Gunakan nilai default.
-
Email Kontak - Tentukan alamat email Anda.
-
Di bawah judul API (Aktifkan Pengaturan OAuth), pilih kotak centang untuk mengaktifkan pengaturan OAuth.
-
Untuk URL Callback, tentukan URL Amazon SageMaker Studio Classic. Untuk mendapatkan URL Studio Classic, akses dari Konsol Manajemen AWS dan salin URL.
-
-
Di bawah Lingkup OAuth yang Dipilih, pindahkan yang berikut ini dari Cakupan OAuth yang Tersedia ke Lingkup OAuth yang Dipilih:
-
Mengelola data pengguna melalui API (
api) -
Lakukan permintaan kapan saja (
refresh_token,offline_access) -
Lakukan kueri ANSI SQL pada data Salesforce Data Cloud ()
cdp_query_api -
Mengelola data profil Platform Data Pelanggan Salesforce ()
cdp_profile_api
-
-
Pilih Simpan. Setelah Anda menyimpan perubahan Anda, Salesforce membuka halaman baru.
-
Pilih Continue (Lanjutkan)
-
Arahkan ke Kunci Konsumen dan Rahasia.
-
Pilih Kelola Detail Konsumen. Salesforce mengarahkan Anda ke halaman baru di mana Anda mungkin harus melewati otentikasi dua faktor.
-
penting
Salin Kunci Konsumen dan Rahasia Konsumen ke editor teks. Anda memerlukan informasi ini untuk menghubungkan cloud data ke Data Wrangler.
-
Arahkan kembali ke Kelola Aplikasi Terhubung.
-
Arahkan ke Nama Aplikasi Terhubung dan nama aplikasi Anda.
-
Pilih Kelola.
-
Pilih Edit Kebijakan.
-
Ubah Relaksasi IP ke Relaksasi pembatasan IP.
-
Pilih Simpan.
-
Setelah Anda memberikan akses ke Salesforce Data Cloud, Anda perlu memberikan izin untuk pengguna Anda. Gunakan prosedur berikut untuk memberi mereka izin.
Untuk memberikan izin kepada pengguna Anda, lakukan hal berikut.
-
Arahkan ke halaman beranda pengaturan.
-
Di navigasi sebelah kiri, cari Pengguna dan pilih item menu Pengguna.
-
Pilih hyperlink dengan nama pengguna Anda.
-
Arahkan ke Izin Set Tugas.
-
Pilih Edit Tugas.
-
Tambahkan izin berikut:
-
Admin Platform Data Pelanggan
-
Spesialis Sadar Data Platform Data Pelanggan
-
-
Pilih Simpan.
Setelah Anda mendapatkan informasi untuk Domain Salesforce Anda, Anda harus mendapatkan URL otorisasi dan URL token untuk AWS Secrets Manager rahasia yang Anda buat.
Gunakan prosedur berikut untuk mendapatkan URL otorisasi dan URL token.
Untuk mendapatkan URL otorisasi dan URL token
-
Arahkan ke URL Domain Salesforce Anda.
-
Gunakan salah satu metode berikut untuk mendapatkan URL. Jika Anda menggunakan distribusi Linux dengan
curldanjqdiinstal, kami sarankan menggunakan metode yang hanya berfungsi di Linux.-
(Hanya Linux) Tentukan perintah berikut di terminal Anda.
curlsalesforce-domain-URL/.well-known/openid-configuration | \ jq '. | { authorization_url: .authorization_endpoint, token_url: .token_endpoint }' | \ jq '. += { identity_provider: "SALESFORCE", client_id: "example-client-id", client_secret: "example-client-secret" }' -
-
Arahkan ke
example-org-URL/.well-known/openid-configuration -
Salin
authorization_endpointdantoken_endpointke editor teks. -
Buat objek JSON berikut:
{
  "identity_provider": "SALESFORCE",
  "authorization_url": "example-authorization-endpoint",
  "token_url": "example-token-endpoint",
  "client_id": "example-consumer-key",
  "client_secret": "example-consumer-secret"
}
-
-
Setelah Anda membuat objek konfigurasi OAuth, Anda dapat membuat AWS Secrets Manager rahasia yang menyimpannya. Gunakan prosedur berikut untuk membuat rahasia.
Untuk membuat rahasia, lakukan hal berikut.
-
Navigasikan ke konsol AWS Secrets Manager
tersebut. -
Pilih Simpan rahasia.
-
Pilih Jenis rahasia lainnya.
-
Di bawah Key/valuepasangan pilih Plaintext.
-
Ganti JSON kosong dengan pengaturan konfigurasi berikut.
{ "identity_provider": "SALESFORCE", "authorization_url": "example-authorization-endpoint", "token_url": "example-token-endpoint", "client_id": "example-consumer-key", "client_secret": "example-consumer-secret" } -
Pilih Berikutnya.
-
Untuk Nama Rahasia, tentukan nama rahasianya.
-
Di bawah Tag, pilih Tambah.
-
Untuk Kunci, tentukan sagemaker:partner. Untuk Nilai, sebaiknya tentukan nilai yang mungkin berguna untuk kasus penggunaan Anda. Namun, Anda dapat menentukan apa saja.
penting
Anda harus membuat kuncinya. Anda tidak dapat mengimpor data dari Salesforce jika Anda tidak membuatnya.
-
-
Pilih Berikutnya.
-
Pilih Toko.
-
Pilih rahasia yang Anda buat.
-
Catat bidang-bidang berikut:
-
Nomor Sumber Daya Amazon (ARN) rahasia
-
Nama rahasianya
-
Setelah Anda membuat rahasia, Anda harus menambahkan izin untuk Data Wrangler untuk membaca rahasianya. Gunakan prosedur berikut untuk menambahkan izin.
Untuk menambahkan izin baca untuk Data Wrangler, lakukan hal berikut.
-
Arahkan ke konsol Amazon SageMaker AI
. -
Pilih domain.
-
Pilih domain yang Anda gunakan untuk mengakses Data Wrangler.
-
Pilih Profil Pengguna Anda.
-
Di bawah Detail, temukan peran Eksekusi. ARN-nya dalam format berikut:.
arn:aws:iam::111122223333:role/Catat peran eksekusi SageMaker AI. Di dalam ARN, semuanya setelahnya.example-rolerole/ -
Arahkan ke konsol IAM
. -
Di bilah pencarian IAM Search, tentukan nama peran eksekusi SageMaker AI.
-
Pilih perannya.
-
Pilih Tambahkan izin.
-
Pilih Buat kebijakan sebaris.
-
Pilih tab JSON.
-
Tentukan kebijakan berikut di dalam editor.
-
Pilih Tinjau Kebijakan.
-
Untuk Nama, tentukan nama.
-
Pilih Buat kebijakan.
Setelah Anda memberikan izin Data Wrangler untuk membaca rahasia, Anda harus menambahkan Konfigurasi Siklus Hidup yang menggunakan rahasia Secrets Manager ke profil pengguna Amazon SageMaker Studio Classic Anda.
Gunakan prosedur berikut untuk membuat konfigurasi siklus hidup dan menambahkannya ke profil Studio Classic.
Untuk membuat konfigurasi siklus hidup dan menambahkannya ke profil Studio Classic, lakukan hal berikut.
-
Arahkan ke konsol Amazon SageMaker AI.
-
Pilih domain.
-
Pilih domain yang Anda gunakan untuk mengakses Data Wrangler.
-
Pilih Profil Pengguna Anda.
-
Jika Anda melihat aplikasi berikut, hapus:
-
KernelGateway
-
JupyterKernel
catatan
Menghapus pembaruan aplikasi Studio Classic. Butuh beberapa saat agar pembaruan terjadi.
-
-
Saat Anda menunggu pembaruan terjadi, pilih Konfigurasi Siklus Hidup.
-
Pastikan halaman yang Anda kunjungi mengatakan konfigurasi Siklus Hidup Studio Classic.
-
Pilih Buat konfigurasi.
-
Pastikan aplikasi server Jupyter telah dipilih.
-
Pilih Berikutnya.
-
Untuk Nama, tentukan nama untuk konfigurasi.
-
Untuk Skrip, tentukan skrip berikut:
#!/bin/bash set -eux cat > ~/.sfgenie_identity_provider_oauth_config <<EOL { "secret_arn": "secrets-arn-containing-salesforce-credentials" } EOL -
Pilih Kirim.
-
Di navigasi sebelah kiri, pilih domain.
-
Pilih domain Anda.
-
Pilih Lingkungan.
-
Di bawah Konfigurasi Siklus Hidup untuk aplikasi Studio Classic pribadi, pilih Lampirkan.
-
Pilih Konfigurasi yang ada.
-
Di bawah konfigurasi Siklus Hidup Studio Classic pilih konfigurasi siklus hidup yang telah Anda buat.
-
Pilih Lampirkan ke domain.
-
Pilih kotak centang di samping konfigurasi siklus hidup yang telah Anda lampirkan.
-
Pilih Tetapkan sebagai default.
Anda mungkin mengalami masalah saat menyiapkan konfigurasi siklus hidup Anda. Untuk informasi tentang debugging mereka, lihatDebug Konfigurasi Siklus Hidup di Amazon Studio Classic SageMaker.
Panduan Ilmuwan Data
Gunakan yang berikut ini untuk menghubungkan Salesforce Data Cloud dan mengakses data Anda di Data Wrangler.
penting
Administrator Anda perlu menggunakan informasi di bagian sebelumnya untuk menyiapkan Salesforce Data Cloud. Jika Anda mengalami masalah, hubungi mereka untuk bantuan pemecahan masalah.
Untuk membuka Studio Classic dan memeriksa versinya, lihat prosedur berikut.
-
Gunakan langkah-langkah Prasyarat untuk mengakses Data Wrangler melalui Amazon SageMaker Studio Classic.
-
Di samping pengguna yang ingin Anda gunakan untuk meluncurkan Studio Classic, pilih Luncurkan aplikasi.
-
Pilih Studio.
Untuk membuat dataset di Data Wrangler dengan data dari Salesforce Data Cloud
-
Masuk ke Amazon SageMaker AI Console
. -
Pilih Studio.
-
Pilih Luncurkan aplikasi.
-
Dari daftar dropdown, pilih Studio.
-
Pilih ikon Beranda.
-
Pilih Data.
-
Pilih Data Wrangler.
-
Pilih Impor data.
-
Di bawah Tersedia, pilih Salesforce Data Cloud.
-
Untuk nama Connection, tentukan nama untuk koneksi Anda ke Salesforce Data Cloud.
-
Untuk URL Org, tentukan URL organisasi di akun Salesforce Anda. Anda bisa mendapatkan URL dari administrator
-
Pilih Hubungkan.
-
Tentukan kredensyal Anda untuk masuk ke Salesforce.
Anda dapat mulai membuat kumpulan data menggunakan data dari Salesforce Data Cloud setelah Anda terhubung dengannya.
Setelah Anda memilih tabel, Anda dapat menulis kueri dan menjalankannya. Output kueri Anda ditampilkan di bawah Hasil kueri.
Setelah Anda menyelesaikan output kueri Anda, Anda kemudian dapat mengimpor output kueri Anda ke dalam aliran Data Wrangler untuk melakukan transformasi data.
Setelah membuat kumpulan data, arahkan ke layar Aliran data untuk mulai mengubah data Anda.
Impor data dari Snowflake
Anda dapat menggunakan Snowflake sebagai sumber data di Data Wrangler untuk menyiapkan SageMaker data di Snowflake untuk pembelajaran mesin.
Dengan Snowflake sebagai sumber data di Data Wrangler, Anda dapat dengan cepat terhubung ke Snowflake tanpa menulis satu baris kode pun. Anda dapat menggabungkan data Anda di Snowflake dengan data dari sumber data lain di Data Wrangler.
Setelah terhubung, Anda dapat secara interaktif menanyakan data yang disimpan di Snowflake, mengubah data dengan lebih dari 300 transformasi data yang telah dikonfigurasi sebelumnya, memahami data, dan mengidentifikasi potensi kesalahan dan nilai ekstrem dengan serangkaian templat visualisasi yang telah dikonfigurasi sebelumnya, dengan cepat mengidentifikasi inkonsistensi dalam alur kerja persiapan data Anda, dan mendiagnosis masalah sebelum model digunakan ke dalam produksi. Terakhir, Anda dapat mengekspor alur kerja persiapan data ke Amazon S3 untuk digunakan dengan fitur AI SageMaker lainnya seperti Amazon Autopilot, SageMaker Amazon Feature Store, dan SageMaker Amazon Pipelines. SageMaker
Anda dapat mengenkripsi output kueri Anda menggunakan AWS Key Management Service kunci yang telah Anda buat. Untuk informasi lebih lanjut tentang AWS KMS, lihat AWS Key Management Service.
Panduan Administrator
penting
Untuk mempelajari lebih lanjut tentang kontrol akses terperinci dan praktik terbaik, lihat Kontrol Akses Keamanan
Bagian ini untuk administrator Snowflake yang menyiapkan akses ke Snowflake dari dalam Data Wrangler. SageMaker
penting
Anda bertanggung jawab untuk mengelola dan memantau kontrol akses dalam Snowflake. Data Wrangler tidak menambahkan lapisan kontrol akses sehubungan dengan Snowflake.
Kontrol akses meliputi:
-
Data yang diakses pengguna
-
(Opsional) Integrasi penyimpanan yang menyediakan Snowflake kemampuan untuk menulis hasil kueri ke bucket Amazon S3
-
Kueri yang dapat dijalankan pengguna
(Opsional) Konfigurasikan Izin Impor Data Kepingan Salju
Secara default, Data Wrangler menanyakan data di Snowflake tanpa membuat salinannya di lokasi Amazon S3. Gunakan informasi berikut jika Anda mengonfigurasi integrasi penyimpanan dengan Snowflake. Pengguna Anda dapat menggunakan integrasi penyimpanan untuk menyimpan hasil kueri mereka di lokasi Amazon S3.
Pengguna Anda mungkin memiliki tingkat akses data sensitif yang berbeda. Untuk keamanan data yang optimal, sediakan integrasi penyimpanan masing-masing pengguna. Setiap integrasi penyimpanan harus memiliki kebijakan tata kelola datanya sendiri.
Fitur ini saat ini tidak tersedia di Wilayah keikutsertaan.
Snowflake memerlukan izin berikut pada bucket dan direktori S3 untuk dapat mengakses file di direktori:
-
s3:GetObject -
s3:GetObjectVersion -
s3:ListBucket -
s3:ListObjects -
s3:GetBucketLocation
Buat kebijakan IAM
Anda harus membuat kebijakan IAM untuk mengonfigurasi izin akses bagi Snowflake untuk memuat dan membongkar data dari bucket Amazon S3.
Berikut ini adalah dokumen kebijakan JSON yang Anda gunakan untuk membuat kebijakan:
# Example policy for S3 write access
# This needs to be updated
{
"Version": "2012-10-17",
"Statement": [
  {
    "Effect": "Allow",
    "Action": [
        "s3:PutObject",
        "s3:GetObject",
        "s3:GetObjectVersion",
        "s3:DeleteObject",
        "s3:DeleteObjectVersion"
    ],
    "Resource": "arn:aws:s3:::bucket/prefix/*"
  },
  {
    "Effect": "Allow",
    "Action": [
        "s3:ListBucket"
    ],
    "Resource": "arn:aws:s3:::bucket/",
    "Condition": {
        "StringLike": {
            "s3:prefix": ["prefix/*"]
        }
    }
  }
 ]
}
Untuk informasi dan prosedur tentang membuat kebijakan dengan dokumen kebijakan, lihat Membuat kebijakan IAM.
Untuk dokumentasi yang memberikan ikhtisar penggunaan izin IAM dengan Snowflake, lihat sumber daya berikut:
Untuk memberikan izin penggunaan peran Snowflake ilmuwan data ke integrasi penyimpanan, Anda harus menjalankannya. GRANT USAGE ON INTEGRATION
integration_name TO snowflake_role;
-
integration_nameadalah nama integrasi penyimpanan Anda. -
snowflake_roleadalah nama peran Snowflakedefault yang diberikan kepada pengguna ilmuwan data.
Menyiapkan Akses OAuth Snowflake
Alih-alih meminta pengguna Anda langsung memasukkan kredensialnya ke Data Wrangler, Anda dapat meminta mereka menggunakan penyedia identitas untuk mengakses Snowflake. Berikut ini adalah tautan ke dokumentasi Snowflake untuk penyedia identitas yang didukung Data Wrangler.
Gunakan dokumentasi dari tautan sebelumnya untuk mengatur akses ke penyedia identitas Anda. Informasi dan prosedur di bagian ini membantu Anda memahami cara menggunakan dokumentasi dengan benar untuk mengakses Snowflake dalam Data Wrangler.
Penyedia identitas Anda perlu mengenali Data Wrangler sebagai aplikasi. Gunakan prosedur berikut untuk mendaftarkan Data Wrangler sebagai aplikasi dalam penyedia identitas:
-
Pilih konfigurasi yang memulai proses pendaftaran Data Wrangler sebagai aplikasi.
-
Menyediakan pengguna dalam penyedia identitas akses ke Data Wrangler.
-
Aktifkan otentikasi klien OAuth dengan menyimpan kredensyal klien sebagai rahasia. AWS Secrets Manager
-
Tentukan URL pengalihan menggunakan format berikut: https://
domain-ID.studio.Wilayah AWS.pembuat sagemaker. aws/jupyter/default/labpenting
Anda menentukan ID domain Amazon SageMaker AI dan Wilayah AWS yang Anda gunakan untuk menjalankan Data Wrangler.
penting
Anda harus mendaftarkan URL untuk setiap domain Amazon SageMaker AI dan Wilayah AWS tempat Anda menjalankan Data Wrangler. Pengguna dari domain dan Wilayah AWS yang tidak memiliki URL pengalihan yang disiapkan untuk mereka tidak akan dapat mengautentikasi dengan penyedia identitas untuk mengakses koneksi Snowflake.
-
Pastikan kode otorisasi dan jenis hibah token refresh diizinkan untuk aplikasi Data Wrangler.
Dalam penyedia identitas Anda, Anda harus menyiapkan server yang mengirimkan token OAuth ke Data Wrangler di tingkat pengguna. Server mengirimkan token dengan Snowflake sebagai penonton.
Snowflake menggunakan konsep peran yang berbeda peran IAM digunakan. AWS Anda harus mengonfigurasi penyedia identitas untuk menggunakan peran apa pun untuk menggunakan peran default yang terkait dengan akun Snowflake. Misalnya, jika pengguna memiliki peran default dalam profil Snowflake mereka, koneksi dari Data Wrangler ke Snowflake digunakan systems administrator sebagai peran. systems administrator
Gunakan prosedur berikut untuk mengatur server.
Untuk mengatur server, lakukan hal berikut. Anda bekerja di dalam Snowflake untuk semua langkah kecuali yang terakhir.
-
Mulai mengatur server atau API.
-
Konfigurasikan server otorisasi untuk menggunakan kode otorisasi dan segarkan jenis hibah token.
-
Tentukan masa pakai token akses.
-
Setel batas waktu idle token refresh. Batas waktu idle adalah waktu token refresh kedaluwarsa jika tidak digunakan.
catatan
Jika Anda menjadwalkan pekerjaan di Data Wrangler, kami sarankan untuk membuat waktu tunggu idle lebih besar daripada frekuensi pekerjaan pemrosesan. Jika tidak, beberapa pekerjaan pemrosesan mungkin gagal karena token penyegaran kedaluwarsa sebelum dapat dijalankan. Ketika token penyegaran kedaluwarsa, pengguna harus mengautentikasi ulang dengan mengakses koneksi yang telah mereka buat ke Snowflake melalui Data Wrangler.
-
Tentukan
session:role-anysebagai ruang lingkup baru.catatan
Untuk Azure AD, salin pengenal unik untuk ruang lingkup. Data Wrangler mengharuskan Anda untuk menyediakannya dengan pengenal.
-
penting
Dalam Integrasi Keamanan OAuth Eksternal untuk Kepingan Salju, aktifkan.
external_oauth_any_role_mode
penting
Data Wrangler tidak mendukung token penyegaran yang berputar. Menggunakan token penyegaran yang berputar dapat mengakibatkan kegagalan akses atau pengguna harus sering masuk.
penting
Jika token penyegaran kedaluwarsa, pengguna Anda harus mengautentikasi ulang dengan mengakses koneksi yang telah mereka buat ke Snowflake melalui Data Wrangler.
Setelah menyiapkan penyedia OAuth, Anda memberikan Data Wrangler informasi yang dibutuhkan untuk terhubung ke penyedia. Anda dapat menggunakan dokumentasi dari penyedia identitas Anda untuk mendapatkan nilai untuk bidang berikut:
-
URL Token — URL token yang dikirim oleh penyedia identitas ke Data Wrangler.
-
URL otorisasi — URL server otorisasi penyedia identitas.
-
ID Klien — ID penyedia identitas.
-
Rahasia klien — Rahasia yang hanya dikenali oleh server otorisasi atau API.
-
(Hanya Azure AD) Kredensional cakupan OAuth yang telah Anda salin.
Anda menyimpan bidang dan nilai dalam AWS Secrets Manager rahasia dan menambahkannya ke konfigurasi siklus hidup Amazon SageMaker Studio Classic yang Anda gunakan untuk Data Wrangler. Konfigurasi Siklus Hidup adalah skrip shell. Gunakan untuk membuat Nama Sumber Daya Amazon (ARN) dari rahasia dapat diakses oleh Data Wrangler. Untuk informasi tentang membuat rahasia, lihat Memindahkan rahasia hardcode ke. AWS Secrets Manager Untuk informasi tentang menggunakan konfigurasi siklus hidup di Studio Classic, lihat. Menggunakan Konfigurasi Siklus Hidup untuk Menyesuaikan Amazon Studio Classic SageMaker
penting
Sebelum membuat rahasia Secrets Manager, pastikan peran eksekusi SageMaker AI yang Anda gunakan untuk Amazon SageMaker Studio Classic memiliki izin untuk membuat dan memperbarui rahasia di Secrets Manager. Untuk informasi selengkapnya tentang menambahkan izin, lihat Contoh: Izin untuk membuat rahasia.
Untuk Okta dan Ping Federate, berikut ini adalah format rahasianya:
{
    "token_url":"https://identityprovider.com/oauth2/example-portion-of-URL-path/v2/token",
    "client_id":"example-client-id",
    "client_secret":"example-client-secret",
    "identity_provider":"OKTA"|"PING_FEDERATE",
    "authorization_url":"https://identityprovider.com/oauth2/example-portion-of-URL-path/v2/authorize"
}
Untuk Azure AD, berikut ini adalah format rahasianya:
{
    "token_url":"https://identityprovider.com/oauth2/example-portion-of-URL-path/v2/token",
    "client_id":"example-client-id",
    "client_secret":"example-client-secret",
    "identity_provider":"AZURE_AD",
    "authorization_url":"https://identityprovider.com/oauth2/example-portion-of-URL-path/v2/authorize",
    "datasource_oauth_scope":"api://appuri/session:role-any)"
}
Anda harus memiliki konfigurasi siklus hidup yang menggunakan rahasia Secrets Manager yang telah Anda buat. Anda dapat membuat konfigurasi siklus hidup atau memodifikasi konfigurasi yang telah dibuat. Konfigurasi harus menggunakan skrip berikut.
#!/bin/bash

set -eux

## Script Body

cat > ~/.snowflake_identity_provider_oauth_config <<EOL
{
    "secret_arn": "example-secret-arn"
}
EOL
Untuk informasi tentang menyiapkan konfigurasi siklus hidup, lihat. Membuat dan Mengaitkan Konfigurasi Siklus Hidup dengan Amazon SageMaker Studio Classic Ketika Anda akan melalui proses pengaturan, lakukan hal berikut:
-
Atur jenis aplikasi konfigurasi ke
Jupyter Server. -
Lampirkan konfigurasi ke domain Amazon SageMaker AI yang memiliki pengguna Anda.
-
Jalankan konfigurasi secara default. Itu harus berjalan setiap kali pengguna login ke Studio Classic. Jika tidak, kredensil yang disimpan dalam konfigurasi tidak akan tersedia untuk pengguna Anda saat mereka menggunakan Data Wrangler.
-
Konfigurasi siklus hidup membuat file dengan nama,
snowflake_identity_provider_oauth_configdi folder beranda pengguna. File tersebut berisi rahasia Secrets Manager. Pastikan itu ada di folder beranda pengguna setiap kali instance Jupyter Server diinisialisasi.
Konektivitas Pribadi antara Data Wrangler dan Snowflake via AWS PrivateLink
Bagian ini menjelaskan cara menggunakan AWS PrivateLink untuk membuat koneksi pribadi antara Data Wrangler dan Snowflake. Langkah-langkahnya dijelaskan di bagian berikut.
Buat VPC
Jika Anda tidak memiliki pengaturan VPC, ikuti instruksi Buat VPC baru untuk membuatnya.
Setelah Anda memiliki VPC pilihan yang ingin Anda gunakan untuk membuat koneksi pribadi, berikan kredensyal berikut kepada Administrator Snowflake Anda untuk mengaktifkan: AWS PrivateLink
-
VPC ID
-
AWS ID Akun
-
URL akun terkait yang Anda gunakan untuk mengakses Snowflake
penting
Seperti yang dijelaskan dalam dokumentasi Snowflake, mengaktifkan akun Snowflake Anda dapat memakan waktu hingga dua hari kerja.
Mengatur Kepingan Salju AWS PrivateLink Integrasi
Setelah AWS PrivateLink diaktifkan, ambil AWS PrivateLink konfigurasi untuk Wilayah Anda dengan menjalankan perintah berikut di lembar kerja Snowflake. Masuk ke konsol Snowflake Anda dan masukkan yang berikut ini di bawah Lembar Kerja: select
SYSTEM$GET_PRIVATELINK_CONFIG();
-
Ambil nilai untuk berikut:
privatelink-account-name,,privatelink_ocsp-urlprivatelink-account-url, danprivatelink_ocsp-urldari objek JSON yang dihasilkan. Contoh dari setiap nilai ditampilkan dalam cuplikan berikut. Simpan nilai-nilai ini untuk digunakan nanti.privatelink-account-name: xxxxxxxx.region.privatelink privatelink-vpce-id: com.amazonaws.vpce.region.vpce-svc-xxxxxxxxxxxxxxxxx privatelink-account-url: xxxxxxxx.region.privatelink.snowflakecomputing.com privatelink_ocsp-url: ocsp.xxxxxxxx.region.privatelink.snowflakecomputing.com -
Beralih ke AWS Konsol Anda dan navigasikan ke menu VPC.
-
Dari panel sisi kiri, pilih tautan Endpoints untuk menavigasi ke pengaturan VPC Endpoints.
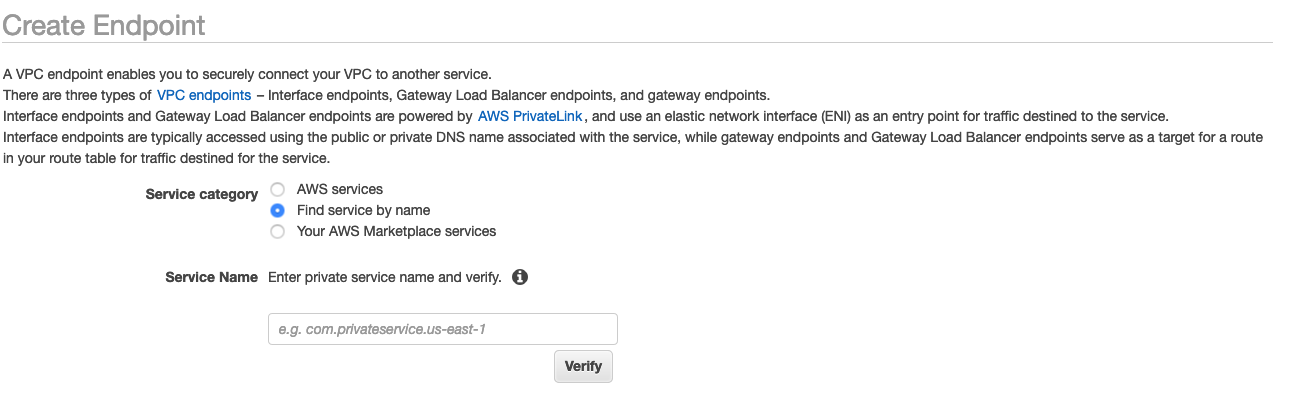
Sesampai di sana, pilih Create Endpoint.
-
Pilih tombol radio untuk Temukan layanan dengan nama, seperti yang ditunjukkan pada gambar berikut.
-
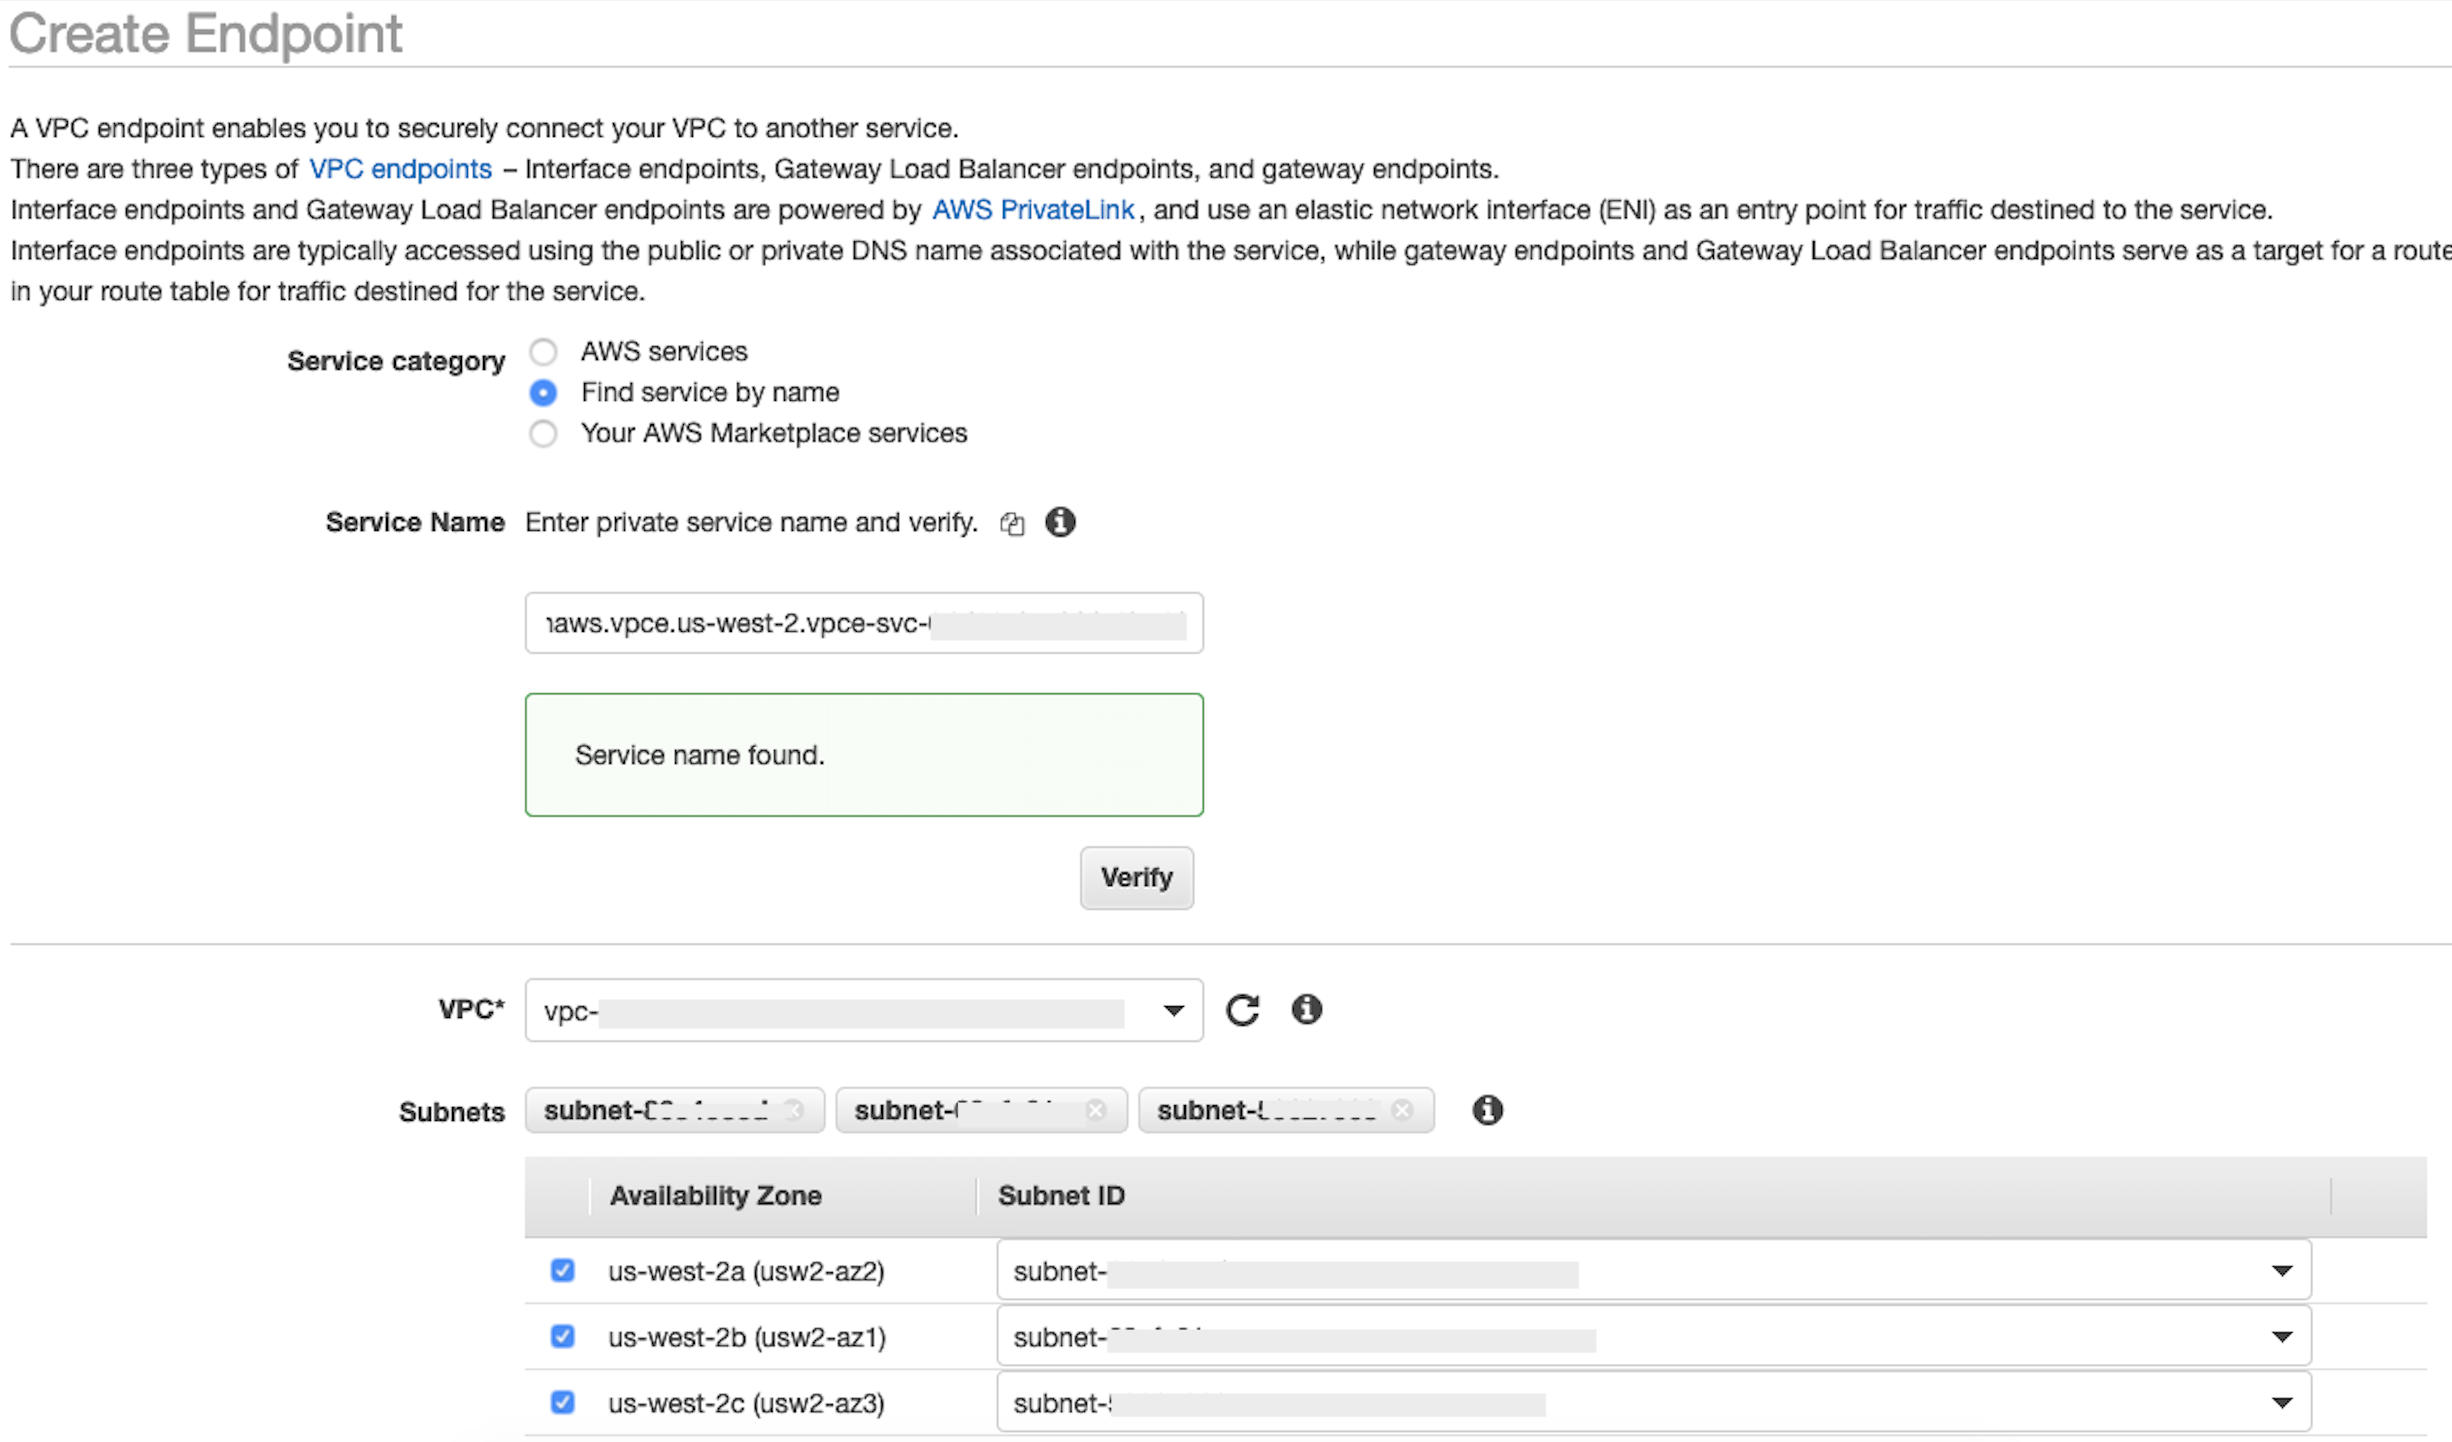
Di bidang Nama Layanan, tempelkan nilai untuk
privatelink-vpce-idyang Anda ambil di langkah sebelumnya dan pilih Verifikasi.Jika koneksi berhasil, peringatan hijau yang mengatakan Nama layanan ditemukan muncul di layar Anda dan opsi VPC dan Subnet secara otomatis meluas, seperti yang ditunjukkan pada gambar berikut. Bergantung pada Wilayah yang ditargetkan, layar hasil Anda mungkin menampilkan nama AWS Wilayah lain.
-
Pilih ID VPC yang sama yang Anda kirim ke Snowflake dari daftar dropdown VPC.
-
Jika Anda belum membuat subnet, maka lakukan serangkaian instruksi berikut untuk membuat subnet.
-
Pilih Subnet dari daftar dropdown VPC. Kemudian pilih Buat subnet dan ikuti petunjuk untuk membuat subset di VPC Anda. Pastikan Anda memilih ID VPC yang Anda kirim Snowflake.
-
Di bawah Konfigurasi Grup Keamanan, pilih Buat Grup Keamanan Baru untuk membuka layar Grup Keamanan default di tab baru. Di tab baru ini, pilih t Buat Grup Keamanan.
-
Berikan nama untuk grup keamanan baru (seperti
datawrangler-doc-snowflake-privatelink-connection) dan deskripsi. Pastikan untuk memilih ID VPC yang telah Anda gunakan pada langkah sebelumnya. -
Tambahkan dua aturan untuk mengizinkan lalu lintas dari dalam VPC Anda ke titik akhir VPC ini.
Arahkan ke VPC Anda di bawah VPC Anda di tab terpisah, dan ambil blok CIDR Anda untuk VPC Anda. Kemudian pilih Tambahkan Aturan di bagian Aturan Masuk. Pilih
HTTPSjenisnya, biarkan Sumber sebagai Kustom dalam formulir, dan tempel nilai yang diambil daridescribe-vpcspanggilan sebelumnya (seperti).10.0.0.0/16 -
Pilih Buat Grup Keamanan. Ambil ID Grup Keamanan dari grup keamanan yang baru dibuat (seperti
sg-xxxxxxxxxxxxxxxxx). -
Di layar konfigurasi VPC Endpoint, hapus grup keamanan default. Tempel di ID grup keamanan di bidang pencarian dan pilih kotak centang.
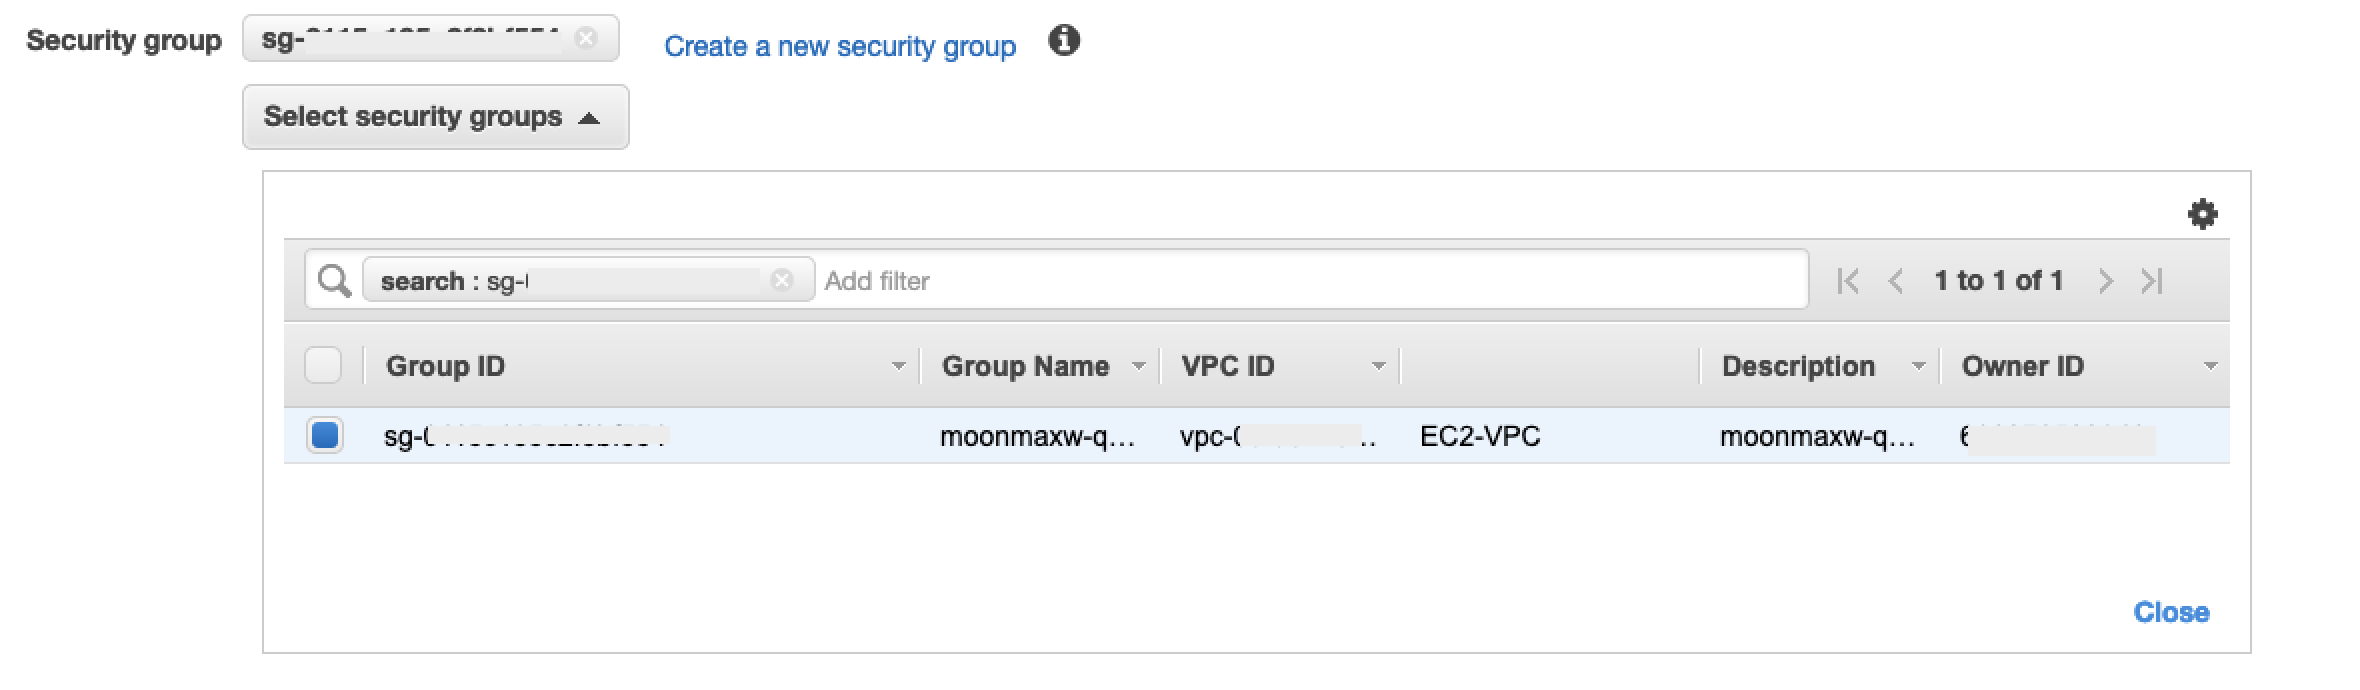
-
Pilih Buat Titik Akhir.
-
Jika pembuatan titik akhir berhasil, Anda akan melihat halaman yang memiliki tautan ke konfigurasi titik akhir VPC Anda, yang ditentukan oleh ID VPC. Pilih tautan untuk melihat konfigurasi secara penuh.
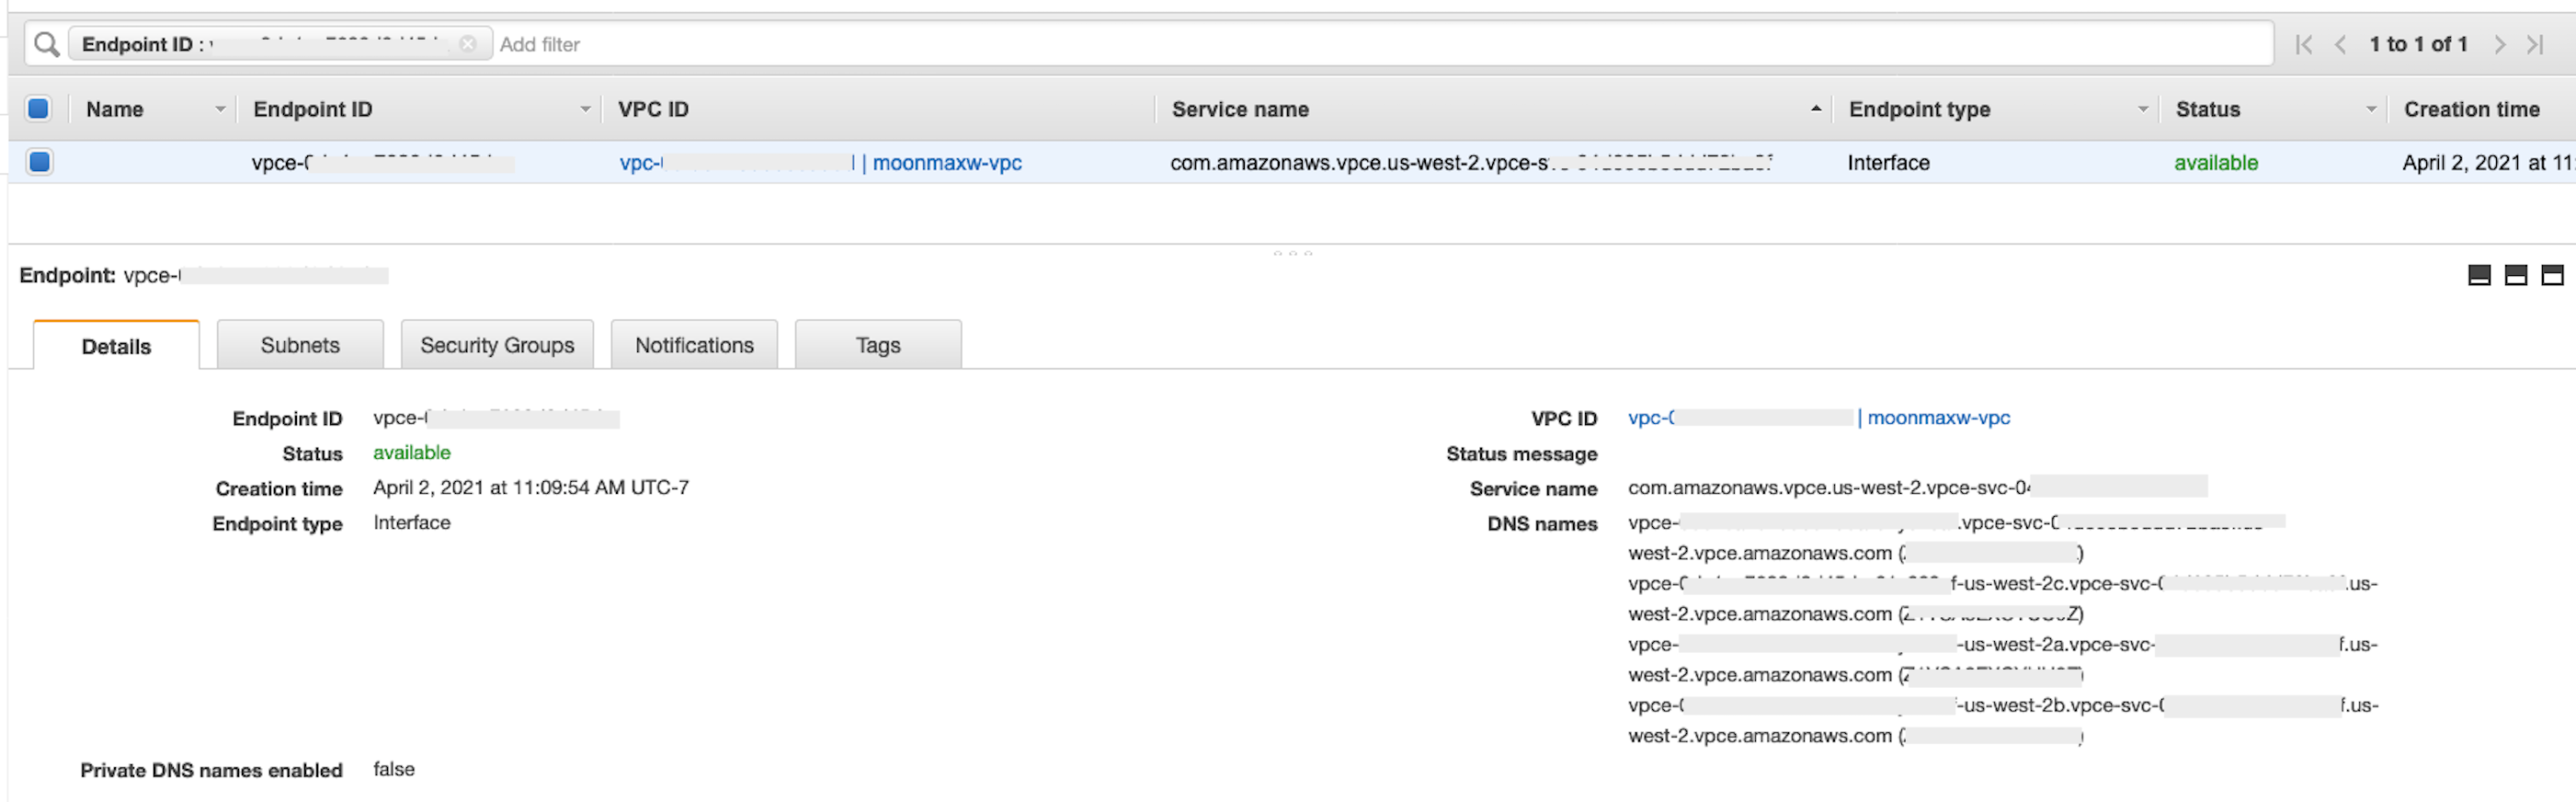
Ambil catatan paling atas dalam daftar nama DNS. Ini dapat dibedakan dari nama DNS lain karena hanya menyertakan nama Wilayah (seperti
us-west-2), dan tidak ada notasi huruf Availability Zone (seperti).us-west-2aSimpan informasi ini untuk digunakan nanti.
Konfigurasikan DNS untuk Snowflake Endpoint di VPC Anda
Bagian ini menjelaskan cara mengonfigurasi DNS untuk titik akhir Snowflake di VPC Anda. Ini memungkinkan VPC Anda menyelesaikan permintaan ke titik akhir Snowflake AWS PrivateLink .
-
Arahkan ke menu Route 53
di dalam AWS konsol Anda. -
Pilih opsi Zona yang Dihosting (jika perlu, perluas menu sebelah kiri untuk menemukan opsi ini).
-
Pilih Buat Zona yang Di-hosting.
-
Di bidang Nama domain, referensi nilai yang disimpan untuk
privatelink-account-urllangkah-langkah sebelumnya. Di bidang ini, ID akun Snowflake Anda dihapus dari nama DNS dan hanya menggunakan nilai yang dimulai dengan pengenal Wilayah. Sebuah Resource Record Set juga dibuat nanti untuk subdomain, seperti,region.privatelink.snowflakecomputing.com. -
Pilih tombol radio untuk Private Hosted Zone di bagian Type. Kode Wilayah Anda mungkin tidak
us-west-2. Referensi nama DNS yang dikembalikan kepada Anda oleh Snowflake.
-
Di bagian VPC untuk dikaitkan dengan zona yang dihosting, pilih Wilayah tempat VPC Anda berada dan ID VPC yang digunakan pada langkah sebelumnya.
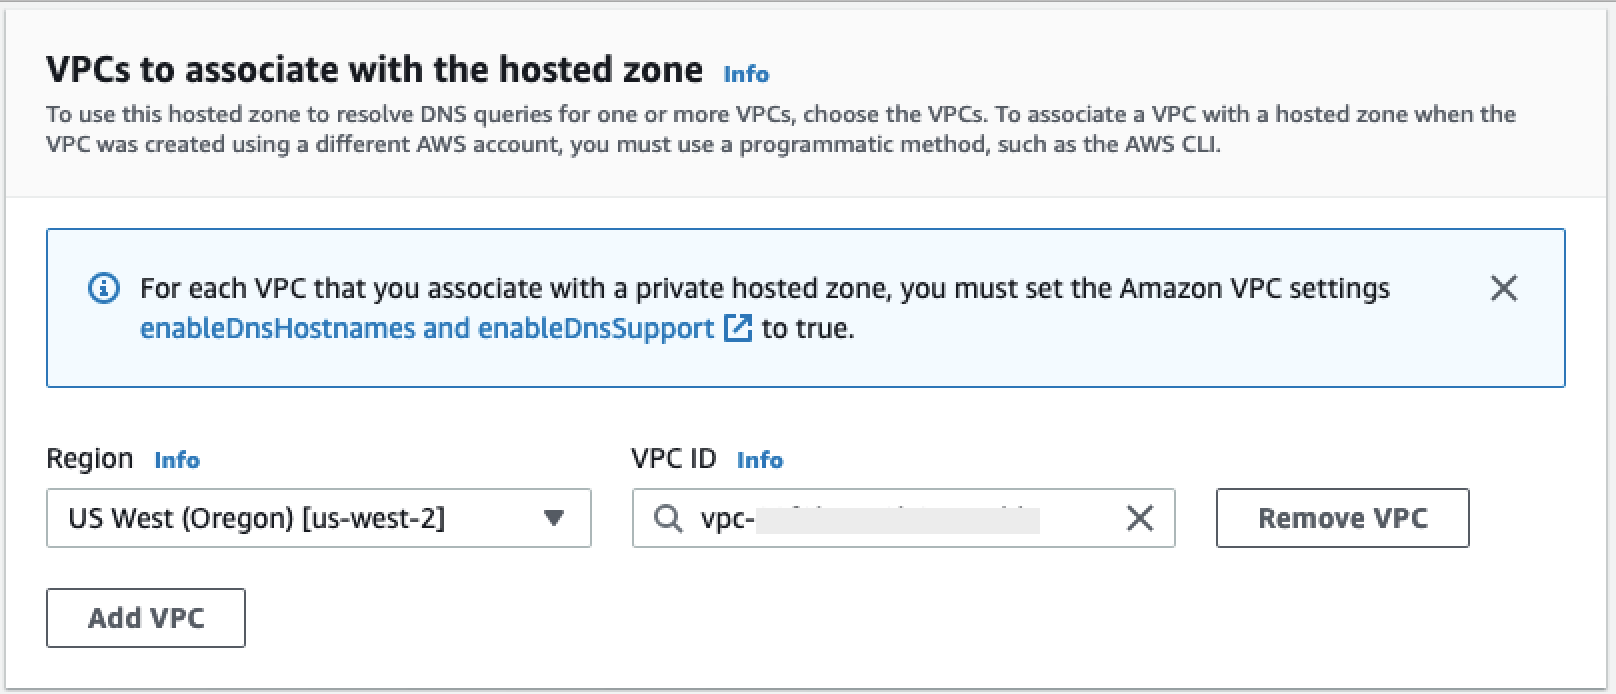
-
Pilih Buat zona yang di-hosting.
-
-
Selanjutnya, buat dua catatan, satu untuk
privatelink-account-urldan satu untukprivatelink_ocsp-url.-
Di menu Zona yang Dihosting, pilih Buat Kumpulan Rekaman.
-
Di bawah nama Rekam, masukkan ID Akun Snowflake Anda saja (8 karakter pertama di
privatelink-account-url). -
Di bawah Jenis rekaman, pilih CNAME.
-
Di bawah Nilai, masukkan nama DNS untuk titik akhir VPC regional yang Anda ambil pada langkah terakhir dari bagian Mengatur Integrasi Kepingan Salju. AWS PrivateLink

-
Pilih Create records (Buat catatan).
-
Ulangi langkah sebelumnya untuk catatan OCSP yang kami catat
privatelink-ocsp-url, dimulai denganocspmelalui ID Snowflake 8 karakter untuk nama rekaman (seperti).ocsp.xxxxxxxx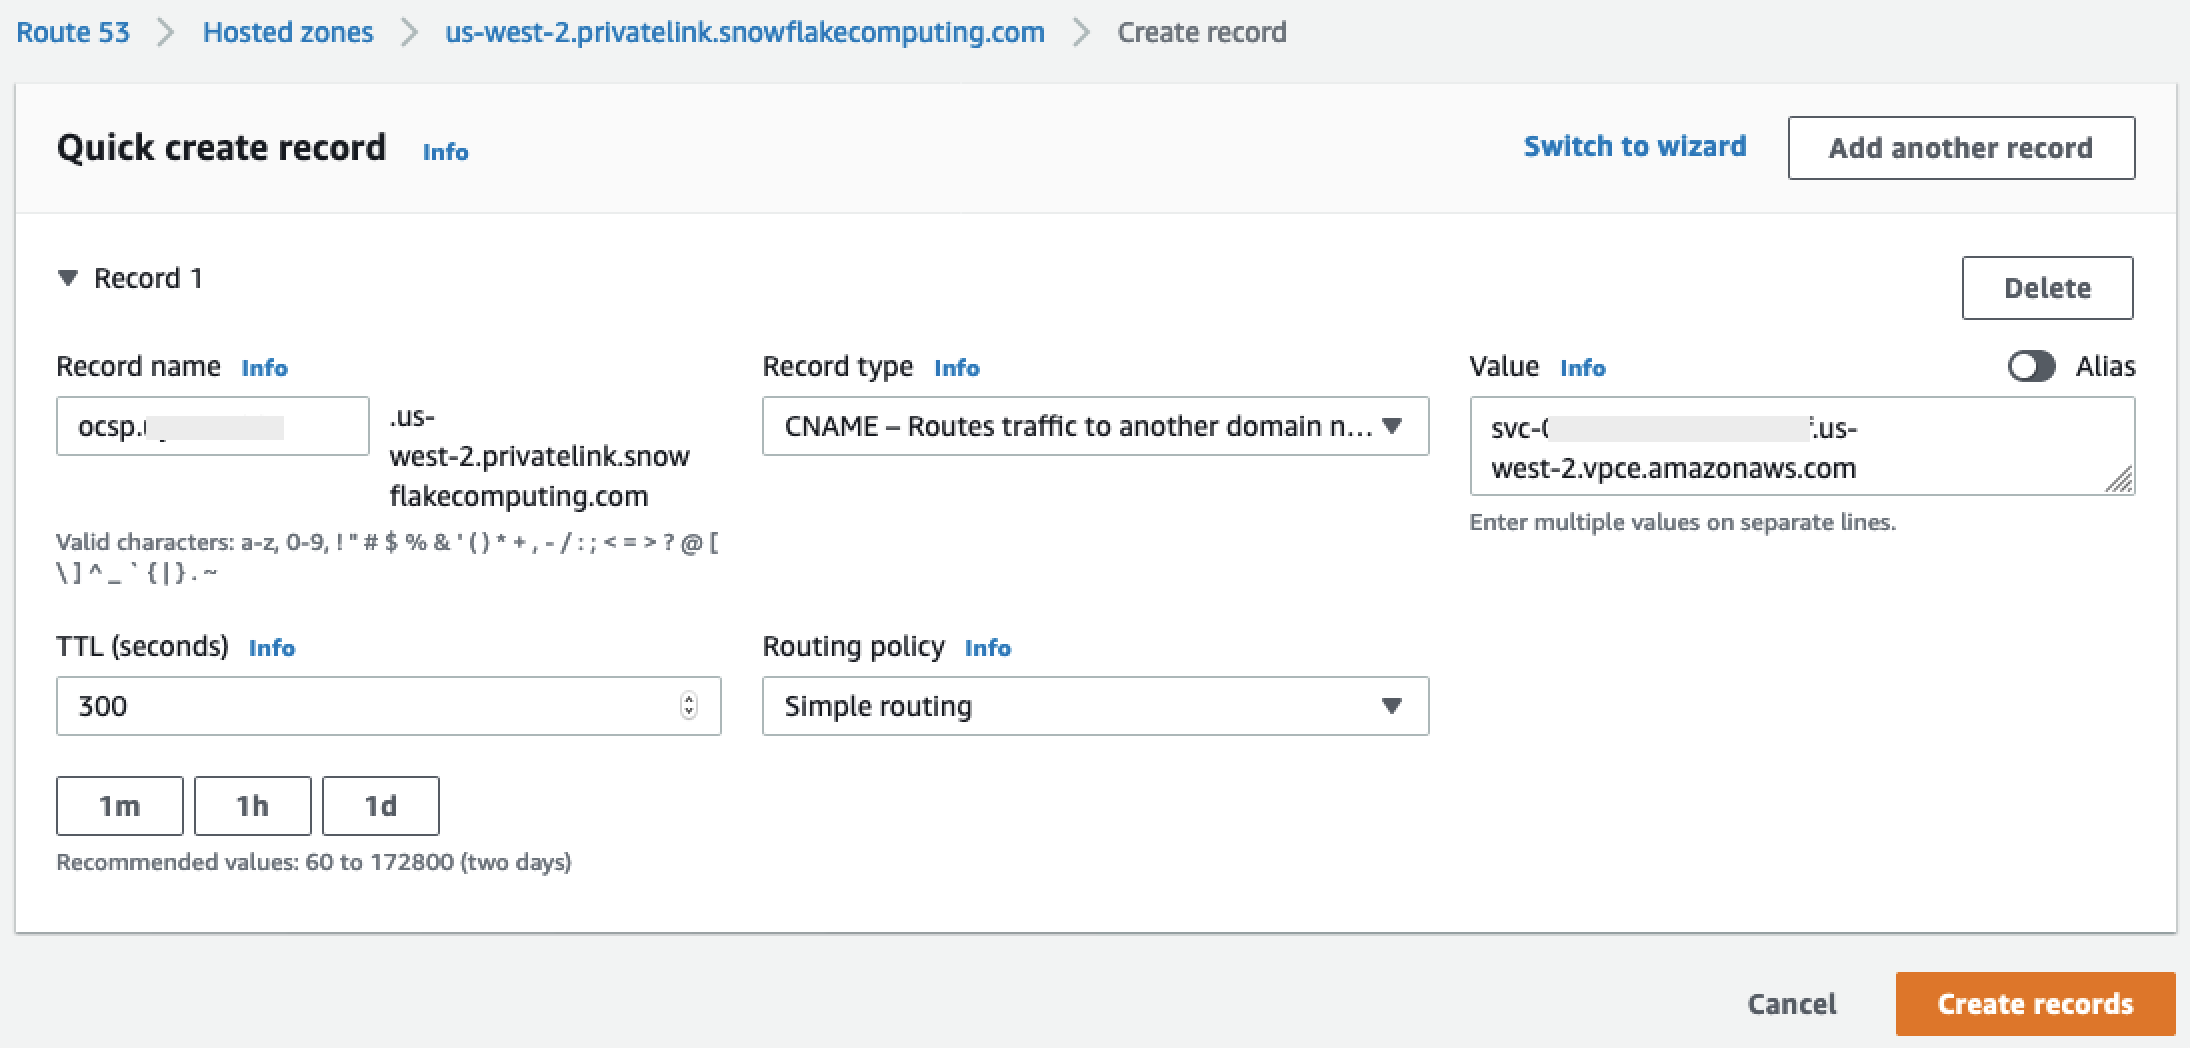
-
-
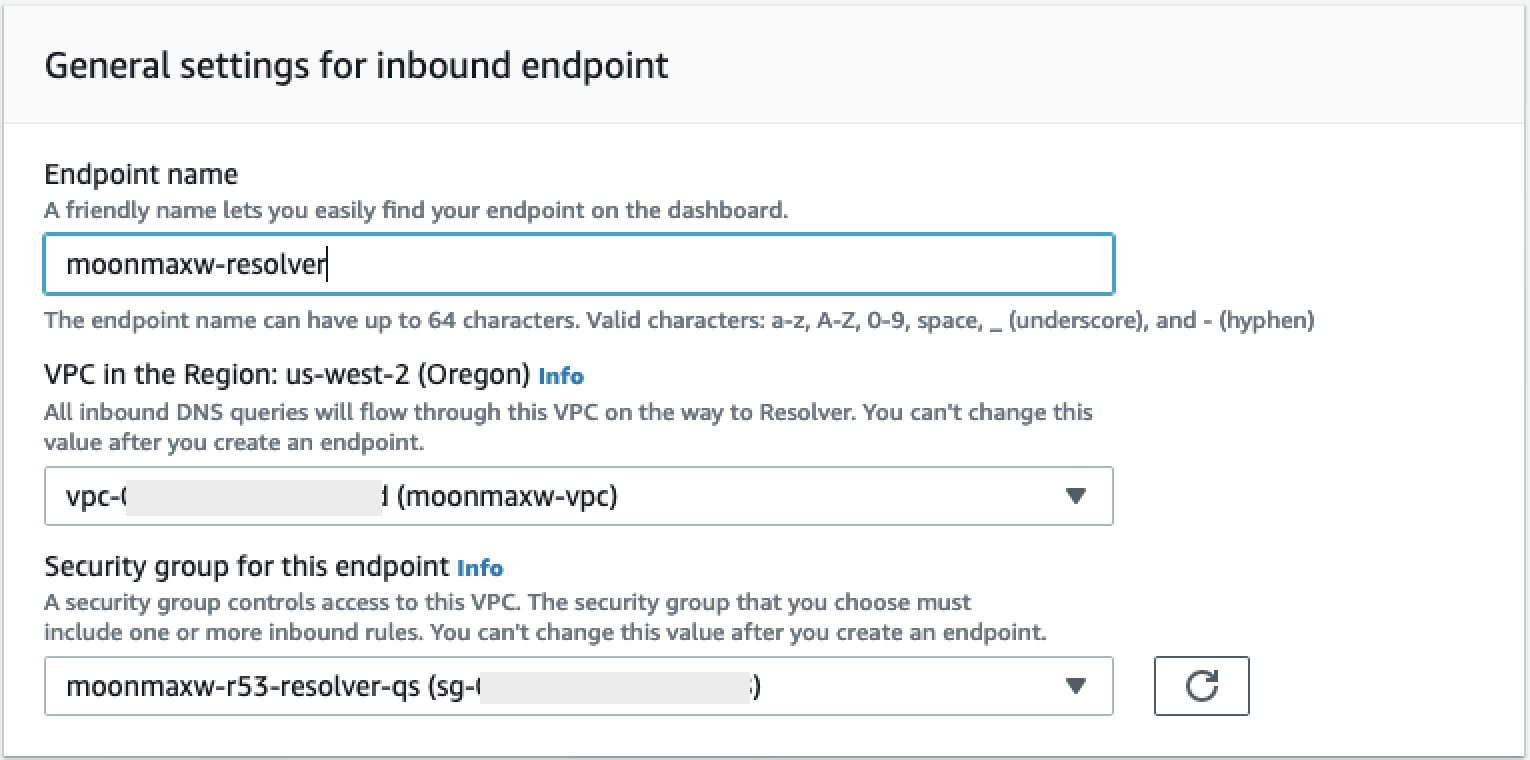
Konfigurasikan Route 53 Resolver Inbound Endpoint untuk VPC Anda
Bagian ini menjelaskan cara mengonfigurasi titik akhir inbound resolver Route 53 untuk VPC Anda.
-
Arahkan ke menu Route 53
di dalam AWS konsol Anda. -
Di panel sebelah kiri di bagian Keamanan, pilih opsi Grup Keamanan.
-
-
Pilih Buat Grup Keamanan.
-
Berikan nama untuk grup keamanan Anda (seperti
datawranger-doc-route53-resolver-sg) dan deskripsi. -
Pilih ID VPC yang digunakan pada langkah sebelumnya.
-
Buat aturan yang memungkinkan DNS melalui UDP dan TCP dari dalam blok VPC CIDR.

-
Pilih Buat Grup Keamanan. Perhatikan ID Grup Keamanan karena menambahkan aturan untuk mengizinkan lalu lintas ke grup keamanan titik akhir VPC.
-
-
Arahkan ke menu Route 53
di dalam AWS konsol Anda. -
Di bagian Resolver, pilih opsi Inbound Endpoint.
-
-
Pilih Buat Titik Akhir Masuk.
-
Berikan nama titik akhir.
-
Dari daftar tarik-turun VPC di Wilayah, pilih ID VPC yang telah Anda gunakan di semua langkah sebelumnya.
-
Dalam daftar dropdown grup Keamanan untuk titik akhir ini, pilih ID grup keamanan dari Langkah 2 di bagian ini.
-
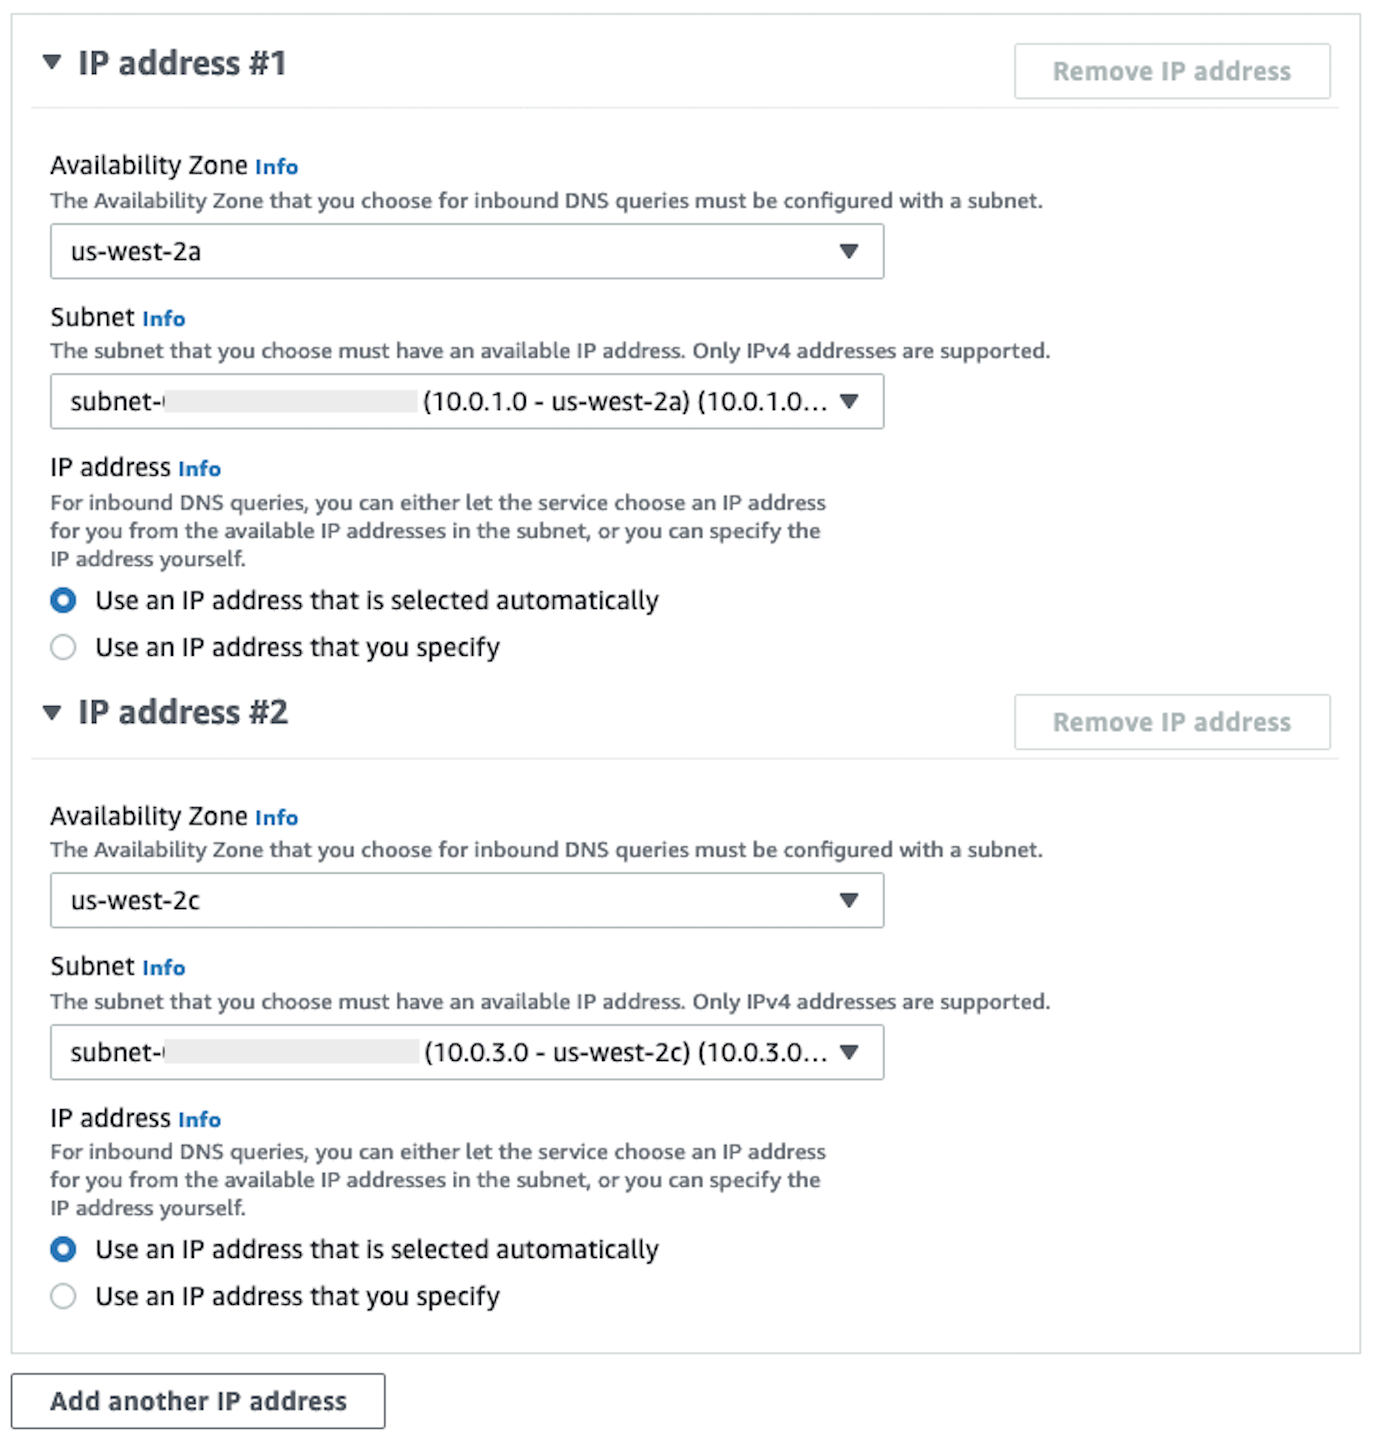
Di bagian Alamat IP, pilih Availability Zones, pilih subnet, dan tinggalkan pemilih radio untuk Gunakan alamat IP yang dipilih secara otomatis dipilih untuk setiap alamat IP.
-
Pilih Kirim.
-
-
Pilih titik akhir Inbound setelah dibuat.
-
Setelah titik akhir masuk dibuat, perhatikan dua alamat IP untuk resolver.

SageMaker Titik Akhir AI VPC
Bagian ini menjelaskan cara membuat titik akhir VPC untuk hal-hal berikut: Amazon SageMaker Studio Classic, SageMaker Notebooks, SageMaker API, Runtime Runtime, dan Amazon SageMaker Feature Store Runtime. SageMaker
Buat grup keamanan yang diterapkan ke semua titik akhir.
-
Arahkan ke menu EC2
di AWS Konsol. -
Di bagian Jaringan & Keamanan, pilih opsi Grup keamanan.
-
Pilih Buat grup keamanan.
-
Berikan nama dan deskripsi grup keamanan (seperti
datawrangler-doc-sagemaker-vpce-sg). Aturan ditambahkan kemudian untuk memungkinkan lalu lintas melalui HTTPS dari SageMaker AI ke grup ini.
Membuat titik akhir
-
Arahkan ke menu VPC
di konsol. AWS -
Pilih opsi Endpoints.
-
Pilih Buat Titik Akhir.
-
Cari layanan dengan memasukkan namanya di bidang Pencarian.
-
Dari daftar dropdown VPC, pilih VPC tempat koneksi Snowflake Anda ada. AWS PrivateLink
-
Di bagian Subnet, pilih subnet yang memiliki akses ke koneksi Snowflake PrivateLink .
-
Biarkan kotak centang Aktifkan Nama DNS dipilih.
-
Di bagian Grup Keamanan, pilih grup keamanan yang Anda buat di bagian sebelumnya.
-
Pilih Buat Titik Akhir.
Konfigurasikan Studio Classic dan Data Wrangler
Bagian ini menjelaskan cara mengkonfigurasi Studio Classic dan Data Wrangler.
-
Konfigurasikan grup keamanan.
-
Arahkan ke menu Amazon EC2 di Konsol. AWS
-
Pilih opsi Grup Keamanan di bagian Jaringan & Keamanan.
-
Pilih Buat Grup Keamanan.
-
Berikan nama dan deskripsi untuk grup keamanan Anda (seperti
datawrangler-doc-sagemaker-studio). -
Buat aturan masuk berikut.
-
Koneksi HTTPS ke grup keamanan yang Anda sediakan untuk PrivateLink koneksi Snowflake yang Anda buat di langkah Atur Integrasi Kepingan Salju. PrivateLink
-
Koneksi HTTP ke grup keamanan yang Anda sediakan untuk PrivateLink koneksi Snowflake yang Anda buat di langkah Atur Integrasi Snowflake. PrivateLink
-
Grup keamanan UDP dan TCP untuk DNS (port 53) ke Route 53 Resolver Inbound Endpoint yang Anda buat di langkah 2 Konfigurasi Route 53 Resolver Inbound Endpoint untuk VPC Anda.
-
-
Pilih tombol Create Security Group di pojok kanan bawah.
-
-
Konfigurasikan Studio Klasik.
-
Arahkan ke menu SageMaker AI di AWS konsol.
-
Dari konsol sebelah kiri, Pilih opsi SageMaker AI Studio Classic.
-
Jika Anda tidak memiliki domain yang dikonfigurasi, menu Memulai hadir.
-
Pilih opsi Pengaturan Standar dari menu Memulai.
-
Di bawah metode Authentication, pilih AWS Identity and Access Management (IAM).
-
Dari menu Izin, Anda dapat membuat peran baru atau menggunakan peran yang sudah ada sebelumnya, tergantung pada kasus penggunaan Anda.
-
Jika Anda memilih Buat peran baru, Anda akan diberikan opsi untuk memberikan nama bucket S3, dan kebijakan dibuat untuk Anda.
-
Jika Anda sudah memiliki peran yang dibuat dengan izin untuk bucket S3 yang Anda perlukan akses, pilih peran dari daftar tarik-turun. Peran ini harus memiliki
AmazonSageMakerFullAccesskebijakan yang melekat padanya.
-
-
Pilih daftar tarik-turun Jaringan dan Penyimpanan untuk mengonfigurasi VPC, keamanan, dan subnet yang digunakan AI. SageMaker
-
Di bawah VPC, pilih VPC tempat koneksi Snowflake Anda ada. PrivateLink
-
Di bawah Subnet (s), pilih subnet yang memiliki akses ke koneksi Snowflake PrivateLink.
-
Di bawah Akses Jaringan untuk Studio Classic, pilih VPC Only.
-
Di bawah Grup Keamanan, pilih grup keamanan yang Anda buat di langkah 1.
-
-
Pilih Kirim.
-
-
Edit grup keamanan SageMaker AI.
-
Buat aturan masuk berikut:
-
Port 2049 ke Grup Keamanan NFS masuk dan keluar yang dibuat secara otomatis oleh SageMaker AI pada langkah 2 (nama grup keamanan berisi ID domain Studio Classic).
-
Akses ke semua port TCP ke dirinya sendiri (diperlukan untuk SageMaker AI untuk VPC Saja).
-
-
-
Edit Grup Keamanan Titik Akhir VPC:
-
Arahkan ke menu Amazon EC2 di konsol. AWS
-
Temukan grup keamanan yang Anda buat pada langkah sebelumnya.
-
Tambahkan aturan masuk yang memungkinkan lalu lintas HTTPS dari grup keamanan yang dibuat pada langkah 1.
-
-
Buat profil pengguna.
-
Dari Panel Kontrol Klasik SageMaker Studio, pilih Tambah Pengguna.
-
Berikan nama pengguna.
-
Untuk Peran Eksekusi, pilih untuk membuat peran baru atau menggunakan peran yang sudah ada sebelumnya.
-
Jika memilih Buat peran baru, Anda akan diberikan opsi untuk memberikan nama bucket Amazon S3, dan kebijakan dibuat untuk Anda.
-
Jika Anda sudah memiliki peran yang dibuat dengan izin ke bucket Amazon S3 yang memerlukan akses, pilih peran dari daftar tarik-turun. Peran ini harus memiliki
AmazonSageMakerFullAccesskebijakan yang melekat padanya.
-
-
Pilih Kirim.
-
-
Buat aliran data (ikuti panduan ilmuwan data yang diuraikan di bagian sebelumnya).
-
Saat menambahkan koneksi Snowflake, masukkan nilai
privatelink-account-name(dari langkah Set Up Snowflake PrivateLink Integration) ke bidang nama akun Snowflake (alfanumerik), bukan nama akun Snowflake biasa. Segala sesuatu yang lain dibiarkan tidak berubah.
-
Memberikan informasi kepada ilmuwan data
Berikan ilmuwan data informasi yang mereka butuhkan untuk mengakses Snowflake dari Amazon SageMaker AI Data Wrangler.
penting
Pengguna Anda harus menjalankan Amazon SageMaker Studio Classic versi 1.3.0 atau yang lebih baru. Untuk informasi tentang memeriksa versi Studio Classic dan memperbaruinya, lihatSiapkan Data ML dengan Amazon SageMaker Data Wrangler.
-
Untuk memungkinkan ilmuwan data Anda mengakses Snowflake dari SageMaker Data Wrangler, berikan salah satu dari berikut ini:
-
Untuk Otentikasi Dasar, nama akun Snowflake, nama pengguna, dan kata sandi.
-
Untuk OAuth, nama pengguna dan kata sandi di penyedia identitas.
-
Untuk ARN, Secrets Manager rahasia Amazon Resource Name (ARN).
-
Rahasia yang dibuat dengan AWS Secrets Manager dan ARN of the secret. Gunakan prosedur berikut di bawah ini untuk membuat rahasia Snowflake jika Anda memilih opsi ini.
penting
Jika ilmuwan data Anda menggunakan opsi Snowflake Credentials (Nama pengguna dan Kata Sandi) untuk terhubung ke Snowflake, Anda dapat menggunakan Secrets Manager untuk menyimpan kredensialnya secara rahasia. Secrets Manager memutar rahasia sebagai bagian dari rencana keamanan praktik terbaik. Rahasia yang dibuat di Secrets Manager hanya dapat diakses dengan peran Studio Classic yang dikonfigurasi saat Anda menyiapkan profil pengguna Studio Classic. Ini mengharuskan Anda untuk menambahkan izin ini
secretsmanager:PutResourcePolicy,, ke kebijakan yang dilampirkan ke peran Studio Classic Anda.Kami sangat menyarankan agar Anda membuat cakupan kebijakan peran untuk menggunakan peran yang berbeda untuk grup pengguna Studio Classic yang berbeda. Anda dapat menambahkan izin berbasis sumber daya tambahan untuk rahasia Secrets Manager. Lihat Mengelola Kebijakan Rahasia untuk kunci kondisi yang dapat Anda gunakan.
Untuk informasi tentang membuat rahasia, lihat Membuat rahasia. Anda dikenakan biaya untuk rahasia yang Anda buat.
-
-
(Opsional) Berikan nama integrasi penyimpanan kepada ilmuwan data yang Anda buat menggunakan prosedur berikut Buat Integrasi Penyimpanan Cloud di Snowflake
. Ini adalah nama integrasi baru dan dipanggil integration_namedalam perintahCREATE INTEGRATIONSQL yang Anda jalankan, yang ditunjukkan dalam cuplikan berikut:CREATE STORAGE INTEGRATION integration_name TYPE = EXTERNAL_STAGE STORAGE_PROVIDER = S3 ENABLED = TRUE STORAGE_AWS_ROLE_ARN = 'iam_role' [ STORAGE_AWS_OBJECT_ACL = 'bucket-owner-full-control' ] STORAGE_ALLOWED_LOCATIONS = ('s3://bucket/path/', 's3://bucket/path/') [ STORAGE_BLOCKED_LOCATIONS = ('s3://bucket/path/', 's3://bucket/path/') ]
Panduan Ilmuwan Data
Gunakan yang berikut ini untuk menghubungkan Snowflake dan mengakses data Anda di Data Wrangler.
penting
Administrator Anda perlu menggunakan informasi di bagian sebelumnya untuk mengatur Snowflake. Jika Anda mengalami masalah, hubungi mereka untuk bantuan pemecahan masalah.
Anda dapat terhubung ke Snowflake dengan salah satu cara berikut:
-
Menentukan kredensi Snowflake Anda (nama akun, nama pengguna, dan kata sandi) di Data Wrangler.
-
Menyediakan Nama Sumber Daya Amazon (ARN) dari rahasia yang berisi kredensialnya.
-
Menggunakan penyedia open standard for access delegation (OAuth) yang terhubung ke Snowflake. Administrator Anda dapat memberi Anda akses ke salah satu penyedia OAuth berikut:
Bicaralah dengan administrator Anda tentang metode yang perlu Anda gunakan untuk terhubung ke Snowflake.
Bagian berikut memiliki informasi tentang bagaimana Anda dapat terhubung ke Snowflake menggunakan metode sebelumnya.
Anda dapat memulai proses mengimpor data Anda dari Snowflake setelah Anda terhubung dengannya.
Dalam Data Wrangler, Anda dapat melihat gudang data, database, dan skema Anda, bersama dengan ikon mata yang dapat digunakan untuk melihat pratinjau tabel Anda. Setelah Anda memilih ikon Tabel Pratinjau, pratinjau skema tabel tersebut dihasilkan. Anda harus memilih gudang sebelum Anda dapat melihat pratinjau tabel.
penting
Jika Anda mengimpor dataset dengan kolom jenis TIMESTAMP_TZ atauTIMESTAMP_LTZ, tambahkan ::string ke nama kolom kueri Anda. Untuk informasi selengkapnya, lihat Cara: Membongkar data TIMESTAMP_TZ dan TIMESTAMP_LTZ
Setelah Anda memilih gudang data, database, dan skema, Anda sekarang dapat menulis kueri dan menjalankannya. Output kueri Anda ditampilkan di bawah Hasil kueri.
Setelah Anda menyelesaikan output kueri Anda, Anda kemudian dapat mengimpor output kueri Anda ke dalam aliran Data Wrangler untuk melakukan transformasi data.
Setelah mengimpor data, navigasikan ke alur Data Wrangler Anda dan mulailah menambahkan transformasi ke dalamnya. Untuk daftar transformasi yang tersedia, lihatTransformasi Data.
Impor Data Dari Perangkat Lunak sebagai Platform Layanan (SaaS)
Anda dapat menggunakan Data Wrangler untuk mengimpor data dari lebih dari empat puluh platform perangkat lunak sebagai layanan (SaaS). Untuk mengimpor data Anda dari platform SaaS Anda, Anda atau administrator Anda harus menggunakan Amazon AppFlow untuk mentransfer data dari platform ke Amazon S3 atau Amazon Redshift. Untuk informasi selengkapnya tentang Amazon AppFlow, lihat Apa itu Amazon AppFlow? Jika Anda tidak perlu menggunakan Amazon Redshift, sebaiknya transfer data ke Amazon S3 untuk proses yang lebih sederhana.
Data Wrangler mendukung transfer data dari platform SaaS berikut:
Daftar sebelumnya memiliki tautan ke informasi lebih lanjut tentang pengaturan sumber data Anda. Anda atau administrator Anda dapat merujuk ke tautan sebelumnya setelah Anda membaca informasi berikut.
Saat Anda menavigasi ke tab Impor aliran Data Wrangler Anda, Anda melihat sumber data di bawah bagian berikut:
-
Available
-
Siapkan sumber data
Anda dapat terhubung ke sumber data di bawah Tersedia tanpa memerlukan konfigurasi tambahan. Anda dapat memilih sumber data dan mengimpor data Anda.
Sumber data di bawah Mengatur sumber data, mengharuskan Anda atau administrator Anda menggunakan Amazon AppFlow untuk mentransfer data dari platform SaaS ke Amazon S3 atau Amazon Redshift. Untuk informasi tentang melakukan transfer, lihatMenggunakan Amazon AppFlow untuk mentransfer data Anda.
Setelah Anda melakukan transfer data, platform SaaS muncul sebagai sumber data di bawah Tersedia. Anda dapat memilihnya dan mengimpor data yang telah Anda transfer ke Data Wrangler. Data yang Anda transfer muncul sebagai tabel yang dapat Anda kueri.
Menggunakan Amazon AppFlow untuk mentransfer data Anda
Amazon AppFlow adalah platform yang dapat Anda gunakan untuk mentransfer data dari platform SaaS Anda ke Amazon S3 atau Amazon Redshift tanpa harus menulis kode apa pun. Untuk melakukan transfer data, Anda menggunakan file Konsol Manajemen AWS.
penting
Anda harus memastikan bahwa Anda telah mengatur izin untuk melakukan transfer data. Untuk informasi selengkapnya, lihat AppFlow Izin Amazon.
Setelah menambahkan izin, Anda dapat mentransfer data. Di Amazon AppFlow, Anda membuat alur untuk mentransfer data. Aliran adalah serangkaian konfigurasi. Anda dapat menggunakannya untuk menentukan apakah Anda menjalankan transfer data sesuai jadwal atau apakah Anda mempartisi data menjadi file terpisah. Setelah mengkonfigurasi alur, Anda menjalankannya untuk mentransfer data.
Untuk informasi tentang membuat alur, lihat Membuat alur di Amazon AppFlow. Untuk informasi tentang menjalankan alur, lihat Mengaktifkan AppFlow aliran Amazon.
Setelah data ditransfer, gunakan prosedur berikut untuk mengakses data di Data Wrangler.
penting
Sebelum Anda mencoba mengakses data Anda, pastikan peran IAM Anda memiliki kebijakan berikut:
Secara default, peran IAM yang Anda gunakan untuk mengakses Data Wrangler adalah. SageMakerExecutionRole Untuk informasi selengkapnya tentang menambahkan kebijakan, lihat Menambahkan izin identitas IAM (konsol).
Untuk terhubung ke sumber data, lakukan hal berikut.
-
Masuk ke Amazon SageMaker AI Console
. -
Pilih Studio.
-
Pilih Luncurkan aplikasi.
-
Dari daftar dropdown, pilih Studio.
-
Pilih ikon Beranda.
-
Pilih Data.
-
Pilih Data Wrangler.
-
Pilih Impor data.
-
Di bawah Tersedia, pilih sumber data.
-
Untuk bidang Nama, tentukan nama koneksi.
-
(Opsional) Pilih Konfigurasi lanjutan.
-
Pilih Workgroup.
-
Jika grup kerja Anda belum menerapkan lokasi keluaran Amazon S3 atau jika Anda tidak menggunakan grup kerja, tentukan nilai untuk lokasi hasil kueri Amazon S3.
-
(Opsional) Untuk periode penyimpanan data, pilih kotak centang untuk mengatur periode penyimpanan data dan tentukan jumlah hari untuk menyimpan data sebelum dihapus.
-
(Opsional) Secara default, Data Wrangler menyimpan koneksi. Anda dapat memilih untuk membatalkan pilihan kotak centang dan tidak menyimpan koneksi.
-
-
Pilih Hubungkan.
-
Tentukan kueri.
catatan
Untuk membantu Anda menentukan kueri, Anda dapat memilih tabel di panel navigasi sebelah kiri. Data Wrangler menunjukkan nama tabel dan pratinjau tabel. Pilih ikon di sebelah nama tabel untuk menyalin nama. Anda dapat menggunakan nama tabel dalam kueri.
-
Pilih Jalankan.
-
Pilih Kueri impor.
-
Untuk nama Dataset, tentukan nama dataset.
-
Pilih Tambahkan.
Saat Anda menavigasi ke layar Impor data, Anda dapat melihat koneksi yang telah Anda buat. Anda dapat menggunakan koneksi untuk mengimpor lebih banyak data.
Penyimpanan Data yang Diimpor
penting
Kami sangat menyarankan agar Anda mengikuti praktik terbaik seputar melindungi bucket Amazon S3 Anda dengan mengikuti praktik terbaik Keamanan.
Saat Anda menanyakan data dari Amazon Athena atau Amazon Redshift, kumpulan data yang ditanyakan akan disimpan secara otomatis di Amazon S3. Data disimpan di bucket SageMaker AI S3 default untuk AWS Wilayah tempat Anda menggunakan Studio Classic.
Bucket S3 default memiliki konvensi penamaan berikut:. sagemaker- Misalnya, jika nomor akun Anda 111122223333 dan Anda menggunakan Studio Classic in, kumpulan data yang diimpor akan disimpan di region-account
numberus-east-1 111122223333. sagemaker-us-east-1-
Alur Data Wrangler bergantung pada lokasi kumpulan data Amazon S3 ini, jadi Anda tidak boleh memodifikasi kumpulan data ini di Amazon S3 saat Anda menggunakan aliran dependen. Jika Anda memodifikasi lokasi S3 ini, dan Anda ingin terus menggunakan aliran data Anda, Anda harus menghapus semua objek trained_parameters dalam file.flow Anda. Untuk melakukan ini, unduh file.flow dari Studio Classic dan untuk setiap instancetrained_parameters, hapus semua entri. Ketika Anda selesai, trained_parameters harus menjadi objek JSON kosong:
"trained_parameters": {}
Saat Anda mengekspor dan menggunakan aliran data untuk memproses data, file.flow yang Anda ekspor merujuk ke kumpulan data ini di Amazon S3. Gunakan bagian berikut untuk mempelajari lebih lanjut.
Penyimpanan Impor Amazon Redshift
Data Wrangler menyimpan kumpulan data yang dihasilkan dari kueri Anda dalam file Parket di bucket AI S3 default Anda. SageMaker
File ini disimpan di bawah awalan berikut (direktori): redshift/ uuid /data/, di mana uuid adalah pengidentifikasi unik yang dibuat untuk setiap kueri.
Misalnya, jika bucket default Andasagemaker-us-east-1-111122223333, satu kumpulan data yang ditanyakan dari Amazon Redshift terletak di s3://sagemaker-us-east-1 -//data/. 111122223333/redshift uuid
Penyimpanan Impor Amazon Athena
Saat Anda menanyakan database Athena dan mengimpor kumpulan data, Data Wrangler menyimpan kumpulan data, serta subset dari kumpulan data tersebut, atau file pratinjau, di Amazon S3.
Dataset yang Anda impor dengan memilih Impor dataset disimpan dalam format Parket di Amazon S3.
File pratinjau ditulis dalam format CSV saat Anda memilih Jalankan di layar impor Athena, dan berisi hingga 100 baris dari kumpulan data yang Anda kueri.
Dataset yang Anda kueri terletak di bawah awalan (direktori): athena/ uuid /data/, di mana uuid adalah pengidentifikasi unik yang dibuat untuk setiap kueri.
Misalnya, jika bucket default Anda adalahsagemaker-us-east-1-111122223333, satu set data yang ditanyakan dari Athena terletak di /athena/ /data/. s3://sagemaker-us-east-1-111122223333 uuid example_dataset.parquet
Subset dari kumpulan data yang disimpan untuk melihat pratinjau kerangka data di Data Wrangler disimpan di bawah awalan: athena/.
