Data Exports
Introduction
The
AWS
Data Exports service allows you to create exports of various types of
billing and cost management data. This page introduces a simple
CloudFormation Template
-
Create AWS Data Exports with cross-account delivery: Set up exports for billing and cost management data with direct delivery to an Amazon S3 bucket in a centralized Data Collection account.
-
Athena Table Creation: Create Amazon Athena tables for querying the exported data directly, enabling data analysis and visualization.
Common Use Cases
This solution covers the following use cases:
-
Move Data Exports data from a Management (Payer) Account to a dedicated Data Collection Account.
-
Aggregate Data Exports data across multiple AWS Organizations into a single account.
-
Aggregate Data Exports data across multiple linked accounts into a single AWS account for the cases when there is no access to Management (Payer) Account.
-
Single account deployment of Data Exports for test purposes.
Supported AWS Data Export types
-
Cost And Usage Report (CUR) 2.0
-
FOCUS 1.2
-
Cost Optimization Recommendations from AWS Cost Optimization Hub
-
Carbon emissions
Architecture
The CloudFormation stack must be installed in the Destination (Data Collection) account and also in one or many Source account(s).
-
Destination (Data Collection) Accountis used to consolidate, analyze, and visualize the data. Typically the FinOps or CCoE team owns this account. -
Source Accountis the account where the stack will create AWS Data Exports. Typically it is one or many Management (Payer) Accounts, but can also be one or many Linked Accounts.
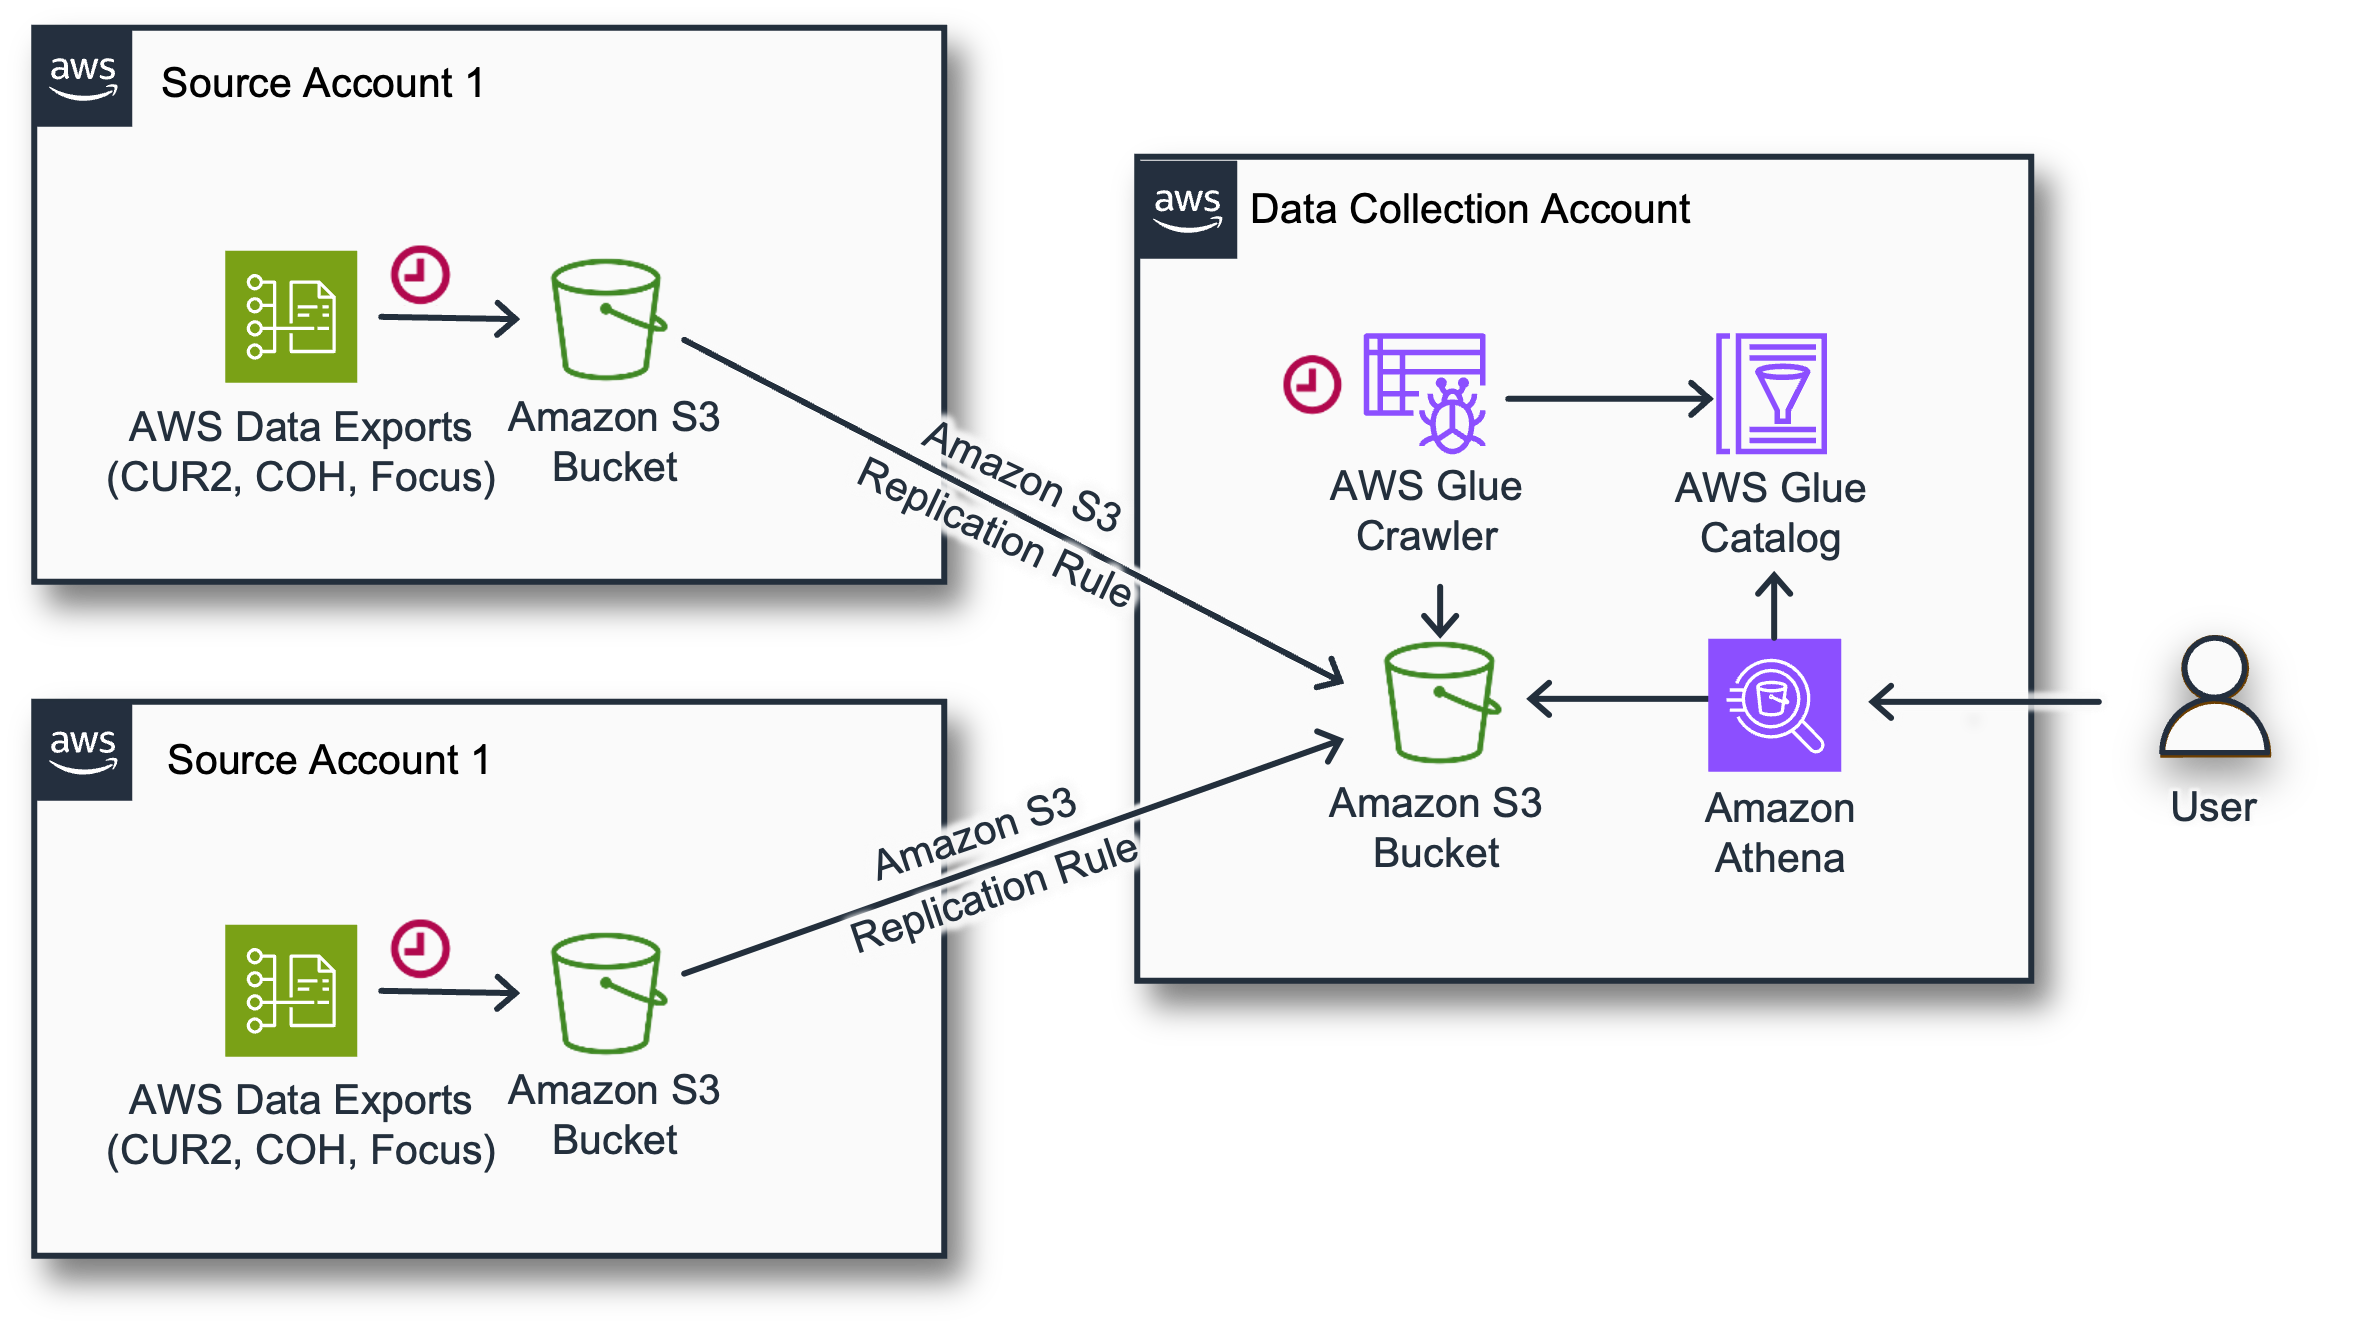
The CloudFormation template installed in each account does the following:
In the Destination (Data Collection) Account:
-
Creates an Amazon S3 bucket with an S3 bucket policy allowing write access for the AWS Data Exports service from Source account.
-
Creates AWS Glue Database, Amazon Athena Tables, and AWS Glue Crawlers.
In the Source (Management or Linked) Account:
-
Creates data exports for one or more supported export types with remote delivery directly to the S3 bucket in the Destination (Data Collection) Account.
Each individual Data Export has a prefix <export-name>/<account-id> so the aggregated structure has the following structure:
s3://<prefix>-<destination-account-id>-data-exports/
    <export-name>/<src-account1>/<prefix>-<export-name>/data/<month-partition>/*.parquet
    <export-name>/<src-account2>/<prefix>-<export-name>/data/<month-partition>/*.parquet
    <export-name>/<src-account2>/<prefix>-<export name>/data/<month-partition>/*.parquet
Costs
-
Estimated costs of the data storage in an Amazon S3 bucket should be <$10 a month for a medium-sized organization, depending on the volume of the data it can vary.
Before you start
-
Define the Region Deployment can be done in any region. Please carefully choose the region as it should be the same region where you are planning to deploy Amazon Quick Sight Dashboards to avoid cross region Amazon S3 costs. AWS Data Exports are available only in us-east-1, so when deployed in other regions, CloudFormation creates Data Exports using Custom Resources.
-
Define the Destination Account Make sure to note your Destination Account Id. It should be the same account where you plan to deploy Amazon Quick Sight dashboards.
-
Make sure you have access: You need access to the Source and Destination accounts allowing you to create AWS CloudFormation stacks and work with AWS Glue and Amazon Athena. When creating a Carbon emissions export, your permissions must include the IAM policies required for the Customer Carbon Footprint Tool.
Prerequisites
If you plan to activate Data Export for Cost Optimization Hub, you need to activate the service
Deployment
The deployment process consists of 2 required steps and 1 optional step. First, create the destination infrastructure in the Data Collection account. Then, create the data exports in one or multiple Source Accounts. Step 3 is only required if you already have Cloud Intelligence Dashboards deployed and want to migrate them to use the new Data Exports as a data source.

Step 1 of 3. (In Destination/Data Collection Account) Create Destination for Data Exports
-
Login to your Data Collection Account. Make sure you use the target region.
-
Click the Launch Stack button below to open the stack template in your AWS CloudFormation console.

-
Enter a Stack name for your template such as CID-DataExports-Destination.
-
Enter your Destination Account ID parameter (Your Data Collection Account, where you will deploy dashboards).
-
Choose the exports to manage. For selected types, the Destination account stack will create the S3 bucket, Athena Tables, and allow delivery from Source Accounts.
-
Enter your Source Account IDs parameter as a comma separated list of all accounts that must deliver AWS Data Exports. In a rare case if you need the Data Collection account to produce AWS Data Export (for testing or single account deployment), you need to specify this Account Id first in the list, and skip "Step 2 of 3".
-
Review the configuration, click I acknowledge that AWS CloudFormation might create IAM resources, and click Create stack.
-
You will see the stack will start with CREATE_IN_PROGRESS. This step can take ~5 mins. Once complete, the stack will show CREATE_COMPLETE.
Step 2 of 3. (In Management/Payer/Source Account) Create AWS Data Exports
-
Click the Launch Stack button below to open the stack template in your AWS CloudFormation console.
-
Enter a Stack name for your template such as CID-DataExports-Source.
-
Enter your Destination Account ID parameter (Your Data Collection Account, where you will deploy dashboards).
-
Choose the exports to manage. For selected types, the Source account stack will create data exports with direct delivery to the Destination Account S3 bucket. Please keep the choice consistent with the same configuration in the Data Collection Account.
-
Review the configuration, click I acknowledge that AWS CloudFormation might create IAM resources, and click Create stack.
-
You will see the stack will start with CREATE_IN_PROGRESS. This step can take ~5 mins. Once complete, the stack will show CREATE_COMPLETE.
-
Repeat for other Source Accounts.
It will typically take about 24 hours for the first delivery of AWS Data Exports to the Destination Account, but it might take up to 72 hours (3 days). You can continue with the dashboards deployment however data will appear on the dashboards the next day after the first data delivery.
Backfill Data Export
You can now
create
a Support Case
Support ticket example:
Service: Billing
Category: Other Billing Questions
Subject: Backfill Data

Hello Dear Billing Team,
Please can you backfill the data in DataExport named `cid-cur2` for last 12 months.
Thanks in advance,
You can also use following command in CloudShell to create this case via command line:
aws support create-case \
    --subject "Backfill Data" \
    --service-code "billing" \
    --severity-code "normal" \
    --category-code "other-billing-questions" \
    --communication-body "
        Hello Dear Billing Team,
        Please can you backfill the data in DataExport named 'cid-cur2' for last 12 months.
        Thanks in advance"
Make sure you create the case from your Source Accounts (Typically Management/Payer Accounts).
Step 3 of 3. (Optional) (In Destination/Data Collection Account) Allow Quick Sight access to Database and Bucket
Note
This step is only required if you already have Cloud Intelligence Dashboards deployed and want to migrate them to use the new Data Exports as a data source. If you are deploying dashboards for the first time, you can skip this step — the necessary permissions will be configured automatically during the dashboard deployment.
In order to allow Amazon Quick Sight access to the Data Exports bucket and Glue database, you need to extend the role that Quick Sight uses.
Option A: If you use CID Foundational dashboards (CUDOS, KPI, Cost Intelligence) installed via CloudFormation or with Terraform
-
Open CloudFormation console
-
Locate CFN stack (default name =
Cloud-Intelligence-Dashboards). Please note it is not the stack of DataExports. It is the one that is used to install Dashboards. -
Update the stack with the latest version from this template
. The version must be >=v3.8.
If this does not work and you see errors in permissions you can do following:
Typically when deploying with CloudFormation the stack create a role CidQuick SightDataSourceRole. This role must be extended with additional permissions.
-
Open CloudShell in Data Collection Account and launch following script (can be just pasted to CloudShell):
export qs_role=$(aws cloudformation describe-stacks --stack-name Cloud-Intelligence-Dashboards --query "Stacks[].Parameters[?ParameterKey=='Quick SightDataSourceRoleName'].ParameterValue" --output text)
export policy_arn=$(aws cloudformation list-exports --query "Exports[?Name=='cid-DataExports-ReadAccessPolicyARN'].Value" --output text)

if [ "$qs_role" -eq "CidQuick SightDataSourceRole" ]; then

    if [ -z "${policy_arn// }" ]; then # Check if policy_arn is empty
        echo "Error: Policy ARN not found in CloudFormation exports."
    else
        aws iam attach-role-policy --role-name "$qs_role" --policy-arn "$policy_arn"
    fi
else
    echo "This script only supports modification of CID default Quick Sight Role == CidQuick SightDataSourceRole but in the stack role is $qs_role. Please attach a policy $policy_arn or grant similar permissions in UI."
fi
Option B: If you installed CID without CloudFormation or Terraform but with cid-cmd command line tool
Typically when deploying with Command Line cid-cmd manage a role CidCmdQuick SightDataSourceRole. This role must be extended with additional permissions.
Option1: use command line to attach access policy to the Quick Sight role
-
Open CloudShell in Data Collection Account and launch following script (can be just pasted to CloudShell)
# Check if policy_arn is empty or only whitespace
export policy_arn=$(aws cloudformation list-exports --query "Exports[?Name=='cid-DataExports-ReadAccessPolicyARN'].Value" --output text)

# Check if policy_arn is empty or only whitespace
if [ -z "${policy_arn// }" ]; then
    echo "Error: Policy ARN not found in CloudFormation exports."
else
    aws iam attach-role-policy --role-name CidCmdQuick SightDataSourceRole --policy-arn "$policy_arn"
fi
Option2: Attach Policy to Role manually
-
Locate the role
CidCmdQuick SightDataSourceRolein your IAM console. -
Locate Arn of the Managed Policy in output of CFN Stack you can check export named
cid-DataExports-ReadAccessPolicyARN -
Attach the managed policy to the role
Option3:
-
Locate the role
CidCmdQuick SightDataSourceRolein your IAM console. -
Add a following policy allowing read a bucket and database:
[
	{
		"Sid": "AllowGlue",
		"Effect": "Allow",
		"Action": [
			"glue:GetPartition",
			"glue:GetPartitions",
			"glue:GetDatabase",
			"glue:GetDatabases",
			"glue:GetTable",
			"glue:GetTables"
		],
		"Resource": [
			"arn:aws:glue:${AWS::Region}:${AWS::AccountId}:table/cid_data_export/*",
			"arn:aws:glue:${AWS::Region}:${AWS::AccountId}:database/cid_data_export"
		]
	},
	{
		"Sid": "AllowListBucket",
		"Effect": "Allow",
		"Action": "s3:ListBucket",
		"Resource": [
			"arn:aws:s3:::cid-${AWS::AccountId}-data-exports"
		]
	},
	{
		"Sid": "AllowListBucket",
		"Effect": "Allow",
		"Action": "s3:GetObject",
		"Resource": [
			"arn:aws:s3:::cid-${AWS::AccountId}-data-exports/*"
		]
	}
]
Option C: If you use a default Quick Sight role.
Follow this guide to add a bucket arn:aws:s3:::cid-${AWS::AccountId}-data-exports to grant access for Quick Sight to Data Exports.
Updating Stack
Update stack or add new exports
To update the stack or enable additional export types, follow these steps:
-
Download the latest version
of the CloudFormation template. -
Update the stack in the Destination (Data Collection) Account first. If you want to add new export types, set the corresponding parameters to
yes. -
Then update the stack in each Source Account with the same template and matching parameter configuration.
Important
Always update the Destination Account stack before updating Source Account stacks.
Adding Source Accounts
To add a new Source Account:
-
Login to your Data Collection Account and update the existing Destination stack to include the new Source Account ID in the Source Account IDs parameter.
-
Then create a new stack in the Source Account following Step 2 of 3.
Usage
-
You can query tables in
cid_data_exportsdatabase in Amazon Athena. -
Now you can proceed with installation of Dashboard of your choice. Please note that only the FOCUS dashboard is supported for now.
Teardown
If you need to delete the stack, you can do that by deleting all stacks in all Source accounts and the Destination account. Before deleting the Destination stack you might need to empty the Amazon S3 bucket.
Authors
-
Yuriy Prykhodko, Principal Technical Account Manager, AWS
-
Petro Kashlikov, Senior Solutions Architect, AWS
-
Zach Erdman, Senior Product Manager, AWS
-
Iakov Gan, Ex-Amazonian
Feedback & Support
Follow the Feedback & Support guide
