Les traductions sont fournies par des outils de traduction automatique. En cas de conflit entre le contenu d'une traduction et celui de la version originale en anglais, la version anglaise prévaudra.
Commencer à utiliser la fédération des identités sortantes
Ce guide explique comment activer la fédération d'identité sortante pour votre AWS compte et obtenir votre premier jeton Web JSON (JWT) (à l'aide de l'GetWebIdentityTokenAPI). Vous allez activer la fonctionnalité, établir une relation de confiance avec un service externe, configurer les autorisations IAM et demander un jeton à l'aide de la AWS CLI ou du AWS SDK for Python (Boto3).
Conditions préalables
Avant de commencer, assurez-vous de disposer des éléments suivants :
-
Dernière version de la AWS CLI ou de Python 3.8 (ou version ultérieure) et Boto3 installés (pour des exemples de AWS SDK)
-
Un compte de service externe dans lequel vous pouvez configurer des relations de confiance (tel qu'un fournisseur de cloud externe, un fournisseur SaaS ou une application de test)
Note
L'
GetWebIdentityTokenAPI n'est pas disponible sur le point de terminaison STS Global.Les jetons Web JSON (JWT) générés par l'
GetWebIdentityTokenAPI ne peuvent pas être utilisés pour la fédération OpenID Connect (OIDC) dans AWS (via l'API). AssumeRoleWithWebIdentity
Activez la fédération d'identité sortante pour votre compte
Vous devez activer la fédération d'identité sortante avant de pouvoir demander des jetons. Vous pouvez activer la fonctionnalité à l'aide de la console AWS de gestion ou par programmation à l'aide de l'EnableOutboundWebIdentityFederationAPI.
Utilisation de AWS INTERFACE DE LIGNE DE COMMANDE (CLI)
aws iam enable-outbound-web-identity-federation
Utilisation AWS SDK pour Python
import boto3

# Create IAM client
iam_client = boto3.client('iam')

# Enable outbound identity federation
response = iam_client.enable_outbound_web_identity_federation()
print(f"Feature enabled. Issuer URL: {response['IssuerUrl']}")
print(f"Status: {response['Status']}")
Utilisation de AWS Console
Accédez à IAM et sélectionnez Paramètres du compte dans la section Gestion des accès du menu de navigation de gauche.
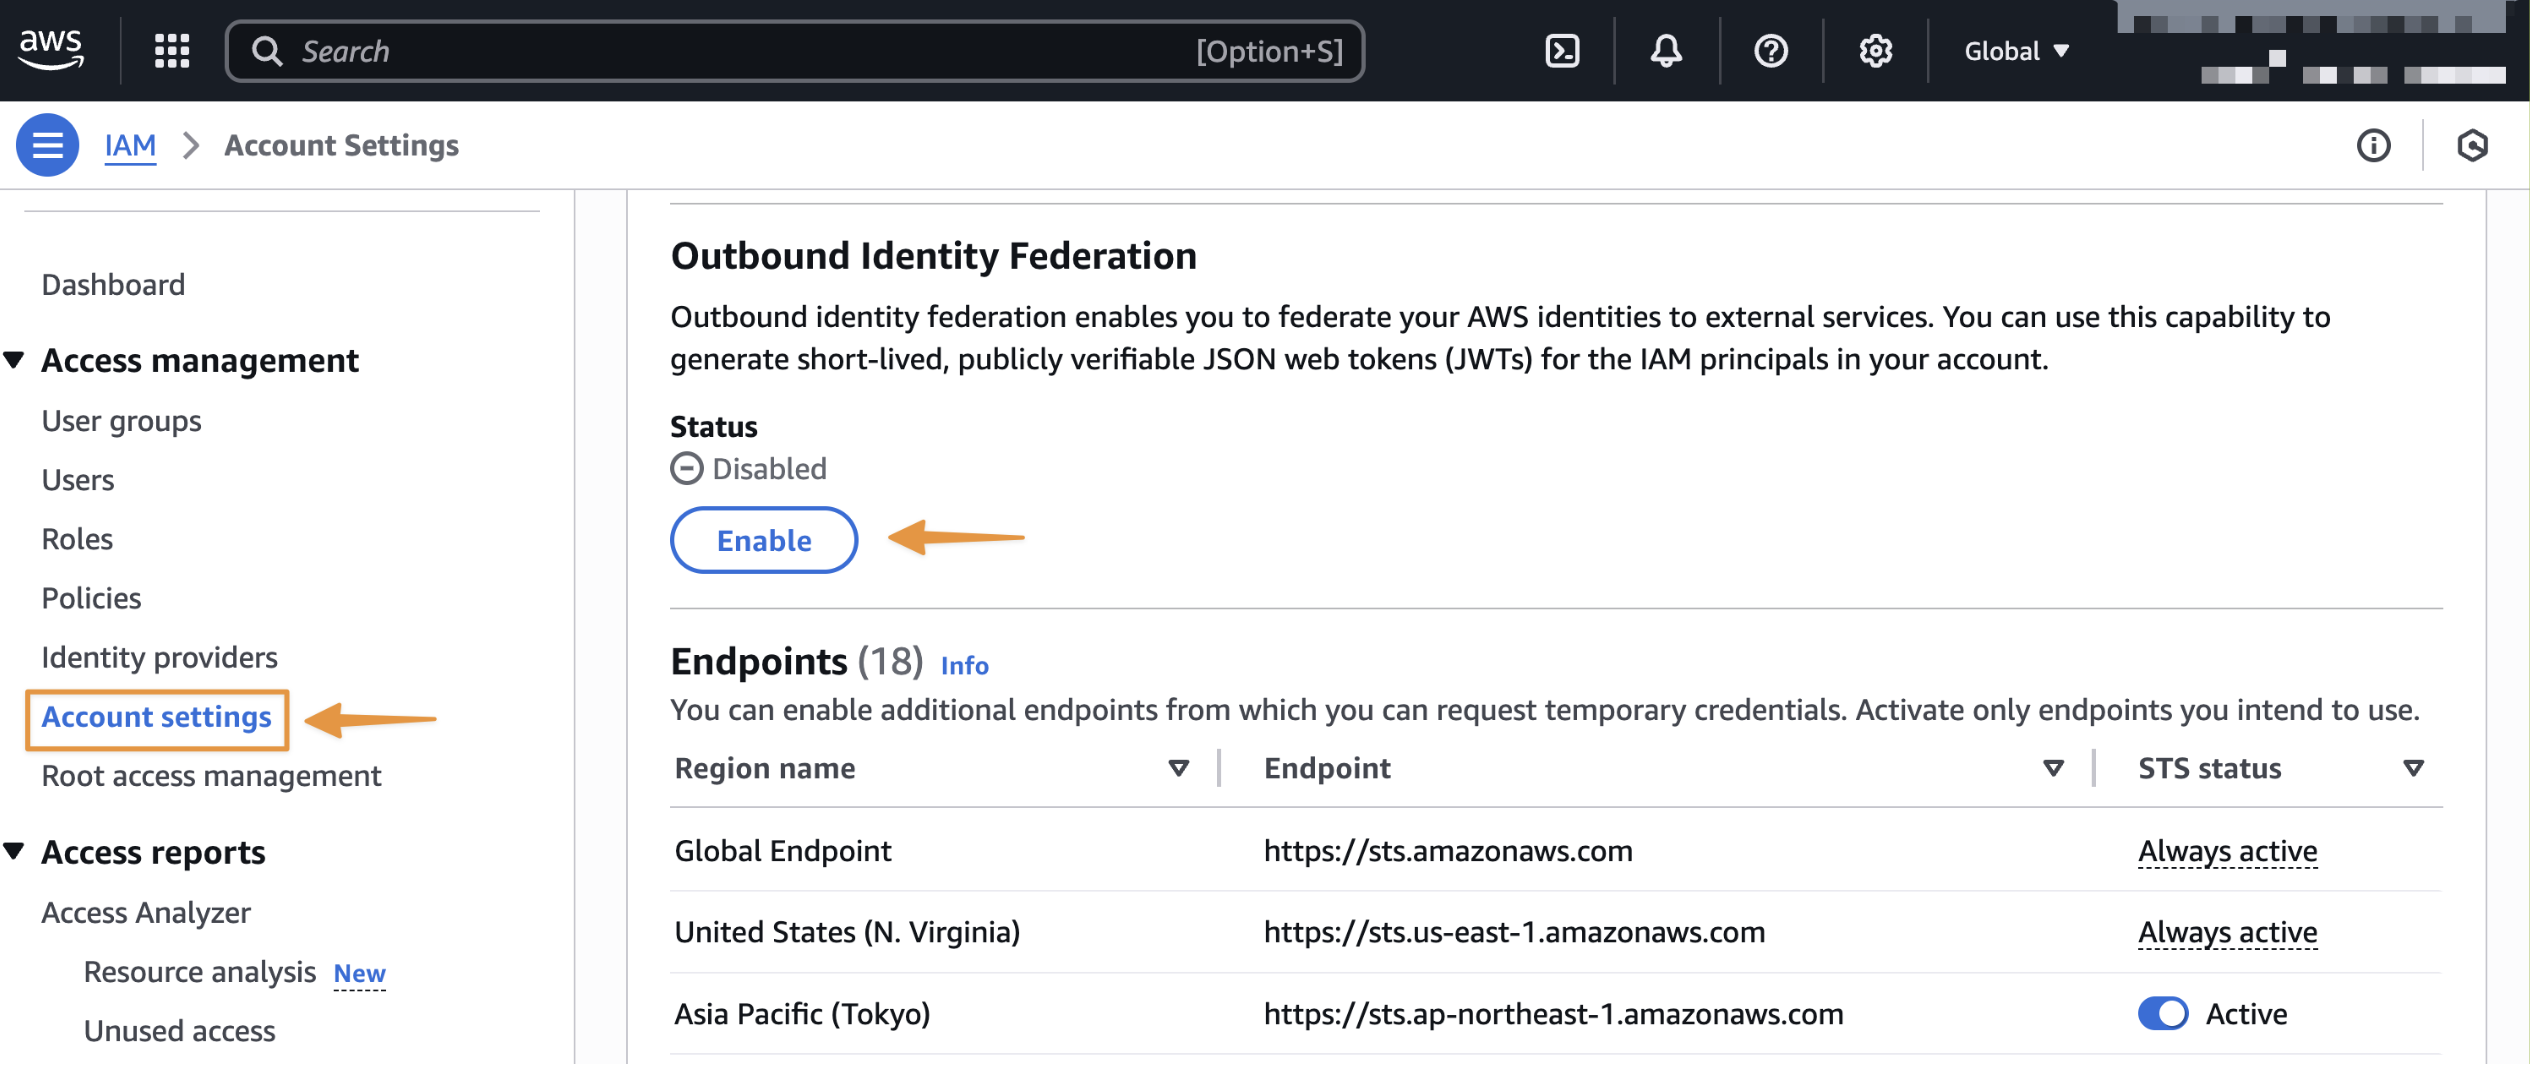
Une fois cette fonctionnalité activée, notez l'URL de l'émetteur spécifique à votre compte. Vous utiliserez cette URL lors de la configuration des relations de confiance dans les services externes. Vous pouvez également récupérer l'URL de cet émetteur selon vos besoins à l'aide de l'GetOutboundWebIdentityFederationInfoAPI.

Établir une relation de confiance dans le service externe
Configurez le service externe pour qu'il approuve et accepte les jetons émis par votre AWS compte. Les étapes spécifiques varient selon le service, mais impliquent généralement :
-
Enregistrement de l'URL de l'émetteur de votre AWS compte en tant que fournisseur d'identité de confiance
-
Configuration des affirmations à valider (public, modèles de sujets)
-
Mappage des demandes de jetons avec des autorisations dans le service externe
Reportez-vous à la documentation du service externe pour obtenir des instructions de configuration détaillées.
Configuration des autorisations IAM
Créez une politique IAM qui autorise l'appel de l'GetWebIdentityTokenAPI et associez la politique à un rôle IAM qui doit générer des jetons.
Cet exemple de politique accorde l'accès à la génération de jetons avec des restrictions spécifiques. Il permet de demander des jetons uniquement pour « https://api.example.com » en tant que public et impose une durée de vie maximale des jetons de 5 minutes (300 secondes). Consultez la IAM et AWS STS clés contextuelles de condition liste des clés de condition que vous pouvez utiliser pour appliquer les propriétés des jetons.
Exemple de politique IAM
{
    "Version": "2012-10-17",
    "Statement": [
        {
            "Effect": "Allow",
            "Action": "sts:GetWebIdentityToken",
            "Resource": "*",
            "Condition": {
                "ForAllValues:StringEquals": {
                    "sts:IdentityTokenAudience": "https://api.example.com"
                },
                "NumericLessThanEquals": {
                    "sts:DurationSeconds": 300
                }
            }
        }
    ]
}
Demandez votre premier jeton Web JSON (JWT)
Vous pouvez demander un jeton Web JSON à l'aide de l'GetWebIdentityTokenAPI. Vous pouvez spécifier les paramètres suivants lorsque vous appelez l'API :
-
Public (obligatoire) : le destinataire prévu du jeton. Cette valeur renseigne la réclamation « aud » dans le JWT. Les services externes valident cette affirmation pour s'assurer que le jeton leur était destiné.
-
SigningAlgorithm (obligatoire) : algorithme cryptographique utilisé pour signer le jeton. Les valeurs valides sont ES384 et RS256. Utilisez l'ES384 pour une sécurité et des performances optimales, ou le RS256 pour une compatibilité accrue avec les systèmes qui ne prennent pas en charge l'ECDSA.
-
DurationSeconds (facultatif) : durée de vie du jeton en secondes. Les valeurs valides sont comprises entre 60 et 3 600. La valeur par défaut est 300 (5 minutes). Nous recommandons de raccourcir la durée de vie des jetons pour une sécurité accrue.
-
Tags (facultatif) : liste de paires clé-valeur à inclure en tant que revendications personnalisées dans le jeton. Les services externes peuvent utiliser ces demandes pour obtenir une autorisation précise.
L'API renvoie les champs suivants :
-
IdentityToken: Le JWT signé sous forme de chaîne codée en base64url. Incluez ce jeton dans les demandes adressées aux services externes.
-
Expiration : horodatage UTC indiquant la date d'expiration du jeton.
Utilisation de AWS INTERFACE DE LIGNE DE COMMANDE (CLI)
aws sts get-web-identity-token \
    --audience "https://api.example.com" \
    --signing-algorithm ES384 \
    --duration-seconds 300 \
    --tags Key=team,Value=data-engineering \
           Key=environment,Value=production \
           Key=cost-center,Value=analytics
Utilisation AWS SDK pour Python
import boto3

sts_client = boto3.client('sts')

response = sts_client.get_web_identity_token(
    Audience=['https://api.example.com'],
    DurationSeconds=300,
    SigningAlgorithm='RS256',
    Tags=[
        {'Key': 'team', 'Value': 'data-engineering'},
        {'Key': 'environment', 'Value': 'production'},
        {'Key': 'cost-center', 'Value': 'analytics'}
    ]
)

token = response['WebIdentityToken']
Vous pouvez également décoder le JWT pour inspecter son contenu à l'aide de bibliothèques JWT standard telles que PyJWT, Python-jose pour Python, Nimbus JOSE+JWT pour Java ou de débogueurs comme jwt.io. Comprendre les réclamations symboliquesPour plus d'informations sur les réclamations incluses dans le jeton, reportez-vous à.
Utiliser le jeton avec un service externe
Après avoir reçu le jeton, incluez-le dans les demandes adressées au service externe. La méthode varie selon le service, mais la plupart des services acceptent les jetons dans l'en-tête Authorization. Le service externe doit implémenter une logique de validation des jetons qui récupère les clés JWKS depuis le point de terminaison bien connu de votre émetteur, vérifie la signature du jeton et valide les demandes essentielles avant d'accorder l'accès à vos charges de travail. AWS
Récupérez les clés de vérification et les métadonnées depuis les points de terminaison OpenID Connect (OIDC)
L'URL unique de l'émetteur de votre AWS compte héberge les points de terminaison de découverte OpenID Connect (OIDC) qui contiennent les clés de vérification et les métadonnées nécessaires à la vérification des jetons.
L'URL du point de terminaison de découverte OIDC contient les métadonnées que certains fournisseurs utilisent pour vérifier les jetons. Il est disponible à l'adresse suivante :
{issuer_url}/.well-known/openid-configuration
Le point de terminaison JWKS (JSON Web Key Set) contient les clés utilisées pour vérifier les signatures de jetons. Il est disponible à l'adresse suivante :
{issuer_url}/.well-known/jwks.json
Récupérez JWKS en utilisant curl
curl https://{issuer_url}/.well-known/jwks.json
Réponse :
{
  "keys": [
    {
      "kty": "EC",
      "use": "sig",
      "kid": "key-id-1",
      "alg": "ES384",
      "crv": "P-384",
      "x": "base64-encoded-x-coordinate",
      "y": "base64-encoded-y-coordinate"
    },
    {
      "kty": "RSA",
      "use": "sig",
      "kid": "key-id-2",
      "n": "base64-encoded-modulus",
      "e": "AQAB"
    }
  ]
}
Utilisation AWS SDK pour Python
import requests

# Fetch Openid Configuration
open_id_config_response = requests.get("https://{issuer_url}/.well-known/openid-configuration")
open_id_config = open_id_config_response.json()

# Fetch JWKS
jwks_response = requests.get("https://{issuer_url}/.well-known/jwks.json")
jwks = jwks_response.json()
Nous vous recommandons de mettre ces clés en cache afin d'éviter de les récupérer à chaque vérification de jeton.
Validations de réclamations essentielles
-
Sujet (sous) : Vérifiez que l'objet de la réclamation contient le modèle d'ARN principal IAM attendu.
-
Expiration (exp) : assurez-vous que le jeton n'a pas expiré. Les bibliothèques JWT gèrent généralement cela automatiquement.
-
Audience (aud) : Vérifiez que l'audience correspond à la valeur attendue. Cela empêche l'utilisation de jetons destinés à d'autres services avec les vôtres.
-
Émetteur (iss) : Vérifiez que l'émetteur correspond au (x) AWS compte (s) auquel vous faites confiance. Tenez à jour une liste des URL d'émetteurs fiables.
Dans la mesure du possible, vous devez valider des demandes AWS spécifiques supplémentaires afin de mettre en œuvre un contrôle d'accès précis dans votre service externe. Par exemple, validez la revendication org_id pour restreindre l'accès aux principaux IAM de votre AWS organisation, cochez principal_tags pour appliquer le contrôle d'accès basé sur les attributs (par exemple en autorisant uniquement les environnements de production ou des équipes spécifiques), ou vérifiez les affirmations relatives au contexte de session telles que lambda_source_function_arn ou ec2_instance_source_vpc pour restreindre l'accès en fonction de la ressource de calcul. Reportez-vous à la section Comprendre les réclamations liées aux jetons pour obtenir la liste complète des réclamations incluses dans le jeton.
