Creating a rule-based matching workflow with the Advanced rule type
Prerequisites
Before you create a rule-based matching workflow, you must:
-
Create a schema mapping. For more information, see Creating a schema mapping.
-
If using Connect Customer Customer Profiles as your output destination, ensure you have the appropriate permissions configured.
The following procedure demonstrates how to create a rule-based matching workflow with
the Advanced rule type using either the AWS Entity Resolution console or the
CreateMatchingWorkflow API.
- Console
-
To create a rule-based matching workflow with the Advanced rule type using the console
-
Sign in to the AWS Management Console and open the AWS Entity Resolution console at https://console.aws.amazon.com/entityresolution/
. -
In the left navigation pane, under Workflows, choose Matching.
-
On the Matching workflows page, in the upper right corner, choose Create matching workflow.
-
For Step 1: Specify matching workflow details, do the following:
-
Enter a Matching workflow name and an optional Description.
-
For Data input, choose an AWS Region, AWS Glue database, the AWS Glue table, and then the corresponding Schema mapping.
You can add up to 19 data inputs.
Note
To use Advanced rules, your schema mappings must meet the following requirements:
-
Each input field must be mapped to a unique match key, unless the fields are grouped together.
-
If input fields are grouped together, they can share the same match key.
For example, the following schema mapping would be valid for Advanced rules:
firstName: { matchKey: 'name', groupName: 'name'
                            }
lastName: { matchKey: 'name', groupName: 'name' }In this case, the
firstNameandlastNamefields are grouped together and share the same name match key, which is allowed.Review your schema mappings and update them to follow this one-to-one matching rule, unless the fields are properly grouped, in order to use Advanced rules.
-
If your data table has a DELETE column, the schema mapping's type must be
Stringand you can't have amatchKeyandgroupName.
-
-
The Normalize data option is selected by default, so that data inputs are normalized before matching. If you don't want to normalize data, deselect the Normalize data option.
Note
Normalization is only supported for the following scenarios in Create schema mapping:
-
If the following Name sub-types are grouped: First name, Middle name, Last name.
-
If the following Address sub-types are grouped: Street address 1, Street address 2, Street address 3, City, State, Country, Postal code.
-
If the following Phone sub-types are grouped: Phone number, Phone country code.
-
-
To specify the Service access permissions, choose an option and take the recommended action.
Option Recommended action Create and use a new service role -
AWS Entity Resolution creates a service role with the required policy for this table.
-
The default Service role name is
entityresolution-matching-workflow-<timestamp>. -
You must have permissions to create roles and attach policies.
-
If your input data is encrypted, you can choose the This data is encrypted with a KMS key option and then enter an AWS KMS key that will be used to decrypt your data input.
Use an existing service role -
Choose an Existing service role name from the dropdown list.
The list of roles are displayed if you have permissions to list roles.
If you don't have permissions to list roles, you can enter the Amazon Resource Name (ARN) of the role that you want to use.
If there are no existing service roles, the option to Use an existing service role is unavailable.
-
View the service role by choosing the View in IAM external link.
By default, AWS Entity Resolution doesn't attempt to update the existing role policy to add necessary permissions.
-
-
(Optional) To enable Tags for the resource, choose Add new tag, and then enter the Key and Value pair.
-
Choose Next.
-
-
For Step 2: Choose matching technique:
-
For Matching method, choose Rule-based matching.
-
For Rule type, choose Advanced.

-
For Processing cadence, select one of the following options.
-
Choose Manual to run a workflow on demand for a bulk update
-
Choose Automatic to run a workflow as soon as new data is in your S3 bucket
Note
If you choose Automatic, ensure that you have Amazon EventBridge notifications turned on for your S3 bucket. For instructions on enabling Amazon EventBridge using the S3 console, see Enabling Amazon EventBridge in the Amazon S3 User Guide.
-
-
For Matching rules, enter a Rule name and then build the Rule condition by choosing the appropriate matching functions and operators from the dropdown list based on your goal.
You can create up to 25 rules.
Note
AWS Entity Resolution also supports transitive matching, which processes records across all rule levels to connect match groups transitively. Transitive matching is available as an API-only feature. When transitive matching is enabled, the EmptyValues=Ignore modifier is not supported. For more information, see Using transitive matching.
You must combine a fuzzy matching function (Cosine, Levenshtein, or Soundex) with an exact matching function (Exact, ExactManyToMany) using the AND operator.
You can use the following table to help decide what type of function or operator you want to use, depending on your goal.
Your goal Recommended function or operator Recommended optional modifier Pros Match identical strings on accurate data but don't match on empty values. Exact EmptyValues=Process Match identical strings on accurate data and ignore empty values. Exact( matchKey)EmptyValues=Ignore Match multiple records across match keys. Suitable for flexible pairings. Limit: 15 match keys ExactManyToMany( matchKey,matchKey, ...)n/a Measure similarity between numerical representations of data but don't match on empty values. Suitable for text, numbers, or a mix of both. Cosine EmptyValues=Process Simple, efficient.
Works well with long text when combined with TF-IDF weighting.
Good for exact word-based matching.
Measure similarity between numerical representations of data and ignore empty values. Cosine( matchKey,threshold, ...)EmptyValues=Ignore Handles typos, spelling errors, and transpositions well.
Effective on a wide range of PII types.
Good for short strings (for example, names or phone numbers).
Count the minimum number of changes needed to change one word into another but don't match on empty values. Suitable for text with slight differences in spelling. Levenshtein EmptyValues=Process Count the minimum number of changes needed to change one word into another and ignore empty values. Levenshtein( matchKey,threshold, ...)EmptyValues=Ignore Compare and match text strings based on how similar they sound but don't match on empty values. Suitable for text with variations in spelling or pronunciation. Soundex EmptyValues=Process Effective for phonetic matching, identifying similar-sounding words.
Fast and computationally inexpensive.
Good for matching names with similar pronunciations but different spellings.
Compare and match text strings based on how similar they sound and ignore empty values. Soundex( matchKey)EmptyValues=Ignore Combine functions. AND n/a Separate functions. OR n/a Group conditions to create nested conditions. (…) n/a Example Rule condition that matches on phone numbers and email
The following is an example of a rule condition that matches records on phone numbers (Phone match key) and email addresses (Email address match key):
Exact(Phone,EmptyValues=Process) AND Levenshtein("Email
                          address",2)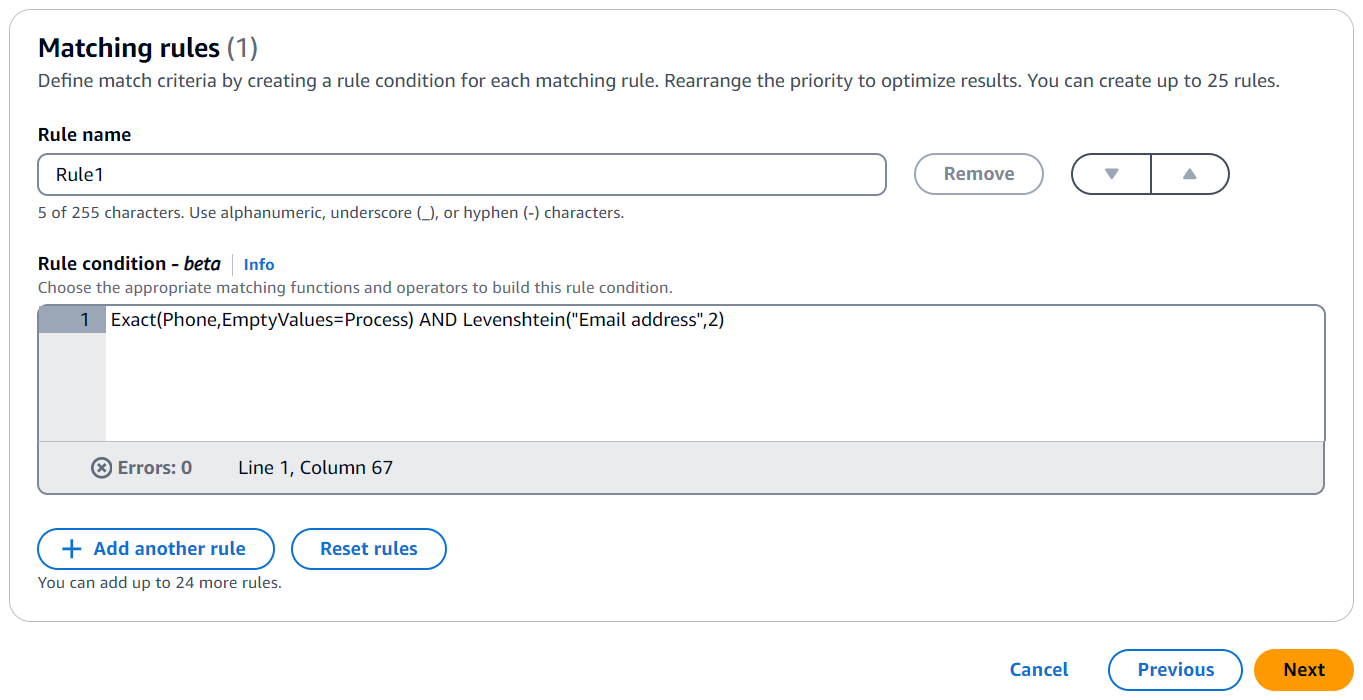
The Phone match key uses the Exact matching function to match identical strings. The Phone match key processes empty values in matching using the EmptyValues=Process modifier.
The Email address match key uses the Levenshtein matching function to match data with misspellings using the default Levenshtein Distance algorithm threshold of 2. The Email match key doesn't use any optional modifiers.
The AND operator combines the Exact matching function and the Levenshtein matching function.
Example Rule condition that uses ExactManyToMany to perform matchkey matching
The following is an example of a rule condition that matches records on three address fields (HomeAddress match key, BillingAddress match key, and ShippingAddress match key to find potential matches by checking if any if any of them have identical values.
The
ExactManyToManyoperator evaluates all possible combinations of the specified address fields to identify exact matches between any two or more addresses. For example, it would detect if theHomeAddressmatches either theBillingAddressorShippingAddress, or if all three addresses match exactly.ExactManyToMany(HomeAddress, BillingAddress, ShippingAddress)Example Rule condition that uses clustering
In Advanced Rule Based Matching with fuzzy conditions, the system first groups records into clusters based on exact matches. Once these initial clusters are formed, the system applies fuzzy matching filters to identify additional matches within each cluster. For optimal performance, you should select exact match conditions based on your data patterns to create well-defined initial clusters.
The following is an example of a rule condition that combines multiple exact matches with a fuzzy match requirement. It uses
ANDoperators to check that three fields —FullName, Date of Birth (DOB), andAddress— match exactly between records. It also allows for minor variations in theInternalIDfield using a Levenshtein distance of1. The Levenshtein distance measures the minimum number of single-character edits required to change one string into another. A distance of 1 means it will matchInternalIDsthat differ by only one character (like a single typo, deletion, or insertion). This combination of conditions helps identify records that are very likely to represent the same entity, even if there are small discrepancies in the identifier.Exact(FullName) AND Exact(DOB) AND Exact(Address) and Levenshtein(InternalID, 1) -
Choose Next.
-
-
For Step 3: Specify data output and format:
-
For Data output destination and format, choose the Amazon S3 location for the data output and whether the Data format will be Normalized data or Original data.
-
For Encryption, if you choose to Customize encryption settings, enter the AWS KMS key ARN.
-
View the System generated output.
-
For Data output, decide which fields you want to include, hide, or mask, and then take the recommended actions based on your goals.
Your goal Recommended action Include fields Keep the output state as Included. Hide fields (exclude from output) Choose the Output field, and then choose Hide. Mask fields Choose the Output field, and then choose Hash output. Reset the previous settings Choose Reset. -
Choose Next.
-
-
For Step 4: Review and create:
-
Review the selections that you made for the previous steps and edit if necessary.
-
Choose Create and run.
A message appears, indicating that the matching workflow has been created and that the job has started.
-
-
On the matching workflow details page, on the Metrics tab, view the following under Last job metrics:
-
The Job ID.
-
The Status of the matching workflow job: Queued, In progress, Completed, Failed
-
The Time completed for the workflow job.
-
The number of Records processed.
-
The number of Records not processed.
-
The Unique match IDs generated.
-
The number of Input records.
You can also view the job metrics for matching workflow jobs that have been previously run under the Job history.
-
-
After the matching workflow job completes (Status is Completed), you can go to the Data output tab and then select your Amazon S3 location to view the results.
-
(Manual processing type only) If you have created a Rule-based matching workflow with the Manual processing type, you can run the matching workflow anytime by choosing Run workflow on the matching workflow details page.
-
(Automatic processing type only) If your data table has a DELETE column, then:
-
Records set to
truein the DELETE column are deleted. -
Records set to
falsein the DELETE column are ingested into S3.
For more information, see Step 1: Prepare first-party data tables.
-
-
- API
-
To create a rule-based matching workflow with the Advanced rule type using the API
Note
By default, the workflow uses standard (batch) processing. To use incremental (automatic processing, you must explicitly configure it.
-
Open a terminal or command prompt to make the API request.
-
Create a POST request to the following endpoint:
/matchingworkflows -
In the request header, set the Content-type to application/json.
Note
For a complete list of supported programming languages, see the AWS Entity Resolution API Reference.
-
For the request body, provide the following required JSON parameters:
{ "description": "string", "incrementalRunConfig": { "incrementalRunType": "string" }, "inputSourceConfig": [ { "applyNormalization":boolean, "inputSourceARN": "string", "schemaName": "string" } ], "outputSourceConfig": [ { "applyNormalization":boolean, "KMSArn": "string", "output": [ { "hashed": boolean, "name": "string" } ], "outputS3Path": "string" } ], "resolutionTechniques": { "providerProperties": { "intermediateSourceConfiguration": { "intermediateS3Path": "string" }, "providerConfiguration":JSON value, "providerServiceArn": "string" }, "resolutionType": "RULE_MATCHING", "ruleBasedProperties": { "attributeMatchingModel": "string", "matchPurpose": "string", "rules": [ { "matchingKeys": [ "string" ], "ruleName": "string" } ] }, "ruleConditionProperties": { "rules": [ { "condition": "string", "ruleName": "string" } ] } }, "roleArn": "string", "tags": { "string" : "string" }, "workflowName": "stringWhere:
-
workflowName(required) – Must be unique and between 1–255 characters matching pattern [a-zA-Z_0-9-]* -
inputSourceConfig(required) – List of 1–20 input source configurations -
outputSourceConfig(required) – Exactly one output source configuration -
resolutionTechniques(required) – Set to "RULE_MATCHING" as the resolutionType for rule-based matching -
roleArn(required) – IAM role ARN for workflow execution -
ruleConditionProperties(required) – List of rule conditions and the name of the matching rule.
Optional parameters include:
-
description– Up to 255 characters -
incrementalRunConfig– Incremental run type configuration -
tags– Up to 200 key-value pairs
-
-
(Optional) To use incremental processing instead of the default standard (batch) processing, add the following parameter to the request body:
"incrementalRunConfig": { "incrementalRunType": "AUTOMATIC" } -
Send the request.
-
If successful, you'll receive a response with status code 200 and a JSON body containing:
{ "workflowArn": "string", "workflowName": "string", // Plus all configured workflow details } -
If the call is unsuccessful, you might receive one of these errors:
-
400 – ConflictException if the workflow name already exists
-
400 – ValidationException if the input fails validation
-
402 – ExceedsLimitException if account limits are exceeded
-
403 – AccessDeniedException if you don't have sufficient access
-
429 – ThrottlingException if the request was throttled
-
500 – InternalServerException if there's an internal service failure
-
-
