Learn how to get started with Elastic Beanstalk
With Elastic Beanstalk you can deploy, monitor, and scale web applications and services. Typically, you will develop your code locally then deploy it to Amazon EC2 server instances. Theses instances, also called environments, run on platforms that can be upgraded through the AWS console or the command line.
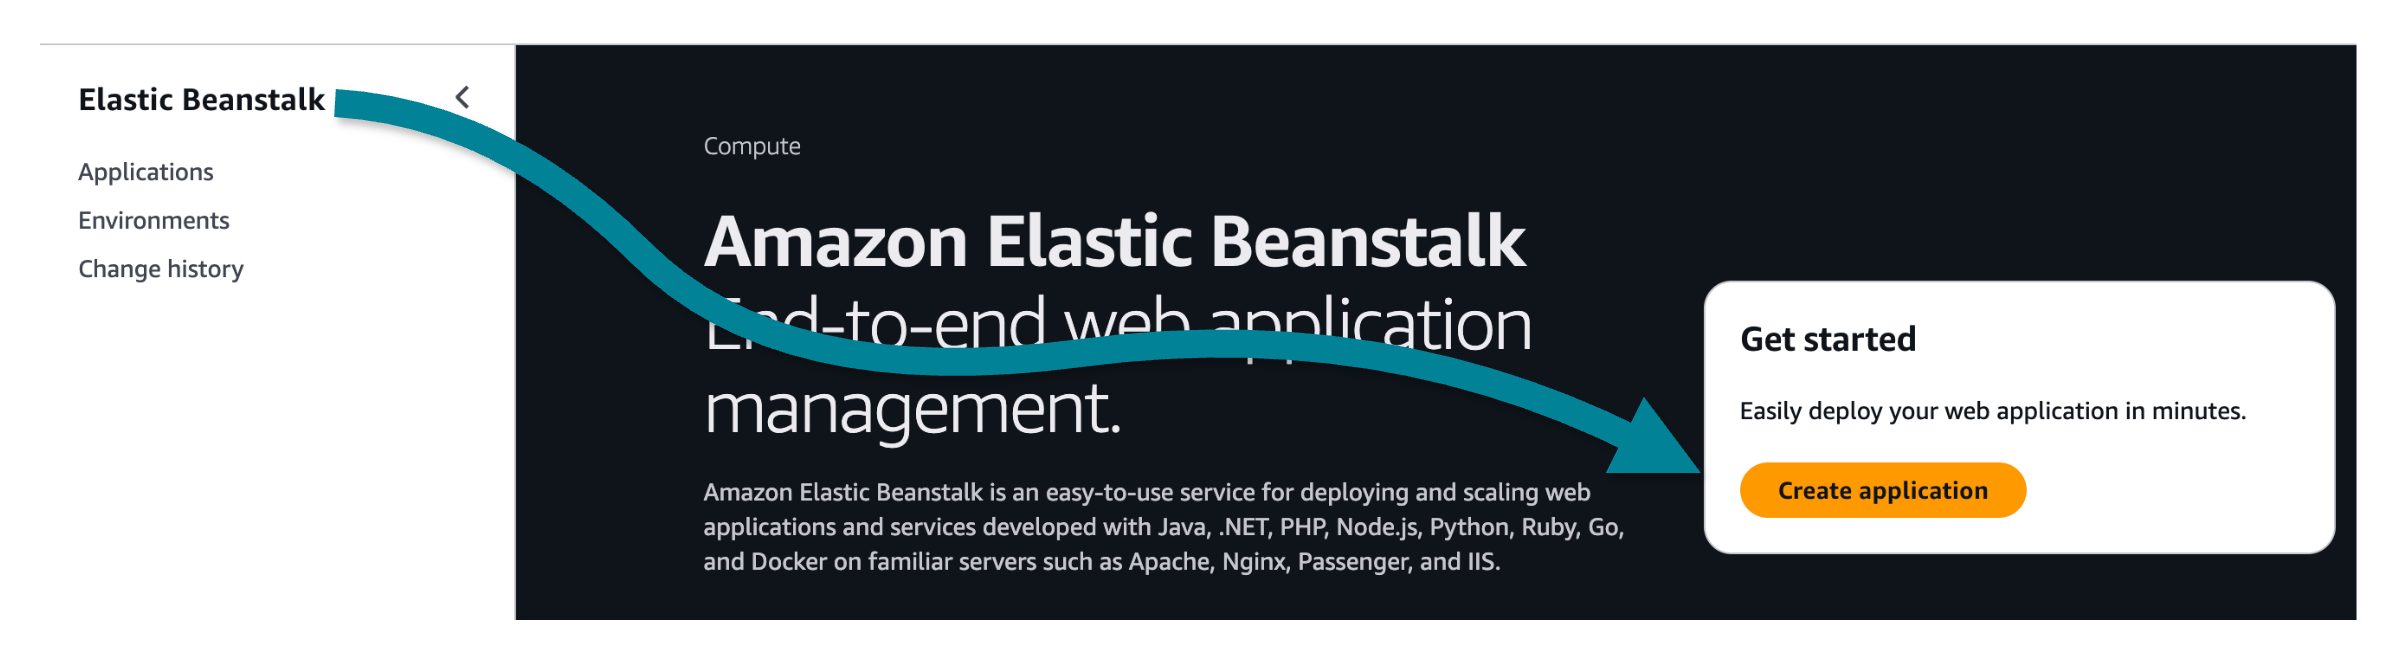
To get started, we recommend deploying a pre-built sample application directly from the console. Then, you can learn how to develop locally and deploy from the command line in the QuickStart: Deploy a PHP application to Elastic Beanstalk.
There is no cost for using Elastic Beanstalk, but standard fees do apply to AWS resources that you
create during the course of this tutorial until you delete them at the end. The total charges
are typically less than a dollar. For information about how to
minimize charges, see AWS free tier
After completing this tutorial, you will understand the basics of creating, configuring, deploying, updating, and monitoring an Elastic Beanstalk application with environments running on Amazon EC2 instances.
Estimated duration: 35-45 minutes
What you will build
Your first Elastic Beanstalk application will consist of a single Amazon EC2 environment running the PHP sample on a PHP managed platform.
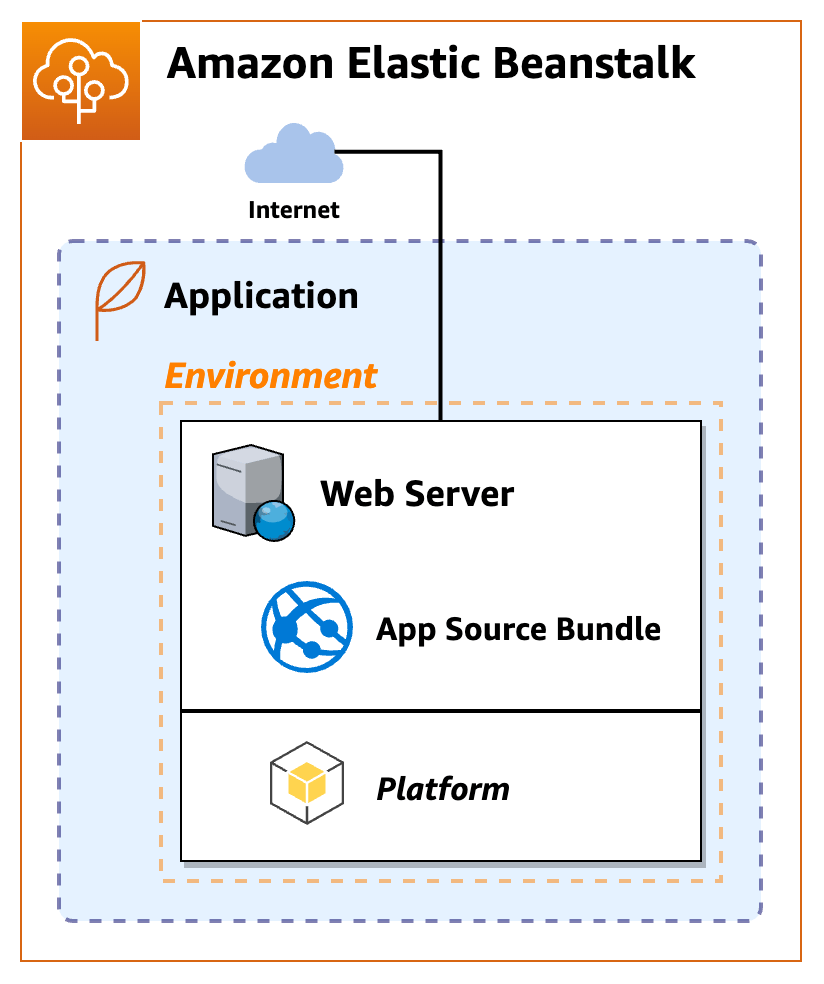
- Elastic Beanstalk application
-
An Elastic Beanstalk application is a container for Elastic Beanstalk components, including environments where your application code runs on platforms provided and managed by Elastic Beanstalk, or in custom containers that you provide.
- Environment
-
An Elastic Beanstalk environment is a collection of AWS resources running together including an Amazon EC2 instance. When you create an environment, Elastic Beanstalk provisions the necessary resources into your AWS account.
- Platform
-
A platform is a combination of an operating system, programming language runtime, web server, application server, and additional Elastic Beanstalk components. Elastic Beanstalk provides manged platforms, or you can provide your own platform in a container.
Elastic Beanstalk supports platforms for different programming languages, application servers, and Docker containers. When you create an environment, you must choose the platform. You can upgrade the platform, but you cannot change the platform for an environment.
Switching platforms
If you need to change programming languages, you must create and switch to a new environment on a different platform.
Step 1 - Create an application
To create your example application, you'll use the Create application console wizard. It creates an Elastic Beanstalk application and launches an environment within it.
Reminder: an environment is a collection of AWS resources required to run your application code.
To create an application
-
Open the Elastic Beanstalk console
. -
Choose Create application.
-
For Application name enter
getting-started-app.
The console provides a six step process for creating an application and configuring an environment. For this quick start, you'll only need to focus on the first two steps, then you can skip ahead to review and create your application and environment.
To configure an environment
-
In Environment information, for Environment name enter:
gs-app-web-env. -
For Platform, choose the PHP platform.
-
For Application code and Presets, accept the defaults (Sample application and Single instance), then choose Next.
To configure service access
Next, you need two roles. A service role allows Elastic Beanstalk to monitor your EC2 instances and upgrade you environment’s platform. An EC2 instance profile role permits tasks such as writing logs and interacting with other services.
To create or select the Service role
-
If you have previously created a Service role and would like to choose an existing one, select the value from the Service role drop-down and skip the remainder of these steps to create a Service role.
-
If you don't see any values listed for Service role, or you'd like to create a new one, continue with the next steps.
-
For Service role, choose Create role.
-
For Trusted entity type, choose AWS service.
-
For Use case, choose Elastic Beanstalk – Environment.
-
Choose Next.
-
Verify that Permissions policies include the following, then choose Next:
-
AWSElasticBeanstalkEnhancedHealth -
AWSElasticBeanstalkManagedUpdatesCustomerRolePolicy
-
-
Choose Create role.
-
Return to the Configure service access tab, refresh the list, then select the newly created service role.
To create or select an EC2 instance profile
-
If you have previously created an EC2 instance profile and would like to choose an existing one, select the value from the EC2 instance profile drop-down and skip the remainder of these steps to create an EC2 instance profile.
-
If you don't see any values listed for EC2 instance profile, or you'd like to create a new one, continue with the next steps.
-
Choose Create role.
-
For Trusted entity type, choose AWS service.
-
For Use case, choose Elastic Beanstalk – Compute.
-
Choose Next.
-
Verify that Permissions policies include the following, then choose Next:
AWSElasticBeanstalkWebTierAWSElasticBeanstalkWorkerTierAWSElasticBeanstalkMulticontainerDocker
Choose Create role.
-
Return to the Configure service access tab, refresh the list, then select the newly created EC2 instance profile.
To finish configuring and creating your application
-
Skip over EC2 key pair.
We'll show you other ways to connect to your Amazon EC2 instances through the Console.
-
Choose Skip to Review to move over several optional steps.
Optional steps: networking, databases, scaling parameters, advanced configuration for updates, monitoring, and logging.
-
On the Review page which shows a summary of your choices, choose Submit.
Congratulations!
You have created an application and configured an environment! Now you need to wait for the resources to deploy.
Step 2 - Deploy your application
When you create an application, Elastic Beanstalk sets up the environments for you. You just need to sit back and wait.
The initial deploy can take up to five minutes to create the resources. Updates will take less time because only changes will be deployed to your stack.

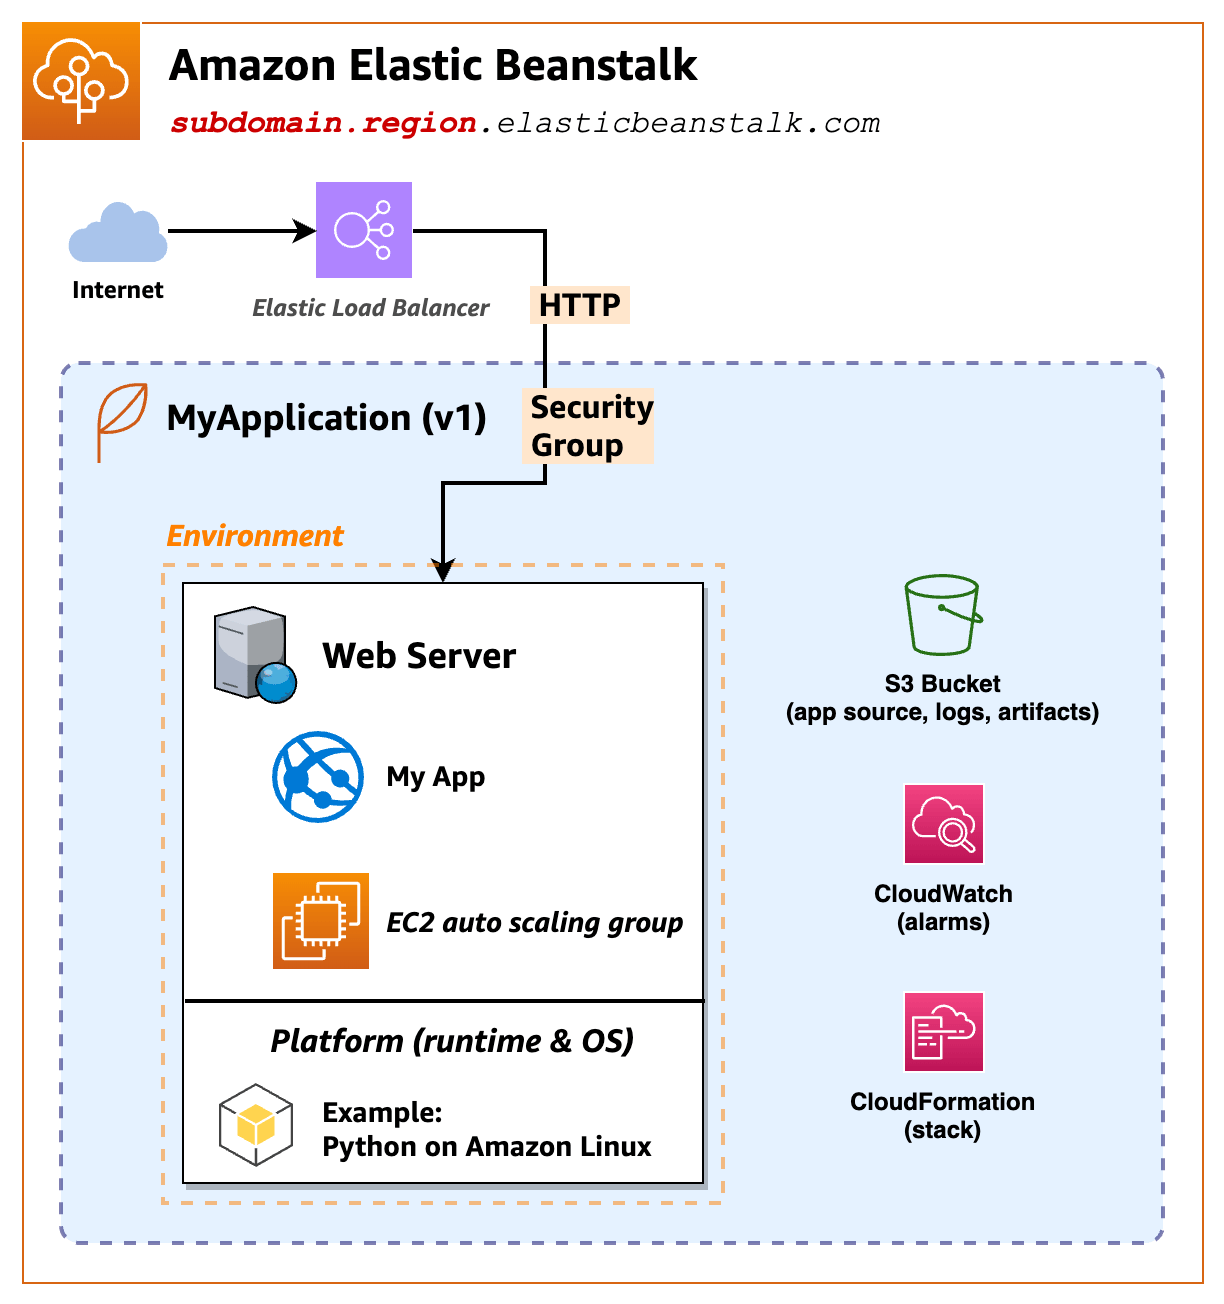
When you create the example application, Elastic Beanstalk creates the following resources:
-
EC2 instance – An Amazon EC2 virtual machine configured to run web apps on the platform you selected.
Every platform runs a different set of software, configuration files, and scripts to support a specific language version, framework, web container, or combination thereof. Most platforms use either Apache or nginx as a reverse proxy to forward web traffic to your web app, serve static assets, and generate access and error logs. You can connect to your Amazon EC2 instances to view configuration and logs.
-
Instance security group – An Amazon EC2 security group will be created to allow incoming requests on port 80, so inbound traffic on a load balancer can reach your web app.
-
Amazon S3 bucket – A storage location for your source code, logs, and other artifacts.
-
Amazon CloudWatch alarms – Two CloudWatch alarms are created to monitor the load on your instances and scale them up or down as needed.
-
CloudFormation stack – Elastic Beanstalk uses CloudFormation to deploy the resources in your environment and make configuration changes. You can view the resource definition template in the CloudFormation console
. -
Domain name – A domain name that routes to your web app in the form :
subdomain.region.elasticbeanstalk.com
Elastic Beanstalk creates your application, launches an environment, makes an application version, then deploys your code into the environment. During the process, the console tracks progress and displays event status in the Events tab.
After all of the resources are deployed, the environment's health should change to
Ok.
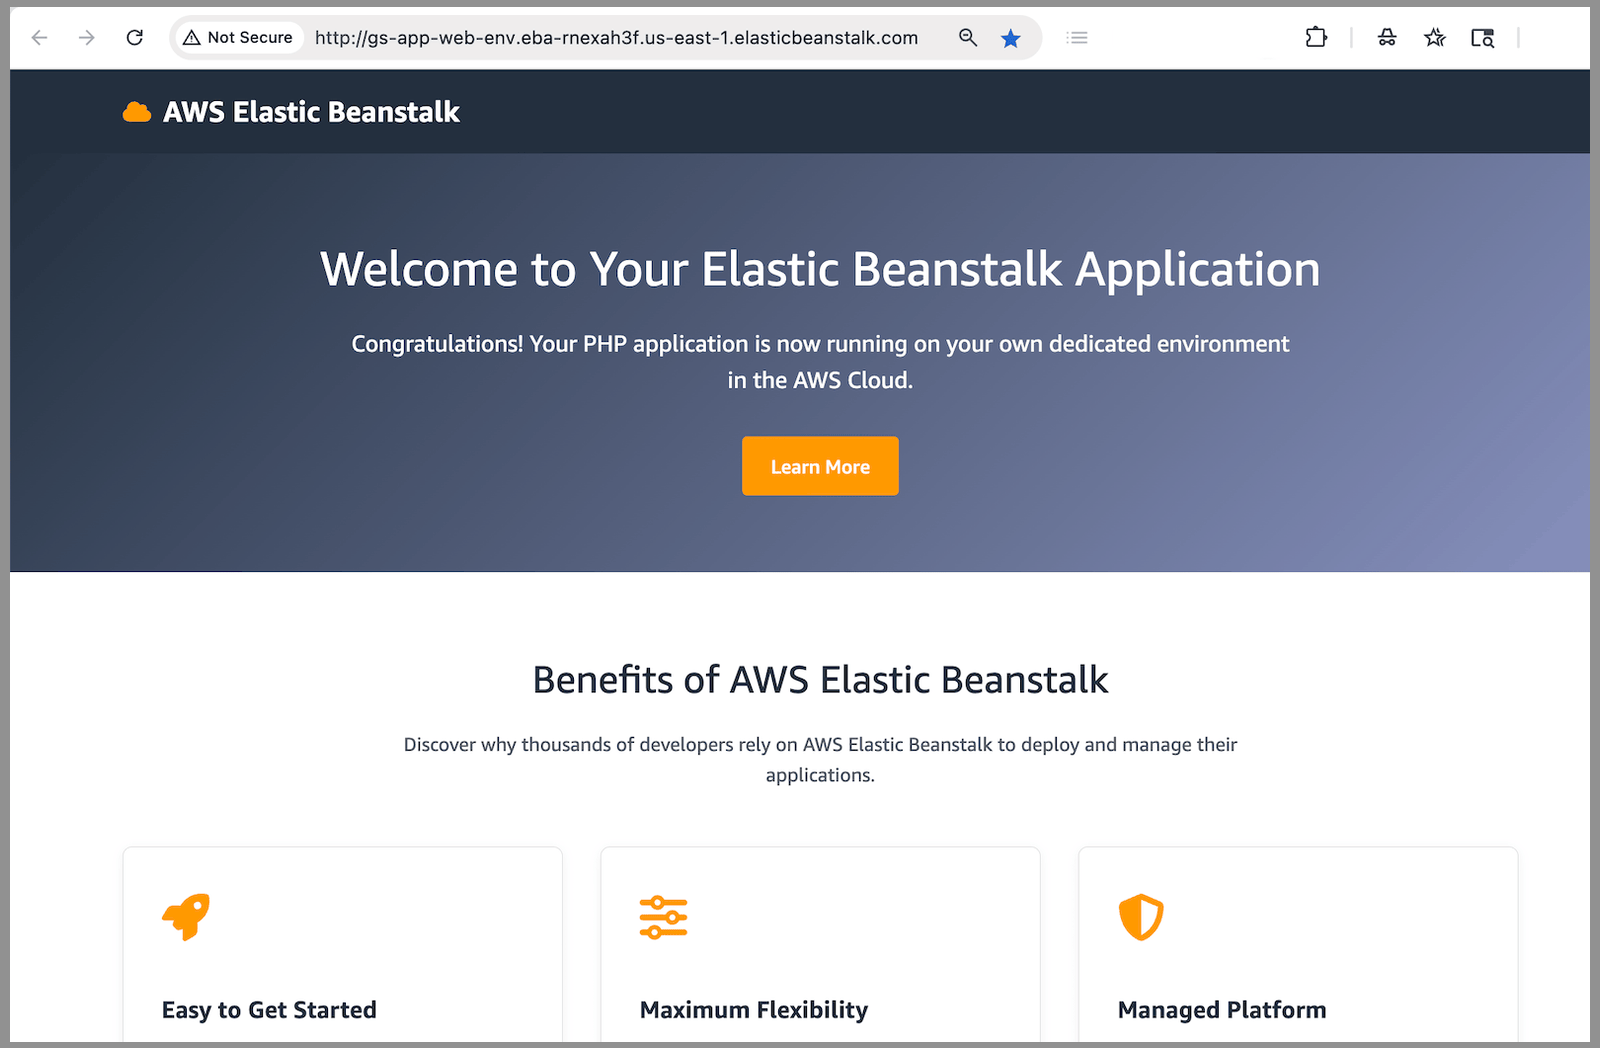
Your application is ready!
After you see your application health change to Ok, you can
browse to your web application's website.
Step 3 - Explore the Elastic Beanstalk environment
You'll start exploring your deployed application environment from the Environment overview page in the console.
To view the environment and your application
Open the Elastic Beanstalk console
, and in the Regions list, select your AWS Region. -
In the navigation pane, choose Environments, and then choose the name of your environment from the list.
-
Choose Go to environment to browse your application!
(You can also choose the URL link listed for Domain to browse your application.)
The connection will be HTTP (not HTTPS), so you might see a warning in your browser.
Back in the Elastic Beanstalk console, the upper portion shows the Environment overview with top level information about your environment, including name, domain URL, current health status, running version, and the platform that the application is running on. The running version and platform are essential for troubleshooting your currently deployed application.
After the overview pane, you will see recent environment activity in the Events tab.

While Elastic Beanstalk creates your AWS resources and launches your application, the environment is
in a Pending state. Status messages about launch events are continuously added to
the list of Events .
The environment's Domain is the URL for your deployed web application. In the left navigation pane, Go to environment also takes you to your domain. Similarly, the left navigation pane has links that correspond to the various tabs.
Take note of the Configuration link in the left navigation pane. which displays a summary of environment configuration option values, grouped by category.
Environment configuration settings
Take note of the Configuration link in the left navigation pane. You can view and edit detailed environment settings, such as service roles, networking, database, scaling, managed platform updates, memory, health monitoring, rolling deployment, logging, and more!
The various tabs contain detailed information about your environment:
-
Events – View an updating list of information and error messages from the Elastic Beanstalk service and other services for resources in your environment.
-
Health – View status and detailed health information for the Amazon EC2 instances running your application.
-
Logs – Retrieve and download logs from the Amazon EC2 in your environment. You can retrieve full logs or recent activity. The retrieved logs are available for 15 minutes.
-
Monitoring – View statistics for the environment, such as average latency and CPU utilization.
-
Alarms – View and edit alarms that are configured for environment metrics.
-
Managed updates – View information about upcoming and completed managed platform updates and instance replacement.
-
Tags – View and edit key-value pairs that are applied to your environment.
Note
Links in the console navigation pane will display the corresponding tab.
Troubleshooting with logs
For troubleshooting unexpected behaviors or debugging deployments, you might want to check the logs in your environments.
You can request 100 lines of all the log files under the Logs tab in the Elastic Beanstalk console. Alternatively, you can connect directly to the Amazon EC2 instance and tail the logs in realtime.
To request the logs (Elastic Beanstalk console)
-
Navigate to your environment in the Elastic Beanstalk console.
-
Choose the Logs tab or left-nav, then choose Request logs.
-
Select Last 100 lines.
-
After the logs are created, choose the Download link to view the logs in the browser.
In the logs, find the log and note the directory for the nginx access log.
Add a policy to enable connections to Amazon EC2
Before you can connect, you must add a policy that enables connections to Amazon EC2 with Session Manager.
-
Navigate to the IAM console.
-
Find and select the
aws-elasticbeanstalk-ec2-rolerole. -
Choose Add permission, then Attach policies.
-
Search for a default policy that begins with the following text:
AmazonSSMManagedEC2Instance, then add it to the role.
To connect to your Amazon EC2 with Session Manager
-
Navigate to the Amazon EC2 console.
-
Choose Instances, then select your
gs-app-web-envinstance. -
Choose Connect, then Session Manager.
-
Choose Connect.
After connecting to the instance, start a bash shell and tail the logs:
-
Run the command
bash. -
Run the command
cd /var/log/nginx. -
Run the command
tail -f access.log. -
In your browser, go to the application domain URL. Refresh.
Congratulations, you're connected!
You should see log entries in your instance update every time you refresh the page.
Connect button not working?
If the connect button is not available, go back to IAM and verify that you added the necessary policy to the role.
Step 4 - Update your application
Eventually, you will want to update your application. You can deploy a new version at any time, as long as no other update operations are in progress on your environment.
The application version that you started this tutorial with is called Sample Application.

To update your application version
-
Download the following PHP sample application:
PHP – php-v2.zip
Open the Elastic Beanstalk console
, and in the Regions list, select your AWS Region. -
In the navigation pane, choose Environments, and then choose the name of your environment from the list.
-
On the environment overview page, choose Upload and deploy.
-
Select Choose file, and then upload the sample application source bundle that you downloaded.
The console automatically fills in the Version label with a new unique label, automatically incrementing a trailing integer. If you choose your own version label, ensure that it's unique.
-
Choose Deploy.
While Elastic Beanstalk deploys your file to your Amazon EC2 instances, you can view the deployment status on the Environment overview page. While the application version is updated, the environment Health status is gray. When the deployment is complete, Elastic Beanstalk performs an application health check. When the application responds to the health check, it's considered healthy and the status returns to green. The environment overview shows the new Running Version—the name you provided as the Version label.
Elastic Beanstalk also uploads your new application version and adds it to the table of application versions. To view the table, choose Application versions under getting-started-app on the navigation pane.
Update success!
You should see an updated "v2" message after refreshing your browser.
If you want to edit the source yourself, unzip, edit, then re-zip the source bundle. On macOS, use the following command from inside your php directory with the -X to exclude extra file attributes:
zip -X -r ../php-v2.zip .
Step 5 - Scale your application
You can configure your environment to better suit your application. For example, if you have a compute-intensive application, you can change the type of Amazon Elastic Compute Cloud (Amazon EC2) instance that is running your application. To apply configuration changes, Elastic Beanstalk performs an environment update.
Some configuration changes are simple and happen quickly. Some changes require deleting and recreating AWS resources, which can take several minutes. When you change configuration settings, Elastic Beanstalk warns you about potential application downtime.

Increase capacity settings
In this example of a configuration change, you edit your environment's capacity settings. You configure a load-balanced, scalable environment that has between two and four Amazon EC2 instances in its Auto Scaling group, and then you verify that the change occurred. Elastic Beanstalk creates an additional Amazon EC2 instance, adding to the single instance that it created initially. Then, Elastic Beanstalk associates both instances with the environment's load balancer. As a result, your application's responsiveness is improved and its availability is increased.
To change your environment's capacity
Open the Elastic Beanstalk console
, and in the Regions list, select your AWS Region. -
In the navigation pane, choose Environments, and then choose the name of your environment from the list.
In the navigation pane, choose Configuration.
-
In the Instance traffic and scaling configuration category, choose Edit.
-
Collapse the Instances section, so you can more easily see the Capacity section. Under Auto Scaling group change Environment type to Load balanced.
-
In the Instances row, change Min to
2and Max to4. -
To save the changes choose Apply at the bottom of the page.
If you are warned that the update will replace all of your current instances. Choose Confirm.
The environment update can take a few minutes. You should see several updates in the list of events. Watch for the event Successfully deployed new configuration to environment.
Verify increased capacity
After the environment update is complete and the environment is ready, Elastic Beanstalk automatically launched a second instance to meet your new minimum capacity setting.
To verify the increased capacity
-
Choose Health from either the tab list or left navigation pane.
-
Review the Enhanced instance health section.
You just scaled up!
With two Amazon EC2 instances, your environment capacity has doubled, and it only took a few minutes.
Cleaning up your Elastic Beanstalk environment
To ensure that you're not charged for any services you aren't using, delete all application versions and terminate environments, which also deletes the AWS resources that the environment created for you.

To delete the application and all associated resources
-
Delete all application versions.
Open the Elastic Beanstalk console
, and in the Regions list, select your AWS Region. -
In the navigation pane, choose Applications, and then choose getting-started-app.
In the navigation pane, find your application's name and choose Application versions.
-
On the Application versions page, select all application versions that you want to delete.
-
Choose Actions, and then choose Delete.
-
Turn on Delete versions from Amazon S3.
-
Choose Delete, and then choose Done.
-
Terminate the environment.
-
In the navigation pane, choose getting-started-app, and then choose GettingStartedApp-env in the environment list.
-
Choose Actions, and then choose Terminate Environment.
-
Confirm that you want to terminate GettingStartedApp-env by typing the environment name, and then choose Terminate.
-
-
Delete the getting-started-app application.
-
In the navigation pane, choose the getting-started-app.
-
Choose Actions, and then choose Delete application.
-
Confirm that you want to delete getting-started-app by typing the application name, and then choose Delete.
-
Congratulations!
You have successfully deployed a sample application to the AWS Cloud, uploaded a new version, modified its configuration to add a second Auto Scaling instance, and cleaned up your AWS resources!
Next steps
To learn how to use the eb command line tool to automate deploying
your code to Elastic Beanstalk, We suggest continuing with the QuickStart: Deploy a PHP application to Elastic Beanstalk.
Next, you might want to review how to set up HTTPS connection, see Configuring HTTPS for your Elastic Beanstalk environment.
