Integrating with Apple platforms using the AWS SDK for Swift
Software running on any of Apple's platforms (macOS, iOS, iPadOS, tvOS, visionOS, or
watchOS) may wish to integrate into the Apple ecosystem. This may include, for example,
letting the user authenticate to access AWS services using Sign In With Apple
Adding the AWS SDK for Swift to an existing Xcode project
If you have an existing Xcode project, you can add the SDK for Swift to it. Open your project's main configuration pane and choose the Swift Packages tab at the right end of the tab bar. The following image shows how to do this for an Xcode project called "Supergame," which will use Amazon S3 to get game data from a server.
Swift Packages tab in Xcode

This shows a list of the Swift packages currently in use by your project. If you haven't added any Swift packages, the list will be empty, as shown in the preceding image. To add the AWS SDK for Swift package to your project, choose the + button under the package list.
Find and select packages to import

Next, specify the package or packages to add to your project. You can choose from
standard Apple-provided packages or enter the URL of a custom package in the search box
at the top of the window. Enter the URL of the AWS SDK for Swift as follows: https://github.com/awslabs/aws-sdk-swift.git.
After you enter the SDK URL, you can configure version requirements and other options for the SDK package import.
Configure dependency rules for the SDK for Swift package

Configure the dependency rule. Make sure that Add to Project is set to your project — "Supergame" in this case — and choose Add Package. You will see a progress bar while the SDK and all its dependencies are processed and retrieved.
Fetching the AWS SDK for Swift package and its product list

Next, select specific products from the AWS SDK for Swift package to
include in your project. Each product is generally one AWS API or service. Each
package is listed by package name, starting with AWS and followed by the
shorthand name of the service or toolkit.
For the Supergame project, select AWSS3, AWSDynamoDB, and
AWSGameLift. Assign them to the correct target (iOS in this example), and
choose Add Package.
Choose package products for specific AWS services and toolkits

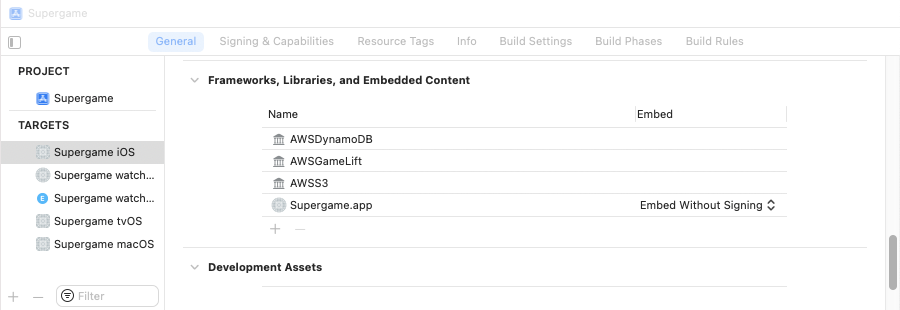
Your project is now configured to import the AWS SDK for Swift package and to include the desired APIs in the build for that target. To see a list of the AWS libraries, open the target's General tab and scroll down to Frameworks, Libraries, and Embedded Content.
AWS SDK for Swift libraries in the Xcode target
If your project is a multi-platform project, you also need to add the AWS libraries to the other targets in your project. For each platform's target, navigate to the Frameworks, Libraries, and Embedded Content section under the General tab and choose + to open the library picker window.
Then, you can scroll to find and select all of the needed libraries and choose Add to add them all at once. Alternatively, you can search for and select each library, then choose Add to add them to the target one at a time.
Find and add SDK for Swift libraries using the Xcode library picker window

You're now ready to import the libraries and any needed dependencies into individual Swift source code files and start using the AWS services in your project. Build your project by using the Xcode Build option in the Product menu.
Authenticating using Sign In With Apple
One convenient way for users to sign into AWS while using your application by adding support for Sign In With Apple. This allows your users to access AWS services using their Apple ID and either TouchID or FaceID.
Adding Sign In With Apple support to your app requires planning and configuration of services:
-
Set up your application in Apple's "Certificates, Identifiers & Profiles
" dashboard, or configure Sign In With Apple using Xcode . -
Set up the application's security and authentication configuration in the AWS Management Console
. -
Add the Sign In With Apple authentication method to your application.
Note
When setting up Sign In With Apple as a way to authenticate to use AWS services,
the JWT audience should always be the same as your application's bundle ID as
configured in Xcode (or the Info.plist file) and the Apple
developer portal.
The rest of this section discusses the process of setting up and using Sign In With
Apple for AWS authentication. The example authenticates to AWS using Sign In With
Apple, then lists the user's Amazon Simple Storage Service (Amazon S3) buckets in a SwiftUI
Configuring the app for Sign in With Apple
If you use Xcode, you can enable Sign In With Apple
-
Verify that your team name and bundle identifier are correct for the application. Be sure to use Apple's standard reverse-URI notation, such as
com.example.buckets. -
Click the + Capability button to open a capability picker. Add Sign In With Apple to your target's capabilities.
-
Click the Automatically manage signing checkbox to enable automatic signing of your application. This also configures your application on the Apple developer portal.
-
Under App Sandbox, enable Outgoing Connections (Client) to have your signed application request network access permission.
If you don't use Xcode, or you prefer to configure the app by hand, you can do so
by following the instructions on Apple's developer website
Configuring AWS services for your application
Next, open the IAM Management
Console
-
In the sidebar, click Identity providers, then look to see if there's already a provider for
appleid.apple.com. If there is, click on it to add your new application's bundle ID as a new audience. Otherwise, click Add provider to create a new identity provider with the following configuration:-
Set the provider type to OpenID Connect.
-
Set the Provider URL to
https://appleid.apple.com. -
Set the audience to match your application's bundle ID, such as
com.example.buckets.
-
-
If you don't already have a permissions policy set up to grant the permissions needed by your application (and no permissions it doesn't need):
-
Click Policies in the IAM Management Console
sidebar, then click Create policy. -
Add the permissions your application needs, or directly edit the JSON. The JSON for this example application looks like this:
This policy allows your application to get a list of your Amazon S3 buckets.
-
On the Review and create page, set the Policy name to be a unique name to identify your policy, such as
example-buckets-app-policy. -
Enter a helpful description for your policy, such as "Application permissions for the Sign In With Apple buckets example".
-
Click Create policy.
-
-
Create a new role for your application:
-
Click Roles in the IAM Management Console
sidebar, then click Create role. -
Set the trusted entity type to Web identity.
-
Under Web identity, select the Apple ID identity provider you created above.
-
Select your application's bundle ID as the Audience.
-
Under Permissions policies, choose the policy you created above.
-
On the Name review, and create page, set a unique name for your new role, such as
example-buckets-app-role, and enter a description for the role, such as "Permissions for the Buckets example." -
Review the Trust policy generated by the console. The JSON should resemble the following:
This indicates that the Apple ID identity provider used to process Sign In With Apple requests should be allowed to use the role if the web token's
audproperty (the audience) matches the application's bundle ID.
-
Adding Sign In With Apple support to your application
Once both Apple and AWS know about your application and that Sign In With Apple should be allowed to authenticate the user for the desired services, the next step is to add a Sign In With Apple button and its supporting code to the application.
This section explains how an application can provide a Sign In With Apple option for authentication, using Apple's SwiftUI and Authentication Services libraries.
Adding a "Sign In With Apple" button
To include a Sign In With Apple button, the
AuthenticationServices module needs to be imported along with
SwiftUI:
import SwiftUI
import AuthenticationServices
In your SwiftUI sign-in view, embed a Sign In With Apple button. The
SignInWithAppleButton is used to trigger and manage the Sign In
With Apple process. This button calls a completion handler with a
Result object, which indicates whether or not a valid Apple ID was
authenticated:
                    // Show the "Sign In With Apple" button, using the
                    // `.continue` mode, which allows the user to create
                    // a new ID if they don't already have one. When SIWA
                    // is complete, the view model's `handleSignInResult()`
                    // function is called to turn the JWT token into AWS
                    // credentials.
                    SignInWithAppleButton(.continue) { request in
                        request.requestedScopes = [.email, .fullName ]
                    } onCompletion: { result in
                        Task {
                            do {
                                try await viewModel.handleSignInResult(result)
                            } catch BucketsAppError.signInWithAppleCanceled {
                                // The "error" is actually Sign In With Apple being
                                // canceled by the user, so end the sign in
                                // attempt.
                                return
                            } catch let error as BucketsAppError {
                                // Handle AWS errors.
                                viewModel.error = error
                                return
                            }
                        }
                    }
This example SignInWithAppleButton uses a function named
handleSignInResult() as its completion handler. This function is
passed a Result that contains an ASAuthorization
object if Sign In With Apple succeeded. If sign in failed or was canceled, the
Result contains an Error instead. If the error
actually indicates that sign in was canceled by the user, the sign in attempt is
ended. Actual errors are stored for display by a SwiftUI alert sheet.
Note
By default, the token returned by Sign In With Apple expires one day from its creation time.
Processing the JSON Web Token
A number of variables are used by the example application to store information related to the user and their sign-in session:
    /// The unique string assigned by Sign In With Apple for this login
    /// session. This ID is valid across application launches until it
    /// is signed out from Sign In With Apple.
    var userID = ""

    /// The user's email address.
    ///
    /// This is only returned by SIWA if the user has just created
    /// the app's SIWA account link. Otherwise, it's returned as `nil`
    /// by SIWA and must be retrieved from local storage if needed.
    var email = ""

    /// The user's family (last) name.
    ///
    /// This is only returned by SIWA if the user has just created
    /// the app's SIWA account link. Otherwise, it's returned as `nil`
    /// by SIWA and must be retrieved from local storage if needed.
    var familyName = ""

    /// The user's given (first) name.
    ///
    /// This is only returned by SIWA if the user has just created
    /// the app's SIWA account link. Otherwise, it's returned as `nil` by SIWA
    /// and must be retrieved from local storage if needed.
    var givenName = ""

    /// The AWS account number provided by the user.
    var awsAccountNumber = ""

    /// The AWS IAM role name given by the user.
    var awsIAMRoleName = ""

    /// The credential identity resolver created by the AWS SDK for
    /// Swift. This resolves temporary credentials using
    /// `AssumeRoleWithWebIdentity`.
    var identityResolver: STSWebIdentityAWSCredentialIdentityResolver? = nil
These are used to record the AWS account information (the AWS account
number and the name of the IAM role to use, as entered by the user), as
well as the user's information returned by Sign In With Apple. The
STSWebIdentityAWSCredentialIdentityResolver is used to convert
the JWT token into valid, temporary AWS credentials when creating a
service client object.
The handleSignInResult() function looks like this:
    /// Called by the Sign In With Apple button when a JWT token has
    /// been returned by the Sign In With Apple service. This function
    /// in turn handles fetching AWS credentials using that token.
    ///
    /// - Parameters:
    ///   - result: The Swift `Result` object passed to the Sign In
    ///     With Apple button's `onCompletion` handler. If the sign
    ///     in request succeeded, this contains an `ASAuthorization`
    ///     object that contains the Apple ID sign in information.
    func handleSignInResult(_ result: Result<ASAuthorization, Error>) async throws {
        switch result {
        case .success(let auth):
            // Sign In With Apple returned a JWT identity token. Gather
            // the information it contains and prepare to convert the
            // token into AWS credentials.

            guard let credential = auth.credential as? ASAuthorizationAppleIDCredential,
                  let webToken = credential.identityToken,
                  let tokenString = String(data: webToken, encoding: .utf8)
            else {
                throw BucketsAppError.credentialsIncomplete
            }

            userID = credential.user

            // If the email field has a value, set the user's recorded email
            // address. Otherwise, keep the existing one.
            email = credential.email ?? self.email

            // Similarly, if the name is present in the credentials, use it.
            // Otherwise, the last known name is retained.
            if let name = credential.fullName {
                self.familyName = name.familyName ?? self.familyName
                self.givenName = name.givenName ?? self.givenName
            }

            // Use the JWT token to request a set of temporary AWS
            // credentials. Upon successful return, the
            // `credentialsProvider` can be used when configuring
            // any AWS service.

            try await authenticate(withWebIdentity: tokenString)
        case .failure(let error as ASAuthorizationError):
            if error.code == .canceled {
                throw BucketsAppError.signInWithAppleCanceled
            } else {
                throw BucketsAppError.signInWithAppleFailed
            }
        case .failure:
            throw BucketsAppError.signInWithAppleFailed
        }

        // Successfully signed in. Fetch the bucket list.
        do {
            try await self.getBucketList()
        } catch {
            throw BucketsAppError.bucketListMissing
        }
    }
If sign in is successful, the Result provides details about
the authentication returned by Sign In With Apple. The authentication
credential contains a JSON Web Token, as well as a user ID which is unique
for the current session.
If the authentication represents a new link between Sign In With Apple and this application, it may contain the user's email address and full name. If it does, this function retrieves and stores that information. The email address and user name will never be provided again by Sign In With Apple.
Note
Sign In With Apple only includes personally identifiable information (PII) the when the user first associates their Apple ID with your application. For all subsequent connections, Sign In With Apple only provides a unique user ID. If the application needs any of this PII, it's the app's responsibility to securely save it locally and securely. The example application stores the information in the Keychain.
The JWT is converted to a string, which is passed to a function called
authenticate(withWebIdentity: region:) to actually create the
web identity resolver.
Creating the web identity credential identity resolver
The authenticate(withWebIdentity: region:) function performs
credential identity resolution by first writing the token to a local file,
then creating an object of type
STSWebIdentityAWSCredentialIdentityResolver, specifying the
stored web identity token file when doing so. This AWS Security Token Service (AWS STS)
credential identity resolver is used when creating service clients.
After authenticating with Sign In With Apple, a function named
saveUserData() is called to securely store the user's
information in the Keychain. This lets the sign in screen automatically fill
in the form fields, and lets the application remember the user's email
address and name if available.
    /// Convert the given JWT identity token string into the temporary
    /// AWS credentials needed to allow this application to operate, as
    /// specified using the Apple Developer portal and the AWS Identity
    /// and Access Management (IAM) service.
    ///
    /// - Parameters:
    ///   - tokenString: The string version of the JWT identity token
    ///     returned by Sign In With Apple.
    ///   - region: An optional string specifying the AWS Region to
    ///     access. If not specified, "us-east-1" is assumed.
    func authenticate(withWebIdentity tokenString: String,
                      region: String = "us-east-1") async throws {
        // If the role is empty, pass `nil` to use the default role for
        // the user.

        let roleARN = "arn:aws:iam::\(awsAccountNumber):role/\(awsIAMRoleName)"

        // Use the AWS Security Token Service (STS) action
        // `AssumeRoleWithWebIdentity` to convert the JWT token into a
        // set of temporary AWS credentials. The first step: write the token
        // to disk so it can be used by the
        // `STSWebIdentityAWSCredentialIdentityResolver`.

        let tokenFileURL = createTokenFileURL()
        let tokenFilePath = tokenFileURL.path
        do {
            try tokenString.write(to: tokenFileURL, atomically: true, encoding: .utf8)
        } catch {
            throw BucketsAppError.tokenFileError()
        }

        // Create an identity resolver that uses the JWT token received
        // from Apple to create AWS credentials.

        do {
            identityResolver = try STSWebIdentityAWSCredentialIdentityResolver(
                region: region,
                roleArn: roleARN,
                roleSessionName: "BucketsExample",
                tokenFilePath: tokenFilePath
            )
        } catch {
            throw BucketsAppError.assumeRoleFailed
        }

        // Save the user's data securely to local storage so it's available
        // in the future.
        //
        // IMPORTANT: Any potential Personally Identifiable Information _must_
        // be saved securely, such as by using the Keychain or an appropriate
        // encrypting technique.

        saveUserData()
    }
Important
The token is written to disk since the SDK expects to load the token from a file. This token file must remain in place until you have finished using the service client. When you're done using the client, delete the token file.
Creating a service client using the web identity credential identity resolver
To access an AWS service, create a client configuration object that
includes the awsCredentialIdentityResolver property. This
property's value should be the web identity credential identity resolver
created by the authorize(withWebIdentity: region:)
function:
    /// Fetches a list of the user's Amazon S3 buckets.
    ///
    /// The bucket names are stored in the view model's `bucketList`
    /// property.
    func getBucketList() async throws {
        // If there's no identity resolver yet, return without doing anything.
        guard let identityResolver = identityResolver else {
            return
        }

        // Create an Amazon S3 client configuration that uses the
        // credential identity resolver created from the JWT token
        // returned by Sign In With Apple.
        let config = try await S3Client.S3ClientConfiguration(
            awsCredentialIdentityResolver: identityResolver,
            region: "us-east-1"
        )
        let s3 = S3Client(config: config)

        let output = try await s3.listBuckets(
            input: ListBucketsInput()
        )

        guard let buckets = output.buckets else {
            throw BucketsAppError.bucketListMissing
        }

        // Add the names of all the buckets to `bucketList`. Each
        // name is stored as a new `IDString` for use with the SwiftUI
        // `List`.
        for bucket in buckets {
            self.bucketList.append(IDString(bucket.name ?? "<unknown>"))
        }
    }
This function creates an S3Client configured to use our web identity credential
identity resolver. That client is then used to fetch a list of Amazon S3 buckets.
The buckets' names are then added to the bucket list. The SwiftUI
List view automatically refreshes to display the newly-added
bucket names.
