Scheduling and running visual jobs
There are two ways to schedule visual ETL jobs in Amazon SageMaker Unified Studio.
-
You can schedule your visual jobs directly in the Visual ETL editor. This way you can schedule a single visual job quickly.
-
You can schedule your visual job using a DAG and the workflows interface. This way you can combine multiple elements in the same schedule.
Scheduling visual jobs from the editor
You can schedule your visual jobs to run from within the Visual ETL editor. To do this, use a project with the All capabilities project profile or another project profile with scheduling enabled in the Tooling blueprint parameters. If you have created a project that needs to be updated to enable scheduling, contact your admin.
Navigate to Amazon SageMaker Unified Studio using the URL from your admin and log in using your SSO or AWS credentials.
-
Navigate to your visual ETL jobs by choosing visual ETL jobs from the Build menu.
-
Choose the visual job you want to schedule from the list to open it in the editor.
-
Choose the Schedule icon in the upper-right corner of the editor.
-
Under Schedule name, enter a name for the schedule.
-
Under Schedule status, choose an option to determine whether the schedule will begin running after being created.
-
Choose Active to activate the schedule and run the Visual ETL job when the schedule indicates it should run.
-
Choose Paused to create a schedule that will not run the visual ETL job yet.
-
-
(Optional) Write a description of the schedule.
-
Choose a schedule type.
-
Choose One-time to run the visual ETL job at one specific time.
-
Choose Recurring to create a schedule that run the Visual ETL job at multiple times that you choose.
-
-
Choose the days and times that the schedule will run.
-
Choose Create schedule.
You can then view the schedule on the Schedules tab of the Visual ETL page in your project.
You can enable project repository auto sync flag when creating or updating the project to ensure the schedules always execute the latest ETL notebook saved to repository. It is recommendede that you test the ETL in draft mode before saving.
Reviewing scheduled visual jobs in the editor
You can review scheduled visual jobs in the Visual ETL interface in Amazon SageMaker Unified Studio. On the schedules page, you can pause, edit, and delete schedules. You can also view the status and other information for a schedule and choose the name of a schedule to view runs and additional data.
To review scheduled queries, complete the following steps:
Navigate to Amazon SageMaker Unified Studio using the URL from your admin and log in using your SSO or AWS credentials.
-
Navigate to your project.
-
Choose Visual ETL jobs from the Build menu.
-
Choose the Schedules tab.
You can then pause, edit, or delete a schedule by choosing the three-dot Actions menu next to a schedule in the list.
To view information about different times the schedule has run, choose the name of the schedule to view the Runs section for that schedule. You can choose the name of a run to see a log and other details for that run.
Scheduling visual jobs with workflows
You can schedule the Visual ETL jobs you authored to run based on a schedule using Workflows. The following is an example of how to do this:
-
Create a Visual ETL flow and name it "mwaa-test".
-
Save your draft flow (“mwaa-test.vetl”) to your project.

-
Navigate to Build → Workflows menu, click on the “Create workflow in editor”.

-
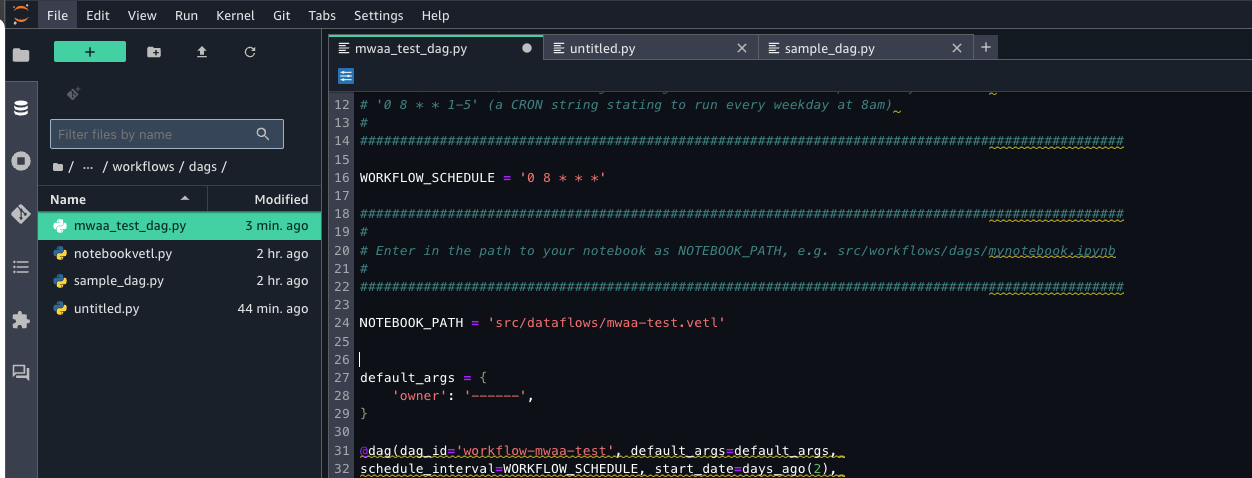
You will now see an example DAG template in JupyterLab.

-
Modify the lines of python code as below, then save it as “mwaa_test_dag.py”. We will execute the dataflow at 8AM everyday. By default, the dataflow’s notebook file is under the path “src/dataflows”.
WORKFLOW_SCHEDULE = '0 8 * * *'
NOTEBOOK_PATH = 'src/dataflows/mwaa-test.vetl'
dag_id = "workflow-mwaa-test" # optional, set to give your workflow a meaningful name
-
Pull the file “dataflows/mwaa-test.vetl” from the project’s source code repository to JupyterLab.


-
Navigate back to the Workflows console, now we can see the DAG is created. We can access Airflow UI via the “Actions” dropdown list.

-
Manually trigger the DAG.
