# Flow block in Connect Customer: Show view
This topic defines the flow block to create step-by-step workflow guides to help agents provide consistent customer experiences, as well as guides to enable interactive customer experiences.
## Description
+ Use this flow block to:
+ Create [step-by-step guides](step-by-step-guided-experiences.md) for agents who are using the Connect Customer agent workspace. These guides are workflows that provide your agents with instructions to help them interact consistently with your customers.
+ Create forms to collect information from customers within a chat experience.
+ When a contact is routed to a flow that includes a **Show view** block, a UI page called a [View](view-resources-sg.md) renders on the agent workspace or within the customer's chat UI.
## Use cases for this block
This flow block is designed to guide agents through the steps to:
+ Perform common tasks for customers, such as making reservations, managing payments, and submitting new orders.
+ Send emails based on a template that notifies a customer about a submitted refund request. The email structure is always the same, but specific values can vary, such as order number, refund amount, and payment account. You can configure the Show view block for the agent to provide these types of information.
+ Create new CRM entries in the existing agent workspace. Use contact attributes to pre-populate the form with relevant information, such as the customer's name and phone number.
And to guide customers through steps within a chat conversation to:
+ Make payments by providing their credit card information.
+ Provide PII information, such as a home address to update their profile.
+ Receive account information by providing their customer account ID.
## Contact types
You can use the **Show view** block in a guide flow that is initiated—by the [Set event flow](set-event-flow.md) block—from any contact type including voice, chat, email or task. If you plan to surface a guide to a customer, you can use the **Show view** block in the main chat flow directly.
| Contact type | Supported? |
| --- | --- |
| Voice | Yes |
| Chat | Yes |
| Task | Yes |
| Email | Yes |
## Flow types
You can use this block in the following [flow types](create-contact-flow.md#contact-flow-types):
| Flow type | Supported? |
| --- | --- |
| Inbound flow | Yes |
| Customer hold flow | No |
| Customer whisper flow | No |
| Outbound whisper flow | No |
| Agent hold flow | No |
| Agent whisper flow | No |
| Transfer to agent flow | No |
| Transfer to queue flow | No |
## How to configure this block
You can configure the **Show view** block by using the Connect Customer admin website or by using the [ShowView](https://docs.aws.amazon.com/connect/latest/APIReference/participant-actions-showview.html) action in the Connect Customer Flow language.
**Topics**
+ [Choose the view resource](#choose-viewresource)
+ [How to use the Set manually option](#view-setmanually)
+ [How to use the Set dynamically option](#view-setdynamically)
+ [How to use the Set JSON option](#show-view-block-example-json)
+ [This view has sensitive data](#showview-sensitive-data)
+ [Flow block branches](#showview-branches)
+ [Additional configuration tips](#showview-tips)
+ [Data generated by this block](#showview-data)
### Choose the view resource
Connect Customer includes a set of views that you can add your agent's workspace. You specify the view in the **View** box, as shown in the following image:

Following is a brief description of these AWS managed views. For detailed information about each one, see [Set up AWS managed views for an agent's workspace in Connect Customer](view-resources-managed-view.md). Customer-managed views are also supported. For more information, see the [Customer-managed views](https://d3irlmavjxd3d8.cloudfront.net/?path=/docs/customer-managed-views-customer-managed-views--page) documentation.
+ **Detail view**: Display information to agents and provide them with a list of actions that they can take. A common use case of the Detail view is to surface a screen-pop to the agent at the start of a call.
+ **List view**: Display information as a list of items with titles and descriptions. Items can act as links with actions attached. It also optionally supports the standard back navigation and persistent context header.
+ **Form view**: Provide customers and agents with input fields to gather required data and submit data to backend systems. This view consists of multiple Sections with a predefined Section style with a header. The body consists of various input fields arranged in a column or a grid layout format.
+ **Confirmation view**: A page to show customers and agents after a form has been submitted or an action has been completed. In this pre-built template you can provide a summary of what has happened, any next steps, and prompts. The Confirmation view supports a persistent attribute bar, an icon or image, headline, and sub-headline, along with a back to home navigation button.
+ **Cards view**: Allows you to guide your customers and agents by presenting them with a list of topics to choose from when the contact is presented to the agent.
The properties of the **Show view** block are dynamically populated depending on which **View** resource you choose. For example, if you choose **Form**, you would configure **Next** and **Previous** actions, which are displayed. These are just a couple of the actions on the view.

The following sections explain how to configure the **Form** actions manually, dynamically, or by using the JSON option.
### How to use the Set manually option
1. On the **Properties** page, in the **View** section, choose **Form** from the dropdown menu, and set **Use version** to 1, the default. The following image shows a **Properties** page configured with these options.

1. The **Properties** page displays a set of fields based on the Form view. Choose **Set manually** and enter text to be rendered on the View UI components. The following image shows the **Next** and **Previous** UI components. The display name of the components have been set manually to **Next** and **Previous**. That's what will appear on the agent workspace when the step-by-step guide is rendered.

### How to use the Set dynamically option
1. On the **Properties** page, in the **View** section, choose **Form** from the dropdown menu, and set **Use version** to 1, the default. The following image shows a **Properties** page configured with these options.

1. The **Properties** page displays a set of fields based on the Form view. Choose **Set dynamically**. In the **Namespace** dropdown menu, choose the contact attribute, and then choose the key. The following image shows a **Heading** that will be rendered dynamically in the step-by-step guide to show the customer's last name.

### How to use the Set JSON option
This section walks through an example of how to use the **Set JSON** option.
1. In the **View** section of the **Properties** page of the Show view block, choose **Form** from the dropdown menu and set **Version** to **1**, the default. These options are shown in the following image.

1. When you choose the **Form** view, the input schema of the view is displayed on the **Properties** page. The schema has the following sections where you can add information: **Sections**, **AttributeBar**, **Back**, **Cancel**, **Edit**, **ErrorText**, and more.
1. The following image shows the **AttributeBar** parameter, and the **Set using JSON** option. To view all of the JSON you pasted in, choose the corner of the box and pull down.

**Tip**
Fix any errors if the JSON is invalid. The following image shows an example error message because there's an extra comma.

1. When selecting a custom view, you will likely want to set the values of dynamic inputs through the **Set JSON** option. When doing this, you can choose **Apply Sample Data** to pre-populate the input with a JSON schema that contains sample data.
Ensure you [configure dynamic references](no-code-ui-builder-properties-dynamic-fields.md) for dynamic data (for example, $.Channel) in the UI builder to be populated at run time.
The following image shows the **Apply Sample Data** option.

1. Choose **Save** and publish when you are ready.
The following code sample shows how this same configuration would be represented by the [ShowView](https://docs.aws.amazon.com/connect/latest/APIReference/participant-actions-showview.html) action in the Flow language:
```
{
"Parameters": {
"ViewResource": {
"Id": "arn:aws:connect:us-west-2:aws:view/form:1"
},
"InvocationTimeLimitSeconds": "2",
"ViewData": {
"Sections": "Sections",
"AttributeBar": [
{
"Label": "Example",
"Value": "Attribute"
},
{
"Label": "Example 2",
"Value": "Attribute 2"
},
{
"Label": "Example 3",
"Value": "Case 123456",
"LinkType": "case",
"ResourceId": "123456",
"Copyable":true
},
{
"Label": "Example 3",
"Value": "Case 123456",
"LinkType": "case",
"ResourceId": "https:example.com"
}
],
"Back": {
"Label": "Back"
},
"Cancel": {
"Label": "Cancel"
},
"Edit": "Edit",
"ErrorText": "ErrotText",
"Heading": "$.Customer.LastName",
"Next": "Next",
"Previous": "Previous",
"SubHeading": "$.Customer.FirstName",
"Wizard": {
"Heading": "Progress tracker",
"Selected": "Step Selected"
}
}
},
"Identifier": "53c6be8a-d01f-4dd4-97a5-a001174f7f66",
"Type": "ShowView",
"Transitions": {
"NextAction": "7c5ef809-544e-4b5f-894f-52f214d8d412",
"Conditions": [
{
"NextAction": "7c5ef809-544e-4b5f-894f-52f214d8d412",
"Condition": {
"Operator": "Equals",
"Operands": [
"Back"
]
}
},
{
"NextAction": "7c5ef809-544e-4b5f-894f-52f214d8d412",
"Condition": {
"Operator": "Equals",
"Operands": [
"Next"
]
}
},
{
"NextAction": "7c5ef809-544e-4b5f-894f-52f214d8d412",
"Condition": {
"Operator": "Equals",
"Operands": [
"Step"
]
}
}
],
"Errors": [
{
"NextAction": "b88349e3-3c54-4915-8ea0-818601cd2d03",
"ErrorType": "NoMatchingCondition"
},
{
"NextAction": "7c5ef809-544e-4b5f-894f-52f214d8d412",
"ErrorType": "NoMatchingError"
},
{
"NextAction": "b88349e3-3c54-4915-8ea0-818601cd2d03",
"ErrorType": "TimeLimitExceeded"
}
]
}
}
```
### This view has sensitive data
It’s recommended that you enable **This view has sensitive data** when collecting credit card data, home addresses, or any other type of sensitive data from customers. By enabling this option, the data submitted by a customer will not be recorded in transcripts or contact records, or be visible to agents (by default). Remember to turn off logging if **Set Logging Behavior** is turned on in your contact flow, to ensure sensitive customer data is not included in your flow logs.

**Tip**
Build a [Flow module](contact-flow-modules.md) with a Show view block that has **This view has sensitive data** enabled, a Lambda function, and prompts to create a re-usable payment experience module that can be placed in an existing inbound contact flow.
### Flow block branches
The following image shows an example of a configured **Show view** block. This block supports conditional branches—that is, the branches depend on which view is selected. It also supports **Error** and **Timeout** branches.
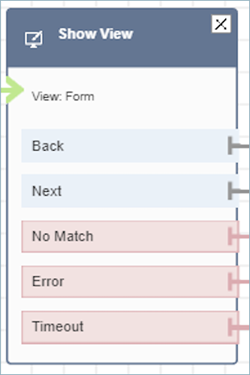
+ Conditional branches: These branches are based on which view is selected on the **Show view** block. The previous image shows the block is configured for the **Form** view, and the following actions: **Back**, **Next**, and **No Match**.
+ For this particular configuration, at runtime, the chat contact is routed down the **Back** or **Next** branches depending on what the agent clicks on the view. **No match** is only possible if the user has an action component with a custom Action value.
+ **Error**: Failure to run (that is, failure to render the view on agent workspace or to capture the view output action) results in taking the **Error** branch.
+ **Timeout**: Specifies how long this step in the step-by-step guide should take the agent to complete. If it takes longer than Timeout for agent to complete the step (for example, the agent didn't provide required information in the specified amount of time) then that step takes the Timeout branch.
When a step times out, the step-by-step guide can follow logic defined in the flow to determine next step. For example, the next step could be to retry asking for information, or stop guide experience.
The customer is connected to the agent at this point, so there is no change in the customer's experience because of Timeout.
### Additional configuration tips
Build a flow module with this logging setting, this block, and Lambda to create a re-usable payment experience module that keeps logging off and can be placed in any existing inbound flow.
Assign the following security profile permission to agents so they can use the step-by-step guides:
+ **Agent Applications - Custom views - All**: This permission enables agents to see step-by-step guides in their agent workspace.
Assign the following security profile permission to managers and business analysts so they can create the step-by-step guides:
+ **Channels and flows - Views**: This permission enables managers to create step-by-step guides.
For information about how to add more permissions to an existing security profile, see [Update security profiles in Connect Customer](update-security-profiles.md).
### Data generated by this block
At runtime, the **Show view** block generates data that is the output when the View resource runs. Views generate two main pieces of data:
+ `Action` taken on the rendered View-UI (on agent workspace) and the `ViewResultData` which is the `Output` data.
When using a **Show view** block, **Action** represents a branch and set to `$.Views.Action` contact attribute under Views namespace.
+ `Output` data is set to `$.Views.ViewResultData` contact attribute under Views namespace.
The values of `Action` and the `Output` data are determined by which the component(s) the agent interacted with during their use of the view resource.
#### How to use this data in different parts of flow
+ When the block receives a response back from the client application, to reference the output data in flows use ` `$.Views.Action` and `$.Views.ViewResultData`.
+ When using a view with the **Show view** block, `Action` represents a branch that is captured in the contact attribute under the Views namespace as `$.Views.Action`, and View Output data is set to the `$.Views.ViewResultData` contact attribute.
+ You can refer to the data generated by the **Show view** block by using the JSON path in contact attributes (you can specify contact attributes in the Set manually or Set JSON options) or by using the attribute selector dropdown when you choose **Set dynamically**.
## Error scenarios
**Note**
When the `ShowView` block takes an error branch (no match, timeout, or error), you might want to route your flow back to a previous point in the flow. If you create a loop in the flow like this, the contact flow can execute endlessly until the chat contact times out. We recommend using the `Loop` contact flow block to limit the number of retries for a particular `ShowView` block.
A contact is routed down the **Error** branch in the following situations:
+ Connect Customer is unable to capture the user action on a View UI component in the agent workspace. This might be due to an intermittent network issue or an issue on the media-service side.
## Flow log entry
Connect Customer flow logs provide you with real-time details about events in your flow as customers interact with it. For more information, see [Use flow logs to track events in Connect Customer flows](about-contact-flow-logs.md).
Following sample ShowView input (ingress log)
```
{
"ContactId": "string",
"ContactFlowId": "string",
"ContactFlowName": "string",
"ContactFlowModuleType": "ShowView",
"Timestamp": "2023-06-06T16:08:26.945Z",
"Parameters": {
"Parameters": {
"Cards": [
{
"Summary": {
"Id": "See",
"Heading": "See cancel options"
}
},
{
"Summary": {
"Id": "Change",
"Heading": "Change Booking"
}
},
{
"Summary": {
"Id": "Get",
"Heading": "Get Refund Status"
}
},
{
"Summary": {
"Id": "Manage",
"Heading": "Manage rewards"
}
}
],
"NoMatchFound": {
"Label": "Do Something Else",
"type": "bubble"
}
},
"TimeLimit": "300",
"ViewResourceId": "cards"
}
}
```
Following sample ShowView output (egress log)
```
{
"Results": "string",
"ContactId": "string",
"ContactFlowId": "string",
"ContactFlowName": "string",
"ContactFlowModuleType": "ShowView",
"Timestamp": "2023-06-06T16:08:35.201Z"
}
```
## Sample flows
You can download a sample flow from Step 2 in the following blog: [Getting started with step-by-step guides](https://aws.amazon.com/blogs/contact-center/getting-started-with-step-by-step-guides-for-the-amazon-connect-agent-workspace/). We recommend performing the steps in the blog to learn how to create flows that are configured with AWS-managed Views and how to run these flows for inbound media contacts.
## More resources
See the following topics to learn more about step-by-step guides and Views.
+ [Step-by-step Guides to set up your Connect Customer agent workspace](step-by-step-guided-experiences.md)
+ Explore [how to implement sensitive data collection in Amazon Connect Chat](https://aws.amazon.com/blogs/contact-center/collecting-sensitive-information-with-amazon-connect-chat/).
+ For step-by-step instructions about how to set up a customer-managed Views, see [Customer-managed Views](https://d3irlmavjxd3d8.cloudfront.net/?path=/docs/customer-managed-views-customer-managed-views--page).
+ For setting up a plug-and-play step-by-step guide experience in your instance, see [Getting started with step-by-step guides](https://aws.amazon.com/blogs/contact-center/getting-started-with-step-by-step-guides-for-the-amazon-connect-agent-workspace/).
+ [AWS-managed Views - Common Configuration](https://d3irlmavjxd3d8.cloudfront.net/?path=/story/aws-managed-views-common-configuration--page)
+ [Views - UI Components](https://d3irlmavjxd3d8.cloudfront.net/?path=/story/ui-component-ui-components--page)
+ [View actions](https://docs.aws.amazon.com/connect/latest/APIReference/view-api.html) in the *Connect Customer API Reference*.