Add Profile explorer to the agent workspace
By default users who have the appropriate security profile permissions can view Profile explorer on the Connect Customer admin website. You may also want your agents to have access to Profile explorer in their agent workspace. This topic explains how to do that.
The following image shows an example of Profile explorer in the agent workspace.

Create the Profile explorer layout you want to share with agents
Here's a high-level overview:
Ensure you have the security profile permissions to create a Profile explorer layout.
Follow the instructions in Get started with Connect Customer Customer Profiles Profile Explorer to create and save the layout you want to share with agents.
Add Profile explorer to Connect Customer as an integration
-
On the Connect Customer console, in the left navigation, choose Integrations, as shown in the following image.

-
On the Integrations page, choose Add integration.
-
On the Add integration page, complete following fields in the Basic information section:
-
Display name: A friendly name for the application. This name is displayed to your agents on the tab in the agent workspace. It is also displayed on security profiles. You can come back and change this name.
-
Integration identifier: The official name that is unique for your integration. If you have only one integration per access URL, we recommend that you use the origin of the access URL. You cannot change this name.
-
Description (optional): You may optionally provide any description for this application. This description is not displayed to agents.
-
Integration type: Choose Standard application.
-
Contact Scope: Choose Per contact. This is a required setting for incoming call support.
-
Initialization timeout: The maximum time, in milliseconds, allowed to establish a connection with the workspace.
The following image shows the configuration of these fields. Initialization timeout is set to 5 seconds.

-
-
In the Access section, complete the following fields:
-
Access URL: This is the URL where your application is hosted. The URL must be secure, starting with https, unless it's a local host.
Important
The URL must contain
?_appLayoutMode=embedded. For example:https://{CONNECT_INSTANCE}/customer-profiles/profile-explorer?_appLayoutMode=embeddedIf you don't include
?_appLayoutMode=embedded, the left navigation from the Connect Customer admin website appears in the agent workspace.For more details about what is allowed for this field, see Integrations.
-
Approved origins - optional: Allowlist URLs that should be permitted, if different than the access URL. The URL must be secure, starting with https, unless it's a local host.
-
-
Completing the next two sections—Permissions and Iframe configuration—is optional and not required to add the Profile explorer to the agent workspace. For information about these sections, see Integrations.
-
Instance association: Choose the instance your agents are using.
You can give any instance(s) within this account-region access to this integration.
-
Choose Add integration.
Assign agents permission to the new security profile
In this step you need to assign agents permissions to access the new integration AND view permission to the Profile explorer.
-
In the Connect Customer admin website, navigate to the Agent security profile.
-
On the Edit security profile page, assign the following permissions:
-
Customer Profiles - Profile explorer - View
-
Agent Applications - name of your integration - Access
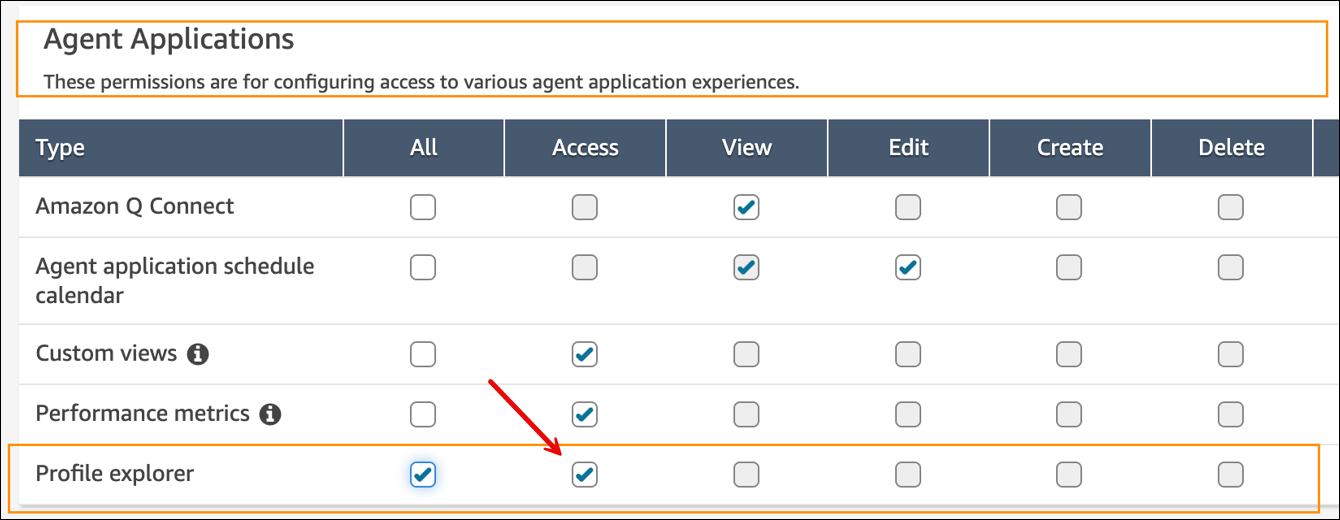
The following image shows an example of permissions added for a new integration named Profile explorer.
-
Tell agents to pin the new application
Using your normal communication method, tell agents to pin the new application to their agent workspace. This allows them to access Profile explorer across workspace instances.
-
In the agent workspace, choose the more icon, then choose Pin tab, as shown in the following image.

Supported functionality
After you complete the above steps, Profile explorer supports lookups on incoming contacts. The following are supported:
-
Phone and chat: Full support
-
Custom contact attributes: Full support for user-defined attributes that Profile explorer reads. You can set user-defined attributes within a flow to support any customer use case. For example:
{
"profileSearchKey": "_phone",
"profileSearchValue": "<Phone number>" }
For more information, see Automatically populate customer profiles.
